DIY paper fruit templates. How to make voluminous fruits from paper
Would you think that a fruit paper product could be interesting and impressive? appearance, but looking at the photo of fruits made from paper, you are amazed at the imagination and imagination of the craftsmen. With such creations you can arrange children's games, use them as decor for an apartment, a New Year tree, and they are also a wonderful gift for children or for their grandparents on any occasion.
An additional bonus of such works is their mobility, because they can be put away in a box and accessed on demand.

Simple and complex applications
The easiest crafts to make, for which there are no abstruse instructions on how to make fruit with your own hands, are appliqués. All you need to do is cut out ready-made diagrams, which are very common on the Internet, and then, using glue, combine them into one picture according to your individual idea. As a rule, you get stunning still lifes that can decorate the walls of your room.

If you build an application using the same method, replacing colored paper to color corrugated cardboard, then you can expect a more spectacular and original result. Such a picture will become more voluminous and acquire special touches.


Quilling fruits
Quilling is the art of paper rolling. This method of needlework is more labor-intensive, but it is worth noting that this is an excellent option for development fine motor skills kids.

Those who are hearing about this technique for the first time are recommended to study a master class on making fruits in the quilling style.

Required tools for making orange:
- corrugated paper sheet up to 1 cm wide;
- cardboard;
- glue.

Completing of the work:
- Roll orange paper strips into a circle 1.5 cm wide.
- Press the resulting circle on one side to obtain a teardrop shape. It is necessary to create and connect together 8 such drops, which will become “slices” and wrap each with two yellow turns.
- Glue the resulting elements around the core. In the space between the parts, glue twisted circles of the required size.
- Wrap the resulting piece with a pair of yellow and orange turns.
- Glue to the base.

Origami from crumpled balls
Handmade items made from crumpled balls can be considered an equally effective and interesting means for developing fine motor skills and creating beautiful decorative fruits. It looks unusual, takes little time, and does not require much expense.

You can form balls from napkins, newspapers, colored or even toilet paper, the main thing is to color it in advance, or choose napkins already suitable colors. We crumple the material into balls of various sizes and glue it to the base on which the image of the fruit is already outlined.

Crafts with filling
One of the most non-standard types of creation volumetric crafts fruits made from paper, you can select crafts with filling. The manufacturing method is quite simple: the material chosen for filling is wrapped in colored sheets or white ones painted in appropriate colors, and decorated as desired.

For filling, you can use materials such as fabric, any sheet material, foam, plastic balls.

Lantern fruits
Thanks to the multi-layered nature of this craft, you can get very realistic fruits. To implement the idea, you need to cut out the desired silhouette in several copies, gluing such elements together to create lantern crafts.

You can glue a lace or thread to such a thing and use it as hanging decoration. To create such crafts, fruits that are round or as close to round as possible are suitable.

Modular fruit origami
Origami is an art that originated in Japan, which teaches how to fold three-dimensional objects from ordinary sheets. This craft can rightfully be considered one of the most accessible, because to master it you only need a piece of paper.

The paper for this purpose is called “kawi”; it is characterized by such properties as thinness and strength, necessary to maintain the shape of the fold.
Note!


There are countless models for folding paper fruits, but the main element modular origami is a triangular module. From many such particles the desired fruit is collected.


Geometric fruits
If you want to give your creation the most realistic forms, you should pay attention to diagrams consisting of strict geometric shapes. The Internet is teeming with patterns and ideas on how to make your own fruit using patterns. Usually this is a drawing outlined on a sheet with straight and dotted lines along which folding and gluing will need to be done.

All kinds of paper of different densities and textures can be used to make products, but an important factor for creating the most realistic object is the similarity of the color to the color of real fruit. There is nothing grandiose in complexity in such needlework, just print out the finished drawing, cut it out, fold it and glue it along the intended lines.

Photo of paper fruits


Note! 


Note! 


Already from the very early childhood Your child has the opportunity to see a wide variety of fruits and berries, which means that he already begins to get acquainted with them. The child gradually remembers what this or that fruit looks like and the name of, then begins to determine the properties and qualities of fruits and berries.
In this article, the News Portal “site” has prepared for you several options for voluminous paper applications on the theme of Fruits and Berries.
By engaging in arts and crafts with your child, you will not only be able to instill in him Creative skills, but also introduce him even closer to fruits and berries. In the process of creating an application, you can tell your child about the benefits of a particular fruit, adding thematic songs, riddles, proverbs and sayings, rhymes and jokes.
Well, now, let’s move on directly to the master classes on making Fruits and Berries paper appliques.
Applique Apple
Applique Apple made of paper

Such a juicy and tasty fruit as an apple is loved by all children and adults. Dedicate one of your evenings to creating such a voluminous, bright Apple applique.
To make an applique you will need a sheet of cardboard, a set of colored paper, scissors, a glue stick and a regular pencil.

Cut a sheet of colored paper (in our case, bright red colored paper) in half. Fold the halves together and then in half. Draw the silhouette of half an apple with a pencil. Cut with scissors (see photo).

Now glue the resulting rounded halves to a sheet of cardboard, which will be the basis of our fruit applique.
From colored paper Brown cut out the spine and a leaf from green colored paper. Glue the parts.
From a sheet of white paper, cut out the core for the future apple and glue it. Draw the bones with a black marker.
Strawberry applique
Strawberry applique
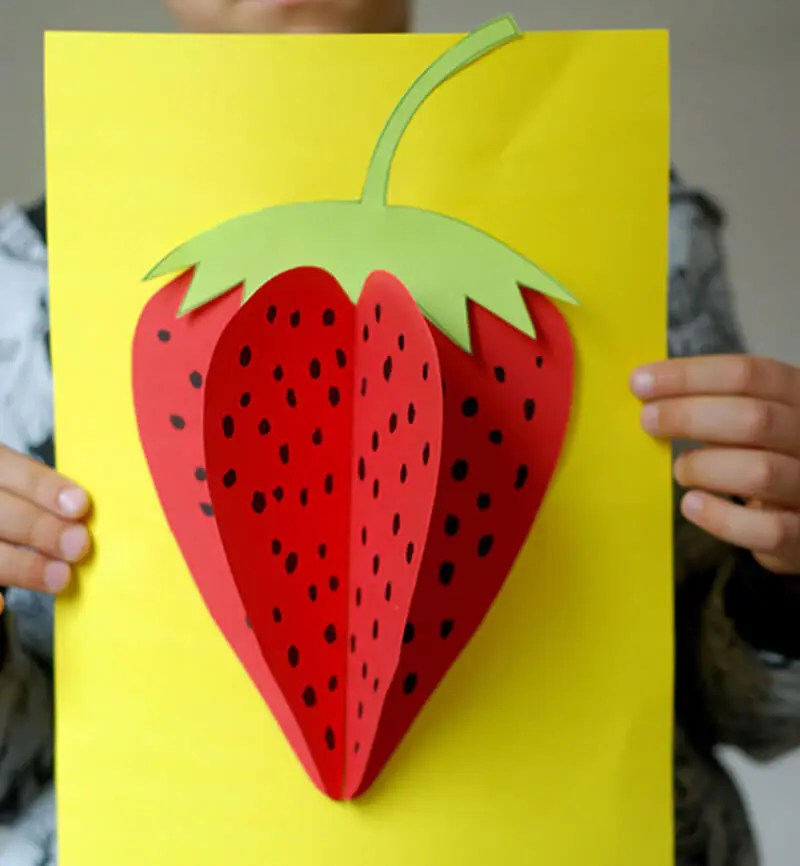
The principle of making this application is similar to the previous one. The only difference is to cut out the correct shape. This time the shape will resemble an oblong heart (see photo).


Decorate the finished applique with leaves (template included) and seeds drawn with a black marker.
Cherry applique

And another applique with the image of delicious cherries.


Having mastered this simple technique, you can make applique with your child of absolutely any fruit, berries and even vegetables. The main thing is to choose the right color and cut out the desired shape.
Volumetric paper applique. Master class with step by step photos.
Composition “Fruits on a plate”
Kudinova Galina Efimovna, teacher of additional education, Municipal Educational Establishment of Children's Educational Institutions CDT "Iskatel" Lytkarino, Moscow Region.
Purpose of the master class: making the composition “Fruits on a plate”
Children's age: 2nd year of study (5 – 8 years)
Level: average. Preparation time: 1 hour 30 minutes.
Purpose of the master class: obtaining skills and abilities to create a three-dimensional application.
Master class objectives:
Educational:
continue training in technique - volumetric appliqué
develop compositional skills - place cut out elements in accordance with the plot.
Educational:
develop attention, memory, eye, logical and imaginative thinking;
promote the development of spatial thinking and imagination;
develop hand motor skills that contribute to the development mental functions in preschool and younger children school age;
continue to develop a sustainable interest in work;
Educators:
cultivate a sense of responsibility;
instill the skills of perseverance, accuracy, love for the work process, and the desire for results;
instill skills of self-control and self-esteem.
CLARIFICATION!
This work can be performed by children from 5 to 8 years old. Depending on the age of the child, the amount of work performed by the teacher changes. If the child is 5 years old, then he will need the help of a teacher, for example, in cutting out parts (depending on the child’s level of preparedness). The child will fold, glue and glue the part.
The level of independence in performing work increases with age and depends on the individual characteristics of the child.
To work you will need:
1. Cardboard white and red.
2. Colored paper: red, yellow, pink, green, lilac brown
3. Pattern of pear, grapes, strawberry, apple, plum, leaves.
4. Glue.
5. Scissors.
6. Hole puncher (flowers).
7. Brown marker.


Progress:
Teacher's story:Fruits, berries, dried fruits and vegetables are of great importance for human health - everyone loves them, both children and adults. Their ripe, juicy and sweet taste is always pleasant and therefore they are always held in high esteem in the diet. In addition, they are not only tasty, but they are also healthy. It’s not for nothing that they say: “Eat fruits for your health, you will always be healthy.” Moreover, according to many experts, a person needs to eat at least 2 fruits a day in order to constantly replenish the body with vitamins and minerals and always be in good shape.
Let's remember what fruits do you know? (children's answers).
I am strong, crispy,
The miracle is real.
Yellow and red -
The skin is satin.
The apple is ruddy
All the best for children!
They call me a pear.
I'll tell you, and you listen:
Love me, children!
I am the most useful person in the world.
Lilac plum,
Ours is a garden
Delicious, tender,
Very useful.
And also from a ripe plum
We can make jam!
I am not a small bird.
I am a useful strawberry.
Who will make friends with me -
Don't catch a cold in winter!
Plum, plum, my plum,
You are beautiful and delicious.
A lot of pulp, amazingly
Well, there’s only one bone.
Grapes, grapes,
Lots of berries in a row
Grew on a branch -
Lunch, kids!
Dear apple,
Ours, liquid.
It will grow in our garden,
I'll go get him in the fall.
Garden decoration-
Clusters of grapes.
In every brush
Sun light -
Warm hello summer.
Pears are like light bulbs
Hanging on a tree
Attracts with smell
Both adults and children:
Yellow, fragrant,
Delicate golden.
They hung and fell...
The bees finished eating the pears. (
1. Cut out the background for our work. I have it 22 cm by 20 cm.

2. Take a small sheet of yellow paper. Fold in half, then in half again. Attaching a template pears to the paper folded four times and trace it. Cut out the pear along the contour.


3. In exactly the same way we prepare silhouette details strawberries, grapes, plums.

4. An apple consists of 2 colors. Take a small sheet of yellow paper and pink flowers and fold them in half. We attach the apple template to each color, trace it and cut it out along the contour.

5. We got 4 pieces of each fruit. We fold each piece in half and have 4 halves of grapes, apples, plums, and strawberries.


6. Take the strawberry parts. Apply glue to one of the halves and glue them together so that the other halves remain free. Glue together 4 strawberry halves.
We do the same with all the details of grapes and plums.


7. Alternate the halves of the apple: yellow – pink, yellow – pink.


8. Fold the leaves in half to make them voluminous.

9. Take the plate template and trace it on paper of the selected color. Cut out a plate along the contour.

10. Glue the plate onto the cardboard.

11. Unwrap all the fruits. Let's make them voluminous.

12. We begin to glue the fruits onto the cardboard.


13. Glue one half of the leaves onto the other. Glue them to the strawberries.

14. Using a brown felt-tip pen, draw the branches of a plum, pear and apple.


15. Glue the twig to the grapes. The tail of the grape can be rounded with your finger.

16. We begin to decorate the plate. Glue on the finished flowers made using a hole punch.


17. Choose a background for the frame. We frame the work.

Soon the most favorite time of children will come - summer. This includes swimming in the warm, gentle sea, playing on the golden sand, flying paper airplanes and kites. But the most important thing is the abundance of healthy and tasty fruits and berries. So voluminous fruits made of paper - the most summer theme for applications.
How to make voluminous fruits from paper? Our master class will help you. Today we will make with you a three-dimensional applique: strawberries, cherries and grapes. You will see diagrams and templates for three-dimensional appliqué made from colored paper below.
For these paper crafts you will definitely need:
- colored paper red, green, purple and yellow flowers(two-sided);
- thick cardboard, which will become the basis of the application;
- scissors;
- pencil;
- PVA glue or glue stick;
- black marker.
Volumetric paper fruits: strawberries

In order to make a voluminous paper applique, you need red colored paper, green for leaves and a thick cardboard base. We will make strawberries on the entire sheet. Cut out the template for the leaves and tail:

Instructions for applying voluminous strawberries step by step:
1. Transfer the template to green colored paper and cut out:

2. Take 2 sheets of red colored paper, fold them in half and cut out a heart-shaped shape:

This will be our strawberry. Then we glue one part to the base cardboard, and the second part only along the fold line.

3. Place leaf and tail templates on top
The “tail” should not overlap the upper (movable) part of the strawberry.

We mark the “seeds” of our strawberry with a marker. That's all - voluminous paper strawberries are ready!
Volumetric cherries made of paper: applique

How to make a three-dimensional applique from paper? What is the technique for performing volumetric applique. In the technique described in previous section, you can perform any fruit, vegetable, berry, and even an animal or insect. For voluminous cherries we will need:
- red colored paper (double-sided);
- base for application in A5 format (half A4);
- scissors;
- pencil;
- double-sided green paper;
- glue.
How to make voluminous cherries from paper: master class.
1. Cut out 4 circles with a diameter of 5-6 cm from red paper. For this it is better to use some kind of template.

2. Bend all the circles in half. We cut out a thin strip from green paper - this will be the stem of our cherries.

3. Cut out leaves from a green rectangle measuring 12x6 cm, then bend them as shown in the figure:

4. First glue the stems onto the base sheet. Then one of the leaves, the second we leave “in free flight”. Then glue one red cherry at a time, and on top - a second one along the fold line. Mark the veins on the leaves using a pencil.


That's it - the Volumetric paper cherries applique is ready!
Volumetric paper grapes. Application

This volumetric applique is done a little differently. However, berries such as mulberries, raspberries and blackberries can be made using this technique.
To work you need:
- a white sheet of paper - you will need to cut out the base from it;
- colored paper of purple or yellow (light green) color;
- scissors;
- glue;
- green pencil or felt-tip pen;
- a simple pencil or marker.
Volumetric fruits made of paper: grapes, master class step by step.
1. To get started, we need to cut out a base template (you can choose any one), onto which we will subsequently glue the grapes.