Nyusha with her own hands description and pattern. Losyash from Smeshariki Do-it-yourself hedgehog pattern from Smeshariki
Which child doesn't like watching cartoons? You probably won't find many of these. For example, the kids really liked the animated film “Smeshariki”. But you shouldn’t let your children sit in front of the TV screen for a long time, because... this can negatively affect their health. But how can we tear them away from their favorite characters on TV screens? And there is a solution to this issue! Invite the children to make Smeshariki quickly and easily with their own hands.
I think that this proposal will be accepted by the children with great pleasure! Adults, of course, will need to spend a little of their time to help their child if necessary. But this is a very interesting and useful activity! After all, such work will help your child develop creatively. The child will be able to dream up a little. The more parents devote time to their children, the stronger and happier the family.
There is nothing complicated about making Smeshariki with children with your own hands. And most importantly, you can choose the most acceptable, cheapest and most interesting way for you to create these characters from your favorite cartoon. The image of Smeshariki is reflected in different types of needlework.
Today we will tell you about several simple options for making heroes with your own hands together with your children.
Making Smeshariki with your own hands from CDs in MK
For example, Smeshariki from disks. In every home you can find old disks that you no longer use.
For work we will need:
- Old disks
- Colored cardboard
- Colored paper
- PVA glue
- Scissors
- Markers
Let's get to work with you.
Be sure to let your child choose the character they want to make first. It is very important!!!
To make any cartoon character, be it Nyusha, Krosh or Sovunya, we need to do the following:
- Cut out eyes, a nose, a mouth, cheeks, hairs, a hat, flowers and other necessary elements from colored paper, depending on the character chosen by the child (or you).
- Cut out ears, arms, legs from colored cardboard.
- To make Smeshariki’s facial features clearer, outline the contours of the details with felt-tip pens.
- Glue all the finished elements onto the disk with PVA glue.
There you go!

Ideas can be taken from drawings in regular coloring books, you can even use them as a template.
We try to cut out from cardboard those parts that will protrude beyond the disk itself. And what will be completely on the disk is best made from colored paper.
Your favorite cartoon characters can be made from many materials found in nature. These can be vegetables, fruits, chestnuts, acorns. The list can go on for a very long time. What is your imagination enough for...

We make various Smeshariki from natural materials
Smeshariki from natural material are created very simply. Of course, it will be interesting and useful for children to make Smeshariki from vegetables and fruits with their own hands using plasticine. This is a great way to spend more time with your child. Such work broadens children's horizons, develops their speech, thinking and fine motor skills.
We will make several of our characters.
To work we need:
- Green apple
- Pear, 2 pieces
- Fresh potatoes, 3 pieces
- Head of cabbage
- Boiled egg
- Black olives
- Ketchup
- Tomato
- Scissors
- Bright and soft plasticine
- Board for working with plasticine
- Toothpicks
Let's get to work.
- To make a teddy bear we use a small potato. We attach ears and a hat made of red plasticine to it. We make eyes from white circles, and pupils from black circles. Then we sculpt the character’s smile, nose and mouth. The main thing is that our Smesharik smiles!
- We will make moose from a large onion. Using plasticine we create a nose, mouth and tongue and ears. We fashion the horns and attach them to the vegetable.
- Let's make a pig from a green apple. We sculpt the eyes, snout and mouth. We make small ears from plasticine. We knit a small pink braid from wire, lace or yarn. Using a toothpick, attach it to the crown.
- A rabbit can be made from a pear. Turn the pear over. We sculpt big ears. We make eyes, a nose and always two snow-white teeth. Do-it-yourself mixed vegetables and fruits are ready!
- Creating cabbage crumbs is also very simple. To do this, take cabbage forks and break off two leaves. They will serve as ears for the future craft. Cut two potatoes in half. Two parts will serve as paws, the other two as arms. Cut the boiled egg and attach it to the cabbage using toothpicks. Attach black olives to the top. We make the nose from a tomato. We draw a smile with ketchup.
So our Krosh is ready!
Photo for inspiration:


Characters can also be crocheted. You can find master classes at the end of the article.
And if you are into sewing, here are the patterns that will help you sew these cuties.

Let your imagination be limitless. Go for it and you will succeed!
A couple of videos on the topic
Find out how to make Smeshariki from paper, plasticine, disks and show this process to your children. And sew a backpack for your child in the shape of your favorite cartoon character.
How to make Smeshariki from paper?
This very accessible material will help you make interesting crafts with your children. If you want, make all the heroes so that your child has a complete collection. But first, let's remember what name each Smesharik has. Here are the characters from three age groups. Teenagers include:
- Nyusha;
- Hedgehog;
- Krosh;
- Barash.
- Losyash.
- Sovunya;
- Kar Karych;
- Kopatych.

We will make them in the form of cubes. To do this, let's take:
- colored cardboard;
- pencil;
- scissors.
- If you have the opportunity to print the presented image on a color printer, do so. If not, then transfer it to paper, which will become templates. And use it to cut out blanks from cardboard.
- The auxiliary places that also need to be cut out are indicated in black.
- Having rolled up the square, you apply glue to them, matching the same letters, first create the base of the hero.
- Then all that remains is to glue the horns on the top, down the legs, and on the sides of the arms. Let the child draw a face for the hero and stick it on his face.
It is made from cardboard or lilac paper according to the same principle as the previous hero. The next one will be Krosh - a cheerful and optimistic rabbit, a lover of adventure. We cut it out of cardboard or blue paper. With the help of parents, using glue, the child will quickly assemble this cartoon character.

Of course, you can’t do without the romantic Nyusha. We cut it out of pink cardboard, onto which we need to apply some details with red paint.

As always, Pin will invent something like that, and it doesn’t matter that he speaks with an accent, the kids understand him perfectly.

They will be able to create their own using the following material. Adults will only show you how to make Smeshariki.
DIY Smeshariki - plasticine figures
For children this activity will be interesting and exciting. But here's what you need to prepare first:
- plasticine;
- plastic knife;
- modeling mat;
- a soft cloth to dry your hands.

For Kopatych, the economical, good-natured bear, you will need plasticine in the following colors:
- orange;
- yellow;
- white;
- black.

The main color of this hedgehog is red. From this plasticine make his body, legs, arms, ears. After the whites for the eyes are created from white plasticine, let the child roll thin sausages from the black mass and frame the character’s eyes with them to turn them into glasses. From black plasticine you need to make the pupils, nose, and needles of the hedgehog.

For the following plasticine figurine you will need the following materials:
- purple;
- white;
- black;
- Red.

Let the children sculpt a dreamy Sheep from pink plasticine.
- First, the base of the round body and head is created, then you need to make many small balls from the same plasticine.
- They are attached to the back of the animal, while at the same time flattening it a little with a finger, then the lamb will dress in its fluffy fur coat.
- To make horns, you need to roll 2 small sausages from black plasticine, attach them to the head, and bend them.
- From the same plasticine it is necessary to make hooves that are attached to the bottom of the arms and legs.
- All that remains is to sculpt the nose, thin lips, piercing eyes and rejoice at what wonderful figures are made from plasticine.

How to make other Smeshariki can be seen in the next photo.

Smesharik from CD
This is also easy to do. So that funny Nyusha will soon live in your home, take:
- old SD;
- colored paper;
- double-sided tape or glue.
The crumb is created from blue, white and red paper. Make it like in the photo. The child will be delighted and will ask to make other cartoon characters from the disks.
After Smesharik Krosh and Nyusha have chosen a place in your apartment, create their friends. Let the Hedgehog also live here.

You can create them using the same technique or differently.

If you want to close the central hole in the disk, then see how to make the following crafts. Take:
- CD disks;
- glue;
- plastic bottle caps;
- hacksaw for metal.
- For each character at the beginning we act almost the same. Place the disk on colored paper of the desired color, outline it, and cut it out.
- Now you need to make eyes for each character. The hedgehog's are framed by glasses, Nyusha's are slightly squinted, and the rest are wide open.
- Having created the facial features, move on to the hairstyle and ears, which are also different for Smeshariki. But they have the same stand.
- Using a hacksaw, cut a hole in it into which you could insert a disk with the image of the character.
How to sew funny animals with your own hands?

Children will certainly love such toys; with them they will fall asleep better and wake up easier. Even those mothers who do not have a sewing machine will certainly succeed. After all, such toys can be created without it, sewn by hand.
Here is a list of what was used:
- fleece in different colors;
- scissors;
- filler;
- threads

- Its body consists of 6 parts; they need to be sewn sequentially, grinding the side of one with the side of another workpiece. Then you need to sweep the sides of the first and last. You will get a circle. You need to fill it with padding polyester through the top hole.
- For each ear you need to cut out 2 parts in a mirror image. Sew them in pairs, sew them on your hands to the hare’s head, at the same time sewing up the hole remaining here.
- The tail is made in the shape of a flower; it will require two identical parts. They are ground off, leaving a small area not yet closed to put a little padding polyester there. Sew up this hole, at the same time attaching the tail in place.
- Each arm and leg are made of identical pieces, carved in a mirror image. They are also sewn together in pairs, stuffed with padding polyester, and then attached in place.
- Based on the drawing, cut out the whites of the eyes from white felt; glue eyes for toys or small circles-pupils of black color onto them. Sew them onto the character's face.
- Make the nose out of pink fabric by cutting out a circle from it. Gathering its edges with a thread, put a little filler inside, tighten the thread, and sew it onto the muzzle. Make the teeth from white felt, attach them with blue thread, and at the same time embroider the rabbit's mouth.
How to sew a backpack in the shape of Smesharik?
It will also be dedicated to this topic.

Children will be happy to carry their things to kindergarten in such a shoulder bag. To sew a backpack in the shape of Nyusha’s Smesharik, take:
- light pink, hot pink, pink fleece;
- white fleece;
- some black fabric;
- 2 meters of belt tape;
- calico;
- adjusters for straps - 2 pcs.;
- polyethylene foam;
- holofiber filler;
- snake lock;
- threads;
- scissors.
To ensure that the backpack keeps its shape, use polyethylene foam. In this case, we took a foil one, which can be bought at a hardware store.

Print out the patterns for the muzzle, legs, arms, and ears.

We make the base of the backpack from pink fleece. You will need a circle with a diameter of 25 cm, which you can draw using a compass or, for example, place a large plate like this on a piece of canvas folded in half to cut out two circles.

You will need two more such blanks from foamed polyethylene; cut them according to the same pattern, but also do not forget to leave allowances for the seams.

Two more circles need to be drawn on a piece of calico and cut out. Now, without seam allowances, cut out blanks for Smesharik’s eyes from white fleece, make eyelids and hair from dark pink, and make her nose from pink.

Complete the look with pink hearts and black pupils.

Here's how to sew the backpack next. Fold together a circle of fleece, polyethylene, calico, stitch them along the edge to connect.

Now sew the facial features here one by one. First the whites of the eyes and nose.

Then eyelids and hearts on the cheeks.

Next you need to attach the hair and pupils, make the nostrils on the nose using a zigzag stitch.

Use the same stitch to make Nyusha’s eyelashes and mouth. From calico, polyethylene foam, light pink fleece, cut out a strip measuring 54x6 cm, cut it out, do not forget to add it to the seams.

Mark with chalk where the hearts will be located and sew a strip of these three materials. Use a zigzag stitch to attach the hearts here.

Now take calico, polyethylene foam and dark pink fleece. From each material you need to cut a rectangle measuring 25x2.5 cm, cut it out, adding seam allowances.

You will need two of these pieces, each one needs to be stitched along the edges to connect all three layers.
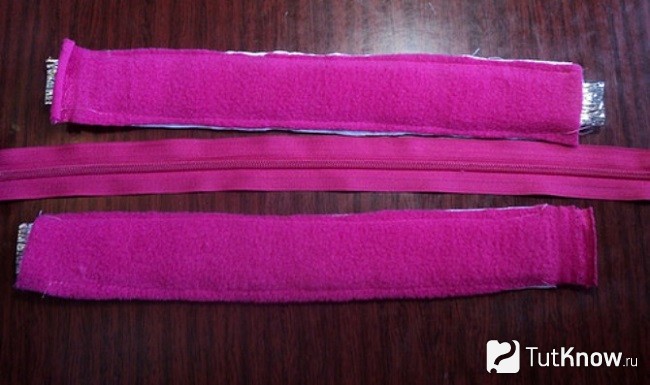
Sew a zipper to the blanks.

Now you need to cut out Nyusha’s arms, legs and ears from light and pink fabric. Sew the pieces in pairs to create double body parts.

Fill them with filler; you should put more holofiber closer to the hooves, and less on the other side.

Cut a strip measuring 20x13 cm from dark pink fleece. Fold it in half, sew on one side, fold the edges inward, and attach this future braid to the part with the lock. Sew with a zigzag stitch in a circle.

The pattern helped you sew a backpack. She also allowed us to make the body parts the way they should be for this fairy-tale character. Place them on Nyusha’s body and head and sew them on.
On the reverse side, this single-color circle must also be sewn to a strip with a lock and to a single-color one so that the two halves of the backpack are connected.

Turn the backpack inside out, this is what you get from the front and back.

Remember, Nyusha’s hairstyle is a braid. It needs to be stuffed with holofiber, stitched in two places with thread, the tip cut into thin strips, and an elastic band tied here.

For the lining, the calico should be folded in half, and on the other side the edge should be made semicircular.

Insert this lining into the backpack, sew it to the top of the arms.

This is how wonderful the shoulder bag turned out.

For a boy, you can sew it according to the same principle, but using the image of another character, for example, Tiny. The presented pattern will help with this.

Here's how to sew a backpack with your own hands so that your child can carry his personal belongings and toys, using the image of his favorite cartoon characters.
Smeshariki made from tires
Smeshariki made from tires will decorate a dacha or the courtyard of a city house. For these crafts you will need:
- wheel tires;
- acrylic paints;
- plywood;
- drill;
- self-tapping screws;
- tassels.
Their paws, ears, and hairstyle for Nyusha are also made from plywood, then they are attached to rubber using self-tapping screws.

You can cut out the limbs of animals from the conveyor belt, also paint it, and attach it to the base.

If you want to show children how to make Smeshariki from plasticine, then let them watch the following story. It shows how to make Krosh.
A young video blogger will tell his peers how to make it from disks.
Which child doesn't like watching cartoons? You probably won't find many of these. For example, the kids really liked the animated film “Smeshariki”. But you shouldn’t let your children sit in front of the TV screen for a long time, because... this can negatively affect their health. But how can we tear them away from their favorite characters on TV screens? And there is a solution to this issue! Invite the children to make Smeshariki quickly and easily with their own hands.
I think that this proposal will be accepted by the children with great pleasure! Adults, of course, will need to spend a little of their time to help their child if necessary. But this is a very interesting and useful activity! After all, such work will help your child develop creatively. The child will be able to dream up a little. The more parents devote time to their children, the stronger and happier the family.
There is nothing complicated about making Smeshariki with children with your own hands. And most importantly, you can choose the most acceptable, cheapest and most interesting way for you to create these characters from your favorite cartoon. The image of Smeshariki is reflected in different types of needlework.
Today we will tell you about several simple options for making heroes with your own hands together with your children.
Making Smeshariki with your own hands from CDs in MK
For example, Smeshariki from disks. In every home you can find old disks that you no longer use.
For work we will need:
- Old disks
- Colored cardboard
- Colored paper
- PVA glue
- Scissors
- Markers
Let's get to work with you.
Be sure to let your child choose the character they want to make first. It is very important!!!
To make any cartoon character, be it Nyusha, Krosh or Sovunya, we need to do the following:
- Cut out eyes, a nose, a mouth, cheeks, hairs, a hat, flowers and other necessary elements from colored paper, depending on the character chosen by the child (or you).
- Cut out ears, arms, legs from colored cardboard.
- To make Smeshariki’s facial features clearer, outline the contours of the details with felt-tip pens.
- Glue all the finished elements onto the disk with PVA glue.
There you go!

Ideas can be taken from drawings in regular coloring books, you can even use them as a template.
We try to cut out from cardboard those parts that will protrude beyond the disk itself. And what will be completely on the disk is best made from colored paper.
Your favorite cartoon characters can be made from many materials found in nature. These can be vegetables, fruits, chestnuts, acorns. The list can go on for a very long time. What is your imagination enough for...

We make various Smeshariki from natural materials
Smeshariki from natural material are created very simply. Of course, it will be interesting and useful for children to make Smeshariki from vegetables and fruits with their own hands using plasticine. This is a great way to spend more time with your child. Such work broadens children's horizons, develops their speech, thinking and fine motor skills.
We will make several of our characters.
To work we need:
- Green apple
- Pear, 2 pieces
- Fresh potatoes, 3 pieces
- Head of cabbage
- Boiled egg
- Black olives
- Ketchup
- Tomato
- Scissors
- Bright and soft plasticine
- Board for working with plasticine
- Toothpicks
Let's get to work.
- To make a teddy bear we use a small potato. We attach ears and a hat made of red plasticine to it. We make eyes from white circles, and pupils from black circles. Then we sculpt the character’s smile, nose and mouth. The main thing is that our Smesharik smiles!
- We will make moose from a large onion. Using plasticine we create a nose, mouth and tongue and ears. We fashion the horns and attach them to the vegetable.
- Let's make a pig from a green apple. We sculpt the eyes, snout and mouth. We make small ears from plasticine. We knit a small pink braid from wire, lace or yarn. Using a toothpick, attach it to the crown.
- A rabbit can be made from a pear. Turn the pear over. We sculpt big ears. We make eyes, a nose and always two snow-white teeth. Do-it-yourself mixed vegetables and fruits are ready!
- Creating cabbage crumbs is also very simple. To do this, take cabbage forks and break off two leaves. They will serve as ears for the future craft. Cut two potatoes in half. Two parts will serve as paws, the other two as arms. Cut the boiled egg and attach it to the cabbage using toothpicks. Attach black olives to the top. We make the nose from a tomato. We draw a smile with ketchup.
So our Krosh is ready!
Photo for inspiration:


Characters can also be crocheted. You can find master classes at the end of the article.
And if you are into sewing, here are the patterns that will help you sew these cuties.
Let your imagination be limitless. Go for it and you will succeed!
A couple of videos on the topic
You can make a toy in the form of a famous character from the animated series “Smeshariki”, which is loved by many children, with your own hands from materials available at home, or you can buy it. You can sew it, for example, from yellow or orange viscose fabric, make its horns from brown fabric, and its nose from pink fabric. The resulting toy will appeal to children and become a good decoration for the home.
This is how my toy Elk turned out:
The process of making it took me approximately two weeks (twelve days).
The process of making crafts.
Step 1. Getting started, I make a sample on paper:
I cut out the resulting image and divide it into separate parts:

Step 2. Next, I take the orange fabric and fold it in half so that the parts can be cut out of it in pairs and neatly. After this, I pin the paper parts of the sample to a fabric of a suitable color and cut out the parts taking into account the allowance (from 0.5 cm):

Now I sew the resulting parts along the edges, leaving each with a small unsewn area in order to then turn them inside out:

Step 3. After this, turning the sewn parts of the paws, legs and ears inside out, I fill them with cotton wool:

Step 4. After filling the parts of the ears, paws and legs with cotton, I sew up their holes and begin making the eyes, nose and smile (mouth).
I do the eyes first. The parts for their manufacture can be made from cardboard painted with varnish:

I glue the details of the pupils on top of the white parts of the eyes, and additionally attach the details of the eyelids, cut from fabric, to the upper edges of the eyes. This will make your eyes look better:

Step 5. Now I start making the nose.
I cut out a nose from a paper sample cut into two parts and glue the two parts together.
Of all the fabric I have at home, the only color that was most suitable for making a nose was pink viscose fabric. The fabric was light brown in color, but it was nylon, and when filled with cotton wool it immediately stretched and became translucent:

After cutting out the nose pieces from the pink rayon fabric, I sew them together, leaving small areas unsewn so that I can fill the finished pieces with wadding.
Having sewn the nose piece, I turn it inside out and embroider black nostrils on the sides:

Step 6. I fill the resulting part with cotton wool, after which I begin making the eyebrows.
Having filled the part with cotton wool, I cut out the eyebrow parts in pairs from brown leather fabric according to the size of the paper samples (the eyebrow parts are small and narrow, and it will be difficult to turn them inside out) and sew them together on the outside with a blanket stitch:

Step 7. Next, I sew the resulting details of the eyebrows and nose to the craft, and then glue the eyes:

Now I sew the front and back parts of the body, and sew horns and paws to the craft as I work. At first I also decided to sew a smile (mouth) for the toy Elk:

Now I fill the toy with cotton wool:

Step 8. Having filled the craft, I wanted to make her a tail. I also make it from two parts.
When sewing the tail parts, I fill them with cotton wool and sew them up:

Step 9. Now my craft is almost ready. All that remains is to sew a chain or ribbon onto it, by which you can hang the finished toy as a decoration in one of the rooms or in a car. I chose the chain:
Making a toy for your child that will become his favorite is not so difficult. Many children adore the heroes of the cartoon “Smeshariki”; any of them can be made from felt. Let's stock up on two sheets of felt, white and blue. Prepare matching threads, a needle, a pen (to trace the details), a couple of beads for making eyes, and a glue gun. It is important that the scissors are sharp.
Many people don’t know where to get patterns - they’re easy to make yourself. Just choose a suitable picture, place a blank sheet of paper on the monitor and translate.
Transferring the pattern to the material is also easy. I cut out each piece, apply it to felt, trace it and cut it out.


To begin with, I collected all the parts together to look at the future toy.

I decided to make it printed, so I cut out most of the parts in twos.

There was no stuffing at that moment; instead I used felt scraps; they remain after any work, be it a brooch, a pin or an applique.

It didn’t turn out very voluminous, but the child liked it. I started sewing from the feet. I combined it, put in a little filler, and sewed it up.

To move on to the body, you must first design the face of the toy. I decided to embroider a smile and outlined it with a disappearing marker. Embroidering on felt is quite convenient, although a good eye is required.

I arranged the remaining pieces to see the big picture, then removed them.

I embroidered a smile and sewed on the nose with red thread.

I constantly checked myself, applying the remaining parts.

I sewed on the eyes, they sell ready-made ones in craft departments, they are inexpensive, and the toy looks different with them.

I attached it using hot glue, but many people simply sew on beads or buttons.

After decorating the muzzle, you can work on the body, stuffing it more than the paws and ears.


