We cut out butterflies and birds from paper for windows: stencils, templates. Butterfly and bird protrusions: patterns for windows. Decorating windows with butterflies and birds made of paper with your own hands: ideas, photos. Paper swallows (20 crafts) for children Cut out a swallow from colored paper
Yulia Butyaykina
Guess what kind of bird it is?
Little dark girl
White from the belly,
The tail is spread into two tails. It's a swallow!
In spring, migratory birds fly to us from hot countries.
When it gets very warm, swallows will fly to us.
If spring “arrived” early and the air warms up to 20 degrees during the day, then expect swallows from mid to late April; if spring is late, then you will not be able to see them until the beginning of May.
I bring to your attention a master class on making a three-dimensional paper craft “Swallow”. It won't be difficult to do. Children will enjoy playing with this swallow.
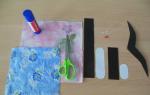
For this we need:
1. Strips of double-sided black paper 2.5 * 20 cm and 2.5 * 10 cm;
2. White paper ovals 2*10 cm and 2*5 cm;
3. A rhombus folded in half from red double-sided paper 2*0.5 cm;
4. Wings cut from black double-sided paper;
6. Scissors;
7. Oilcloth;
8. Napkin.

Let's get started.
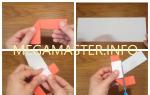
Glue a white oval onto the long black strip, closer to the edge. This is the future body of our swallow.

Fold the piece in half and glue the edges.

Cut the tail as shown in the photo.

Glue a white oval onto the short black strip, closer to the edge.

Fold it into a ring and glue it together. The result is the head of a swallow.

We connect the head and body of the bird with glue.

Then we decorate the swallow’s head - glue on the eyes and beak. Take the remaining piece in the form of a diamond made of red paper, fold it in half and glue it to the bird’s head.

Glue the wings to the body.

Our wonderful paper craft is ready!

These are some beautiful crafts we made!

The grass is turning green, the sun is shining.
A swallow flies towards us with spring in the canopy.
I wish everyone success in making crafts! Thanks to everyone who came to my master class.
Publications on the topic:
The holiday is Women's Day, and people usually give flowers and cards for the holiday. I would like to offer you another way to make paper roses. This.
What's winter without a snowman, and what's New Year without a Christmas tree? The main symbol of the New Year is, of course, the Christmas tree. And there is very little left until the New Year.
The wonderful, beloved New Year holiday is approaching. And an elegant Christmas tree is a symbol of this holiday. We have been decorating for many years.
“Snowflakes fall, fall quickly, make a white road for the sleigh...” (G. Sapgir) Sledding down a hill is a favorite pastime for both children and adults.
Paper construction develops children's creativity and skills. If you don’t learn creativity in childhood, where does this skill come from?
Making cards with your own hands is a very interesting and creative activity. Dear colleagues, I suggest a postcard that you can make.
There are many different types of paper crafts, since it is not for nothing that it is considered a universal material. For example, you can decorate the interior with a cute swallow you made yourself. The kids will definitely like it very much. By the way, you can create various interesting paper crafts with them - this will help to interest them and involve them in the creative process. In addition, such an activity perfectly develops fine motor skills of the hands.
What do you need to create a paper swallow?
You will need black and white, as well as red colored paper, stationery or PVA glue and a stapler with scissors.

Advice
Before you start work, carefully study what you need to do and in what order. This will save you from possible mistakes.
The sequence of creating a three-dimensional paper swallow
First you will need to cut out all the details from colored paper - like the body, a blank for the head and for the wings. As an option, it is possible to use a ready-made template, for example taken from the Internet, or draw all the contours of the parts manually. Ask your children to draw - they will certainly love this idea. Now you need to take a small strip of black paper - from it you will make a swallow's head. It should be folded into a ring and secured with a stapler. And a large strip of black fabric is a blank for the body of the bird. Be sure to take care of the forked tail. The strip should be folded in half and fastened with a stapler. After this, “dick-fronts” are glued to the body and head of the so-called swallow. They need to be made from white paper. Try not to mix it up - glue the shorter part to the head, and attach the longer part to the body. When the glue is completely dry, you can connect the head to the body of the bird. This is done both with glue and a stapler.

Wings
The next step in making a three-dimensional paper swallow will be gluing the wings to the body. Next, you will need to decorate the swallow’s head, in particular, glue on its eyes. They can be purchased at any store that sells sewing supplies, or simply made from white circles of paper onto which small black circles are glued. After this, all that remains is to glue the bird’s beak. To do this, take the only remaining unused part - a piece of red paper. Let's make something like a rhombus out of it and fold it in half. Next, you need to glue it to the bird’s head.

You can make a swallow differently - without using glue and a stapler. We are talking about the origami technique. This is a figure of medium difficulty level. To create it, cut out a square from paper. After this, fold the sheet diagonally and then again along the vertical axis. Then you need to straighten the upper triangle, turning it into a square. And then turn the sheet over and throw the triangle to the right. Then straighten the corner into a square. Fold the top layer of the side corners towards the middle and bend them back. Then you need to unfold the top layer up along the fold lines. Turn the shape over and make bends towards the middle. Fold the top layer up along the fold lines. Then you need to bend the side corners of the top layer towards the middle, after which the figure must be turned over again.

Then you bend the side corners of the top layer so that they “look” into the middle. Turn the sectors over and bend the upper corners inward. The top layer needs to be bent so that you get a “step”. The top corner should be bent so that it protrudes slightly. Then you turn the resulting structure over and cut the tail. Next, the tips of the tail need to be slightly moved apart so that it is forked. That’s it – your origami swallow is ready. If you are not familiar with this paper technique, it is better to use step-by-step instructions with pictures.

Conclusion:
The swallow is a cute and well-known bird. Making it out of paper to decorate a room or to play with will surely be interesting for children. In addition, the process is not at all complicated, but rather, on the contrary, fun and exciting. With the help of adults, children 5-7 years old will probably be able to do everything.
Swallow made of paper using origami technique
Making a swallow out of paper
How to make a swallow out of paper You are in the Bird Outlines coloring page category. The coloring book you are considering is described by our visitors as follows: “swallow outline, bird template for paper cutting” Here you will find many coloring pages online. You can download coloring pages Outlines of birds and also print them for free. As you know, creative activities play a huge role in the development of a child. They activate mental activity, form aesthetic taste and instill a love of art. The process of coloring pictures on the topic Contours of Birds develops fine motor skills, perseverance and accuracy, helps you learn more about the world around you, and introduces you to all the variety of colors and shades. Every day we add new free coloring pages for boys and girls to our website, which you can color online or download and print. A convenient catalog, compiled by category, will make it easier to find the desired picture, and a large selection of coloring books will allow you to find a new interesting topic for coloring every day. A paper swallow craft using the origami technique, which is easy to make according to the description, is not difficult to make
A paper swallow craft using the origami technique, which is easy to make according to the description, is not difficult to make
Crafting a swallow from paper using the origami technique is a very interesting activity. This model of a beautiful bird is quite simple to make. It can be easily and quickly put together not only by adults, but also by children who have never engaged in this type of activity before. Making a swallow from paper will take very little time, and a detailed description of the work will make the process easy. The ancient oriental art of making various crafts from ordinary sheets of paper, origami, came to the world not so long ago, just a few decades ago, or more precisely, after the Second World War. But even in such a short period of time, it won the hearts of many residents of all countries. There are many options for making various figures, simple and quite complex, large in size. All of them are very interesting, and the activity itself is useful, especially for children, as it develops qualities such as attentiveness, perseverance and motor skills. You can make absolutely any item or object out of paper. This applies to both living nature and non-living, inanimate objects. Children most of all like to put together figures that represent something living - fish, birds, animals, people, plants. Today we propose to make a well-known bird - a swallow - out of paper using the origami technique. Even a preschool child can easily handle this model. He will be interested in making his own bird, or even several, with which he can subsequently decorate his room. If this activity is new for your child, it’s not scary, you just need to help him a little, give him some advice, based on our description of the work and step-by-step photographs. So, let's start implementing our idea, assembling a paper swallow craft using the origami technique in a simple way. We will need glossy colored paper. It is not necessary to take a black sheet. You can take any color at your discretion. If it's a bright shade, even better. The craft will turn out colorful and rich. It is preferable to use glossy paper because it is quite thick and has a beautiful texture, so the craft will look very beautiful. The paper must be square in shape. This is the main condition, therefore, if our sheets are rectangular, first we need to give them the necessary shape.  At the very beginning of work, we need to fold a square sheet of paper in half. We will fold along a diagonal straight line.
  Fold the resulting triangle in half again. As a result, we will get a small part in the form of an equilateral triangle.
  We need to bend the part of the triangle located on top in half, just as we can see in the photograph.
  Now we need to unbend and fold this part. In this case, the folds must completely coincide with each other and be strictly in the center of the resulting square, on top of our workpiece. You can clearly see what should happen in the next photo.
  Next we will turn the workpiece over to the opposite side. The side that was at the top will now be on the working surface.
  We will bend the corner on the right to the bottom. Thus, we have a square.
  Let's unfold the workpiece again, giving it its original position, and fold it in the shape of a square, as shown in the photographs.
  Now we will carefully bend both sides from the sides towards the bottom, and move the corner located at the top down. There should be such a figure in front of us.
  Again, unfold all the edges of the workpiece. We need to take the part that is below by the corner and slightly lift it upward.
  We will carefully bend the edges that are on the sides of the figure along the existing folds inward.
  Turn the workpiece over to the other side. There should be a figure like this, which is shown in the photo.
  Now, towards the line located in the center, bend the sides on both sides.
  We need to open the upper part of the workpiece. This is not at all difficult to do, just look at the photo carefully.
  In exactly the same way as on the opposite side of the figure, we will carefully bend the edges inside the craft.
  Next, fold the parts in half from the sides first, those that are on the bottom.
  Then we repeat the same action with the workpiece on its borate side.
  We will bend the side on the left to the right. The sides folded earlier should be in such a position that the part is completely solid in the middle.
  We see in the photograph that the upper part of our figure is forked. It is these two components that will become the swallow’s wings.
  To give them the desired shape and position, we will bend them a little to the sides and down.
  Now let's turn our attention to the lower part of the workpiece. We need to bend one of its parts along the middle line and point it upward.
 Then carefully fold the same part in the middle so that the corner is directed downward.

 Fold it in half again, only in this case the corner will point upward.
  Turn the resulting figure over to the other side. As we can see, our beautiful swallow is almost ready to fly. All we have to do is make the finishing touches, namely, form a ponytail with a characteristic fork at the end.
  In order to give the ponytail the correct appearance, we will use ordinary stationery scissors. We will need to carefully make a small cut in the middle.
  Now carefully bend the cut edges in opposite directions and the swallow is completely ready.

 You can make several of these birds in different colors. Then you and I will have a beautiful multi-colored flock of swallows. You can decorate a child's room with similar crafts. The baby will be interested in looking at them and will be pleased that he made such an extraordinary decoration independently, with his own hands.
  Crafting a swallow from paper using the origami technique will definitely appeal not only to children, but also to adults, especially since it takes very little free time to make it.
Comments
Related posts:
A volumetric cube using the origami technique can be easily assembled from a regular sheet of paper even by a child.
Master class on making a spring toy - do-it-yourself swallows with children aged 5-7 years.
Ksenia Alekseevna Kruglova, technology teacher, Nizhnekuryatsk secondary school, Karatuz district, Krasnoyarsk region
Job description: The master class is designed for children 5-7 years old, educators, primary school teachers, technology teachers, additional education teachers, parents who love to be creative with their children.
Purpose: room decoration for the spring holidays, gift.
Target: making toys with your own hands.
Tasks:
- learn to create crafts with your own hands;
- develop hand motor skills;
- cultivate diligence and accuracy in work.
Materials and tools:
- colored paper;
- glue;
- scissors;
- marker;
- thread, needle.

The grass is turning green
The sun is shining;
Swallow with spring
It flies towards us in the canopy.
With her the sun is more beautiful
And spring is sweeter...
Chirp out of the way
Greetings to us soon!
I'll give you some grains;
And you sing a song
What from distant countries
I brought it with me. (Alexey Pleshcheev)
The swallow is a migratory bird, and its return in the spring signifies hope, fertility and renewal of life. Since the swallow was once believed to spend the winter hibernating, it may symbolize the resurrection. Like most birds, the swallow also represents light.
The Egyptians considered the swallow to be the embodiment of motherhood, and the flock was perceived as the northern stars hanging above the Tree of Life.
In Ancient Greece and Rome, there was a belief that killing a swallow meant inviting trouble, since it embodied the spirit of dead children; in addition, she was an attribute of Aphrodite (Venus).
In China, the swallow is a symbol of courage, danger, fidelity and a positive change in fate, but in Japan it is identified not only with maternal care, but also with infidelity.
The swallow is also revered by Muslims, as there is a belief that it makes an annual pilgrimage to Mecca.
In heraldry, the swallow was depicted on coats of arms as a fantastic bird without legs, since in the Middle Ages it was believed that the swallow did not touch the ground. It is also a symbol of younger sons. In addition, according to legend, swallows feed their chicks with celandine juice, which gives them visual acuity, and therefore they have become a symbol of God's illumination.
According to popular beliefs, a swallow's nest under the roof of a house brings happiness and good luck.
Step by step execution of work.
We prepare the necessary materials.

To make a swallow, we use a template, where
1 – body, black color
2 – breast, white
3 – head element, white color
4 – beak, red
5 – head, black color
6 – wing, black

We cut out all the details according to the template.

We roll the head part into a cylinder, the body into a loop and glue the edges.

Glue a white piece to the head.

Glue the white breast to the body.

Glue the head to the body.

We fold the beak part in half and glue it to the swallow’s head along the fold line.

We randomly cut out circles from white paper and draw eyes with a black marker. We glue the resulting parts to the head.

We glue the wings and glue them on top to the body.


We hang the swallow on a thread and find a place for it in our interior. The work is ready!


From Africa in the spring
Swallows are flying
Under roofs made of clay
Nests are being made.
They fly like airplanes
Elegant and light.
Forked ponytails
They are small.
Triangular beak
Grabbed on the fly
Midges and mosquitoes,
They take it home.
Similar to notes
Sitting on wires
And they chirp merrily
About sun and rain. (V. Miryasova)
Thank you for your attention!