How to sew a quilted bedspread on the first try. Ethno style accessories: chic and bright
What is associated with pleasant dreams, comfort and bliss? Bon blanket, of course. It will warm and decorate the interior, it will be useful for a newborn baby to walk in the cold season, it can become a comfortable rug for the development of a child. Just choose the model that suits both kids and adults.
The bom blanket looks great in the nursery. As for the choice of colors, it can be made monochromatic or multi-colored by choosing two or three colors that are combined with each other or matching the tones of the interior. And thanks to its light, airy structure, adults will also like it. A model in cream or pink looks like a marshmallow treat, and will definitely appeal to a teenage girl.
This quilt is a kind of quilts. But the special technique of its manufacture turns this model into an airy and elegant interior decoration. After all, the zest of this species is not just in multi-colored patches, but in the fact that it consists of components that look like small ottomans or bright bubbles.
It has different names: bombon, "biscuit", "ottoman blanket", "bonbon" and even "marshmallow blanket". Therefore, having chosen the color and material in accordance with personal preferences, you can sew a wonderful warm and beautiful blanket for your beloved child with your own hands.
Gallery: bonbon blanket (25 photos)


How to sew
You will need the following materials and tools in order to sew a bombon blanket, the master class will be presented below:
- fabric for small pillows, one color, two or three colors, to choose from;
- fabric for the base, you can take any chintz, even an old sheet, it will not be visible;
- holofiber or synthetic winterizer for filling the pillows, it is undesirable to use cotton wool, because after washing it will collapse into lumps and the product will lose its appearance;
- threads of colors matching the fabric;
- needles for fastening the fabric;
- scissors;
- pencil;
- ruler.
Of course, you will need a sewing machine, free time and a desire to make a beautiful and original thing.
Blanket making schemes
 First you need to decide how the product will look like. If you plan to sew a blanket from colorful patches, then it is better to draw a diagram on paper. The shape of the finished product will be square or rectangular, and if alternation of colored fragments is supposed, then this must be thought out immediately on the diagram in order to produce the appropriate number of elements.
The squares for the pillows must have a side not less than 8 cm and not more than 40 cm, with other parameters, the blanket will not look beautiful. A universal calculation based on the estimated size of the blanket is as follows: the width of the base fabric should be one and a half cm larger than the size of the material that will be used for sewing the top, that is, the sum of all squares, plus 2 cm for seam allowances.
When choosing a fabric, you should be guided by the purpose of this wonderful thing, for example, silk and satin are well suited for adults, such a blanket will be very elegant. For babies, it is better to opt for bright chintz. You can sew it from scraps of unnecessary fabric, this option will be the most economical.
Basic ways
There are two techniques for sewing a product with your own hands, which differ from each other in the methods of making blanks for the product:

Sequential stitching
Consider the step-by-step instructions for the first option for sewing a bombona blanket. The master class, in this case, is based on making a product for a child. Let's say there are three colors of cotton in stock. The blanket will consist of 17 cm squares, eight in width and ten in length.
On the diagram, they will alternate with diagonal stripes, from right to left and the first square in the upper right corner will be made of fabric No. 1, the next two squares in color from fabric conditionally named No. 2, then again diagonally a strip of fabric No. 1, and the fourth diagonal of color No. 3. We start again: a diagonal of squares in the following sequence - with colors # 1, # 2, # 1, # 3.
We repeat this alternation in the diagram for the size of the blanket we need. Thus, there will be 80 pieces of squares: 40 from fabric # 1, and 20 each from fabric # 2 and # 3. It is up to you to decide which fabric will be with which number.
Now we start cutting.
Make a pattern of a square with the selected side and cut out the required number of squares from fabric of different colors. Fold the first horizontal strip of squares according to the scheme and sew. Press seams to the right. Collect the next horizontal strip from the squares of the desired colors, also assemble into a tape, just smooth the seams to the left. This will help you then sew the strips together so that the seams look beautiful.
Outline the fabric that is selected for the base into squares with a side of 11 cm... Leave a 1 cm seam allowance in the length between each row. Leave 4-5 cm allowances on the sides, so that later you can make an edging to decorate the finished product.
 Take a strip sewn from squares and attach to the base so that the stripes you draw line up with the borders between the squares on the stripes. But the free part of the fabric must be folded in two neat opposite folds or collected when sewing.
It is better to fix the strips on the base with needles, because the appearance of the finished product depends on how exactly all the strips are stitched.
We sew a strip on one side horizontally, and then we attach along the vertical stripes in exact accordance with those drawn on the base.
Should turn out pockets that need to be filled with holofiber... Tuck it in gently and topstitch on the rest of the side. Now the next strip in the same pattern to make a beautiful colored blanket.
To finish making the quilt faster and with fewer seams, you can attach another strip, closing the remaining stuffing opening with one seam. Then you need to fix all intermediate results with needles so that the tapes do not move.
When all the prepared ribbons were stitched on, a beautiful product turned out, it remains only to process the sides with edging. You can sew the second side to the blanket from the wrong side, and between them a layer of padding polyester, so it will become even warmer.
Blanket of ottomans
Now recommendations for sewing a Bonbon blanket from small pillows... You need to cut out a square-shaped template with an arbitrary side, for example, 10x10 cm. You can take fabric of two or more matching colors, but all the colorful patches will make a colorful and funny blanket. This will fit well into a rustic interior, for example, in a summer cottage.
Decide on the size and cut out the required number of squares. Moreover, the front part of the pillows will be sewn from beautiful fabric, but for the opposite, any plain and even unnecessary sheet is suitable. This side will not be visible as the pillows will need to be sewn onto the base.
MIRACLE BAG
How cute: a reticule with a straw border, cheerful pom-poms and crocheted flowers.
YOU WILL NEED:
For a jute bag: red rep ribbon 2 cm wide, 65 cm long; elastic cord 1 m long; braided jute cord 1.2 m long; fringed braid approx. 5 cm, 65 cm long; narrow braid with beads 65 cm long; 2 crocheted flowers; sewing threads; a thick needle for embroidery or darning. For pom-poms: wool yarn in various colors and a fork.
HOW TO MAKE:cut out the details of the jute bag:
Circle for the bottom of the bag diam. 18 cm
The top of the bag is 62 cm wide, 22 cm high.
For the top of the bag, sew 22 cm sides face to face (1 cm seam width). Iron the allowances. At a distance of 11 cm from the bottom cut, prick the braid with a fringe. Tuck the ends of the tape at the seam. Sew the upper edge of the tape. Sew the beaded braid by hand along the top edge of the fringed tape. Gather the top of the bag along the lower cut, for which, at a distance of 8 mm and 12 mm from the lower cut, sew with long stitches, leave the ends of the threads hanging. Pull the fabric on a thread, the finished width is approx. 50 cm. Distribute the gathers evenly. Sew the bottom to the bottom edge of the top of the bag. Sew the ends of the rep tape, in the finished form, the edging is 60 cm wide. Fold the tape in half across the width and press it on. Lay the tape around the top edge of the bag and stitch it in a zigzag pattern.
Lay the top of the bag flat so that the seam is in the middle on the back side, mark the side folds. Cut the elastic cord into 2 equal parts. At a distance of 5 cm from the top edge of the bag, thread the cords along the markings into the fabric of the bag using an embroidery or darning needle. Tie the ends of the cords in knots so that in the extended state the bag is straightened to its full width.
Sew crocheted flowers to the front of the bag. For the handle, sew the ends of the braided jute cord at a distance of 6 cm from the top edge of the bag to the markings on the sides from the inside of the bag.
Make pom-poms: Wind the yarn around the fork several times. Fix the appeared numerous loops in the middle with a thread. Cut the loops on both sides, cut the ends of the threads evenly if necessary.
Sew two pom-poms to the bag. Sew one pom-pom to the ends of the elastic cord.
When brushes, pompons, etc. come together, the effect is guaranteed!
YOU WILL NEED:
the remains of straws of natural, bright pink, turquoise and yellow colors. Hook number 4; matching threads for sewing; a needle with a blunt end. Two gold earring hooks, gold-colored sequins. Gold beads, 2 crystals of blue color. Sewing needle small scissors.
HOW TO MAKE: crochet a chain of air from straws of natural color. n. Wrap the chain in a spiral with straws, while sewing individual circles with a needle with a blunt tip for sewing. When the ring is 4.5 cm in diameter, sew the ends of the straws. Make the second circle in the same way.
Sew crocheted flowers by hand in the middle of both circles with small stitches. Sew on beads, sequins and rhinestones. Pom-poms rip off the braid, cut to shape and also fasten on straw circles. Tie three small brushes from multi-colored straws, attach these brushes together with ready-made brushes to the bottom edge of the straw circles. Attach earring hooks to the upper edge of the circles. 
IN TWO ACCOUNTS
All bracelets on straw clothes! Choose according to your taste - with tassels, with ornaments or with pom-poms.
Bracelet with pom poms
YOU WILL NEED:
plastic bracelet 2.5 cm wide; red straw; thick darning needle. For pom-poms: wool yarn of different colors, fork.
HOW TO MAKE:
Wrap the bracelet tightly with straws, sew the ends of the straws on the inside of the bracelet. Make pom-poms, see model "Miracle bag", while tying the ends of the threads leave to hang for a length of approx. 10 cm. Attach the pom-poms to the ends of the threads on the bracelet.
Crocheted bracelet
YOU WILL NEED:
plastic bracelet 2.5 cm wide; straws of orange and green; hook number 4; thick darning needle.
HOW TO MAKE:
knit a row of air from green straw. p., row length = bracelet diameter. From the seamy side of each air. n. knit art. b / n. Close the row in a circle. Pull the connected circle over the bracelet, place it in the middle. Thread the orange straw through a darning needle. On the one hand, work into the loop of Art. b / n, draw the straw from the inside around the bracelet and on the other side, insert the needle into the same loop. Thus, sew the ring on the bracelet, sew the ends of the straw on the inside of the bracelet.
Tassel bracelet


YOU WILL NEED:
bracelet, straw. Black embroidery threads, darning needle, scissors, ruler.
STEP 1 From each skein of straw, cut 7 pieces of 12 cm long and tie on a bracelet, alternating the colors and direction of the ends.
STEP 2 Trim the ends of the segments with scissors.
STEP 3 Sew a piece of embroidery thread over each knot on both sides of the bracelet.
Photo: Jan Schmidel (7); catwalkpix.com (2); execution: Teresa Bachler.
Patchwork for beginnersStep 1.
To create a block, we need 4 types of fabric (preferably in a contrasting color).
Cut out 2 sets of stripes, 4 stripes in each set. Width - any (I have 2 ""). It is best to cut the stripes along the share, but if you do not have enough fabric, you can also perpendicular to it.
Step 2.
Sew the strips together in the desired sequence. For more accurate sewing, I recommend using the 1/4 '' foot and be sure to pinch the strips before sewing. perpendicular seam lines.

After stitching, iron one set of strips to one side, the other to the other.

Step 3.
We lay out the sewn strips on the mat so that the edge of the strip lies exactly along the marking line. Determine the width of the strips (I have 6.5 "") and using a ruler and a roller knife, cut the strip into squares. From the first and second set of stripes, cut out 4 squares. There are 8 squares in total.
Please note that the square must be square !! Deviations are not allowed, otherwise the seams will not come together.

In order not to get confused, we lay out the squares in two piles (although in the photo it is one big pile :-)).

Step 4.
We take one from the first pile of squares, and place it on the rug so that the marking lines exactly coincide with the edges of the block.

Place the ruler on the diagonal of the square and slowly, cut the square diagonally.

We put the cut triangles aside. From the same pile we take the second square, again place it along the marking lines and place the ruler on the other diagonal.

Please note that we place the second square on the rug in the same way as the first (for me, with a brown stripe upward).
Cut the square diagonally and set the resulting triangles aside.

We repeat this operation with all squares from the first and second stacks. There should be 16 right-angled triangles.

Step 5.
Putting the cut triangles into squares.

Putting the squares into blocks. From 16 right-angled triangles, 2 blocks are obtained.
If you suddenly decide to save money and sew this block of 4 squares cut into triangles, then you will be disappointed. This is not possible! But there are positive aspects to everything. With this cutting, you get not one, but two blocks.

The blocks turned out to be mirrored. The mills in the center of the block are twisted in different directions. Beautiful?
Step 6.
We disassemble one of the blocks into elements and sew the triangles together so that we again get squares. Pay special attention to the seams. In order to get the "lock" and the stripes dock better, it is necessary that the seams of the triangles to be sewn look in different directions. We fix them with pins and sew them.

We do the same procedure with the rest of the elements.
Step 7.
So, you should have 4 squares of the same type as in the photo.

We turn on the iron and iron the seams on all squares so that they look clockwise or counterclockwise.

Step 8.
At this stage, you need to trim all the squares with a ruler and a knife.

To do this, position it on the rug markings in such a way that the diagonal seam coincides with the 45 degree line and carefully trim it on all sides.
Put our future block on the rug again.

Step 9.
We sew two squares in such a way that we get horizontal rows. Do not forget to pre-pin them with pins and combine all the "locks". Ideally, after sewing, all seams should come together. Particular attention must be paid to the point at which the three seams converge (see photo). Everything must be perfect, otherwise the seams will not come together. Iron the seams in different directions.

We sew two rows of blocks together. For a better convergence of the seams at one point, the horizontal seam should lie exactly at their intersection (see photo)

We open the seam and iron it out. Carefully iron the block from the face and .... The block is ready !!
If you will use it in the future, check if it is even. If not, trim it!

The finished block size is 11.5 x 11.5 inches.
I will also tell you about one option for creating a block from stripes.

I have already described many stages of creating a similar block above, but since I wanted to create a full-fledged master class, some of the steps will be repeated.
Step 1.
To create the block, we need four types of fabric.

Cut the fabric into strips of any width. For this block, I cut strips 1 3/4 inches wide. Since I use the dedicated patchwork foot, my stitches are always the same at 1/4 inch. When sewing blocks, I never use a bartack (to be able to "open" the seams) and set the stitch length to 2-2.5 mm.
Step 2.
We sew the strips together one after another. If you are not confident in your abilities, or a beginner, I strongly
I recommend that you chop off the strips before you start sewing! The pins should always be located perpendicular to the future seam line, then the machine needle will easily "slip" them.

Carefully, trying not to stretch the fabric, iron the seams to one side.

We place the stripes sewn together on the rug so that the edge of the stripes coincides with the marking lines. Using a ruler, knife and rug, cut off the excess and cut the strips into squares. To create this block, we need 4 squares.
After you have cut the required number of squares, be sure to check if they are square? If yes, then you can proceed to the next step, if not, then you must definitely trim them!

We put the cut squares in a pile in the same way (for example, with a light green stripe upward, as in my photo). We take the first square from the pile, place it along the marking lines and use a ruler to cut it diagonally. We also cut the second square diagonally, but along the other (see photo)! You should have 8 right-angled triangles.
If you make a mistake when cutting, you will not be able to piece the block together.

We are trying to add the view of the future block from triangles. The beauty!!

Now we sew the triangles together, pre-chipping them together with pins. Don't forget about the "locks" !!
Surely cleaving the triangles together, you will find that there are no "locks" at all! And you will be right. With this cut, "locks" are not automatically obtained. And you need to iron the seams at a part of the triangles ... But! If you decide to swing at William Shakespeare ... :-) (I mean a blanket), then you better have two sets of stripes from which you will further cut into squares, and then triangles. In one of them, the seams should be smoothed in one direction, in the other, in the other. In this case, you don't have to iron anything!

After the triangles are sewn together, we fold our future block again and smooth out all the seams either clockwise or counterclockwise (see photo).

Step 9.
Despite the fact that we use a ruler, a knife, a rug, we measure everything exactly ... sometimes we have to cut what we have sewn!

All squares are cut and it remains only to sew them together. We do not hope for a miracle and do not forget to pin everything with pins. Better to spend 30 seconds than then sit and smack for 5 minutes.

Be sure to monitor the convergence points of several seams. Ideally, everything should turn out as in the photo.

Step 11.
After assembling the block, we steam the central seam and carefully (without stretching the block) iron the seams. Voila !!

Pay attention to the back of the block. You should get about the same.

After the block is ready, be sure to lay it out on the mat, check the dimensions. If it's a curve, let's figure out why (by the way, by the way, you can write a whole opus ...). If necessary - trim!
The finished block size is 9.5 x 9.5 inches.
That's it for today!
http://mquilts.blogspot.ru/search

Like the other patchwork pieces in this collection, the talented needlewoman Rebekah has sewn a bright, colorful sofa cushion cover. We look and admire: 
Materials and tools:

Sew the squares together and iron the seams:
Fold the squares and connect
Sew a strip from a contrasting fabric,
Iron out.
roll up, put the cord inside.
Then lay the resulting edging with the top and side details. Flash.
Put on pillow and sew up edge
It turned out to be a great cushion. \!
Having accidentally seen a pompom blanket on the Internet, I also caught fire with the thought that such a miracle must be done. Immediately there was a mass of descriptions, detailed and not very detailed, as well as pictures of finished products, according to which a plan of further actions was calculated.
Well, now I want to tell and show what happened in the end in my photo master class on making a blanket from pompons.
I want to say right away that the process of making such a blanket is quite laborious and not fast, despite the first glance - so be prepared to be patient and perseverant. And also be prepared for the fact that it may not be possible to avoid small calluses on delicate fingers)))
To make a blanket from pompons 80 * 80cm in size, I needed:
A knocked-down wooden frame measuring 90 * 90cm, along the perimeter of which, at a distance of about 4 cm, small carnations must be driven in. I got 22 nails on each side of the frame.

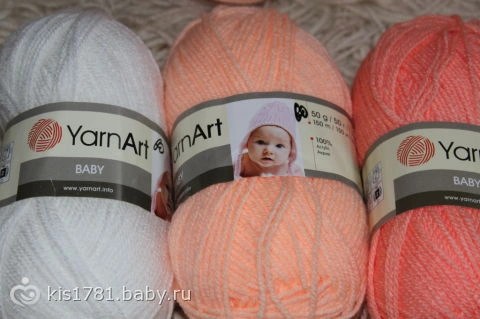
And of course you need yarn. In my case, the size indicated above took 5 skeins of acrylic yarn 350m each (100g) and half a ball of thin acrylic threads in the color of the blanket (but you can also use the required number of threads from the above skeins)

And of course the manufacturing process itself:
We fasten the thread on the extreme nail on either side of the row and begin with a snake, moving from top to bottom and back to fix the thread, moving from one side of the frame to the other. When you reach the end of the row of nails, then carefully transfer the thread to the adjacent nail, and now we fix the threads horizontally, not vertically. Thus, we wind all five skeins layer by layer, connecting the ends of the skeins into one thread (horizontal stand of threads - vertical layer and again horizontal - vertical). We fix the end of the thread by tying it well on the nail.

This part of the process is pretty simple and takes a little time.
All the most difficult lies ahead.
Please note right away that you need to leave a certain amount of threads for the next stage of production, or choose another skein that matches the color. I took a small skein of thread, thinner.

We proceed to the second stage of making a plaid from pompons. To do this, we cut the thread into pieces of 10-15 cm, and with them we tie each intersection of the layers of threads on the frame. Since I had 22 nails in a row, I ended up with 400 crossings of threads, each of which had to be tied with a strong knot.
It is precisely about this stage that I wrote above, as about the most difficult, because, believe me, it is impossible to tie 400 strong knots in one evening, while hands and fingers get tired quite well. Therefore, be prepared to stretch this pleasure over several evenings. It took me a week to do this, despite the fact that I knitted knots in the evenings for two to three hours.

Well, when all the knots have been tied, the third stage remains, which will seem simple and quick to you. All that is required of you is to take scissors and methodically cut the threads between the knots in the center from one row to another, forming pompons. At the same time, we cut not all the threads, but 2/3 of their parts, since our pompons should be formed only from the front of the blanket, and from the wrong side there is a layer of threads that form a "frame" on which the pompons will be held.

I left the outer rows with the knots of threads for last, so that when cutting the pom-poms, the blanket was well fixed on the frame. At the very end, we cut the layers of threads along the perimeter between the nails - the tension of the threads will be weakened - the pom-poms will take shape, become closer to each other.

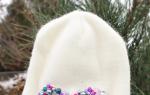
And now the blanket is ready! Fluffy soft pom-poms will delight not only you, but also your baby! And of course it is worth noting that the look of the blanket is only admirable!

Video to help
Plaid with two-tone pom-poms for discharge! (MK)
Completed its work today.
Here we will wrap our baby in such a blanket at discharge


To knit such a blanket you will need:
Yarn (I had 10 skeins of 150m each -100% acrylic, you can also take acrylic with wool - 2 white, 2 coral and 6 peach. Later I bought another white skein for dressing intersections)
A sheet of plywood, I have a thickness of 18mm, size 80 * 80cm (more can be done, but accordingly more threads will go away!)
Nails 80mm (in short, I do not advise because the threads will fly off.
The help of a spouse or other male to drive nails into a sheet of plywood (perhaps there are especially gifted young ladies who are capable of carpentry work, alas, I am not one of those)
And your desire, patience and of course hardworking hands))
1. I had yarn in three shades.
2. Here is a sheet of plywood with nails already hammered in. My distance between the nails is 4cm, maybe 5, then the pom-poms will be a little larger. And we begin to wind the threads, first horizontally, then vertically, alternating. I advise you to start with white threads or any that contrast with the main color of the blanket. 3. Macro.
 Wound 20 rows of white yarn, started winding coral)
4. Continue ... after two skeins we wind the main color - peach (well, this is mine, but you may have a different shade of thread) 

 All the yarn was wound ...
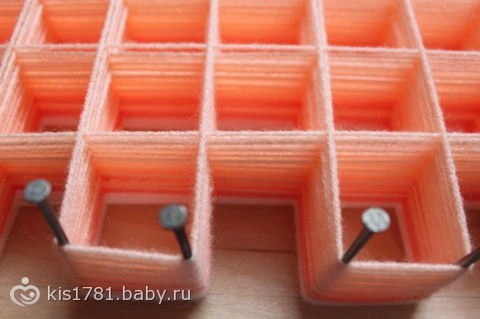
5. We bandage all intersections (very tightly, I bandaged it twice). At the intersection, there are 2 times more threads.
If we take the classic version of knitting this blanket, in total 50 rows should be wound vertically and 50 horizontally, of which 20 rows are the lowest contrast shade) i.e. accordingly, 100 threads are obtained at the intersections. I did more.
 6.
6. After all the intersections are tied up, we proceed to the formation of pompons. We simply cut the top 30 threads (to white yarn) - I did not have 30, but more turned out, strictly in the middle between the intersections. Be careful, one wrong move and this cute product might be. spoiled. That's all! If something is not clear, please, I will tell you.
  Seamy side
Additions to the post at the request of girls - How to remove a blanket from nails
Now let's move on to the next stage of work. We cut off our blanket from the nails. We go around the entire perimeter of the frame and where it is marked with a red line in my photo, we cut it in half.

We have done most of the work, now we are waiting for cutting the pom-poms. We take scissors, preferably not very sharp and not blunt))). Scissors rub your fingers pretty well, so take breaks when cutting. We cut from our nodes from four sides to 30 threads, without touching the base, otherwise nothing will work.
Now I explain why we took threads of a different color for the warp: in order not to count 30 threads each time, we simply see by color, where the warp is and do not touch it, we only cut a different color, which we wound after the warp.
I also show in the photo exactly where to cut, the red line indicates the place of the cut. That is, we cut the small sides of the resulting squares in the middle.

Thus, we cut our entire blanket and in the end we get such a wonderful fluffy blanket made of pompons with our own hands.

1.
2.
3.
4.
5.
6.
7.
8.
9.
10.
11.
12.
13.
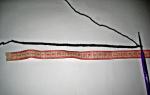
When the usual home design is boring, tired and wants change, every woman thinks about buying new furniture, decorative elements, repairs, expensive curtains or tablecloths. But, unfortunately, there is not always a financial opportunity to purchase exactly those things that will bring satisfaction. And decorating a house for a small amount is difficult. We will tell you how you can turn your apartment or house into a festive home. And all this ... with the help of braid with pompoms.
You will need to buy braid with pompoms in different sizes - large, small, medium. It is advisable to choose different colors - from blue to yellow. Manufacturers produce braid in both monochromatic and multi-colored. For example, the braid itself may be red, and the pom-poms may be white. This color is great for decorating a house and a Christmas tree for the New Year holidays.
A braid is a tape of different widths to which pompons (balls of fabric of different diameters) are attached. In most cases, they are attached to one side of the webbing. Often, the shape of the pom-poms is not completely round, but oval, oblong. If you bought the standard version and you need to give a special shape (more oblong, in the form of drops, etc.) to the pom-poms, use scissors. Trim them lightly to make the curls more beautiful.
The braid is made from natural and synthetic materials. The natural components of the braid help protect yourself and your loved ones from allergies, rashes, and skin irritation. You can freely contact with her, without fear of a negative reaction of the body. This braid with pom-poms is used to decorate children's clothes, clothes, toys, etc. And synthetic tape costs a little less. It is more commonly used for decoration.
Getting started decorating
To make beautiful Christmas tree decorations and replace artificial rains with natural ones, buy yellow, blue, red or blue braid. Try to choose pom-poms in white, milky, or cream colors. So they will stand out favorably against the background of the green Christmas tree. We advise you to buy sequins or sparkles in bright colors. Use glue to attach them to braids or pompoms. So they will look beautiful on the New Year tree.
To make an original Christmas wreath with your own hands, braid is also useful. After you attach toys, candy, showers and other decorations to the base of the wreath, glue (tape) or pin the tape on the sides. It is better to choose the size from 3 to 10 cm. It is also better to choose large, oval or round pompons. The braid will play the role of the edging of the wreath. It will look much prettier and more expensive.
For the new year, braid is often decorated with chandeliers, a door, a refrigerator, and a kitchen. More often it is shaped like flowers or bows. Products are attached to curtains, curtains, tulle, flower pots or to the flowers themselves (if the plant is large). You can dress up your house as you like. Pompons make the braid more festive and fun. It is better to choose bright colors - light green, pink, blue, red, so that they stand out.
To add exclusiveness to a familiar lampshade, floor lamp or sconce, use braid in warm shades - orange, yellow, beige, cream. Gently attach the braid or glue it with double-sided tape to the end of the chandelier. The pom-poms will hang beautifully from the edges of the chandelier. When you turn on the light, your lighting fixture will not light up the room as brightly as usual. On the contrary, the pom-poms will give you festive soft lighting.
Pom-pom braids are often sewn onto pillowcases and pillows. You need to purchase a braid ranging in size from 1.5 to 6 cm. Sew it by hand or on a typewriter to the front of the product, along the edges. Better to use overlock. If the pillows are more for decoration than for sleeping, you can choose braid for large round pom-poms. For sleep, it is advisable to fasten a neat thin braid from 1 to 2 cm. Often housewives sew braid with pompoms to the center of the pillowcase or pillow, giving it the shape of fairy-tale characters, hearts, trees, the sun, etc.
Braid is a universal tool for wrapping gifts and flowers. Various colors and shades allow you to choose the most suitable option for presentable packaging. Instead of bows, packing tape, it is better to use natural braid. If you tie it beautifully in the form of a bow, an elegant pattern, or simply wrap it around the base, your gift will take on a more expensive look. And it will be perceived as a gift from the heart.
We have simplified the ordering process for those who need decorative ribbons. Below is the online catalog of the pom-pom braid we have in stock. Choose color, size and click on the picture. The system will automatically take you to the order form. Everything is very easy, simple and convenient!