Do-it-yourself soft toy dog. Do-it-yourself dog pattern from fabric: even beginners can do it
The New Year is just around the corner, and we want to invite you to sew a symbol of the new 2018 - a cheerful dog. The author of this wonderful dog is Tatyana Leonenko.
For work we need the following materials:
- white calico about 50 * 22 cm, a piece of thick cardboard (on the bottom) 9 * 5 cm;
- holofiber, sintepukh or any other filler;
- stick (for sushi) for eversion or tweezers;
- scissors, white thread, needles;
- coffee, cinnamon, vanillin, PVA glue (for coffee solution), brush;
- acrylic paints: white, brown, red, black; a jar of water, brushes;
- dry brown pastel, short-haired brush (or cotton swab);
- black gel pen;
- good mood and desire to create.
Pattern:
We lay out the details of the pattern on the fabric, follow the direction of the shared thread (the arrow indicates the share thread on the pattern) and circle it with a simple pencil. Don't forget about the required number of details! Since the fabric is folded in half, we outline the tail and body once, the ears - twice, the upper paws - 2 times, the lower ones - 2 times. We also circle the bottom, then draw a nose on the second detail (we have one bottom and a nose each).

We put the body of the dog on the fabric with the muzzle down, chop off with a pin with one layer of fabric, turn off the fabric and transfer the drawing with a simple pencil to the front side, lightly outline the nose with a dotted line.

We sew our parts on a sewing machine with a small stitch (except for the bottom!), Leaving the places for turning out not sewn up (marked with a dotted line on the pattern). On the body we do not sew up places for sewing in the upper paws (marked on the pattern). We cut it out, leaving an allowance near the line of 3 mm, in places for eversion 5 mm, at the bottom of the body of the dog 1 cm.

We cut out the bottom part from one layer of fabric, leaving an allowance of 1-1.5 cm. Draw a nose on the second piece of fabric and cut it out along the contour.

On all parts where there are roundings (body, paws and tail), we make notches with scissors, not reaching the seam 1 mm.

We turn out all the details of our dog (except for the body), straighten the seams. On the ears, we tuck the fabric inward by 4-5 mm and sew it with a hidden seam.

We take the paws and fill them with holofiber by one third, mark the fingers with a pencil.

Now let's do the tightening of the fingers. To do this, we introduce a needle and thread on the side of the foot and bring it to the beginning of the line, leave the tail of the thread on the side. We make a fastener in this place.

We throw the thread over the edge, insert the needle from the opposite side to this point and tighten the thread. We repeat this action again.

Now we again insert the needle from the back side, and bring the finger into the next line. Insert the needle again from the opposite side and bring it out to this point, tighten the thread. We repeat again.

We fix the thread: step back 1 mm towards the seam and bring the needle to the other side, then again take a step of 1 mm and bring the needle towards the side seam. We cut off all the threads. The fingers are ready.
This Sunday, my daughter and I sewed a charming soft toy made of fluffy white fleece fabric especially for the New Year, since the Symbol of the Year 2018 is the Dog. And by tradition, every year we sew and make different ones. We really like the process, and the result even more. Well, an additional plus - the child is accustomed to work. At the present time, rarely anyone knows how to sew on a button, and sewing a dog with your own hands is a real art.
Here is our symbol of the year 2018 - a do-it-yourself dog.
To sew a dog for 2018, we first looked for suitable ones. We liked two. I hope we will also sew a second dog and show it to you. For such a pattern of a dog made of fabric was used.
You can open a photo of the pattern in a separate tab, save and print. We try to save dogs from the fabric of the symbol of 2018 in A4 format to make it easier to print.
To sew a dog with your own hands, you will need:
- a piece of soft fabric (fleece, felt, bright chintz is suitable) 20 cm wide, 40 cm long,
- synthetic padding for soft toys,
- decorative bright ribbon for the collar,
- buttons for eyes and nose
- threads, needles,
- scissors,
- and a pattern of the dog of the symbol of 2018.
How to sew a dog with your own hands - a step-by-step master class with a photo
To sew a dog with your own hands, we put the patterns on the fabric. For those parts that are needed in the amount of 2 pieces - we fold the fabric in two, pin the first part of the dog's body with English needles and circle it. We circled with a beige marker, and in our case it began to shine through the fabric and is a little visible on the toy itself. Therefore, it is better to circle with a pencil.
The pattern of the part between the ears on the head is needed in the amount of 1 piece, so cut out only one of it.

After all the patterns have been transferred to the fabric, we remove the paper and cut out the details of the soft toy - the symbol of the year 2018.
The next step is to sew the pieces together. For this:
- we sew the lower part of the legs to the outside of the body, leaving the tummy open (through it we will fill the craft with a padding polyester);
- on the head, between the ears from the nose and further with the transition to the back, we sew an insert;
- in other places we sew the body of the dog together.
You can sew a dog with your own hands with a needle and thread, but we sewed it on a sewing machine. So faster and my daughter likes to sew on a typewriter.
There is a subtlety in how to sew a dog beautifully and neatly. Everyone who sews knows about it, but still I will remind you. In places of corners (on the legs, on the tummy), the fabric is stretched when you turn the toy inside out, folds form and looks ugly. To prevent this from happening, you need to make a small incision to the seam from the wrong side, in the place where the seam makes an angle. Then, when turned inside out, the fabric left to hem stops stretching and there are no folds on the outside. I hope I have explained clearly. Look at the photo where you need to make small cuts.
Now that the dog has sewn the symbol of the new year 2018 with his own hands, it remains to fill it with padding polyester or any other stuffing. Try to stuff the symbol of the year dog with your own hands tightly, if necessary, pushing the padding polyester with a pencil.
To make the craft, the symbol of the year, the dog look elegant and become a real New Year's decoration, sew on a collar from a shiny ribbon.
Brilliant eyes - beads and a cute nose made of a transparent brown button in the shape of a heart decorated our symbol of the year dog crafts with your own hands.
Even our cat fell in love with this cute symbol of the new year. She lies in the photo in the background, if you look closely.
There is an easier option, how to sew the symbol of the year 2018 dog with your own hands. To do this, cut out only two outer parts of the dog's body and sew together. The dog will turn out flat, easier to manufacture, but no less interesting. You can attach a ring to the collar and you will get a wonderful keychain for.
This time it's coffee dogs - a simple yard guy Tobik and a charming dachshund Button.


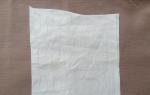
So what we need:
- a piece of white calico about 50x50cm;
- filler;
- instant coffee;
- PVA glue;
- acrylic paints - white, black and brown;
- brushes, thread, needle.
Patterns:


1. We transfer the pattern to the fabric, sew, not forgetting to leave holes for eversion. We cut the seams in the corners. If the fabric is very loose, I advise you to coat the PVA allowances on the seams in the places of cuts.

2. Carefully turn out all the details, stuff them tightly with filler, sew up the holes with a blind seam. We fill the ears of the buttons loosely, by about 2/3.

3. Sew on the ears to the Button.

4. Dilute the coffee mixture for coloring toys - dilute 1 tablespoon without a slide of instant coffee in 3 tablespoons of boiling water. When the mixture has cooled slightly, add 1 tablespoon of PVA and a pinch of crystal vanillin. To remove excess paint, after dyeing, I blotted the toys a little with a paper towel.

5. Dry the blanks. I baked in the oven at 75 degrees for about 10 minutes. You can use a hair dryer to dry, you can let the toys dry in a natural way.

6. In the remaining coffee solution, add half a teaspoon of brown acrylic paint (I have Van Dyck) and draw spots. Here, as fantasy tells me 🙂 On Tobika, I painted the spots in one layer, I covered the Button in two layers to get a rich chocolate color.
Every year you puzzle over what to give your friends for the New Year, or what souvenir to present when you go to visit. It is preferable to make a gift in the form of a symbol of the coming year. The symbol of the approaching 2018 will be the Dog. This animal is very noble and faithful, distinguished by friendliness and devotion. We can see magnets, calendars and T-shirts with such symbols on sale, why not make a tilde dog with your own hands and give it to a loved one, friend or colleague as a sign of attention. The mistress of the coming year, the Dog, may look different. You can make it out of paper, felt, or you can learn how to sew a tilde dog. Patterns, as well as a description, you will find in the article. It is sewn quite easily, but much attention is paid to the dog tilde toy along with the fashionista.
Consider the dog tilde pattern and make it on paper.

Now you can transfer to the fabric, in this case it is fleece.

Cut out the pattern for the head. First we sew the undercuts, and then we fold the two parts face to face, we cut them off with pins and we sew:
Cut out the head, sew the tucks, and then you can fold both parts face to face and sew.


Sew the remaining details of the tilde dog along the contour. You can first stitch them, and then cut them out

Make cuts on the handles, legs, ears with nail scissors on those sides that will touch the body.

Turn out all the details, fill with padding polyester and sew holes.


Sew the ears to the head


Now you can sew the head to the body

With the help of buttons, you can sew the legs of a tilde dog to the body

Now you can start preparing an outfit for our tilde dog.
This will require fabric, lace, thread

Cut out rectangles from two colors of fabric. The first corresponds to the size of the dog's body, the second is 2-3 times larger, depending on the width of the frill of the dress.
Sew lace to 1 piece, and assemble the second piece like a frill.

Sew details.

Cut another piece of fabric, larger than the second

Fold it in half, making a frill

Sew the frill to the dress

We put the dress on our dog, making an assembly at the neck.

The dress can be decorated with satin ribbons or organza ribbons.
Also use beads or buttons as decoration.


sew the sleeves over the handles. Pin to body with pins and sew on with buttons.


Let's start sewing pants. Cut out the pieces by double stitching the bottom.


Pin together and stitch together


With the approach of the New Year celebrations, we really want to make a variety of holiday crafts, of course, every family is recommended to do symbol of 2018 do it yourself- It's about a cute dog.
Dog - a symbol of 2018 do it yourself
Children really like festive handmade, during such an activity you can demonstrate all your abilities, develop new skills and, of course, have fun with your parents. We recommend that you make a craft together from waste material - a toilet paper rollBend the edges of the roll (the process is shown in the photo tip) and glue. Paint the roll in blue, for this you can take gouache or acrylic paints.
While you are waiting for the paint to dry, cut out all the necessary paper details: a ten-centimeter tail, ears, eyes, nose, drop-shaped tongue, a collar measuring 0.6 by 17.5 cm.
Trace the base of the roll on black cardstock and draw the paws from the side of the muzzle, then cut and glue. Twist the blank for the tail, painted on both sides, to make a ring. It remains only to glue the tail and a wonderful dog is ready.
Do-it-yourself dog - a symbol of 2018
If you really like such an activity as sewing, then by all means please your child with a new soft toy - crafts symbol of the New Year 2018, do-it-yourself stitched.
Cut out 2 parts of the side of the body along with the head, 2 pcs. for the tail, 1 pc for the lower body, 4 pcs for the ears, 1 pc for the nose.
Cut out all the necessary details, the seam allowances on the pattern are not indicated, but you should not forget about them - take an additional 0.5 cm. You can sew the details both manually and on a typewriter. Sew carefully, do not rush. Use threads that match the color of the main fabric. So, lay out the details on the wrong side. First of all, grind the blanks of the side parts, the bottom part and the ears. Connect the sides and bottom together. Turn your body out. Then sew on the ears and tail.
For stuffing toys, you can take a synthetic winterizer, there is also a special cotton wool designed for stuffing soft toys. Please note that the ears do not need to be stuffed. After you fill the doggie, you need to sew up the hole. Buttons can be used as the eye of the toy.
DIY symbol of the New Year 2018
From the most ordinary socks you can make very cute dogs - the child will surely be delighted with such a wonderful transformation.

So, take a sock (the longer it is, the better), cut off a toe from it in an arc, later it will come in handy for making ears. On the other hand, you will need to cut off blanks for four paws and a tail.
The rest of the sock should be turned out and stitched from the side of the muzzle, then some kind of filler should be pushed inside, it can be a synthetic winterizer, holofiber or even cotton wool. Sew the fabric on the other side, not forgetting to leave a hole in order to sew in the tail.

Sew paws, tail and ears, turn inside out, fill with filler and sew to the figure.
DIY symbol 2018
Cut, using the scheme, the details of the colored felt. Sew the paws to the puppy's body, sew the spots on the head, sew the spots also to the halves of the dog's body.

Sew the two halves of the body into one piece, leaving a hole at the bottom so that you can stuff the puppy. After filling, you need to sew up the hole. Don't forget to sew on the beads for the eyes and make the nose.

Sew on the ears, and also sew a bow to the head.
DIY crafts - dog symbol 2018
After a summer holiday spent on the sea coast, children return home with large bags of various shells. Why not use this natural material to make a cute puppy?
For work, 14 ordinary shells should be prepared (they are also called “heart-shaped”, “skafarka”), you will also need one spiral-shaped shell. Among the materials will also be ready-made plastic eyes.

First of all, the collected shells must be thoroughly washed and then dried. Prepare a glue gun for work - this tool glues surfaces perfectly and quickly, in addition, it is very convenient to use it.
Take 4 large shells and glue them in pairs - they will play the role of a dog's head and body. Connect these parts to each other by gluing the wide parts. To the bottom of the body, glue 4 pieces of shells of the same size - paws. Glue a pair of identical shells on the muzzle, playing the role of cheeks, and glue a very small one on them - a nose. Under the sock, attach exactly the same - the mouth. The two shells that you will use as ears should also be the same, they should be glued with a narrow part to the head. Attach a spiral tail shell to the back of the body.
Well, now all your imagination should come into play - you can use ordinary gouache paints to decorate the “masterilka”, or you can save the natural color and just sprinkle the figure with spray varnish, then dry it. Remember to use aerosol varnish very carefully and in well-ventilated areas. After the varnish or paint has dried, artificial eyes can be glued. So a cute craft is ready, which in winter will remind you of summer.