Do-it-yourself origami from fabric in clothes. Origami butterfly made of fabric. Master Class. We sew a pillow cover with “Origami from fabric” elements
Master Class
"Fabric origami"
Technology teacher, MBOU Secondary School No. 1
Velizhanskaya V.V.
Handicraft is an amazing form of creativity,
allowing you to create a masterpiece in a short time.
Dare, create, and you will get the true
pleasure from your work.
Goals and objectives:
Get to know the viewdecorative and applied arts– technology"fabric origami"and learn how to perform work using this technique.
Transfer of teaching experience to participants in the master class of “innovative products” obtained as a result of creative activities.
Create conditions for professional self-improvement, the formation of an individual style of creative activity of a teacher.
visual range : presentation materials, work samples, technological maps for the sequential production of modules.
materials and equipment : drawing tools, cardboard, fabric, threads, tools and accessories for hand sewing, sewing machine, iron.
Lesson plan
Introductory part
Greetings . Wishing you success in your creativity.
Master class principle : “I know how to do it. I will teach you."
Message about the topic of the lesson (Slide No. 2). Various techniques and methods in decorative and applied arts help the teacher to comprehensively develop the child’s personality and teach him to express his own “I”. The form of interaction is cooperation.
2. Main demo part . Presentation.
Origami - the Japanese art of folding figures from paper or fabric, inspiring fashion designers to experiment with draperies and folds in their collections.
Everyone has heard about origami - the ancient art of folding paper figures. However, few people know that the fabric is also perfect for vintage technology. Of course, you need to master some techniques and subtleties when folding figures from the material. Having acquired the necessary skills, you will be able to independently make original products - from a theatrical handbag to a panel - which will surprise even the most skilled craftswomen with their exquisite and unique appearance.
And so, fabric origami is a type of ancient Japanese art that has become popular recently. To be fair, it must be said that the origins of this fascinating activity, which allows you to create real miracles from pieces of woven materials, competing with nature in invention, can be found here: just remember how intricately fabrics were draped when sewing clothes in the old days. However, fabric origami is a special phenomenon. It is much younger than orikata (origata) - the six-hundred-year-old custom of beautifully folding paper, passed down from generation to generation in the samurai class. But it has its own philosophy, its own rules, its own techniques - not at all complicated, and the results are simply amazing, with a minimum of time, effort and money.
The main terms of fabric origami are:
Sample - basic patterns for origami made of fabric, which are geometric shapes.
Module - a piece of fabric, cut using a template, sewn and ironed.
The basis - a product to which parts made up of modules - blanks - are attached.
Materials and tools:
No special devices are needed. Only what is in every home is used: scissors, needles, threads, a sewing machine... The main “tool” is your hands. They will be skillful if they get down to business in a good mood. And this good attitude will definitely transfer into a handmade product.
It is no coincidence that origami has long been attributed magical properties. So, according to legend, paper cranes - tsuru - bring happiness and longevity. The magic of origami also has the opposite effect: anxiety, fatigue, irritation - everything that darkens the mood recedes after making figurines and flowers. Once upon a time, with the help of origami, they carried out “correspondence”: they confessed their love, expressed respect, confirmed friendly feelings, etc. Each fold of origami carried its own meaning.
Materials, used for the manufacture of products using the origami technique are fabrics intended for modules, that is, blanks, and base products that want to be decorated with these colors. Fabrics can be very different, but in order for their choice to be successful, you should know some subtleties.
To make modules, you need fabrics that are contrasting, of the same thickness and density, that hold their shape well and do not fray. Based on this, choose from cotton, blends, silk and fine wool materials.
Almost any material, even drape, is suitable for sewing the base. The main thing is that they harmonize in color and texture with the decorative fabrics.
The fabrics are cut, the blank modules are sewn - it seems beautiful, but at the same time something is missing. Additional materials will help you place the necessary accents, complete the work, and properly decorate the product.
What can be used as additional materials? Anything you consider worthy of attention: beads, seed beads, rhinestones, braid, bird feathers, ribbons, cords, tassels, etc.
Practical work
Using the instruction cards, complete the proposed modules using the “fabric origami” technique.
Instruction card No. 1
Fabrication of the base module
№ p/p
Technological operations
Image
Tools and devices, materials
Make templates
Drawing tools, scissors, cardboard
Prepare the fabric. Cut out the parts to make the module.


Ruler, tailor's chalk, scissors, iron, scraps of fabric.
Hand stitch with a needle forward stitch at a distance of 5-7 mm on each large circle.

Scissors, needle for handwork, threads, cutting details.
Place a smaller round template in the center of the large circle for ironing and pull the fabric by the ends of the threads.

Smaller diameter template, round cut detail.
Remove template after ironing. Do not bend the allowance, leave the thread in the part

Template, cut detail
On the wrong side, in the center, place the insulation and a piece of colored fabric.

Details of cut and centipon.
Secure the protruding parts of the circle with pins, going around the edges of the square, and sweep.

Cutting details, centipon, pins.
Machine stitch the folded edges

Sewing machine, scissors, module detail.
Lay out the parts according to the diagram.

Base details.
Instruction card No. 2
Manufacturing a triangular module
Technological operation
Technological operation
1

Prepare a template
2

Cut out two pieces from different colors of fabric and hem them, leaving room to turn them inside out
3

Turn out, iron
4

Fold the corners to the center of the triangle and secure with thread
5

Fold the corners towards the center of the triangle and secure
6

Bring the thread to the back of the module
7

8


Fold the sides of the module to the center of the hexagon and secure it in the center
9

10

Instruction card No. 3
"Butterfly"

Cut out the parts of module 2. Stitch, leaving room for
eversion
Turn out, iron 4. Hem, retreating 1.5-2 mm

5. Fold in half, then again

6. Unfold the corners and pin them with a pin.
7. Tuck inside corners

8. Wrap the wings, secure with pins
9. Turn over, fold the belly and secure with thread


10. Decorate with beads, rhinestones, etc.
4. Summing up
Demonstration of completed work, discussion.
Sources used:
Galanova T.V. “Fabric origami. Encyclopedia. Technique. Techniques. Products". LLC “Ast-press skd”.
club.osinka.ru›topic-69741
origami-iz-tkani.-idei-dlja-stilnogo
users/krispel/post234493694/
For those who love sewing, I would like to suggest sewing a textile basket. A basket or vase made of fabric is very easy to sew, as you can now see for yourself by viewing the master class in photographs. There’s not much to sew here, except perhaps a square made of the main fabric, lining fabric and non-woven fabric. A sewn and processed square is folded using the origami technique, after which, miraculously, a basket is obtained) A basket created with your own hands can be used for napkins or small items for handicrafts, as well as for candies, cookies and New Year's sweets. By the way, do you remember that the next year, 2016, according to the eastern calendar, is the year of the red monkey? What should your New Year's outfit be to please the symbol of the year? After all, New Year is better meet like this to please the mistress of the coming year as much as possible. You can find out which outfit to choose on New Year's Eve on the website New-year-party.ru. Here you will find delicious holiday recipes, horoscopes and fortune telling, handmade ideas for interior decoration and other interesting New Year's items)

So, how to sew a basket or vase from fabric and fold it using the origami technique. For work we will need the following materials:
- cotton fabric for the front side - checkered,
- cotton fabric for lining and finishing - plain,
- interlining or adhesive fabric,
- threads,
- needles,
- sewing machine,
- iron,
- ruler or square.
Let's start sewing a fabric basket. We cut out squares with a side of 45 cm from the front and lining fabric. From non-woven fabric we cut out a square one centimeter smaller - with a side of 44 cm.

We connect the squares together, glue the interlining using a hot iron.

We sew squares from the front and finishing fabrics, laying a line along the edge of the interlining. We leave a few centimeters unsewn on one side so that the part can be turned out. We cut off the corners of the resulting basket blank, as shown in the photo below.

Now we turn our workpiece inside out. We sew up the open area by hand using an invisible blind stitch.

That's all, in principle our basket is ready), all that remains is to fold it using the origami technique. First, steam the workpiece with a hot iron through a damp cloth or gauze. Next, fold it diagonally, like this:

Having folded it diagonally and ironed it with an iron, open the square and fold it again, along a different diagonal. Open and fold, placing the corners inside, as shown in the photo below.

We continue to fold the basket.


This is how it should turn out:

We sew the resulting border, folded onto the outer side of the basket, by hand using threads that match the color of the finishing fabric.

So our fabric basket using the origami technique is ready. You can put small craft items, napkins or cookies with candies in it.

Ekaterina Pashkova
To make such a butterfly you need:
- sewing machine
- scissors
- threads in the color of the fabric and needle
- fabrics in two colors. It is better to take cotton fabrics that hold their shape. I took calico.
1. Cut out two rectangles with an aspect ratio of 2 to 3. I cut out rectangles with sides of 8 and 12 cm (you can have 6 and 9 cm, etc.)

2. Fold the fabric right side inward and stitch (seam width 3-4 mm), leaving a space for turning it inside out.

3. Trim the corners and turn them inside out, straightening the seams and corners. Sew up the hole with a blind stitch.

4. Iron the resulting rectangle.

5. Now you can put away the sewing machine; it will no longer be needed. All you need is your hands and an iron.
Fold the rectangle in half. Find the middle of the resulting rectangle and pin it with a pin for convenience.

6. Fold the side of the rectangle inward, as in the photo.

7. Do the same with the second side of the rectangle. Align and iron everything.

8. Now we unfold the rectangle as in the photo.

9. Turn the resulting workpiece over. We begin to form the wings as in the photo.

10. Form the second wing and fix it with an iron.
Municipal budgetary educational institution
Subpolar Secondary School
TECHNOLOGY PROJECT
Completed by: Kuznetsova Anastasia,
7th grade student
Teacher: Yumasheva S.V.
Introduction
The theme of the work is “Fabric Origami”. Fabric origami is a special phenomenon. It is much younger than orikata (origata) - the six-hundred-year-old custom of folding paper, passed down from generation to generation in the samurai class. But it has its own philosophy, its own rules, its own techniques.
When choosing a topic for the project, I wanted to work on something new. During technology lessons, we were introduced to types of decorative and applied arts, and among them the name of fabric origami was mentioned. This interested me. I love folding figures from paper and did not know that this can also be done from fabric. That's why this became my theme for the project.
Before completing the project, I set myself the following goals and objectives.
Goal: learn the technique of origami from fabric and do something using this technique.
Get acquainted with the history of origami.
Learn the technique of making origami from fabric.
Make your own product using this technique.
Projects are classified by quantity, time and focus.
This project is individual, short-term, practical.
To complete this project, I used the following methods: study and practical part.
There is very little literature on this type of decorative and applied art. When working on the project, I used books that contain rich illustrated material and manufacturing techniques. The book by T.V. Galanova especially helped me. "Origami their fabrics." Technique. Techniques. Products. – Encyclopedia.
The material can be used in technology lessons, MHC, and in circle classes.
INTRODUCTION

Origami is the original Japanese art of creating models of various objects, animals, birds, flowers by bending a sheet of paper. Nobody knows exactly who and when invented origami and how its unwritten rules were developed. There is even an opinion that this art is older than paper. That the first origami figures arose from the art of draping fabric in the making of traditional Japanese clothing. Many generations of Japanese have contributed to origami, passing on the ability to fold a flat sheet into a wonderful figure.
Since ancient times, origami has played a different role in the life of the Japanese. Paper figurines accompanied ritual processions in Shinto shrines, graceful butterflies decorated the wedding table, samurai entertained ladies at medieval balls by folding simple figurines, caring relatives hung magical paper balls over the bed of a sick person to drive out evil spirits. From generation to generation, the ancient art was improved, selecting the most elegant, most expressive figures for posterity.
Over time, origami left the religious framework and became a court art. Only a select few could do it, since paper was a rare and very expensive material. The ability to fold a figure from a square sheet was considered a sign of good education, refined manners and refined taste.
The emergence of origami
IN  In ancient China, paper was used in a variety of ways, including and in religious rituals. For example, it was initially customary at a funeral to burn all his household belongings along with the deceased - in order to ensure his future path in heaven. However, later, out of frugality, the real things of the deceased were replaced with special strips of paper on which only their names were written (similar strips of paper with printed wishes for prosperity and happiness can now be bought in small shops in China). Various useful things in everyday life, such as the famous hanging lanterns, were also made from paper. The folding technique was also used in their manufacture. However, folding figures from square sheets of paper has not received the same powerful development in China as in Japan. This is probably explained by the fact that the Japanese used paper not only for writing, making screens, umbrellas, windows and even clothing, but also for visually demonstrating some ideological ideas of the philosophy of Zen Buddhism.
Buddhists were the first to pay attention to the little things and destroy the division of the world into high and low (in contrast to the Western focus on general laws, predilection for the big, leading to the division of arts into high and low, activities into important and not so important). They turned their attention to everything that is fragile, for a moment, to the smallest little thing, with a wonderful goal - to catch in it, in the little things, the breath of eternity, for in the world everything is connected with everything. They sought in the simplest manifestations of a single and indivisible truth - makoto - for every little thing contains it, and one must be able to discover it, the Truth, there.
Buddhism generally sought the truth in many directions, and each people who accepted it found its own special path to it. Speaking about the path in the Buddhist understanding, it is worth emphasizing that the different paths to the Truth in it did not compete with each other, but rather complemented each other, because everything led in the same direction - to the one and indivisible Truth. In this sense, the East did not know the religious fanaticism of Europe.
Japanese Buddhists have developed amazingly powerful ways to see the Truth. They discovered its truest sign: beauty. The Japanese branch of Buddhism followed the path of the invisible, choosing beauty as an indicator of truth. On this path, the Japanese discovered the beauty of fragility, simple things, the patina of time on things.
That is why origami was not born, for example, in China, where Zen (Chinese Chan) Buddhism also flourished. The Chinese were looking for truth in a different direction; there was no bi-do - the path of beauty, i.e. ideas about beauty as a path to Truth.
In general, the Japanese discovered the beauty hidden in things in the 9th-12th centuries, during the Heian era (794-1185) and even designated it with the special concept “mono-no-aware”. This discovery comes from Shinto, the belief that every thing, every phenomenon, even words, contain a kami - a deity. Shintoism, in general, is very similar to our paganism. For Shintoists, the kami lives and settles especially willingly in everything that is unusual. For example, in paper. And, especially, twisted in a tricky zigzag gohei, which still hangs today in front of the entrance to Shinto shrines and indicates the presence of a deity in the temple. There are 20 folding options for the gohei, and those folded especially unusually attract the kami. Since the 9th century, there has been a custom in Japan to attach gohei to the belts of sumo wrestlers before the start of a fight.
Still folded in Japan kata-shiro– eight white paper dolls, which are placed to prevent misfortunes in all eight directions of space; fold gofu- paper amulets; And nagashi-bina- a symbol of family harmony: he and she in a paper kimono on a round bed. To drive out evil spirits and cleanse temples, Shintoists still use haram geese– a whisk made from strips of white paper. In general, the role of paper in Shinto is very large, and products made from it are given an esoteric meaning.
During the Kamakura (1185 - 1333) and Muromachi (1333 - 1573) periods, origami expanded beyond the temples and reached the imperial court. The aristocracy and courtiers had to have certain skills in the art of folding. Notes folded in the shape of a butterfly, crane, flower or abstract geometric figure were a sign of friendship or good wishes for a loved one. They were sometimes able to express more attention and love than could be done with words. The ability to fold has become one of the signs of good education and refined manners. Various noble families used origami figures as a coat of arms and seal. The court lady Murasaki Shikibu, who lived in the 11th century, mentions in her book “Ganji mono gatari” (“The Tale of the Brilliant Prince Ganji”) about the variety
origami - the art of folding letters, when the letter itself turned into an intricate envelope with decoration.
During the Azuchi-Momoyan (1573 - 1603) and Edo (1603 - 1867) periods, origami evolved from a ceremonial art into a popular pastime. Then paper ceased to be a luxury item and origami began to spread among the common people. It was then, three hundred to four hundred years ago, that a number of new figures were invented, which later became classics. Among them is the Japanese crane ( tsuru) is a traditional Japanese symbol of happiness and longevity. The art of origami in Japan has become a tradition that is passed down from generation to generation mainly through the female line. Origami historians claim that by the manner of folding and the set of figures it was possible to determine the province of Japan in which the girl grew up and studied.
So, Shintoism was involved in the emergence of origami, which drew the attention of Buddhists to the mystery of a sheet of paper. The similarity in the sound of the Japanese words for “paper” and “deity” - “kami” also turned out to be important. In the minds of the Japanese, a certain mystical connection arose between religious rituals and products made from folded paper. It is no coincidence that the first origami appeared in Shinto shrines. One of the rituals using them was to make small paper boxes sanbo, which were filled with pieces of fish and vegetables, offering them as sacrifices to the gods.
The first books on origami.
The first Japanese publication on origami is considered to be the book “Semba-tsuru Orikata,” which was published in 1797. The translation of its title “how to fold a thousand cranes” clearly alludes to an ancient legend that claims that folding a thousand classic paper birds helps make wishes come true. The book is entirely devoted to folding one single model - a crane. The diversity of the 49 models included in it is based on different combinations of cranes with each other. For example, they can take the form of a garland in which the figures are connected by the tips of their wings or beaks. To fold such a structure, blanks are made from strips or rectangles with incomplete cuts, which turn the blanks into sets of squares. The author of "Sembadzuru Orikata" is considered to be the abbot of the Rokan Temple. Also in 1797, he published the book “Chashingura Orikata,” which showed how to use paper folding and scissors to make the main characters of the then popular play “Chashingura” out of paper.
In 1845, the book “Kan-no-mado” was published in Japan, which in literary translation means “winter window”, or more precisely “midwinter window”. It includes instructions, mostly verbal, on how to fold several dozen classic paper figures and graphic illustrations of finished models. Experts in the history of origami claim that it was in “Kan-no-mado” that the folding diagram of the basic “frog” shape and the figure itself on this basis was first printed. The appearance of this book during the Tokugawa period (1603 - 1867) is not accidental. It was this time that was characterized by the beginning of the “democratization” of origami - the transformation of this activity from a ritual and temple activity into a popular leisure activity. The title of the book points to origami as an activity with which you can pleasantly while away a long winter evening. But there is another interpretation of the name - as a hint of the light of modest knowledge that can be gleaned from it.
In 1879, the headmaster of a girls' school, Saki Nobuzou, made an origami book for his young students, containing instructions on how to fold 20 simple classical figures. In 1885, Okamoto Konseki published a book for children on origami, Orikata, which was later translated into English.
One of the most popular types of origami is modular origami. Here the whole figure is assembled from many small parts (modules), where each part is folded separately. The most popular figure folded in a modular style is kusudama, which is a three-dimensional spherical figure assembled from individual modules.
Flat folding more difficult, since the development is a drawing that shows all the folds that form when the finished model is unfolded. However, this method provides information not only about how to fold the model, but also about how the model was conceived. Developments are usually used when developing new origami models.
Wet folding method gives the figures expressiveness and smooth lines. This method is especially relevant for folding figures of flowers and animals. Wet folding involves using thick enough glued paper that will not come apart when wet.
Origami may seem like child's play, but in many countries around the world it is an integral attribute of folk holidays and even a design element. There are even theaters where all the decorations and characters are made using origami technique. Now in big cities courses and master classes on origami are being held, entire schools are being opened where groups of people of different ages learn this art from real professionals.
Fabric origami
A new type of needlework for Russians - fabric origami- folding fabric flowers. It is a type of ancient Japanese art origami- folding paper figures of animals, birds, butterflies, flowers, etc., which has become popular recently. To be fair, it must be said that the origins of this fascinating activity, which allows you to create real miracles from pieces of woven materials, competing with nature in invention, can be found here: just remember how intricately fabrics were draped when sewing clothes in the old days. However fabric origami- a special phenomenon. It is much younger than orikata (origata) - the six-hundred-year-old custom of beautifully folding paper, passed down from generation to generation in the samurai class. But it has its own philosophy, its own rules, its own techniques - not at all complicated, and the results are simply amazing with a minimum of time, effort and money.
No special devices are needed. Only what is in every home is used: scissors, needles, threads, a sewing machine... The main “tool” is your hands. They will be skillful if they get down to business in a good mood. And this good attitude will definitely transfer into a handmade product.
It is no coincidence that origami has long been attributed magical properties. So, according to legend, paper cranes - tsuru - bring happiness and longevity. The magic of origami also has the opposite effect: anxiety, fatigue, irritation - everything that darkens the mood recedes after making figurines and flowers.
Once upon a time, with the help of origami, they carried out “correspondence”: they declared their love, expressed respect, confirmed friendly feelings, etc. Each fold of origami paper carried its own meaning. What message can fabric flowers convey? If they are made for themselves, decorating their clothes, household items, and home with them, then, apparently, in this way a person communicates about himself to others that he is open to the world, everything new and loves life. If a flower or a product with it is given to another, then this is at least a demonstration of friendly disposition.
A deeper interpretation is also possible if we recall the symbolism adopted in Europe: thistle - kindness, hydrangea - generosity, generosity, dahlia - maximalism, bell - conservatism, tulip - dignity, rose - beauty and inaccessibility, aster - fun, freesia - fearlessness and stubbornness, peony - endurance, gladiolus - hard work, etc. There is only one problem: knowledge of such wonderful properties of flowers is the lot of the few,
Therefore, in order for your “message” to be completely deciphered, maybe you need another hint, a hint?
Fabric crafts folding is easier than paper figures: an incorrectly made fold on paper cannot be corrected, whereas fabric allows you to achieve a good result even after several mistakes. Flowers are made based on several templates (six of them, the main ones, are given in the book). But first, fabrics of contrasting colors are selected to give the flower more expressiveness. In this case, you can be guided by intuition, or you can use the hints of the color wheel. And then the process of creating a flower begins - in fact, in many ways copying the shapes and color combinations that Nature has already found. Maybe by doing fabric origami, people are getting closer to understanding the secrets of the universe?
Using the origami technique, you can make decorations in the form of flowers or use them to make effective and necessary things (bags, boxes), but you can also sew pillows, cases for glasses, cosmetic bags, and then decorate them with fabric flowers. The origami technique is also used to make clothes, use them in interiors, fold napkins, towels, etc.
Let's look at some products made using the origami technique:
|
Bag 1 |
Cloth |
Cloth |
||
|
Bag 2 |
Housekeeper |
|
||
|
Bag 3 |
Casket |
Cloth |
||
|
Folding towels |
Pillows |
|||


 napkins


All the products are very interesting, but when starting to study the technique, I think you need to start with something simpler.
Folding napkins is the easiest part. I tried it and it worked, but I want something more interesting.
Making clothes using this technique is very difficult for beginners.
Folding towels can be used as a game with children - it is fun and useful for the child's development.
P  The fragrances, the box and the key holder are interesting things, but I was interested in the bags, especially No. 3 - the original one.
To implement this idea, you will have to master the technique of making flowers from fabric.
To create origami from fabric, to make the products expressive, materials that complement each other are most often used. Contrast
used mainly for color. Petals, for example, are made of light fabric, and the base is made of darker fabric, or vice versa.
To make modules - blanks from which flowers are then folded - you need fabrics that are contrasting, of the same thickness, density, hold their shape well and do not fray. Based on this, you need to choose from cotton, blended, silk and fine woolen materials.
Additional materials will help to place the necessary accents, give completeness to the work, and competently decorate the product: beads, seed beads, sequins, rhinestones, buttons, braid, ribbons, cords, bird feathers, colored wire.
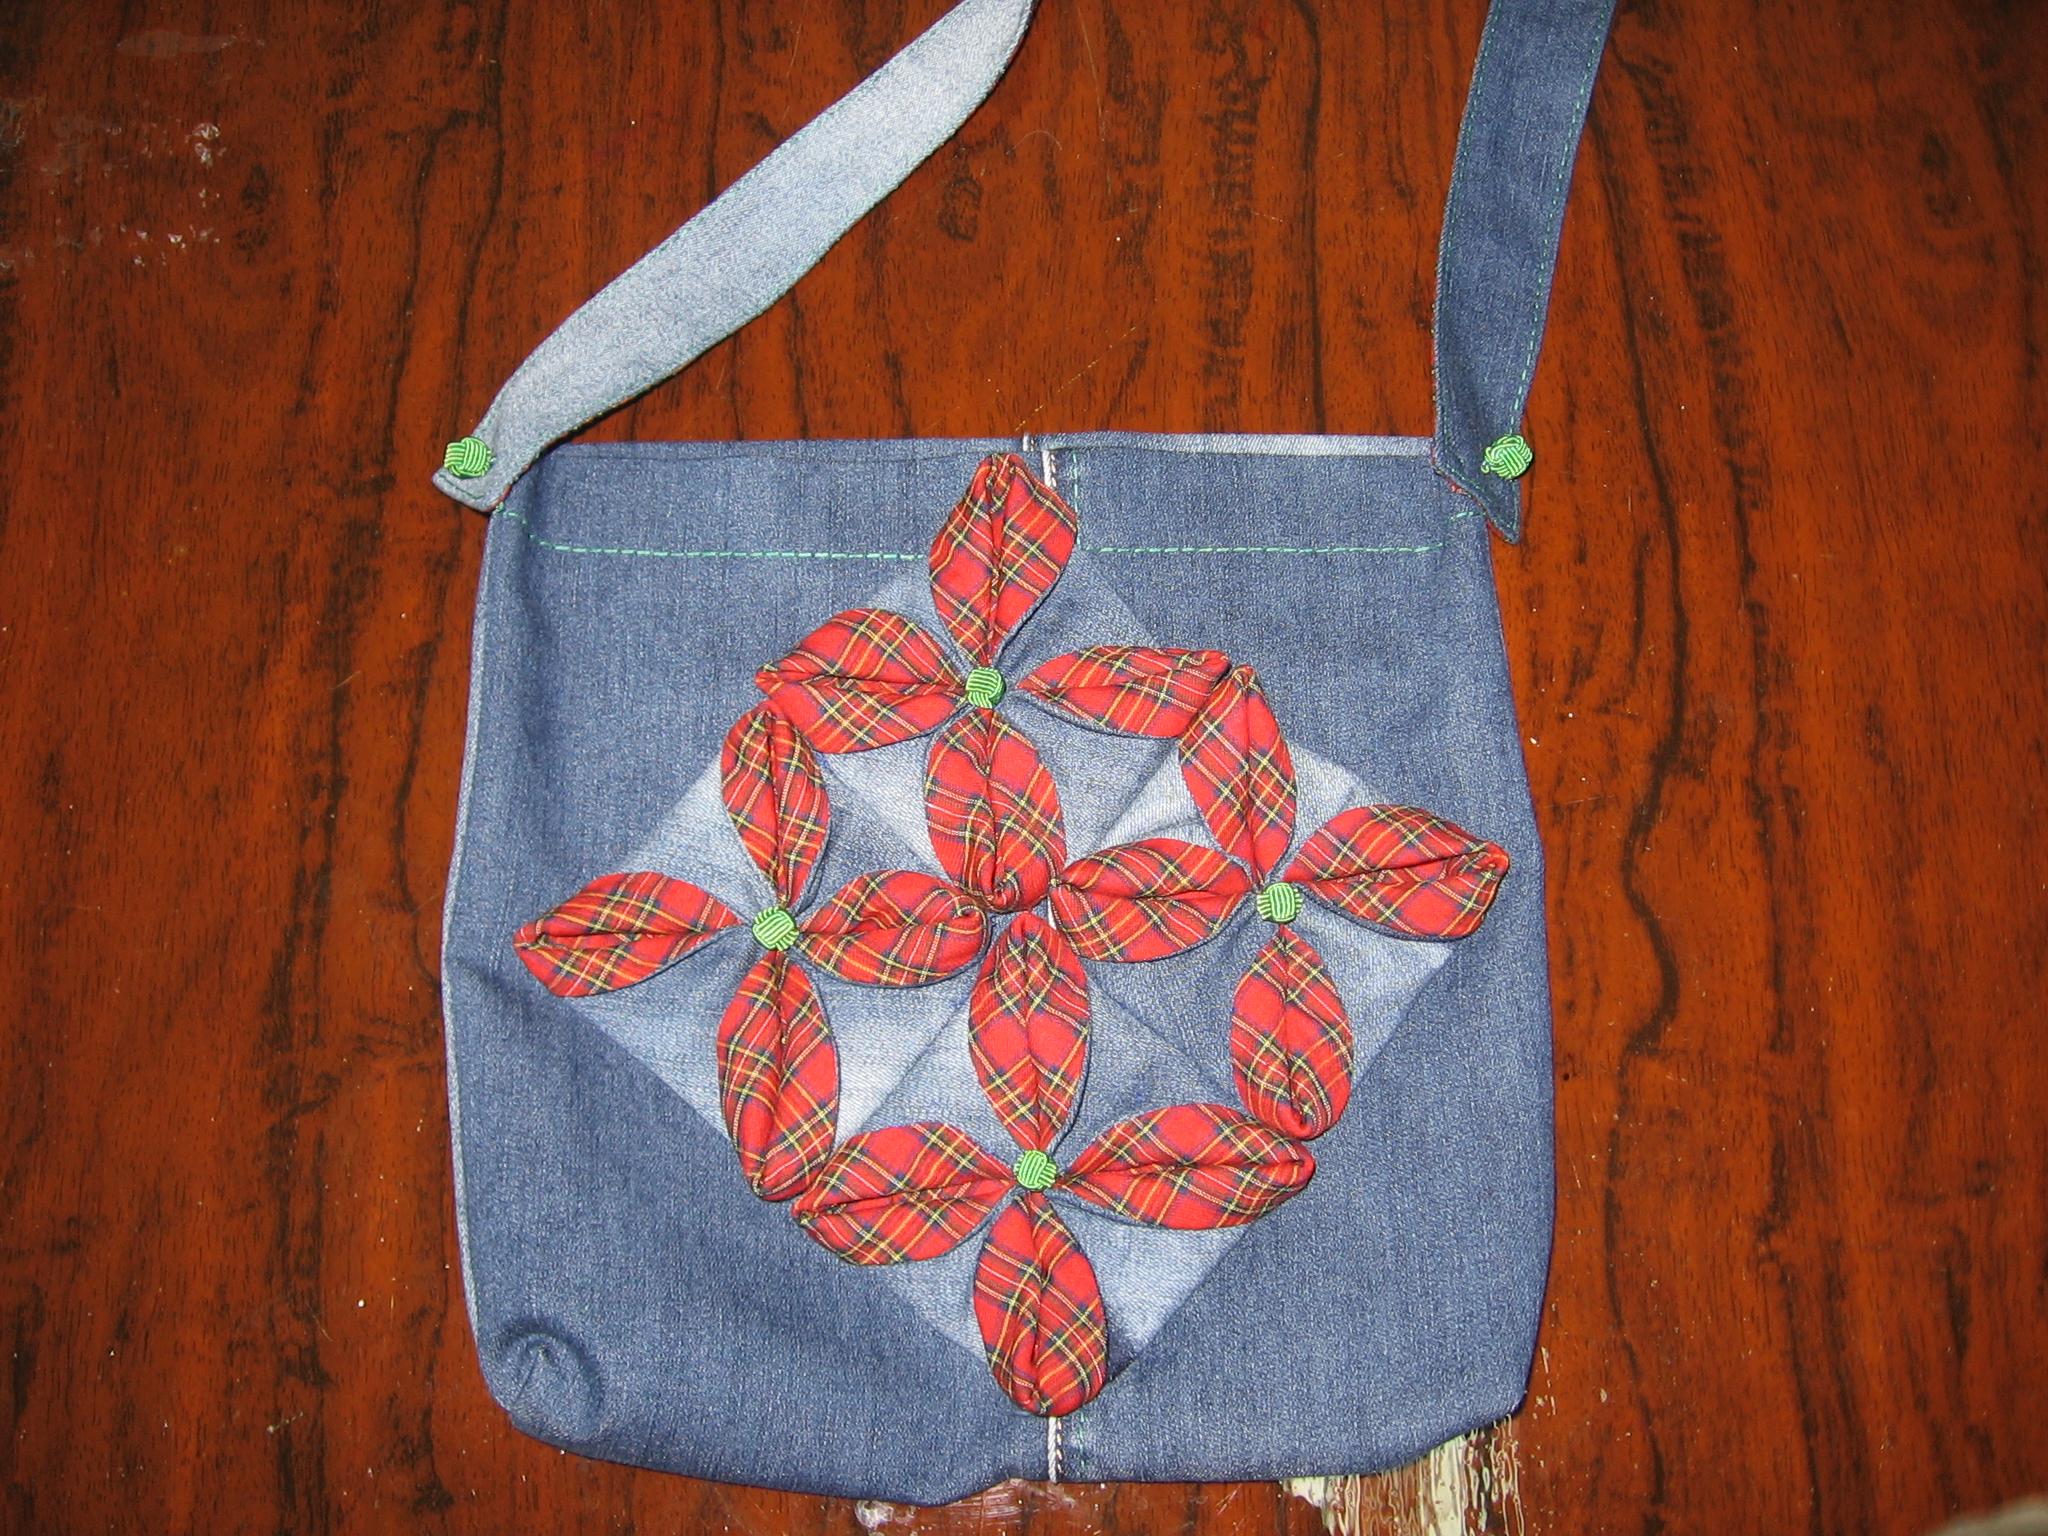
When I saw this bag, the first thing that came to my mind was: I’ll make it out of denim! We have old jeans at home. So there will be a use for them.
And for making flowers I have checkered fabric. Denim always looks good paired with plaid fabric. For finishing I use thread ball buttons.
Well, let's get to work!
Bag size 26 x 27 cm
Materials:
Denim - size 58 x 28 cm.
For the handle – denim fabric measuring 108 x 5 cm
check fabric - tartan size 108 x 5 cm
4 fabric flowers; material for them: denim and checkered.
6 green ball buttons.
Green threads to match the color of the buttons.
Tools and accessories:
Hand needles
Progress:

Bag:
Cut the jeans legs along the inseam. Iron. Cut out a rectangle measuring 58 x 28 cm.
Fold the workpiece in half with the front side facing inward.
3. Sew the sides with a seam width of 1 cm, overcast.
4. Finish the top edge with an overlocker.
5. Turn right side out.
6. Fold the top edge of the bag 3.5 cm to the wrong side and stitch it.
7. From the second leg, cut two strips for the handle measuring 55 x 5 cm. Sew into one strip, seam width 1 cm. Iron the seam.
8. From checkered fabric, cut a strip for a handle measuring 108 x 5 cm.
9. Make a handle for the bag: fold the two parts right sides inward, stitch to a width of 0.7 cm, turn right side out, sweep. Give a finishing stitch along the edge of 0.1 - 0.2 cm.
10. Iron the bag.
11. We connect the handle to the bag by sewing on finishing ball buttons.
Flowers:
Make 4 flowers - anemones (see below). Arrange the flowers in the form of a square, the diagonals of which are perpendicular to the sides of the bag. Attach the flowers to the bag with hidden stitches. Sew a button in the center of each flower.


Making a flower - ANEMONE (ANEMONE).
1. Using a round template (Appendix 1), cut out one piece each from plain and colored fabric. (Before you start cutting the module, you need to determine what the size of each flower should be and make a template of the appropriate size).
2. Fold the pieces right side inward and sweep along the marked lines. Sew the parts together, leaving a 2 cm section unsewn for turning the part right side out. Remove basting.
3. Turn the piece right side out, baste along the edge, iron, remove the basting, iron.
4. Sew the remaining area with hidden stitches.

5. Bend it slightly horizontally and vertically to determine its center. Mark the center point on both sides of the module using a pencil or chalk.
6. Place the module with the colored side up and place a small octagon template in its middle (Appendix 2). Trace the outline of the template with a pencil, and then remove the template (Fig. 1).
7. Along the marked lines, fold the opposite segments towards the center of the workpiece (Fig. 2) and forcefully run your thumbnail along the folds.
8. Using a needle and thread, sew the tops of the folded segments to the center of the module. The module should become square.
9. Fully open the “pockets” in each corner (Fig. 3).
10. Turn out the edges of the “pockets”, bending the tops 1 cm beyond the edges of the module and fix their position with several invisible stitches (Fig. 4).
11. The flower is ready!


The bag is ready! It turned out funny!
The bag did not require large material costs, because... made from old things. You can change the size, make it smaller or larger, or make it from other fabrics. It can be used for going to the beach, visiting and more, as well as a gift for a child. By removing the handle and inserting the zipper, you get a good cosmetic bag. By changing the size and color of the fabric, we will get an original children's handbag.
The manufacturing technique is quite accessible, uncomplicated and very interesting.
Before completing the project, it seemed to me that the technique of folding fabric was something little known, but we come across it much more often than we think. When setting a festive table, we fold napkins in various ways, and this is origami. This technique is also used in the manufacture of evening dresses, especially stage dresses. Flowers made from fabric can be used to decorate a box, a handbag, a holiday table, clothes, etc. And in order to diversify and make it all more festive, interesting, fun, and mysterious, it is useful to master the technique of fabric origami.
M  I didn’t like working with this technique so much that I want to use it in clothes.
Annex 1
The template is given on a scale of 1:2. Seam allowances 0.7 cm.
Appendix 2
The template is given on a scale of 1:2.
Used Books.
Galanova T.V. "Origami their fabrics." Technique. Techniques. Products. – Encyclopedia.- Moscow. AST - PRESS
"Gifts" Technique. Techniques. Products. - Encyclopedia.
http://serentex.blogspot.com/2006/05/orinuno-patchwork.html
http://fashiony.ru/page.php?id_n=114
2012-2013 academic year
The voluminous flower was created by Melanie.
You will need two rectangles of different colors.

They need to be folded right sides together and sewn, leaving a gap in the seam to turn right side out.


Fold the corners so that the rectangle becomes an octagon.


Pin the edges, but do not sew them.

Fold the corners to the opposite side

Carefully tie the corners together with a thread, by the edge.

Also sew the middle edge of the rectangle.

Fold the edges of the resulting squares.


And this is the resulting flower:


Phlox
To make a phlox flower, use a pentagonal template; cut out two parts from dark and light fabrics. Sew two pieces and iron them. Find the central point (it will lie at the intersection of the diagonals), mark it on both sides of each module using a contrasting color pencil, chalk, soap, etc.
Bend all corners of the module inward, towards the center (Fig. 1).
When folding, move clockwise. Tuck the edge of the last lapel under the end of the first lapel. Sew the tops of the corners to the center of the module (Fig. 2). Iron the edges of the workpiece.
Open the “pockets” and bend their tops 1 cm to the reverse side, to the “wrong side”, so that fabric of a different color becomes visible. Carefully sew the resulting “petals” to the edges of the workpiece (Fig. 3).
Using a needle and thread, connect the adjacent phlox “petals” (Fig. 4).
Iron the product. Attach the flower to the base by sewing each “petal” on the wrong side.
Thumbnails of attached images

Anemone
1. Using a round origami template, cut out one piece each from dark and light fabrics. Sew the module and iron it. Bend the workpiece slightly horizontally and vertically to determine its center.
Mark the center point on both sides of the module using a pencil, chalk, etc. Place the module light side up and place a small octagon template in the middle of it. Trace the outline of the template with a pencil, and then remove the template (Fig. 1).
2. Along the marked lines, fold the opposite segments towards the center of the workpiece (Fig. 2) and firmly run your thumbnail along the folds. Using a needle and thread, sew the tops of the folded segments to the center of the module. The module should become square. Fully open the “pockets” in each corner (Fig. 3).
3. Turn the cut “pockets” inside out, bending the tops 0.5-1 cm beyond the edges of the module, and secure their position with several invisible stitches (Fig. 4).
4. Attach the flower to the base by making neat stitches in four places on the wrong side (Fig. 5). The origami anemone flower is ready.
Peony
Creating an origami peony takes place in two stages: first, the corolla is made, and then the receptacle. They are cut out using one template at a time, and then folded according to different patterns.
Using a pentagonal template, cut out two pieces for each piece from a dark and light fabric, sew the two pieces together and iron them. Find the central point (it will lie at the intersection of the diagonals), mark it on both sides of each module using a contrasting color pencil, chalk, etc.
Peony corolla
Bend the sides of the workpiece towards the center by 3 cm (Fig. 1).
Fold the module counterclockwise. Folding the last, fifth side, bend the end of the first flap and place the end of the fifth under it (Fig. 2). Iron the folds.
Open the “pockets” at the corners of the module, fasten their bases with neat stitches. The connection points are at the vertices of the central pentagon (Fig. 3).
By pressing on the central part of each “pocket”, flatten it (Fig. 4). Secure the new position of the “pockets” with pins. Iron the rounded piece through the fabric.
Using a strong thread, sew a “needle forward” stitch through all layers of fabric, departing 0.7 cm from the edge of the workpiece (Fig. 5). Do not fasten the end of the thread. Remove the pins. By pulling the end of the thread, tighten the seam so that a circle with a diameter of 1-2 cm is formed on the back of the workpiece.
Invisibly secure the end of the thread to the back of the module. If the resulting circle is too large, place another seam next to the first and pull it together as well. Turn the module over to the other side (Fig. 6).
Bend the tops of the “pockets” towards the assembled center of the module. Smooth the fold lines. Using invisible stitches, passing the needle through all layers of fabric, sew the tops of the “pockets” to the center of the workpiece (Fig. 7).
8. The peony corolla is ready (Fig. 8). As a whisk, you can use not only the “front”, but also the reverse, “wrong” side of the workpiece (Fig. 9), the central part of which is occupied by a pentagon.
Peony receptacle
Bend the corners of the second piece towards the center (Fig. 10).
Using neat stitches, sew the tops of the corners to the center of the workpiece (Fig. 11).
Open the “pockets” and bend their edges outward by 1 cm so that the fabric of a different color becomes visible. Using a needle and thread, quietly secure the edges of the “petals” along the edges of the module (Fig. 12).
Assembling origami peony flower
Place the corolla in the center of the receptacle and secure it with a few stitches, sewing on the central part. A voluminous two-tier peony flower is ready. Sew each corner of the receptacle to the product from the wrong side.
And one more master class by Arte e Artesanato (ARTEMELZA)

Cut circles out of fabric and connect them together by stitching on a typewriter

make one side from colored fabric, the other from plain fabric

lightly cut the middle in order to turn our workpiece inside out