Volumetric fruits and vegetables made from paper templates. Paper fruits: voluminous applications and DIY paper crafts
Soon the most favorite time of children will come - summer. This includes swimming in the warm, gentle sea, playing on the golden sand, flying paper airplanes and kites. But the most important thing is the abundance of healthy and tasty fruits and berries. So voluminous fruits made of paper - the most summer theme for applications.
How to make voluminous fruits from paper? Our master class will help you. Today we will make with you a three-dimensional applique: strawberries, cherries and grapes. You will see diagrams and templates for three-dimensional appliqué made from colored paper below.
For these paper crafts you will definitely need:
- colored paper red, green, purple and yellow flowers(two-sided);
- thick cardboard, which will become the basis of the application;
- scissors;
- pencil;
- PVA glue or glue stick;
- black marker.
Volumetric paper fruits: strawberries

In order to make a voluminous paper applique, you need red colored paper, green for leaves and a thick cardboard base. We will make strawberries on the entire sheet. Cut out the template for the leaves and tail:

Instructions for applying voluminous strawberries step by step:
1. Transfer the template to green colored paper and cut out:

2. Take 2 sheets of red colored paper, fold them in half and cut out a heart-shaped shape:

This will be our strawberry. Then we glue one part to the base cardboard, and the second part only along the fold line.

3. Place leaf and tail templates on top
The “tail” should not overlap the upper (movable) part of the strawberry.

We mark the “seeds” of our strawberry with a marker. That's all - voluminous paper strawberries are ready!
Volumetric cherries made of paper: applique

How to make a three-dimensional applique from paper? What is the technique for performing volumetric applique. In the technique described in previous section, you can perform any fruit, vegetable, berry, and even an animal or insect. For voluminous cherries we will need:
- red colored paper (double-sided);
- base for application in A5 format (half A4);
- scissors;
- pencil;
- double-sided green paper;
- glue.
How to make voluminous cherries from paper: master class.
1. Cut out 4 circles with a diameter of 5-6 cm from red paper. For this it is better to use some kind of template.

2. Bend all the circles in half. We cut out a thin strip from green paper - this will be the stem of our cherries.

3. Cut out leaves from a green rectangle measuring 12x6 cm, then bend them as shown in the figure:

4. First glue the stems onto the base sheet. Then one of the leaves, the second we leave “in free flight”. Then glue one red cherry at a time, and on top - a second one along the fold line. Mark the veins on the leaves with a pencil.


That's it - the Volumetric paper cherries applique is ready!
Volumetric paper grapes. Application

This volumetric applique is done a little differently. However, berries such as mulberries, raspberries and blackberries can be made using this technique.
To work you need:
- a white sheet of paper - you will need to cut out the base from it;
- colored paper of purple or yellow (light green) color;
- scissors;
- glue;
- green pencil or felt-tip pen;
- a simple pencil or marker.
Volumetric fruits made of paper: grapes, master class step by step.
1. To get started, we need to cut out a base template (you can choose any one), onto which we will subsequently glue the grapes.
Everything is just the most interesting! How to make eclairs, lemons from bottles, sew vegetables and berries, make them from papier-mâché.
Food is a pleasant topic for many. Products run out quite quickly, and only memories remain from delicious cakes and fruits. But you can make sure that they will always be before your eyes, and even decorate the interior. Don't believe me? Then find out how to achieve it.
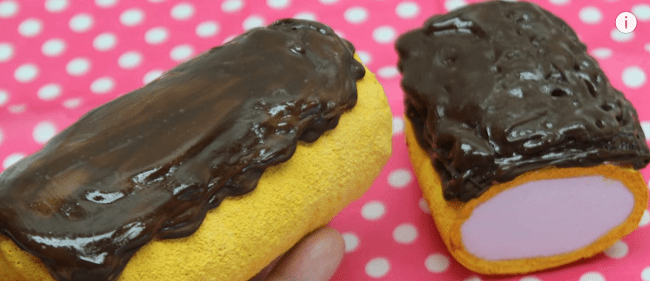
How to make eclairs from plastic bottles?
Look how delicious the cakes look. But do not forget to warn your home and visiting guests that these eclairs cannot be eaten, they can only be admired.
To make such a sweet that will always be in the house, take:
- 3 plastic bottles of 0.5 l;
- foil;
- salt;
- PVA glue;
- acrylic paints;
- scotch;
- thin white foam;
- Styrofoam;
- white fom;
- glue gun;
- tassels.

Unfold the foil, place this blank on it, and next to it another, but whole bottle without a lid. Wrap them in foil and place in the oven for two minutes. Homemade eclair also needs to be baked, but these pieces are placed in a hot place to make them more pliable. When you take them out of the oven, press down on the top of the foil until the bottles become oval.
Cut the whole container in half, you only need the part with the bottom. She will play the role of half of the cake. A blank of two bottles must be taped at the junction.
Pour PVA glue into a convenient container. Sprinkle salt on the board. Lubricate the blank from a plastic bottle with a brush with glue, then roll it over the salt, which will stick well to this base.
Set these future eclairs aside to dry. After this, you need to brush off the excess salt with your hands or a brush. Cut a small cone shape from the foam. Lubricating it with silicone from glue gun, glue a sheet of thin white foam rubber here. You will need to wrap the foam piece around a couple of times.
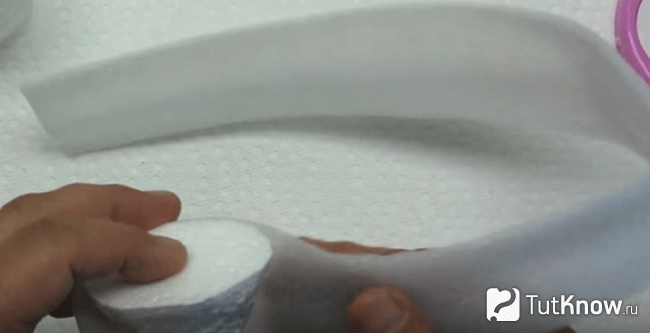
The strip of foam rubber will imitate the dough, and the foam will imitate the inner white cream.
Now insert this blank with the cone-shaped part inside the bottle. This part must fit firmly and well into it. Place the bottle on its side on the board, cut off the excess with a sharp knife to get a nice, even cut.
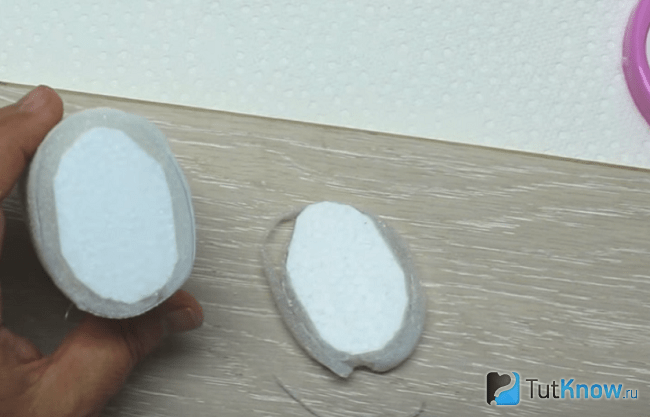
Now yellow acrylic paint coat the surface of the cakes. To highlight the dough of the eclair halves with this color, apply it with a thin brush along the contour of the cut, painting here the white foam rubber.
Cut a rectangular blank from white foamirant and round the edges. Its shape practically repeats the appearance of the cake from above.
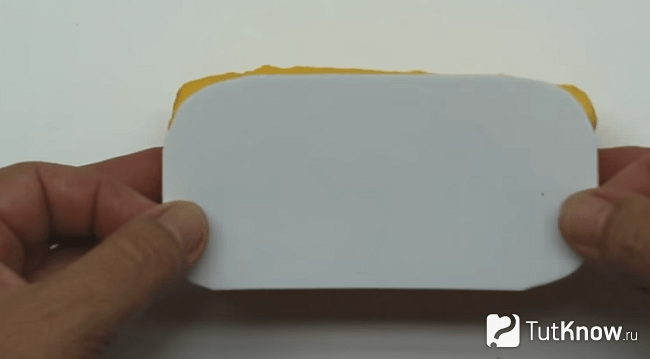
Glue this part using a glue gun, trim off the excess.
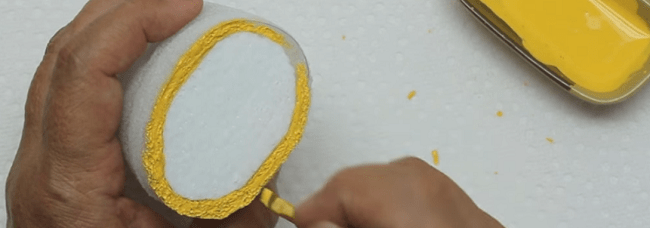
Now generously pour silicone here from the glue gun. To do this, prepare the silicone rods in advance so that they do not run out in the middle of the process.
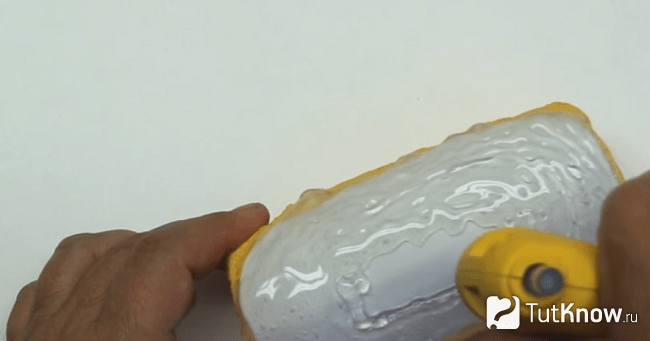
Wait for this glue to dry, after which you need to paint over it with brown acrylic paint to create a delicious glaze. The photo clearly shows how to make such an eclair.
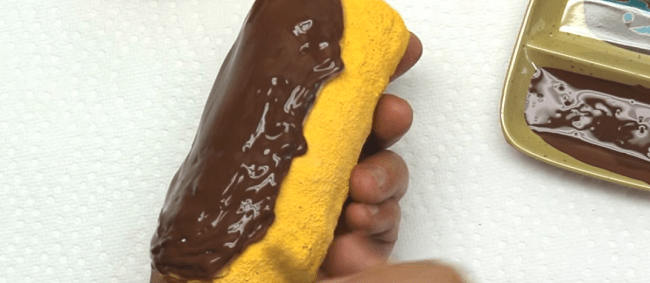
Make the icing for the second cake in the same way, after which you can place them on decorative dishes, but it is better to place them not on the table, but behind glass in a cabinet. After all, these cakes are so similar to the real thing, they look very appetizing, you need to be careful so that no one wants to try them “to taste.”
If for a competition in kindergarten you need to bring a craft, this will be a great way out of the situation. But the teacher must also be vigilant so that children cannot take such artificial sweets.
The next craft also looks like the real thing. Therefore, you also need to warn everyone who looks at it that it is not edible.
How to make lemon at home?
For this craft, take:
- small bottles;
- sharp knife;
- PVA glue;
- salt;
- acrylic paints;
- scotch;
- thin brush.

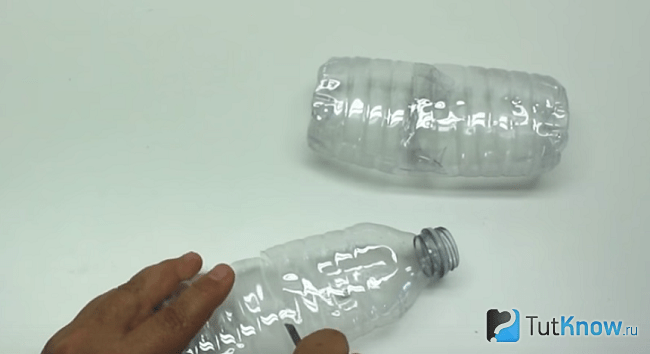
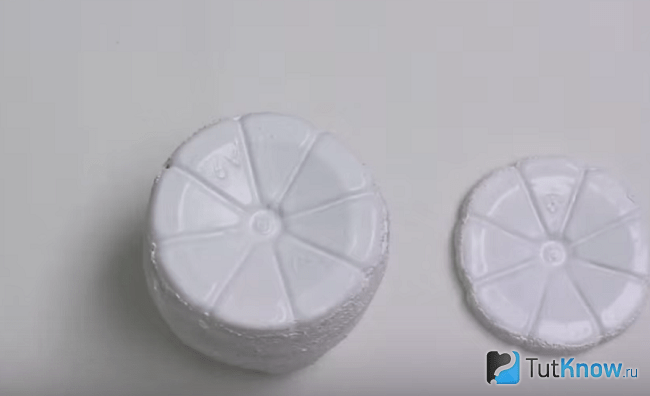
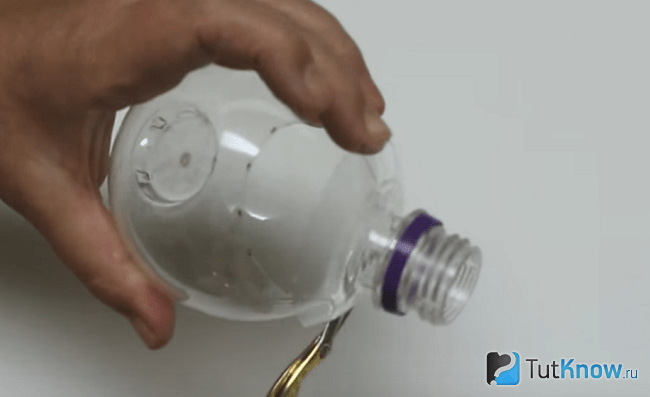
From the bottom of the bottle, cut a piece about 7 cm high, you can vary this value at your discretion to make a lemon the right size. Cut strips of it on top, the distance between them is 1 cm, their length is the same.
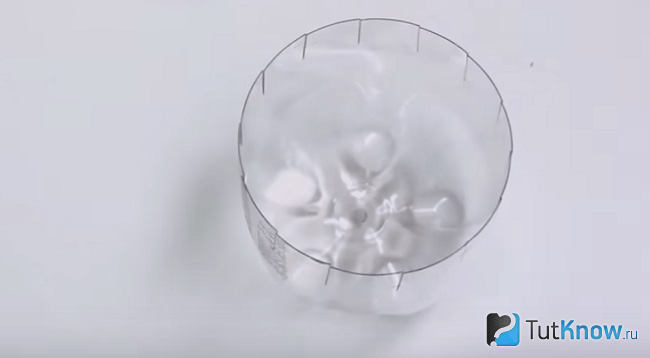
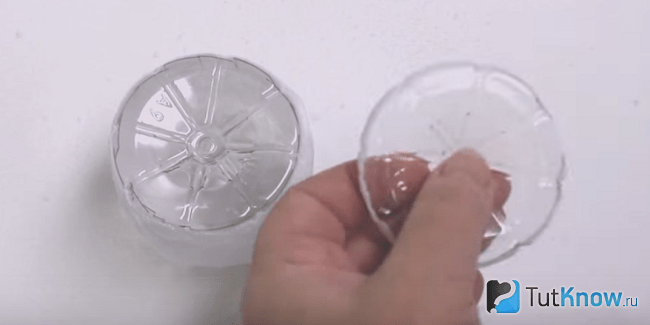
As in the first case, such a fringe will help to better fit the second part of the bottle onto this one. But from the second bottle you need to cut off the bottom, the height of which is very small, about 1.2 cm.

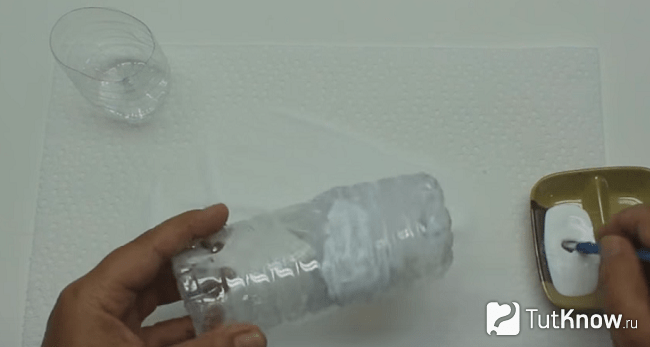
Compare these two blanks, seal the junction with tape. Lubricate the surface of one and the second bottle with glue and sprinkle with salt.

In this case, the bottom, which is inserted into this container, does not need to be lubricated. To make lemon wedges, cut the bottoms of plastic bottles so that the height of these blanks is about 1 cm or slightly less. Only the sides need to be coated with PVA glue and sprinkled with salt. While the glue dries, you can go about your business.
Then you need to remove excess salt with your hands. If this is not done, then the paint will fly off along with these grains when you cover the surface of the fruit with it.
To ensure the brightest color of the final work, it is better to first cover the surface with white acrylic paint; when it dries, use the one you need.
This is how elegant the blanks painted with white acrylic look.
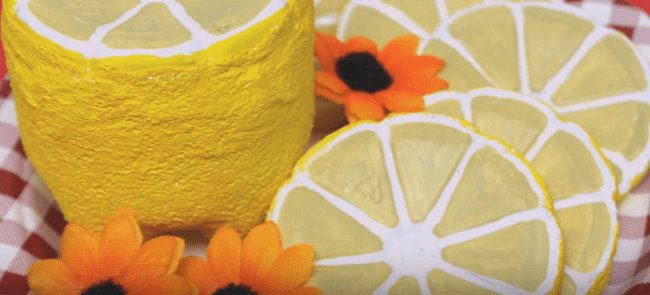
Now the skin of the lemon and its slices need to be painted with bright, juicy yellow paint. To make the flesh have a realistic color, mix white and beige paint and add a little yellow. This composition should be applied with a thin brush to the lemon slices, but leave white veins and a light edging.
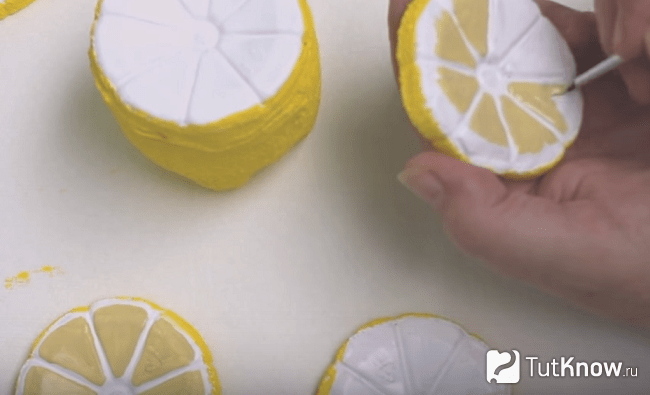
When the paint dries, place the juicy lemon and its slices on a plate. Let everyone who sees such beauty praise your golden hands and be surprised that such a bright, realistic lemon can be made from a plastic bottle.
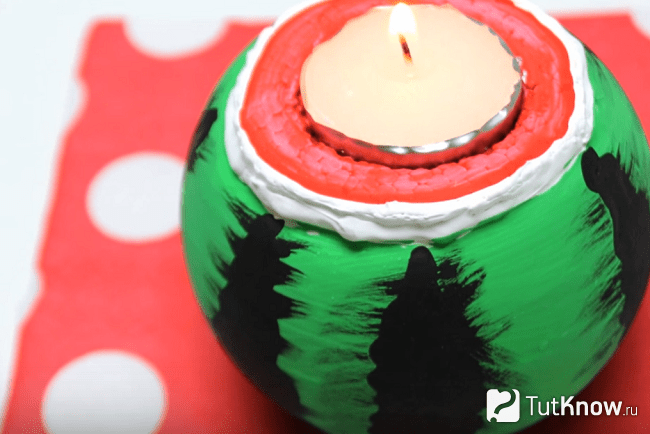
How to make a candle in the shape of a watermelon with your own hands?
The main component will also be a plastic bottle, but small and round shape. Here's what you'll need to transform it:
- a piece of foam;
- sharp knife;
- small round candle;
- expanded clay;
- acrylic paints.
To round the edges of this container, making them less sharp, apply this cut to a heated iron for a few seconds.
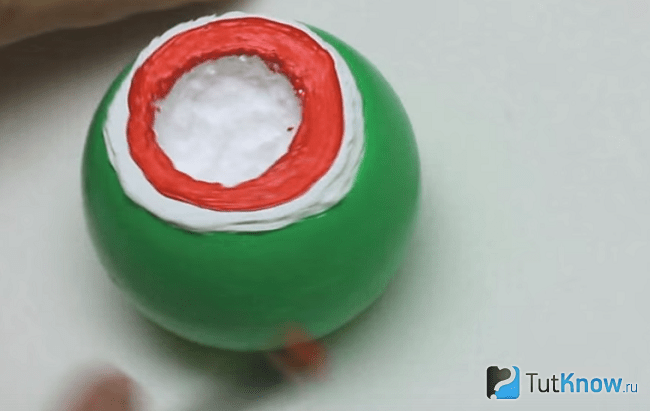
Place foam in front of you. Turn the blank over from the bottle, place it cut side down on this material, and draw a circle along these contours with a pencil. Cut it out, draw another circle inside, its diameter is equal to the diameter of the candle. Make this internal notch.

Pour expanded clay or other clay into a plastic bottle decorative stones, place a foam candle blank on top.
On the outside, paint the blank made from a plastic bottle, as well as from foam plastic, with white acrylic paint. Apply green on top of it, of course, when the previous layer has dried.
Cover the top of the white with red paint to create the pulp of the fruit.
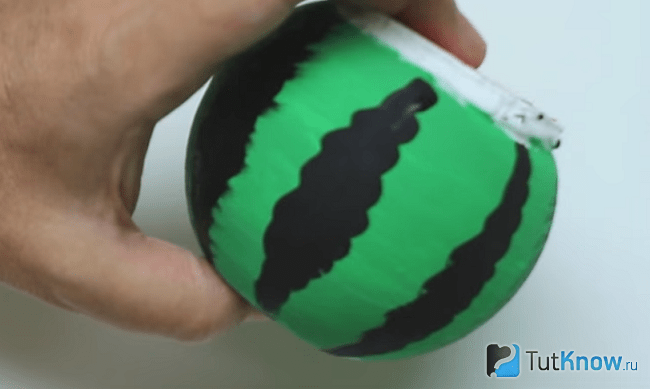
Now, on top of the dried green paint, you need to draw black stripes of the watermelon; they do not have to be straight, make them openwork.
All you have to do is put a candle inside, light the wick and you can indulge in romantic dreams by the fire.
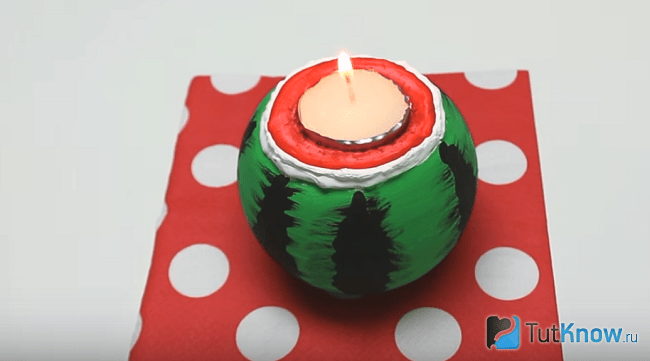
Here's how to make a candle at home from practically nothing.
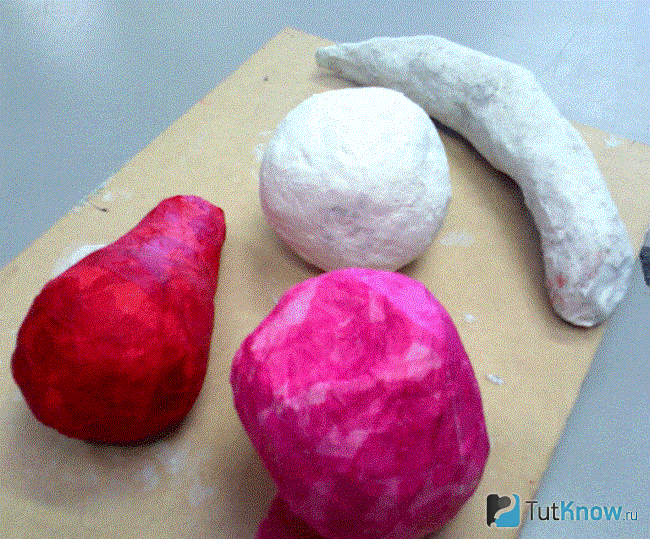
How to make vegetables and fruits: master class
We will make them from papier-mâché. To do this, take:
- newspapers;
- paste or PVA glue;
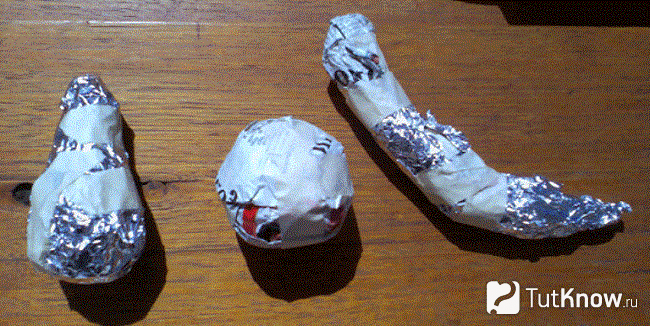
- foil;
- scotch;
- colored or corrugated paper, or tissue paper.
The next batch of newspaper sheets should also be kneaded well, then dipped in PVA or glue prepared with your own hands. To do this, you can mix flour or starch with water, put it on the fire, and bring to a boil with frequent stirring.
When this glue has cooled, you need to dip newspapers into it and distribute them over the surface of the foil fruit. Place the blanks on a tray and put them in a warm place, for example, under a radiator, to dry completely. Only then proceed to registration.
To do this, you need to generously grease colored, corrugated or tissue paper with paste or PVA, and paste these blanks over future fruits and vegetables.
Look what wonderful crafts will work out. Place them in a bowl. Place it on the table or nightstand for decoration.

There is another way that will tell you how to make fruits and vegetables with your own hands from papier-mâché.
- This requires real products. If you want to use them for food later, then use only natural paste made from flour or starch.
- Pour it into a bowl and place the torn pieces in it. paper napkin, remove the mixture with a spoon with holes, called a slotted spoon. Then the excess glue will drain.
- The paper composition must be applied to the selected object, for example, a banana, orange or apple. The layer should be sufficient. Then also put the crafts in a warm place.
- When they are dry, carefully cut the paper layer of each fruit in the middle to remove the two halves of the hardened papier-mâché mass. To give them integrity, connect them again by gluing the cut area.
- Further, such blanks are designed at your own discretion. You can cover them with colored paper or paint them.

If you want to make halves of an apple, then you do not need to glue 2 pieces of paper together; on the contrary, you need to fill them with a mixture of newspaper or napkins mixed with glue. When the pieces are dry, prime them with putty. After this mass has dried, it must be sanded and then covered with acrylic paints.
For this type of work you will need:
- paper napkins;
- fruits and vegetables;
- paste;
- Bowl;
- sandpaper;
- acrylic paints;
- brush.
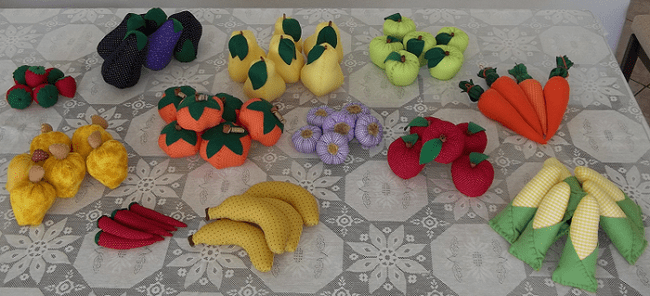
How to make artificial fruits and vegetables from fabric?
They can be voluminous or flat. Let's focus on the first option. If you were asked to bring toy fruits and vegetables to kindergarten, then you can sew them from leftover fabric.
Take:
- scraps of fabric;
- padding polyester;
- presented patterns;
- scissors;
- chalk or dry soap.
It consists of several slices, the following photo will tell you their pattern.
Based on this diagram, cut out 6 blanks; they need to be sewn into a single fabric. Stitch the second side of the last piece and the first side of the first. Fill the resulting bag with padding polyester, sew it on top, and tighten the thread. Sew up this hole, glue or attach tow on top with a thread and a needle.
You can also sew a banana from fabric.
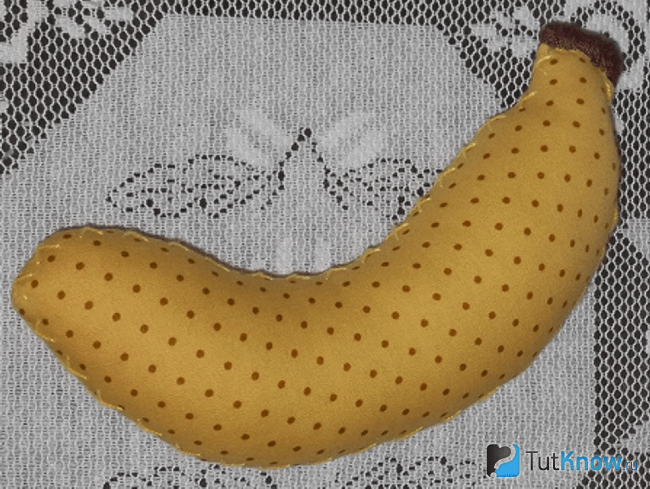
To do this you need to take:
- fabric of a suitable color;
- volumetric filler;
- threads with a needle.
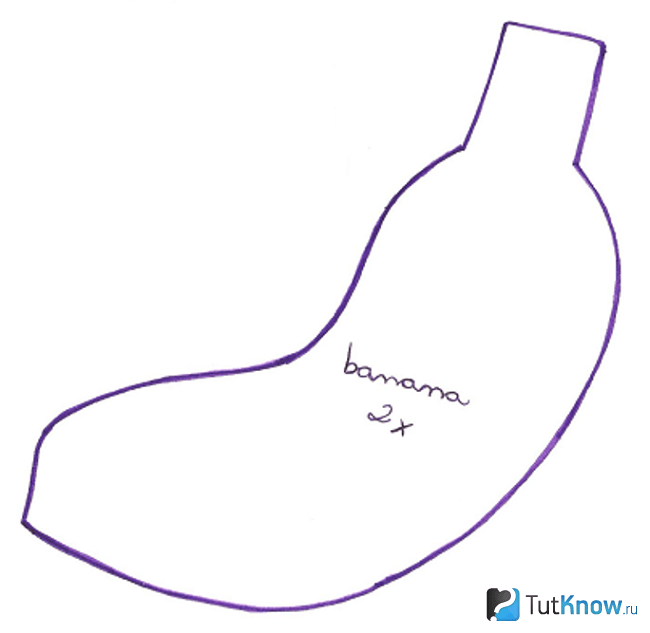
- Redraw the outlines of this fruit, attach this template to the yellow fabric, cut out two blanks.
- If you have a sewing machine and work skills, then sew both halves on it, leaving a small edge free on top.
- Through it you will stuff the banana with padding polyester. Cut a small rectangle from brown fabric, fold it in half like a ribbon, sew it here, closing this hole at the same time.
- If a sewing machine is not available, then you need to sweep both halves, using a seam over the edge. Even without this tool at hand, you can still make a banana.

Looking at such carrots bright color, I immediately remember summer and lift my spirits. Find fabric in a suitable color. As you can see, you can use not only plain orange, but also small white polka dots.

- Transfer this template to your chosen canvas. Connect the sides of this figure to form a cone. They can also be swept by machine or by hand.
- Fill this cone with padding polyester and sew greenery on top. To make it, cut out a circle from thick fabric of the same color. Using scissors, cut its edges almost to the middle. Lift them up, sew this part to the carrots.
- To give the greens the shape we need, tie them with thread.

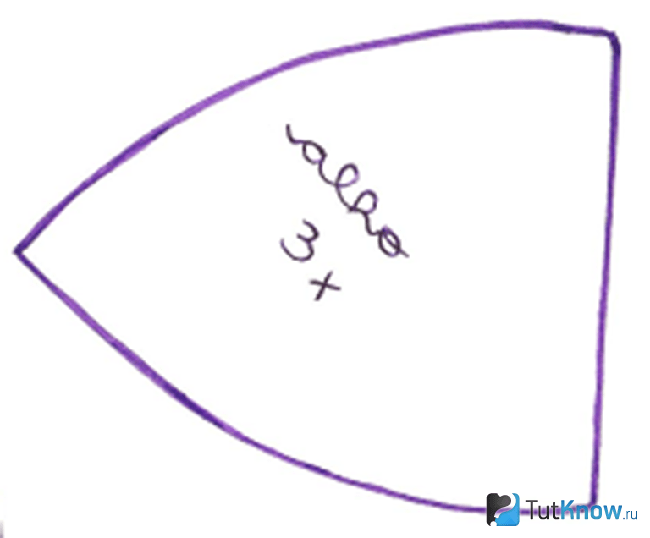
A pattern will also help you make this vegetable.

As you can see, the big part is the eggplant itself; you will need to cut out 5 identical ones. Small petal-shaped greens are a vegetable. Cut it out of fabric of this color. 5 identical wedges need to be sewn together to create a piece that looks like a cone. Through the top hole you will fill it with padding polyester and sew greenery here.
A pattern will also help you make quince.
The main part of this fruit is a large piece; you will need 3 of them, which need to be swept on the sides. You will make the quince tail from brown fabric, sewing 2 parts for this. Stuff the body of the fruit with padding polyester, sew a tail on top, covering the junction of these two elements.
Here's how to make a fabric apple. To do this, you need to cut out three identical parts and stitch them on the sides. Gather the resulting workpiece onto the thread and tighten.
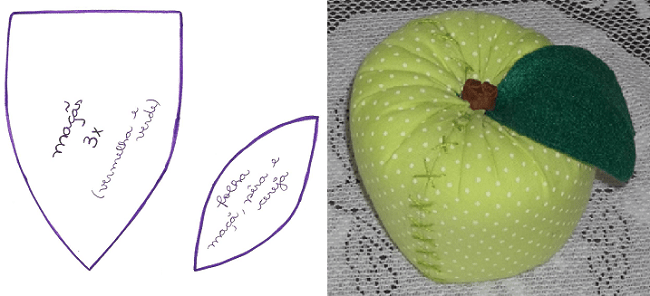
Cut out a leaf from a green drape or felt, a tail of a fruit from a brown one, attach these parts into place using a thread and a needle.
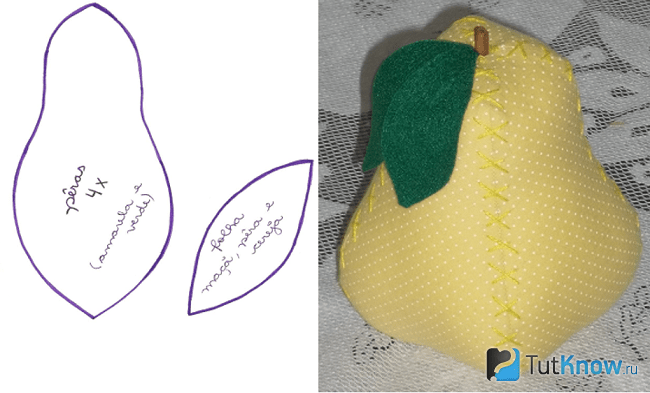
The pear consists of 4 blanks that need to be swept away. If you are doing this on your hands, use a cross stitch. To do this, first make parallel seams at an angle of 45°, then with an inclination in the other direction - seams perpendicular to them.
If you don't know how to make strawberries to add this berry to fruits and vegetables from fabric, then pay attention to the pattern.
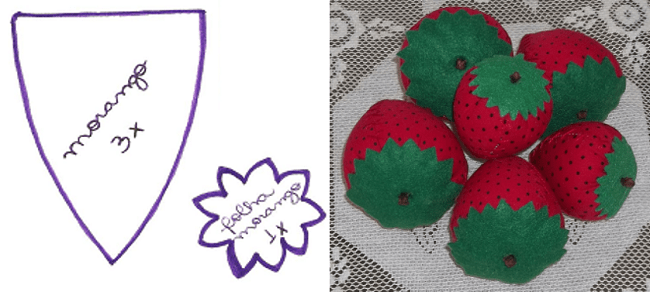
Three almost triangular-shaped parts, sewn into a single fabric, will become a berry, if you then fill this semi-finished product with synthetic padding, gather it at the top, and sew the greens of the berry here.
- The grape bunches are created in a very interesting way. From fabric suitable color cut out a triangle similar to the one you made for the carrots, but larger.
- Sew this piece on the side to create a wide cone. Fill it with padding polyester. Starting from the bottom, separate small pieces of fabric along with padding polyester, tie them with thread to make balls.
- Make these grapes all over the surface of the cone. Sew a green drape hat and a ponytail on top.

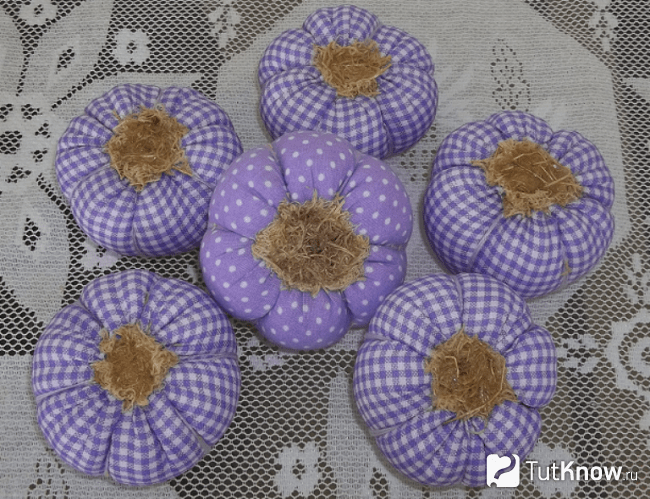
At the end you can add some spice by adding another vegetable. A pattern is also provided for it.
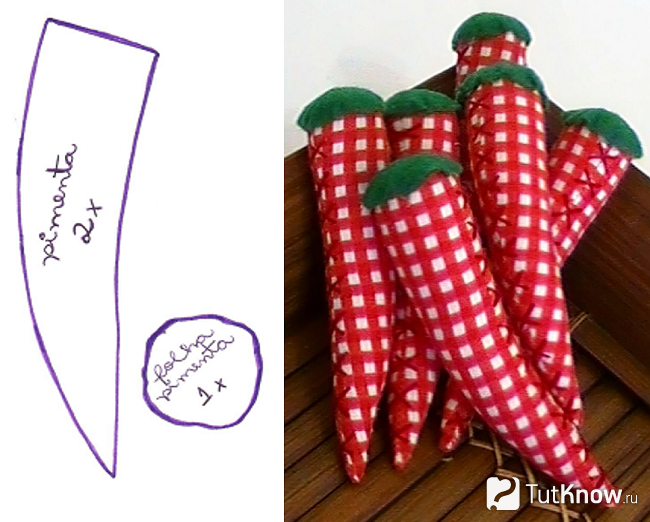
You can make hot peppers using a red cloth, plain or with fastenings. Cut out two identical acute-angled pieces and connect them at the sides using a seam. Fill with filler and cover the area with a green cap of fabric.
Here's how to make your own vegetables using scrap fabric, empty plastic bottles, old newspapers or paper towels.
We hope that you will be interested in seeing the process of making vegetables in the presented story.
How to make a sweet loved by many - lollipops - is described in the second video. You will create them from plastic bottles using interesting craft methods.
This fruit set will be a wonderful educational toy for your baby. But if you are already an “adult” and have long known all the fruits by heart, a bright paper still life will fill your room with summer freshness, adding a piquant sourness to the interior.
Ripe bananas, fragrant citrus fruits, juicy strawberries and honey watermelon are not all the fruits and berries that you and I will learn how to design today. Pustunchik has prepared many paper fruit templates for you, but making them is equally simple and quick.
All you need: white sheets, scissors and glue.
Print out color diagrams of fruits, cut them out and make curves along the dotted lines. Glue in the right places. Ready!


Let's take a closer look at the process of creating berries and bananas.

Look how delicious the berries, watermelon, lemon halves and kiwi look!

Strict geometric shapes pears and apples.

... And finally - a “family” photo =)

Have fun and be inspired to create!
Already from the very early childhood Your child has the opportunity to see a wide variety of fruits and berries, which means that he already begins to get acquainted with them. The child gradually remembers what this or that fruit looks like and the name of, then begins to determine the properties and qualities of fruits and berries.
In this article, the News Portal “site” has prepared for you several options for voluminous paper applications on the theme of Fruits and Berries.
By engaging in arts and crafts with your child, you will not only be able to instill in him Creative skills, but also introduce him even closer to fruits and berries. In the process of creating an application, you can tell your child about the benefits of a particular fruit, adding thematic songs, riddles, proverbs and sayings, rhymes and jokes.
Well, now, let’s move on directly to the master classes on making Fruits and Berries paper appliques.
Applique Apple
Applique Apple made of paper

Such a juicy and tasty fruit as an apple is loved by all children and adults. Dedicate one evening to creating such a voluminous bright Apple applique.
To make an applique you will need a sheet of cardboard, a set of colored paper, scissors, a glue stick and a regular pencil.

Cut a sheet of colored paper (in our case, bright red colored paper) in half. Fold the halves together and then in half. Draw the silhouette of half an apple with a pencil. Cut with scissors (see photo).

Now glue the resulting rounded halves to a sheet of cardboard, which will be the basis of our fruit appliqué.
From colored paper Brown cut out the spine and a leaf from green colored paper. Glue the parts.
From a sheet of white paper, cut out the core for the future apple and glue it. Draw the bones with a black marker.
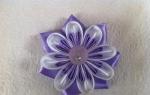
Strawberry applique
Strawberry applique

The principle of making this application is similar to the previous one. The only difference is to cut out the correct shape. This time the shape will resemble an oblong heart (see photo).


Decorate the finished applique with leaves (template included) and seeds drawn with a black marker.
Cherry applique

And another applique with the image of delicious cherries.


Having mastered this simple technique, you can make applique with your child of absolutely any fruit, berries and even vegetables. The main thing is to choose the right color and cut out the desired shape.