Fish do-it-yourself templates for technology. Gold fish. Paper applique with a highlighted outline. Paper snowflake stencils
Bright and nimble waterfowl attract all children, so they will definitely like the volumetric application "Fish in the Aquarium". But the fish themselves in this work are quite complex. Therefore, if the children are small, it is better to make simple colorful fish in a flat form. Also, you do not need to make a very small aquarium, since small fish in this technique are quite problematic to tinker, especially for children.
Materials for work
- White cardboard;
- Colored paper blue or blue, as well as green, red, pink, yellow;
- Glue stick, scissors, pencil, black marker.

Stages of creating a volumetric application "Fish in an aquarium"
How to make an aquarium out of paper?
Draw a round aquarium on a white piece of cardboard and cut it out. Do not make it very small, because small voluminous fish are very difficult to make.

Place the aquarium on the blue paper, circle it. And then draw a parallel inner line next to it, as the water should follow the outline of the aquarium, but be slightly smaller. Draw a wavy line at the top. Cut out the water.

Fill the aquarium with it, that is, glue the blue paper to the white cardboard blank.

What is an aquarium without algae? Cut simple, wavy stems out of green paper. Also, cut out circles of different sizes from white paper, which will be air bubbles.

Glue the details, now the aquarium is completely ready to receive its inhabitants. At this stage, kids can cut out very simple fish, but older children can be advised to make voluminous fish.

How to make a volumetric fish out of paper?
You will need a small square of paper. Its size depends on the size of the aquarium. Put your square in the created aquarium, does it look normal, does not occupy the entire area of the aquarium, will there fit two more fish, or at least one more? If the answer is yes, we continue to make the fish.

Fold the square in half, corner to corner, to make a triangle.


Open the doubled paper.

Where there is a sharper angle, make cuts, not reaching the edge by about a third. You should get 6 thin stripes.

Arm yourself with a glue stick and start folding the strips one on top of the other, securing them with glue. First, connect two strips, and glue at the intersection, then two more, well, the last two should converge on top. In the process, try not to lose sight of the tail, with the correct cross direction, it should be a fluffy bunch, and not just a layering.


At the last stage of creating a volumetric fish, draw one eye for it with a felt-tip pen, add strokes to the tail.

The green fish was an example, and for the aquarium I made three bright fish - pink, yellow and red.

It's time to put the fish in the aquarium by gluing them in the tail area. Here is such a nice application of a fish in an aquarium.

Optionally, you can glue a strip of white cardboard on the back so that the aquarium is, as it should be, upright.

The underwater world is always interesting for children, because its nature is so different from the nature of land. Sea plants, animals and fish attract babies with bright and unusual colors. In order to acquaint your child with marine life, we suggest that you make a craft from colored paper - the application "Fish in an aquarium". In this article you will find two options for a master class on this topic - for kids (they need help from adults) and for older children. And crumbs aged 1.5-2 years can be offered to make the simplest application in the form of an aquarium by making fish from.
Simple application "Aquarium"
1. Here's a piece of work we should get.
2. For its production we need: white and double-sided colored paper, gouache of two colors (yellow and blue), a sponge for dishes, glue, scissors, "running" eyes.

3. We paint with gouache and a sponge White list paper, visually dividing it into two unequal parts: yellow sand and blue sea.

4. Cut out the applique elements from colored paper:
- colorful fish (you can pre-make a template);
- brown corals;
- green algae;
- sea pebbles different shades of pink, red and brown.

5. Gradually glue all the details on the painted and dried sheet: first, algae and stones, then corals and fish, trying to evenly place it all on the sheet.

Is your child already familiar with where and how the fish live? What do they eat, what types are there? Not yet?! Then it's time to introduce your baby to the amazing underwater world... And to make the acquaintance not only informative, but also fascinating and extraordinary, we suggest you to make such bright and funny thematic children's crafts on the subject of Fish.
Craft Fish
Craft Paper Fish

You can make such colorful funny fish from double-sided colored paper with your own hands, accompanying the lesson with a fascinating story about the life of fish.
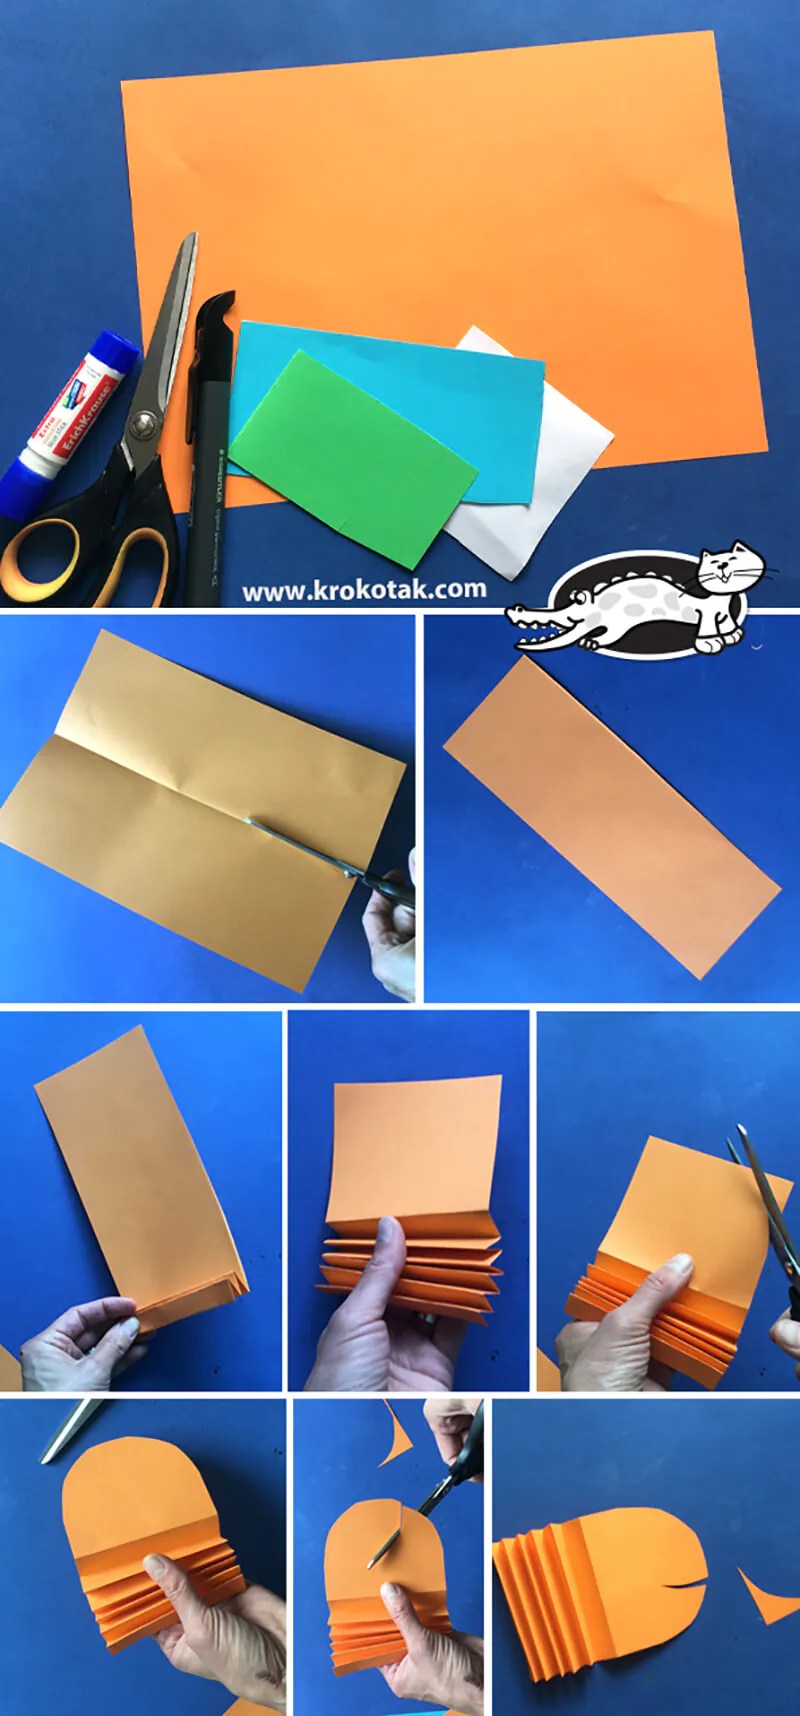
Cut a wide strip from a sheet of double-sided colored paper and fold it into a neat accordion. You should not fold the accordion until the very end, leave a small piece of a flat sheet, which you need to round off with scissors and cut out the mouth - this will be the head of the future fish.
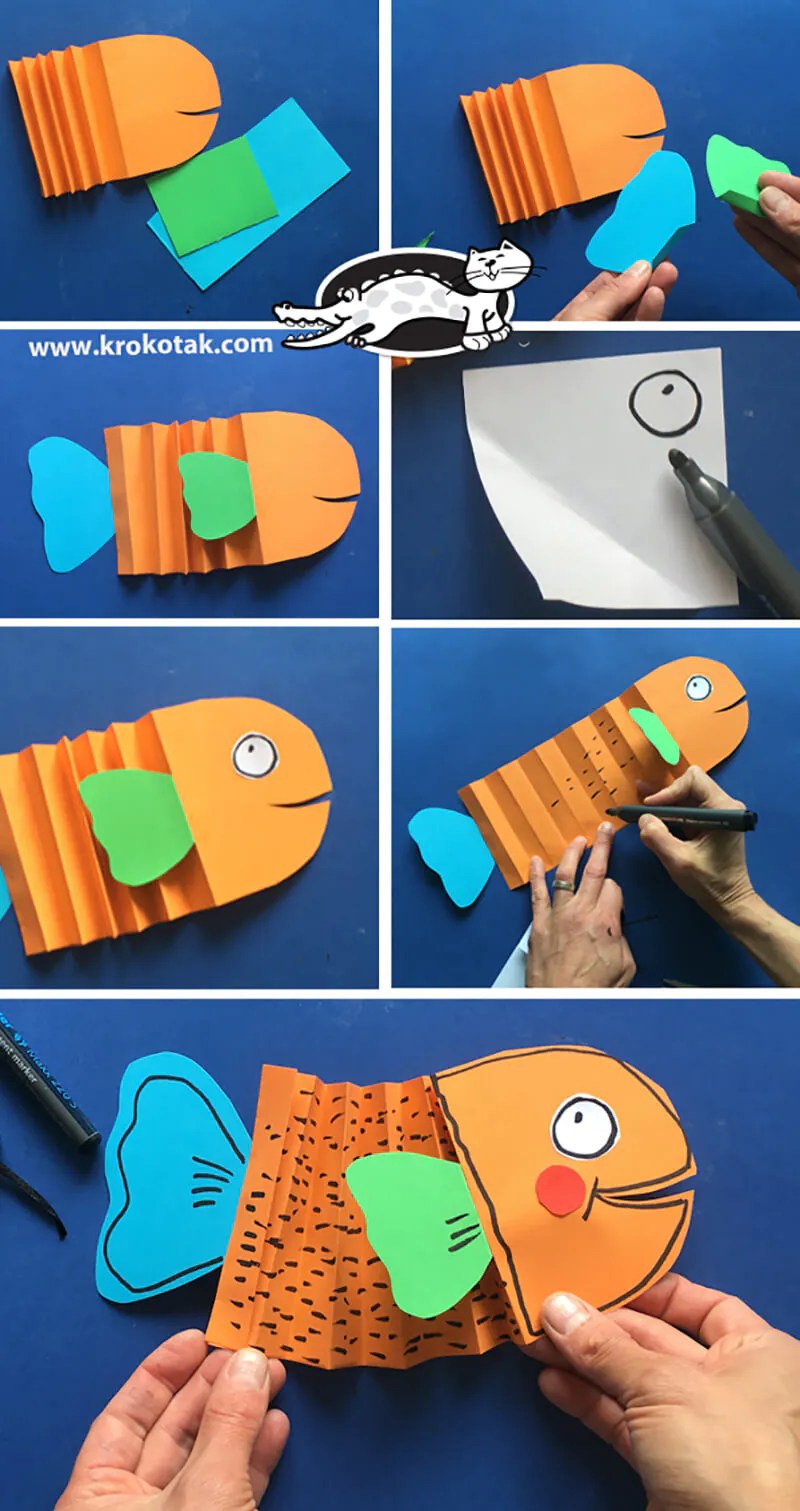
Cut out the fin and tail from paper of other colors, glue the finished parts to the fish.
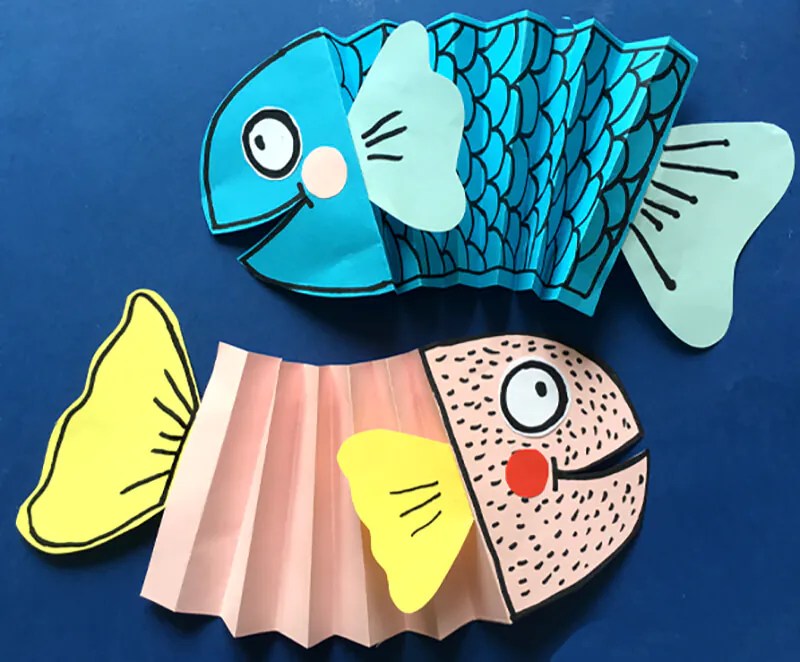
Draw a round eye on a separate piece of white paper, cut it out and glue it to the fish's head.
Video master class:
Paper fish
How to make paper fish
Panels Underwater World

Now we want to offer you an amazing craft that can become a real art object in your baby's nursery, or maybe an unusual gift for friends, teacher or kindergarten.
For the craft, you will need a large sheet of colored cardboard in blue or light blue. This will be the basis of the panel.
Using ready-made templates, make the inhabitants of the underwater world.

Print templates on colored paper, then cut and fold along the dotted lines. You should get: fish, crab, starfish. Glue the finished paper characters to a sheet of blue cardboard.

You can cut algae from green paper, and air bubbles from white paper.
Video master class:
How to make paper fish?
Origami fish from paper

This movable fish craft will be a great toy!

Fold the blank out of a sheet of colored paper following the instructions. Fix it with pencil glue.

The two sides of the resulting volumetric triangle must be cut into thin strips with scissors.

Cut out the tail and fins from paper of a different color. Glue to the craft.

Be sure to cut the round eyes out of white paper and glue them to the craft too.

From scraps of colored paper, cut out the lower part of the fish, which will be a movable mouth. And glue it too.
Video master class:
Paper fish
DIY Fish Craft

And finally, one more option for making paper fish. This method will especially appeal to girls, because with light movements of the hands, the finished fish can change color.
Cut out the silhouette of a fish from a sheet of colored paper (see photo).

Fold the workpiece in half and make horizontal cuts.
Expand the craft.

Video master class:
The underwater world is always interesting for children, because its nature is so different from the nature of land. Sea plants, animals and fish attract babies with bright and unusual colors. In order to acquaint your child with marine life, we suggest that you make a craft from colored paper - the application "Fish in an aquarium". In this article you will find two options for a master class on this topic - for kids (they need help from adults) and for older children. And crumbs aged 1.5-2 years can be offered to make the simplest application in the form of an aquarium by making fish from geometric shapes.
Simple application "Aquarium"
1. Here's a piece of work we should get.
2. For its production we need: white and double-sided colored paper, gouache of two colors (yellow and blue), a sponge for dishes, glue, scissors, "running" eyes.

3. Paint a white sheet of paper with gouache and a sponge, visually dividing it into two unequal parts: yellow sand and blue sea.

4. Cut out the applique elements from colored paper:
- colorful fish (you can pre-make a template);
- brown corals;
- green algae;
- sea pebbles in different shades of pink, red and brown.

5. Gradually glue all the details on the painted and dried sheet: first, algae and stones, then corals and fish, trying to evenly place it all on the sheet.

Application "Beautiful fish in a volumetric aquarium"


FISH stencils
Quote post MANUALFISH stencils


FISH TEMPLATES FOR DRAWING
Read it in its entirety into your quote book or community!
It would be nice to catch a goldfish. Make a lot of wishes and let everything come true. It is very difficult to single out the main thing. Well, if you don't catch it, then at least draw it.
In all the illustrations, the goldfish is a lush-tailed, rounded beauty with big intelligent eyes. But for a good cause, the form is not so important as the content. Therefore, templates will help you choose your fish, or maybe everything for a cozy night light, vase, candlestick, made with stained glass painting or in other techniques, draw with children, make an applique from colored paper or felt.
The printed template can be transferred to a solid object using a carbon copy. To get an image on a light fabric, you need to put the fabric on the drawing and circle it with a pencil. Reduce or enlarge the image on a copier, or set the size and print on the printer. Many people place paper or cloth on the monitor and copy pictures. A friend of mine copies pictures from the monitor directly onto T-shirts!
@ Home HAND-MADE
Part 1 - Stencils
Part 2 - Stencils-2
...
...
Part 30 - Patterns from Quaddles-Roost
Part 31 - MANDALA - round patterns
Part 32 - Deciduous ornament
Quote post by Tatiana_Kuranova Read it in its entirety into your quote book or community!
It would be nice to catch a goldfish. Make a lot of wishes and let everything come true. It is very difficult to single out the main thing. Well, if you don't catch it, then at least draw it.
In all the illustrations, the goldfish is a lush-tailed, rounded beauty with big intelligent eyes. But for a good cause, the form is not so important as the content. Therefore, templates will help you choose your fish, or maybe everything for a cozy night light, vase, candlestick, made with stained glass painting or in other techniques, draw with children, make an applique from colored paper or felt.
The printed template can be transferred to a solid object using a carbon copy. To get an image on a light fabric, you need to put the fabric on the drawing and circle it with a pencil. Reduce or enlarge the image on a copier, or set the size and print on the printer. Many people place paper or cloth on the monitor and copy pictures. A friend of mine copies pictures from the monitor directly onto T-shirts!
@ Home HAND-MADE
A series of messages "templates, stencils":Part 1 - Stencils
Part 2 - Stencils-2
...
Part 8 - Stencils "Trees"
Part 9 - Patterns for decorative plates
Part 10 - Patterns of fish for drawing
Part 11 - Drawings on children's clothes
Part 12 - Drawings for batik
...
Part 14 - Butterfly stencils for stained glass
Part 15 - Collection of butterflies for batik
Part 16 - Spot painting and stencils
Drawings stencils Fish.
Fishes


7.
8.


 Quote post by Dama_Madama Read it in its entirety into your quote book or community!
It would be nice to catch a goldfish. Make a lot of wishes and let everything come true. It is very difficult to single out the main thing. Well, if you don't catch it, then at least draw it.
In all the illustrations, the goldfish is a lush-tailed, rounded beauty with big intelligent eyes. But for a good cause, the form is not so important as the content. Therefore, templates will help you choose your fish, or maybe everything for a cozy night light, vase, candlestick, made with stained glass painting or in other techniques, draw with children, make an applique from colored paper or felt.
The printed template can be transferred to a solid object using a carbon copy. To get an image on a light fabric, you need to put the fabric on the drawing and circle it with a pencil. Reduce or enlarge the image on a copier, or set the size and print on the printer. Many people place paper or cloth on the monitor and copy pictures. A friend of mine copies pictures from the monitor directly onto T-shirts!
Quote post by Dama_Madama Read it in its entirety into your quote book or community!It would be nice to catch a goldfish. Make a lot of wishes and let everything come true. It is very difficult to single out the main thing. Well, if you don't catch it, then at least draw it.
In all the illustrations, the goldfish is a lush-tailed, rounded beauty with big intelligent eyes. But for a good cause, the form is not so important as the content. Therefore, templates will help you choose your fish, or maybe everything for a cozy night light, vase, candlestick, made with stained glass painting or in other techniques, draw with children, make an applique from colored paper or felt.
The printed template can be transferred to a solid object using a carbon copy. To get an image on a light fabric, you need to put the fabric on the drawing and circle it with a pencil. Reduce or enlarge the image on a copier, or set the size and print on the printer. Many people place paper or cloth on the monitor and copy pictures. A friend of mine copies pictures from the monitor directly onto T-shirts!
Fish for applications.
Quote post by galina_solovyova Read it in its entirety into your quote book or community!Fish for applications
I have accumulated a huge "aquarium" of these wonderful creatures, which I use for application. I love to work with this technique ..... 


It would be nice to catch a goldfish. Make a lot of wishes and let everything come true. It is very difficult to single out the main thing. Well, if you don't catch it, then at least draw it.
In all the illustrations, the goldfish is a lush-tailed, rounded beauty with big intelligent eyes. But for a good cause, the form is not so important as the content. Therefore, templates will help you choose your fish, or maybe everything for a cozy night light, vase, candlestick, made with stained glass painting or in other techniques, draw with children, make an applique from colored paper or felt.
The printed template can be transferred to a solid object using a carbon copy. To get an image on a light fabric, you need to put the fabric on the drawing and circle it with a pencil. Reduce or enlarge the image on a copier, or set the size and print on the printer. Many people place paper or cloth on the monitor and copy pictures. A friend of mine copies pictures from the monitor directly onto T-shirts!
>SALT PAST FISH
Quote post by besta-aks Read it in its entirety into your quote book or community!No, this is not a culinary recipe, so for those who like to eat delicious food here is clearly not a "fishy" place. But for those who want to create beauty with their own hands, this information may be suitable. Moreover, in this collection for clarity, the works of several masters are combined. Yes, what! See for yourself.

Master class from Master Dvatay
Coffee fish
3.
I roll such a pancake)) under the fish pattern. This is a photo from another fish, but not important for the process itself. 
4.
I cut it out according to the template. I am using a plastic knife from the plasticine kit. From the head flew as it is called))). If the edges are uneven - rough, go over them with a damp brush, everything will be smooth. 
5.
I draw a cup on the template. With a needle or thin awl I pierce the dough through the paper along the contour of the drawing. 
6.
With a knife I cut through the dough point by point. And I move the edges of the slot a little. 
7.
I tried this on a piece of dough. The edges can then be smoothed out with a damp brush. 
8.
She sculpted the second one right away. I experimented with fins. The parts are easily attached if moistened with water. 
9.
Unfortunately, I forgot about the camera further. And I remembered at this stage))) When our cup is cut through, we sculpt the eyes, add coffee beans, but so that they do not stick. And we send off to dry. 1 mm of dough dries for 1 day. The fish dried for 2 weeks.
I paint dried fish in Brown color... I paint over all the slots well. We emphasize them in white.
3.
painting: in places of deepening in a dark color 
4.
then blot with a lighter color and wipe with a washcloth 
5.
make one more color (light) and eyes 
8.
we assemble all the fish and mommy is ready 
9.
ANAID Financial Success Guarantee
3.
take any color (I have brown) and cover the entire surface 
4.
then wipe it with a washcloth and blot with a second color (I have silver) 
5.
paint on the eyes with light and the money fish is ready
Source stranamasterov.ru
Application from colored paper " gold fish". Master class with step by step photos.
Natalia Kuzmina, teacher primary grades MBOU Secondary School No. 23 of the village of the Newly established Stavropol Territory
Description:
A fish made of colored paper can be offered to be made to children 5 - 8 years old. The work can participate in the competition.
Target:
development of the ability to perform interesting work from colored paper.
Tasks
: teach to choose the right color range paper for applique; observe safety precautions when using scissors at work; develop imagination, fantasy, creativity; cultivate perseverance and accuracy while performing work.
Materials and tools necessary for making the applique: cardboard, colored paper, scissors, glue, pencil, templates, sample work.

My aquarium is huge
Like a home ocean
Modest flowing outside the window
Bubbles live fountain.
There in the aquarium, fish,
She has an underwater home
The fish moves flexibly
Waving a fan-tail.
This fish is not simple -
Her golden outfit
Shining brightly with a rainbow,
The look is mesmerizing.
Between the algae tender
Near the pebbles at the bottom
The fish swims slowly
And he lives for my joy.
(I. Konkov)

Guys, we all know "The Tale of the Goldfish" by A.S. Pushkin, where the fish fulfilled the wishes of the old woman. Today we will make a goldfish out of colored paper and maybe she can also fulfill your desire. We will use scissors to cut out parts, let's remember - safety precautions when working with scissors:
- Use scissors with rounded ends.
- Store the scissors in a certain place, put them with the closed sharp ends away from you.
- Pass the scissors in rings forward with closed blades.
- You cannot cut on the go.
- When working with scissors, it is necessary to monitor the movement and position of the blades during operation.
- Do not work with blunt scissors or with a loose hinge.
- Do not hold the scissors with the blade up.
Pick up colored paper for your application.
We need templates to work.

Execution of the application "Goldfish":
1. Take cardboard (white or blue).
2. Take the blue paper and cut out the body of the fish using the template. We will glue it to the cardboard.

3. Cut out the tail according to the pattern of red paper, glue it.

4. Cut the upper fin out of red paper and glue it.

5. Cut out the two lower fins according to the template and glue them.


6. Now we need to make scales for our fish. Cut out a piece for the scales according to a pattern from yellow paper.

7. Draw the scales with a simple pencil.

8. Cut out the scales in an arc. And drive them away.


9. Gently spread the glue and glue it on the fish. Let's peel off the scales.