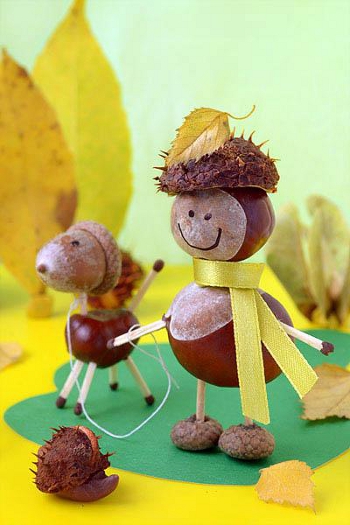
Crafts chestnut house. Crafts from chestnuts on the Autumn theme, made by children from kindergarten and school (master classes). “Mushroom picker with a dog” made from chestnuts, acorns and other natural materials
Good day! Today we will make crafts from chestnuts. Chestnuts are smooth small miracle! A great way to feel like a child again is to look for and fill your pockets full of chestnuts. Not for crafts, not to use them as counting material or to train accuracy by throwing them into a bucket. Chestnuts are needed just for joy.
We offer you a whole series of articles to help you on how to make crafts with your child from plasticine and, if something doesn’t suit you, then you will find more visual ones. And, of course, let's not forget about paper, from which there are a lot of beautiful ones.
Crafts made from natural materials. Crafts from chestnuts
You can make all kinds of people and animals from chestnuts. When making crafts from this natural material, you can use both the chestnuts themselves and their prickly peel. Here are just some examples of crafts made from chestnuts.
Bear made of chestnuts and plasticine

Cheburashka from chestnuts
When making this and other chestnut crafts, we recommend that you use glue gun. Be sure to teach your child how to use it and stay close to him.

Man and bull made of chestnuts and matches
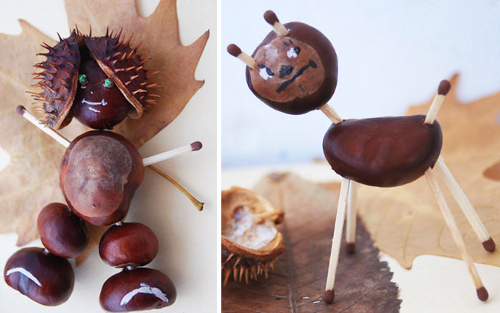
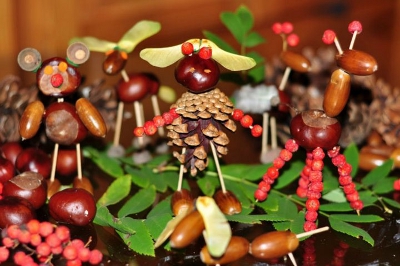
Boy with a dog made of chestnuts and acorns
DIY chestnut autumn crafts
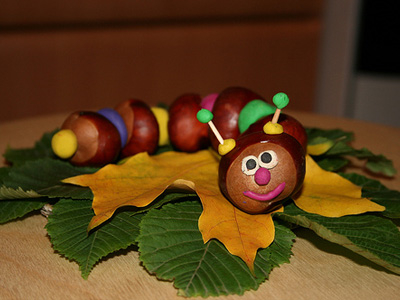
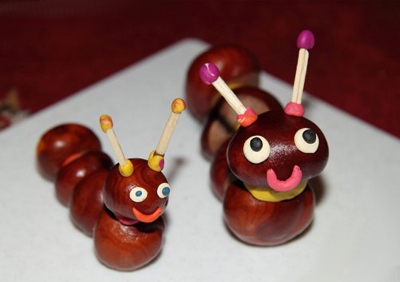
Caterpillar made of chestnuts and plasticine
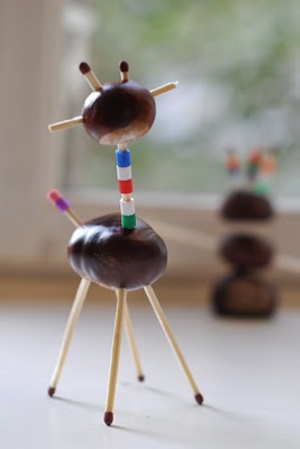
Horse made of chestnuts, matches and beads
To make this chestnut craft, you will need wooden beads and threads.

Using colored beads you can add color to your craft.
Decorate a chestnut craft for kindergarten You can also use rowan berries, both red and black. A natural replacement for beads and it looks no worse.
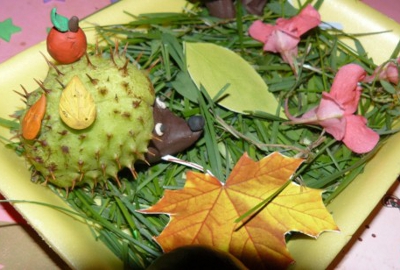
Cheerful hedgehog made from chestnut peel and plasticine
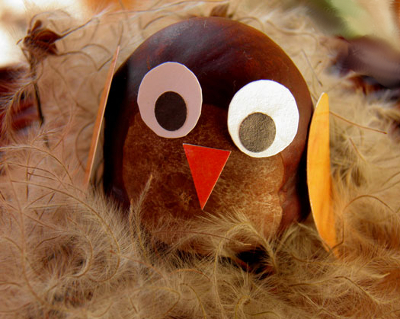
Chestnut owl
The birds' eyes are made from acorn caps; the beak, paws and wings are made of felt.

Here's another version of this autumn crafts from chestnuts with your own hands. Here all the details are made of colored cardboard. Here it’s up to you to choose.
Perhaps autumn is the most generous time of year for natural materials for children's crafts. Gifts of autumn crafts never cease to amaze us with their simplicity and charm. Look how many more interesting crafts You can make it from chestnuts with your child for kindergarten.
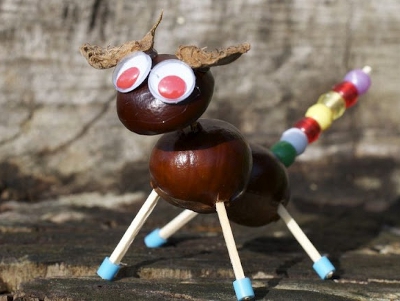
Serpent Gorynych made of chestnut and acorns

Snails made from chestnuts and plasticine
A very simple craft, so be sure to decorate the background beautifully. These can be leaves, twigs, mushrooms or fruits.

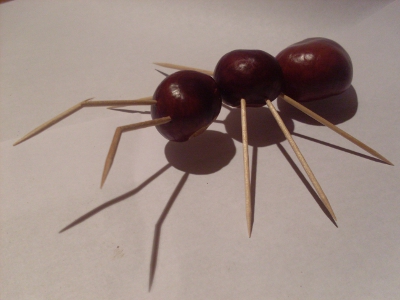
Ant made from chestnuts and toothpicks
First, holes are made for the paws with an awl, then prepared toothpicks are inserted.
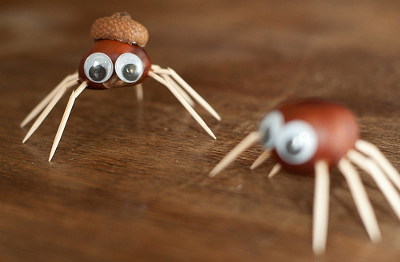
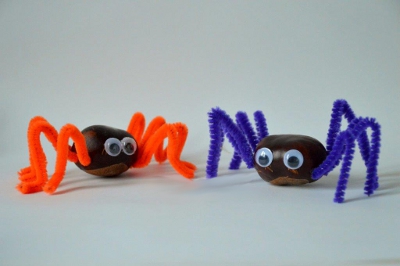
Chestnut spiders with acorn caps
The paws can be made from toothpicks or pieces of wire. First you need to make small holes in the chestnut with an awl. The paws are inserted into them. You can buy eyes, or you can cut them out of felt or cardboard.
Web of chestnuts and threads
Since we're talking about spiders, let's mention here another beautiful and easy-to-make chestnut craft - a web. To make this craft from natural material, you will also need thick yarn and twigs. This chestnut craft can serve as a wonderful autumn decoration your house.

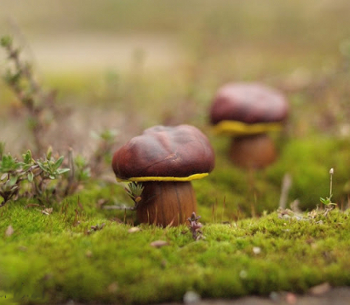
Mushrooms from chestnuts and acorns
The leg is made of an acorn, everything is connected with a piece of plasticine.
Flower made from chestnut and maple seed petals
The stem is made from a branch, the center of the flower is from chestnut, the petals are from maple seeds. Everything is held together with a glue gun.

Autumn crafts for children from chestnuts. Autumn games
If you attach multi-colored tails from chestnuts corrugated paper, then you can launch beautiful comets or rockets, whichever you like best.

All you need is a chestnut, a napkin cut into strips, scissors and glue.
1) Make a hole with scissors or an awl.
2) Cut several strips of tissue paper. Twist at one end and secure with glue.
3) Let dry and fun game and flying high!
With the beginning of the school year for parents of students junior classes The exciting game “do a craft for your child” begins. Topics for development creative thinking There are quite a few in the school curriculum, so concerned moms and dads are kept busy until May.
Moreover, a special highlight of this game is the suddenness of the start of the next round: at 9 pm the child remembers that tomorrow he needs to bring a craft from natural materials. It would be impossible to complete such a task if not for the all-knowing Internet, which kindly provides photos of chestnut crafts in response to such a request.

Ideas for chestnut crafts
The beauty of the chosen material is its availability - chestnut trees are much easier to find in parks and alleys than oak trees. In addition, chestnut does not require painstaking collecting, drying and other preparatory work. Here it is enough to find a tree, find about 10 chestnuts (with a reserve) on its branches or under it, and wash them at home and dry them with a towel.

To make a craft from chestnuts, in addition to the chestnuts themselves, you will need imagination and any available finishing tools. As a rule, chestnut nuts become part of a variety of animals or fairy-tale creatures.


Moreover, not only the seeds, but also their prickly shell can be used. Depending on what composition is being compiled, the types and quantities of auxiliary materials will differ.

Chestnut flora
The simplest DIY chestnut crafts, accessible even to kids, involve copying well-known objects. At the same time, it is important to take into account that the material is difficult to process, that is, it is better for it to remain in the composition. original form. Thus, representatives of the flora that can be copied using chestnuts usually include flowers and mushrooms.

To assemble such a craft, as a rule, the chestnuts and plasticine themselves are enough. The flower can be made both as a volumetric composition and as an applique.

For the most realistic simulation you will need:
- chestnut;
- tree branch (with several branches);
- maple seeds;
- dry leaves (herbarium);
- plasticine and glue.

The twig will be used as a stem. It can be glued to cardboard or placed in a tall glass to preserve the craft. Then, leaves are glued to the tips of the knots, and a chestnut is secured to the top of the branch with plasticine. It will play the role of the core of the flower, so you will need to make a plasticine ring around it.

Maple seeds (or colored cardboard cut in the shape of petals) are glued onto this ring. If you want to create a bouquet, you can use 2-3 chestnuts.

A chestnut mushroom is created using plasticine, which is used to form the stem. The finished mushroom can be painted or left in its natural form.

Chestnut fauna
Crafts made from chestnut, made for a child for school, can also depict a wide variety of animals. So, if you wish, you can create a spider, a caterpillar, a bird, a bear, a dog, a horse and many others.


Moreover, it is absolutely not necessary to decorate the product with any additional paints, because chestnut has a shade that is most often found in the color of animals.

Plasticine, colored cardboard, toothpicks or matches and glue are usually used as auxiliary materials when creating animals. In other words, a set of items that can be found in any home.

The master class on creating a chestnut spider, however, involves the presence of wire, but this component can be replaced with the same plasticine. In the classic version, to make a spider, it is enough to glue cardboard eyes on top of the nut, and pierce 8 holes along the bottom side. A wire is inserted (screwed) into the holes formed and bent at an angle of 45°, imitating spider legs.


It also doesn't take much effort to make a caterpillar. In the very simple version 10-12 chestnuts are laid out on cardboard covered with a layer of plasticine (4-5mm). Then an insect’s face is drawn on the first nut, and legs on all the others.

Wanting to create more volumetric version crafts, you can fix half of the chestnuts in plasticine on cardboard, and lift part of it by placing it on a wire or toothpick.

The hedgehog, made from all the ingredients of chestnut, looks original. To create it you need:
- Use plasticine to form an elongated hedgehog’s face on a chestnut nut;
- on the muzzle, use beads to indicate the eyes and nose;
- mold and glue the animal’s paws to the chestnut;
- cover the craft with a chestnut shell, the thorns of which will create a hedgehog effect;
- Glue apples or leaves cut out of cardboard on top of the shell.

The production of other animals from chestnuts follows the same pattern. The head (1 chestnut) and body (2 chestnuts) are made from nuts, and limbs, ears and tails are formed using plasticine or matches/toothpicks.

Photos of chestnut crafts


A wonderful summer has flashed by. The longest and most beloved holidays have come to an end - it’s time for the children to get ready for school and kindergarten. How it starts academic year? Will he be successful? We can only guess about this for now. One thing is certain - already in September, during labor lessons, children from 3 to 9 years old will create like real artists and a little bit like sculptors. They will make unusual crafts with their own hands from chestnuts, acorns, cones, leaves and plasticine. The most original works on the theme “Autumn” will traditionally take part in competitions, and soon their winners will receive long-awaited prizes. Your child can also be among the winners: look at our photos and videos with him - they will help you come up with your own original craft and surprise all your classmates.
We make crafts from chestnuts with our own hands on the theme of Autumn - Master class with photos
Chestnuts - ready construction material. Even a kid can make the cutest craft on the theme “Autumn” with his own hands (but not without your help). Ideas for such creations are often born spontaneously: for some, round chestnuts resemble the head of a future doll or a toy turtle; to others they appear to be the beads of a giantess. When going to the park with your child, take a cloth bag with you. Collect chestnuts, branches, colorful leaves in it - all this will be useful in your work.
How to make a Platypus from chestnuts - Photo of crafts on the theme Autumn
You can make various funny figures and crafts on the theme “Autumn” from chestnuts. Here they are:

The simplest animal that can be quickly created by adding a little plasticine to natural materials is the Australian Platypus. The work will take no more than half an hour, and the resulting cheerful animal will delight your child and you for a very long time.
To work you will need:
- Chestnuts;
- Brown, black and gray plasticine;
- Plastic knife;
- Plastic board for plasticine.
Platypus made of plasticine and chestnuts - Simple master class

When creating a Platypus from plasticine and chestnuts, start by making the animal's legs, tail and nose.

Crafts for kindergarten from chestnuts and plasticine - How to make them yourself: photos and videos
In kindergartens, teachers devote a lot of time to children's creativity. They make crafts with them, using not only traditional plasticine, but also natural materials, including chestnuts. Doing something new with your own hands is always incredibly interesting!
Craft from chestnuts and plasticine Pig - Master class

Thousands of crafts and souvenirs can be made from chestnuts, including the Pig from the popular game AngryBirds. The main thing here is to find light green plasticine.
So, before you start, prepare the following:
- Chestnuts (one for each craft);
- Lime, black, yellow and white plasticine;
- Plastic knife;
- Plastic board for plasticine.
- Start making some colorful crafts.

You can make a few more pigs in the same way. At the end of the work, you can cover the craft clear varnish- the product will not get dirty and will “live” for many years!
Crafts from chestnuts and acorns for school for a competition: master classes with step-by-step photos
Chestnuts and acorns can be wonderful materials for making crafts. Once you make them at home, you can always bring them to school for a competition. Well, winning it is as easy as shelling pears - carefully study the master classes, watch the videos and photos presented on our website.
Examples of crafts made from chestnuts and acorns - Photos and videos of making items for school for a competition
The most versatile natural material, suitable for creating a variety of crafts, always remains acorns and chestnuts. Over time, they do not deteriorate, dry out or rot, maintaining their natural appearance for many years. By combining chestnuts and acorns and joining them with plasticine, you can prepare many works for a school competition.
Mushrooms

Cats

Fairytale animals

Bouquets

Crafts from chestnuts and cones for the older group of kindergarten
IN senior group In kindergarten, children aged 5-6 years can already come up with original crafts themselves. Children are always interested in autumn themes, especially since the nature of September-October generously shares chestnuts, pine cones, and acorns with them. Preschoolers use them to make funny animals, unusual bouquets, panels, gifts for parents and beautiful installations.
What can a child of the senior group of kindergarten make from pine cones and chestnuts - Examples of crafts with photos
In the senior group of kindergarten, the child already knows how to handle plasticine and natural materials. Having started making crafts with their mother or teacher at the age of 3, by the age of 5-6, boys and girls themselves are happy to invite adults to participate in their creativity - to create wonderful animals, beetles, houses, people, robots from pine cones and chestnuts... In the photo you will see the most unusual creations of children.
Hedgehog family

Mushroom glade

Funny squirrel

Curious owls

Unusual crafts with chestnuts and leaves
Not only children are interested in crafts made from natural materials. Adults, especially people inclined to creativity, create the most unusual products. They make wonderful, unique gifts for a birthday or other occasion. Using autumn leaves and chestnuts, you can collect a large bouquet or make a topiary (mini-tree) that is fashionable today.

How to make topiary from chestnuts and leaves - Photos and videos of unusual crafts

To make a topiary, you should first prepare a flower pot with filler (gypsum, cement) instead of soil, glue, a trunk for the future tree (a thick branch), newspapers. You should start working with the base of the craft - a ball of crumpled newspaper, wrapped in thread and holding its shape well thanks to glue. It needs to be attached to the trunk and immersed in a pot filled with liquid gypsum. After the filler has dried, begin decorating your topiary with leaves and chestnuts.

Simple crafts with chestnuts for children 3 years old
Children 3 years old can already do the most simple crafts. Of course, parents should help them with this by telling the kids how to properly fasten chestnuts with plasticine and how to decorate the finished product. The easiest animals for three-year-olds to hatch are hedgehogs, kittens, bear cubs and other animals.

Examples of simple chestnut crafts for children over 3 years old
IN younger group Kindergarten teachers are already making the simplest crafts from plasticine with children aged 3-4 years. These can be giant caterpillars, birds, fish and mice. If a child ever asks you to explain to him how a simple chestnut can “turn” into a funny little man or mouse, show him examples of works made from natural materials.


September-October is the best time for walking with children. Be sure to go with your child to the park and forest: there you will find real treasures - natural materials for the future. unusual crafts from chestnuts, acorns, leaves and cones. Children begin to make such products on their own only at school. In kindergarten, teachers help children 3-5 years old to cope with this work. We are sure that photos and videos original crafts DIY projects on the theme “Autumn” posted on this page will give them many interesting ideas.
All last weekend, my children and I spent as much as possible outdoors. And the reason was chestnuts, which at that time were a dime a dozen underfoot. They became a serious reason to once again go for a walk in the nearest park and breathe fresh air, taking with you a larger basket.
Autumn can’t always please you with good weather, and you don’t always know what to do with your children and yourself on these long gray days and evenings. This is where crafts come to the rescue. And it is not at all necessary to buy any materials for this, because everything you need can literally be collected under the trees while walking or returning from work.
And most importantly, such creativity gives both you and your children many pleasant and joyful moments. The crafts that the child creates together with his parents will help him at various art events at school. For example, this Wednesday my son won the autumn exhibition.
Autumn crafts from chestnuts
Chestnuts are simply a great material for creativity! Handmade crafts made from chestnuts will fit perfectly into your interior or become a unique and creative gift.
Editorial "So simple!" I have prepared 23 bright ones for you chestnut craft ideas. Ideal for creativity with children!
- An interesting idea for decorating a Halloween party.


- You can make all kinds of people and animals from chestnuts. When making crafts from this natural material, both chestnuts themselves and their prickly peel are used.


- And for the interior of the house, making topiary from natural materials is truly a wonderful solution. This will especially appeal to lovers of eco-style in the interior.


- With help chestnut crafts you can create a fairy-tale world with your own heroes and adventures. Why not the beginning of an exciting and imagination-developing game for a child?

- And this is an idea for an adult. Using a drill, pliers and metal wire, you can create this kind of autumn interior decor for both your home and various establishments. For example, for a cafe or office.

- I am absolutely delighted with this adorable chestnut dragon!


- Or you can ask your child to dream up and create his own copy. You will need chestnuts, plasticine and toothpicks.
This test will help you understand what emotions your child is experiencing. You will find out how he perceives the close people who participate in his life - ask him to sculpt his dad and mom. The result will be a friendly and wonderful chestnut family.


- An excellent solution for a wreath on the door made of chestnuts and acorns.


- It is very easy to make legs for a toy animal from matches. You will need to make four small holes in the chestnut and insert matches there.


- Just look at these cute owls, no one will definitely refuse such crafts!


- And with the help of chestnuts you can create such a stylish candlestick for your home.

Useful tips
You can make various crafts from chestnuts, and they work especially well when using plasticine along with chestnuts.
In addition, there are other natural materials, together with which various compositions, insects and animals can be made from chestnut.
On our website you will also find:
Here are some of the most interesting chestnut crafts:
DIY chestnut crafts: snail

You will need:
Plasticine
Plastic knife.
1. Roll a “sausage” out of plasticine.
2. Cut the tip of the sausage in half with a plastic knife - these will be the snail horns.

3. Press down the rest of the sausage and place a chestnut on it - this will be the snail’s house.

4. Make eyes for the snail out of plasticine and attach them.

Crafts from acorns and chestnuts: mushroom
There are two ways to make a mushroom from acorns and chestnuts - a simpler one and a little more complicated.
Method 1.

You will need:
Plasticine.
1. Using plasticine, connect the acorn and chestnut as shown in the image.
2. Make several small “cakes” from plasticine and attach them to the cap of your mushroom to make a fly agaric.

3. Make a large green cake out of plasticine - this will be a clearing for the mushroom.
4. Place the mushroom in the clearing and you can decorate your work with a sprig of rowan and Christmas tree needles.
Method 2.

You will need:
Plasticine
Plastic knife or match.
1. Make a small cake and use a plastic knife or match to draw a small texture on it (make many small holes).
2. Attach the acorn to the plasticine and you're done.
You can make a clearing as in method 1.
DIY chestnut crafts for children: insects
Acorn caterpillar. Option 1.

You will need:
Chestnuts
Plasticine
1. Prepare several chestnuts of approximately the same size. Their number will depend on how long the track you want to make.
2. Use plasticine to connect all the chestnuts.
3. Mold the eyes, nose and mouth of the caterpillar from plasticine.
4. Take the largest chestnut tree and attach all the details of the caterpillar's face to its light part.
5. Attach the head to the caterpillar and attach the horns (matches).
How to make a caterpillar from acorns. Option 2.

You will need:
Chestnuts (preferably 1 large chestnut for the head)
Strong thread (line) and needle
Felt pen (for "face")
Toy eyes (optional)
Hammer
Pliers
A tin lid or small board (so you can drive a nail into the chestnut).

1. Use a hammer and nail to punch holes in your chestnuts.
2. Take a large chestnut, which will act as a face, and make a hole on the side (turning the light part of it on its side).

3. Now pass a strong thread or fishing line through all the chestnuts and tie a knot, both at the beginning and at the end.

4. Use a marker to draw eyes, a nose and a mouth on the large chestnut tree.

Crafts from chestnuts for kindergarten: chestnut spider

You will need:
One big chestnut
Plasticine
Super glue
Toothpicks
Acorn hats (optional).
The chestnut will be the body of your spider, and you need to attach toothpicks to it, which act as legs.
1. Prepare 8 toothpicks and break them in the middle.
2. Use super glue to secure the toothpicks to the chestnut as shown in the image.
If necessary, you can fix the spider's legs with plasticine.
3. Make spider eyes out of plasticine and attach them to the chestnut tree.

* You can also make eyes from acorn hats, inside which you need to attach small pieces of plasticine that will act as pupils.
* You can also use an acorn cap to make a headdress for a spider.
* Instead of toothpicks, you can use wire, which you can cover with a thin layer of plasticine.
Crafts from chestnuts for children: owl

You will need:
PVA glue, super glue or hot glue
Acorn caps
Felt-tip pen or plasticine (for the pupils).
1. Cut out the wings, legs and beak of an owl from felt and glue them to the chestnut.
2. Glue two acorn caps to the chestnut. You can insert a piece of plasticine into each hat to make a pupil, or simply draw eyes with a felt-tip pen.
Crafts from chestnuts on the theme "Autumn": beads

You will need:
Chestnuts
Colored beads
An awl or nail and a hammer.
1. Use an awl to make holes in each chestnut.
2. Start stringing the chestnuts onto the fishing line, inserting one colored bead between them. At the end, tie the fishing line in a knot.
Autumn crafts from chestnuts: God's eye (Ojo de Dios - Mexican craft)


