Do-it-yourself hydrangea. Do-it-yourself hydrangea from foamiran. Hydrangea from foamiran: a master class and step by step instructions
I really like artificial hydrangea flowers. It is noteworthy that the hydrangea blooms in hats, and in scrapbooking this flower is used as it is.


There are a great variety of them in online stores - a variety of colors and sizes.
I wanted to use them to make a wedding box, but due to circumstances, I couldn’t order them in advance. In our city, scrapbooking is known to a few, it is simply impossible to buy anything more or less suitable. In stores they began to sell some sets, hole punches - in a meager assortment and in a single copy and at an inflated price (alas, in our city they are used to selling everything with a wrapping 2-3 times more expensive than in other Siberian cities). And so I set myself on fire to make these wonderful flowers.
As they say, the eyes are afraid, the hands are doing. To begin with, I studied what hydrangea petals look like (see photos above).
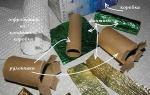
For work, we need: gelatinized fabric, stencil, pencil, thick paper, scissors, crochet hook (No. 0.9 ... 1.5), watercolor pencils, cosmetic sponge.
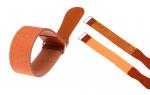
For hydrangea, we need a delicate thin fabric with a dense weave of threads, opaque. You can take silk - natural or artificial (white), I took a feather teak (light pink, blue), a wide satin ribbon (pink). The fabrics are completely different, but we will make the flower from teak, since it turned out to be stiffer and the veins are well drawn. The photo also contains pink and black organza. Flowers will not work from this fabric, since it is practically not embossable. This fabric is good because after impregnation with gelatin, it does not crumble. The satin ribbon doesn't fit well either.

I drew two types of stencil.
The first is two paired petals. This stencil gives volume, more like a real hydrangea flower.


The second is a flower.


After the blanks are cut out, we proceed to toning.
We take a watercolor pencil of a suitable shade and wet the lead. We apply strokes to the sponge.

Then we tint the core - first with yellow.

After yellow, we take a green pencil and mark the core of the flower.

Paired petals:

Examples of tinting (photo from the Internet):


When the flower dries, you can squeeze the veins. To do this, take a crochet hook (preferably with a plastic handle), heat it over the flame of a gas stove. Heating time - seconds 10-15.

We lay the flower blank on something soft (I use a thick clothing catalog, a white sheet of paper on top). With a hot hook, with its blunt side (where the bend is), we push through the veins.
The vein pattern is something like this:


Veins are ready:  After we have pushed through the veins, we proceed to emboss the edges of the petals. You can use the same heated hook or do it with your fingers. We look at the vein pattern and the shape of the petals in the photo of the flowers (above). I show on a paired petal:

Result:

It remains only to collect the flower. To do this, simply glue the petals with glue - I use a transparent universal Moment Gel. Leave until dry.
Whole flowers (blue flowers from teak, two dark pink from satin ribbon, white and pink from synthetic fabric):

You can then correct the tint of the flower - once again walk with a sponge. Ink pads can be used instead of watercolor pencils (if available). I do not recommend gouache or watercolors, as they must be diluted with water, and when wet on the fabric, stains are obtained.
As the core of the hydrangea, you can use semi-pearls, rhinestones, small roses, buttons with a threaded waxed cord, stamens, labels.

My example of using a homemade hydrangea:

Today we want to offer you a master class on making paper hydrangeas with your own hands using a template and a step-by-step description. These flowers are not so easy to make, but they are worth the time spent on them! Use the templates below to create your own hydrangea bouquet!
Tools and materials Time: 2 hours Difficulty: 3/10
- thick double-sided paper in white, blue, blue and olive;
- printed templates (presented at the end of the master class);
- scissors or cutting machine;
- watercolor paints and a brush;
- stylus or round pencil;
- floral wire;
- glue gun;
- green floral tape
- pliers.
Hydrangea made of paper is attractive and beautiful, so it is often used as a filler for bouquets or interior decoration.

Unlike real flowers, paper hydrangeas will decorate your home all year round! It is also a great gift for a loved one, which is sure to impress him.

Step by step master class
So, let's start working with paper.
Step 1: cut out the details
- Print transparent leaf and flower templates on paper of the appropriate color or color on white paper - it's up to you. One leaf with printed flowers will be enough to make one branch, but the final version will depend on how lush you want to make the flower.
- Using scissors or a cutting machine, carefully cut out the flowers and leaves.
If you decide to cut out the details with scissors, all the flowers and leaves will be slightly different in shape, which will give the hydrangea more realism and uniqueness.

Step 2: paint over the middle
With watercolor paint and a brush, paint over the middle of all the flowers. Let them dry.


Step 3: twist the petals
Using a stylus or a round pencil, twist all the petals up.


Step 4: cut the wire
Cut the floral wire into equal lengths in the amount of 15-20 pieces. Please note that the protruding part of the segments for stringing flowers on them should be 8 cm, and the rest of the wire length will be equal to the length of the stem.
Twist the wire into one bundle, leaving 8 cm gaps on each piece at the top. Wrap the rest of the wire bundle with green floral tape.

Step 5: Form the Stem
- Bend to the sides in an arcuate manner each piece of floral wire, forming a sphere from the top of the bundle.


Step 6: Glue the Flowers
Glue a flower to each curled end of the wire. Then glue the flowers in the gaps between the top flowers.


Step 7: Make the Leaves
- Use a pin to draw patterns on the leaves. Bend the leaves a little arc.
- Glue 3 leaves in a circle under the flowers on the wire.
- Wrap the entire length of the stem again with floral tape, fixing and securing the leaves.


Do-it-yourself paper hydrangea is ready! It remains to put it in a beautiful vase or wrap it with a ribbon and give it to a loved one.

If a foamiran flower falls, it will remain intact, will not wrinkle or break off, as if it were made of polymer clay. Foamiran flowers look good as decorations - brooches, earrings, hairpins and hoops. Also, stylists create accessories for the bride and groom or complement the bouquet of the young. Foamiran hydrangeas look original and will always find their consumer.
Foamiran is foam rubber that can remember the shape that was given to it when heated. Various flowers are often made from this material - daisies, poppies, hydrangeas.
Recently, hydrangeas have been quite popular; wedding tables are decorated with these flowers, various colorful hairpins or headbands are made.
The main advantages of the material are:
- The material does not fade under bright sunlight. The color remains the same saturated and colorful.
- Foamiran is a rather plastic material, but in order to give it a shape, you need to heat it.
- Foamiran flowers are not afraid of moisture or frost - their shape remains unchanged.
- Products do not bend or break if you accidentally press on them.
- The material is very light and hydrangeas or any other flowers in the form of decorations will not be felt on the head or clothes of their owner.
- Foamiran is a soft and pleasant to the touch material that many girls will like.

Foamiran hydrangeas have almost no drawbacks, but the disadvantages include the fact that the material is afraid of strong heat, so you should not dry the products on a battery or near an open fire.
Foamiran is a highly flammable material, so you need to be very careful when working and not allow products to be near the fire.
Hydrangea from foamiran: a flower pattern for needlework
Hydrangeas come in both juicy, bright colors and delicate pastels. The shape of the flower is very simple - 4 small petals and a core. In the finished inflorescence, small flowers look very beautiful.
The flower pattern includes the flower itself - how it should be in finished form, petals and leaves separately, and their number for future crafts. Hydrangea leaves may vary slightly in size, like a real flower. Also in the pattern, you need to take into account how to properly connect the buds, flowers, stems and leaves on the finished flower.

It should be remembered that the larger the pattern, the larger the flower will be. In the case of hydrangeas, do not make large flowers. Many small flowers, collected in a heap, will look beautiful and elegant.
Hydrangea patterns can be drawn by yourself, copied from a book or a needlework magazine.
In addition to leaves and a flower, you need to have stamens (you can buy them at any needlework store), wire and green teip tape.
It may be difficult for a beginner at first to create a pattern and decide on the required number of flower elements, but after making your first flower from foamiran, next time this will not be a problem.
We create a do-it-yourself foamiran hydrangea template
In order for the hydrangea flower to turn out as close to the present as possible, you need to have a good template. Thanks to the blank, you will cut flower details from foamiran. The flower pattern must be natural size. That is, if in your pattern of the finished flower the hydrangea petals are 1.5 cm x 4.5 cm, then each petal should be of this size.
You can prepare a template for a whole flower of four petals, or two petals, which will need to be combined with each other using a stamen.

On a thick sheet of cardboard, you need to draw the shape of the petals and leaves of the hydrangea. Cut out the piece. By applying a template to a sheet of foamiran, you can easily cut out the flower petals - they will be the same shape. If all the hydrangea petals are the same size, then the flower will look harmonious and natural. But do not worry if they are slightly different, because nature can create a flower that is not perfectly proportioned.
The more cut out details, the more magnificent your flower or bouquet will be.
You can cut hydrangea petals immediately on a sheet of material. Drawing on foamiran is not recommended, a pen or pencil can leave noticeable marks that are difficult to remove. It is better to cut out the hydrangea elements with a toothpick or a thin knife. This option is acceptable if you have already got your hand on cutting out flower details and they all turn out the same.
Hydrangea from foamiran: a master class and step by step instructions
Making hydrangea from foamiran is quite simple. The main thing is to have a good workpiece and quality materials to create a flower. Using the step-by-step instructions, you can easily create beautiful hydrangeas with your own hands.
So, what do we need to create a hydrangea:
- One sheet of foamiran for flowers and leaves;
- Mold "hydrangea";
- Color pastel;
- Super glue;
- Ready stamens;
- Green teip tape;
- Wire;
- Scissors;
- Iron.
Depending on what color hydrangea you want to get, we take a sheet of foamiran. If there is no colored material available, it can be replaced with white, which must then be tinted with colored pastels. Hydrangea from white foamiran, painted in purple pastel, looks very beautiful.

Getting started, you need to free up enough space on the table, where materials and ready-made flowers will be placed.
Step-by-step process of making hydrangeas from foamiran:
- Having templates for hydrangea leaves and petals on hand, we cut out a sufficient number of them. Of course, it is better to make a flower of 4 petals, so the process will go faster.
- To give shape or relief to a leaf or petal, you will need special devices - molds. We heat each element of the hydrangea on the iron (delicate mode "Silk") and put it on the mold. As a result, you should get flower petals with veins.
- To give the flower maximum realism, draw a pastel in the middle with a slightly lighter color than a foamiran sheet or darken the edges of the petals.
- We pass stamens through the middle of the flower. If you have two double petals, put them together and use an awl or needle to make a through hole. The stamens are attached to the petals with super glue. It is enough to drip on the middle of the petal, and the stamens will firmly stick together.
- To make a hydrangea inflorescence, we fasten 5-7 flowers together.
- Cooking green hydrangea leaves. According to the template, we cut out the leaves of the flower, warm it up and print it on the mold. While the foamiran is still warm, you can bend the leaf a little.
- We attach the wire to the reverse side with glue.
- We connect the wire with ready-made inflorescences and wrap the wire with green teip tape.
- Everything, a bouquet of hydrangeas from foamiran is ready!
Beautiful hydrangea from foamiran: do-it-yourself master class (video)
In fact, foamiran hydrangea is done quite quickly, and as a result you get a beautiful bouquet of flowers. It can be used as you like - small flowers are good for decorations, larger flowers are good for various decor. You can even lay out a three-dimensional picture. It all depends on your imagination!
Hydrangea is a flower that captivates with its grace and beauty. And in the summer, in the midst of the wedding season, these flowers can do a great job. Hydrangea flowers decorate the bride's bouquet, wedding tables, cars. They are perfect for decorating a wedding arch.
At first glance, it seems that making hydrangea out of paper is not easy, because. its large inflorescence balls consist of many small flowers. In fact, everything is different.
In order to collect the hydrangea inflorescence, you need to make 30 paper flowers and attach them to the wire. Each flower has four petals. After the flowers are ready, everything becomes simple. We connect the flowers together and tape the stem with teip tape.
Making hydrangea flowers takes a lot of time, but it's worth it.


Corrugated paper hydrangea master class.
This master class of hydrangeas is made from professional floristic corrugated paper. As a result of studying this master class, you will get a great hydrangea do it yourself. And then you can collect handmade hydrangea bouquet.
To create a hydrangea you will need:
1) corrugated paper (in the photo corrugation No. 566);
2) thermal gun;
3) floral wire;
4) scissors;
5) stationery knife;
6) teip tape;
8) beads;
9) brush;
10) chalk or colored pencils.

We cut the corrugated paper into squares measuring 4 x 4 cm.

Cut out petals from each square. On each square we cut out five petals.

From the prepared petals we collect a flower. We stitch the resulting flower with a thread.

Now cut off the excess corrugation under the petals. We do this so that the base of the flowers is not thick.

We take the floristic wire and cut it into four parts. Now glue the flowers to the wire with hot glue.

After the flowers are glued to the wire, we tape the stem with ap tape.

We take chalk and crush it with a knife.

Using a thin brush, we tint the heart of the flower with chalk powder.

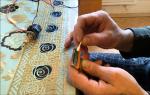
In the center of the flower we glue the bead on the hot glue.

We get flowers - blanks for hydrangeas. Gather them all together and tape them with tape.

These are the flowers you should get. Type of one flower for hydrangea.

After we collect the flowers in the inflorescence, we get such a hat.
Now we attach the sheet and our hydrangea is ready.

It takes three to five hours to make such a hydrangea eyelid. The more flowers you prepare, the larger and more magnificent the inflorescence will turn out.

A branch of hydrangea is perfect for decorating a bouquet of sweets.

Plastic suede, or foamiran, is a foamy material often used by decorators and florists to create attractive and sustainable products, including decorations and interior accessories. It is used by needlewomen to create artificial flowers that are indistinguishable from natural ones. The material is plastic, holds its shape well and is pleasant to the touch. In this master class, we will look at how to do it using the example of hydrangea. There are many options for using the resulting product. For example, for making a wedding bouquet, hairpins or brooches.
Materials for creating hydrangeas
Before you do, you need to prepare everything you need. You can purchase a scrapbooking kit, which includes thin plastic suede. It is not necessary to use natural tones to create a bouquet. If you show imagination and work out the details, the buds of any color will look natural. To create a hydrangea from foamiran, we will use a material 5 mm thick.
From the materials you will also need:
- transparent glue;
- iron;
- scissors;
- oil pastel;
- floral tape;
- wire;
- tassel;
- stamens.
Making petals for hydrangea flowers
You can cut hydrangea petals according to a template or cut a foamiran sheet into 2x2 cm squares and make free-form flowers out of them. If you use two blanks to create flowers - with two and four leaves, then the inflorescence will look more voluminous and more natural. The fact is that in nature a hydrangea flower usually looks like this: one petal at the top, then a couple of petals and one more at the bottom. Another option is a pair of petals on top and two on the bottom. Such flowers for hydrangeas from foamiran can be made if you want to get an inflorescence that is indistinguishable from the real one, but the process is too time-consuming. Therefore, it is easier to collect an inflorescence from flowers with four petals or from two paired petals. If you combine both types, you get an option that is very close to the real inflorescence.

Hydrangea from foamiran: tinted petals
We choose the shade of colors ourselves. In nature, the inflorescence of this shrub is most often blue, pink or white. If you take white foamiran for work, it is easy to tint it with oil pastels and give hydrangea flowers almost any shade. The color is applied to the petals on both sides. To make the bud more natural, apply several colors of oil pastels to each leaf. When using blue material, cover the middle of the flower with white pastel, drawing two thick lines crosswise along the petals, and then apply small strokes across them. We do this on all blanks, including on double leaves.
Drawing and re-coloring the petals
To apply the texture to the foamiran hydrangea, we will use a mold in the form of a sheet. If it is not there, you can make a mold with your own hands from polymer clay or take corrugated paper with a similar structure.
- We heat the details on the iron: we bring the petal to the tip of the sole and then apply it to the mold, making an imprint.
- Repeat on all petals on both sides, turning them over. We apply the structure to all blanks.
- Now we color the flowers again, but for this we use a green pastel. We tint the edges of the leaves with it.
- We apply purple pastel, covering completely all parts of the workpiece, except for the middle.
The coating makes the veins on the petals more visible and adds naturalness to the inflorescence. You can use dry pastel, applying and blending it with a brush.

Inflorescence assembly
When all the elements are painted over, in the center of each flower you need to make a hole for the stamen with an awl or a burner. After processing all the blanks, we begin to give them a shape, chopping off the petals several times and twisting them between the fingers. Then we straighten the flower, heat it on the iron and bend the edges of each petal, folding in half and stretching. There should be a sharp bend.

We begin to collect flowers: we apply transparent glue to the tip of the stamen and put on it one piece with four petals or two with a pair. You can make terry inflorescences. Then we fasten the finished flowers to each other, forming a bouquet. We fix it with wire. We cover the leg with corrugated paper or, if desired, leaves can be added to the composition. They are cut out of green foamiran and the structure is applied in the same way as on flower petals. To fix in a bouquet, a wire is glued to the underside of the leaves. Now the product is ready for use in floral arrangements or for creating jewelry.