"Mouse King" made of nylon and fabric. Master class (based on the cartoon "The Nutcracker"). Nutcracker - gift box Plasticine Nutcracker
Red hat, sad eyes and angular shapes: probably, we are all familiar with the funny Nutcracker - the hero of the New Year's fairy tale, so surprisingly kind and nostalgic, which we all associate with magic. To make such a toy that can decorate both a Christmas tree and a fireplace is possible not only for adults, but also for children.
rest assured: the presence of this grateful character on the Christmas tree is very important - the spirit of the holiday will instantly envelop the apartment. On top of that, such a Nutcracker can be presented to a loved one on New Year's Eve. What could be better than a handmade gift.
Master class on making toys
Nutcracker based on the box
It's easy to make a Nutcracker out of a box with your own hands. To work, you will need various materials. Experienced craftsmen cut the Nutcracker out of wood, children are happy to assemble a paper toy, older people will be happy to knit a fairy-tale hero, and if you have experience in needlework, you can easily contribute to the creation of a doll in the form of an interesting design solution.
First you need to figure out how to make a nutcracker with your own hands out of the box.
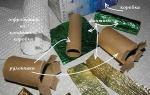
You will need the following materials:

Movable Nutcracker It can also be a great option for a Christmas tree. The option is more complex, but also more spectacular. Consider it in stages using the example of making a toy from a matchbox.
The angular hero with kind eyes and a noble heart is remembered by everyone who read the fairy tale about the Nutcracker, watched the cartoon or theatrical performances. A master class on making crafts will introduce children and adults to the classics and create a festive atmosphere.
You can make a Nutcracker with your own hands from different materials and using different techniques. If you are a master in a certain direction, then you can safely use your skills in practice to create an exclusive toy.
Can you crochet? Fine. Do you work with wood? Amazing. Do you want to make paper toys? Easy peasy. The main thing is to remember all the distinctive details that characterize the character. Crocheting a Nutcracker is a bit more difficult and will require some skill. We decided to make the Nutcracker out of felt.
Preparation of materials
Felt is easy to work with, and it also has a pleasant texture and gives off warmth, which is so lacking on cold winter evenings. A do-it-yourself felt toy, wherever it is, on the Christmas tree, under the Christmas tree, on the New Year's wreath, gives comfort to the house. It harmoniously looks next to the fireplace or with candles.
For work we need:
- felt - more red, a little white;
- leatherette - can be taken from an old bag or wallet;
- satin ribbon - narrow fit;
- matchboxes - 6 pcs;
- cotton pads;
- cocktail straws;
- feathers;
- skewers;
- sequins;
- acrylic paints;
- glue gun;
- white sheet of paper - landscape and notebook are suitable.
The working process
Matchboxes will be the basis of the figurine of our character. Therefore, we advise you to immediately decide on the size. To do this, decide where the finished toy will stand or hang.


If you plan to hang a handmade toy on a Christmas tree, then make a loop from a lace or thick thread. Our Nutcracker is completely ready.
Other ideas
The shape of the toy is quite simple, which allows you to come up with a lot of other ways to make the Nutcracker with your own hands. For example, you can use a small wooden block as a base. On it you can draw all the main details: face, uniform, headdress. Then buttons, ribbons are glued, and a champagne cork, cut in half lengthwise, acts as handles. A hairstyle can be made from paper twisted onto a regular pencil.


You can use paper as a material. First you need to draw and cut out the pattern of the toy, and then glue and paint everything. A crocheted or knitted Nutcracker will turn out to be a real soft doll that you can play with.
The fairy tale of Hoffmann about the wooden Nutcracker doll from the Christmas tree and the girl won many children's hearts. Making such a hero with your own hands is a great idea for creativity with children. In this master class with step by step photos, we will show you how to make a wooden Nutcracker with your own hands.
Craft for children from 5 years under the supervision of parents.
How to make a wooden Nutcracker with your own hands
For children's crafts "The Nutcracker" we need:
- base - wooden block;
- masking tape;
- acrylic paints (red, black, white);
- sewing accessories (braid, buttons, eyes, ribbons, etc., everything that is enough for imagination);
- champagne cork;
- White paper;
- black marker;
- hot gun;
- clove buttons.

Master class for children's crafts "The Nutcracker" with step by step photos:
1) We measure 5 cm from the top and glue it with tape in a circle, measure 13 cm from the bottom and also glue it with tape. We do this in order to paint the hat and tunic with a smooth edge, and leave the face intact.

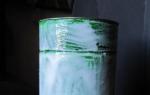
2) We paint with acrylic paints the smaller part in black, the rest in red. We do this with acrylic paints because they dry quickly and are non-toxic. You can replace it with any other paints, such as gouache, but dilute it with PVA glue, or use colors.

3) Remove the tape. And this is how it turns out.

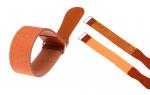
4) Next, we need to use a hot gun. Do not trust children to use a hot gun on their own, burns may occur. And so we need to glue all our fittings. For handles, we use a cork from champagne, after cutting it in half, we glue the half from the narrow ends of the bar. We take the buttons we like and glue them in the center in a row, these will be the buttons on the tunic. We will also decorate the headdress with a golden ribbon, fixing it on a hot gun.

5) Next, we need to make blanks for the hair. We take paper with a width equal to the narrow ends of the bar, about 5-6 cm long. We wind the paper onto a skewer, remove it and glue it along the black edging. It turns out the hair sticks out from under the hat. You can make two levels of curls, you can vary their number.

6) When everything is glued, draw a face. Eyes can be drawn or glued from sewing accessories (sold for 10p a pair). And we paint the cork handles in the color of the tunic.


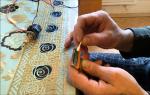
7) Having painted the face, we return again to the decor of the tunic. Let's make decorative green buttons. Carnation buttons will help us with this, they easily enter soft pine. If this craft is done with a child, then it is very interesting and fun for him to hammer such buttons with a hammer (BUT remember!!! This should be done only under the supervision of adults, in order to avoid childhood injuries).

The fairy tale of Hoffmann about the wooden Nutcracker doll from the Christmas tree and the girl won many children's hearts. Making such a hero with your own hands is a great idea for creativity with children. In this master class with step by step photos, we will show you how to make a wooden Nutcracker with your own hands.
Craft for children from 5 years under the supervision of parents.
See also: Robot: children's trash craft.
For children's crafts "The Nutcracker" we need:
- base - wooden block;
- masking tape;
- acrylic paints (red, black, white);
- sewing accessories (braid, buttons, eyes, ribbons, etc., everything that is enough for imagination);
- champagne cork;
- White paper;
- black marker;
- hot gun;
- clove buttons.

Master class for children's crafts "The Nutcracker" with step by step photos:
1) We measure 5 cm from the top and glue it with tape in a circle, measure 13 cm from the bottom and also glue it with tape. We do this in order to paint the hat and tunic with a smooth edge, and leave the face intact.

2) We paint with acrylic paints the smaller part in black, the rest in red. We do this with acrylic paints because they dry quickly and are non-toxic. You can replace it with any other paints, such as gouache, but dilute it with PVA glue, or use colors.

3) Remove the tape. And this is how it turns out.

4) Next, we need to use a hot gun. Do not trust children to use a hot gun on their own, burns may occur. And so we need to glue all our fittings. For handles, we use a cork from champagne, after cutting it in half, we glue the half from the narrow ends of the bar. We take the buttons we like and glue them in the center in a row, these will be the buttons on the tunic. We will also decorate the headdress with a golden ribbon, fixing it on a hot gun.

5) Next, we need to make blanks for the hair. We take paper with a width equal to the narrow ends of the bar, about 5-6 cm long. We wind the paper onto a skewer, remove it and glue it along the black edging. It turns out the hair sticks out from under the hat. You can make two levels of curls, you can vary their number.

6) When everything is glued, draw a face. Eyes can be drawn or glued from sewing accessories (sold for 10p a pair). And we paint the cork handles in the color of the tunic.


7) Having painted the face, we return again to the decor of the tunic. Let's make decorative green buttons. Carnation buttons will help us with this, they easily enter soft pine. If this craft is done with a child, then it is very interesting and fun for him to hammer such buttons with a hammer (BUT remember!!! This should be done only under the supervision of adults, in order to avoid childhood injuries).


See more ideas for creative crafts with kids.
8) And put the finishing touches. We finish the smell on the tunic, cuffs on the sleeves, hands on the ends.
And voila our nutcracker is ready!!!


Children are very fond of picking up various buttons, ribbons, ribbons, sequins, choosing a tunic design. And they are completely delighted with the hammer, you just need a little help, to make buttons!
The angular hero with kind eyes and a noble heart is remembered by everyone who read the fairy tale about the Nutcracker, watched the cartoon or theatrical performances. A master class on making crafts will introduce children and adults to the classics and create a festive atmosphere. You can make a Nutcracker with your own hands from different materials using different techniques. If you are a master in a certain direction, then you can safely use your skills in practice to create an exclusive toy. Can you crochet? Fine. Do you work with a tree? Amazing. Do you want to make paper toys? Easy peasy. The main thing is to remember all the distinctive details that characterize the character. Crocheting a Nutcracker is a bit more difficult and requires some skill. We decided to make the Nutcracker out of felt.
Preparation of materials
The felt is easy to work with, and it also has a pleasant texture and gives off warmth, which is so lacking on cold winter evenings. A do-it-yourself felt toy, wherever it is, on a Christmas tree, under a Christmas tree, on a New Year's wreath, gives comfort to the house. It harmoniously looks next to a fireplace or candles. For work, we need:
- felt - more red, a little white;
- leatherette - you can take an old bag or wallet;
- satin ribbon - narrow fit;
- matchboxes - 6 pcs;
- cotton pads;
- cocktail straws;
- feathers;
- skewers;
- sequins;
- acrylic paints;
- glue gun;
- white sheet of paper - landscape and notebook will do.
The working process
At the heart of the figures of our character will be matchboxes. Therefore, we advise you to immediately decide on the size. To do this, decide where the finished toy will stand or hang.


 If you plan to hang a handmade toy on a Christmas tree, then make a loop from a string or thick thread. Our Nutcracker is completely ready.
Other ideas
Comments
related posts:
DIY pom-pom toys, master class, how to make / DIY toys, patterns, video, MK
 How to make clouds from cotton wool with your own hands. Master Class. Video / DIY toys, patterns, video, MK