Parquet tinting with tinted varnish. Tinted varnish or stain - where are the stains from? Tinting varnishes on old paint
Hello dear visitors!
In this article, we want to tell you about tinted (tinted) varnishes and stains, the specifics of their application and common mistakes. Clients turn to us with a request to choose a varnish for the floor and walls, for tinting it in the chosen shade. In such a situation, we offer two ways:
1) Tinted the varnish and cover the floor or walls with it in two layers (the process is less laborious).
2) First go through 1-2 layers of tinted stain, then colorless varnish on top.
What is the difference, what to choose, to follow the simpler path - immediately tinted varnish or stain first, and then varnish? In fact, there is a difference and quite noticeable. It is more difficult to work with tinted varnish, first of all we are talking about solvent-based varnishes (pf, alkyd, alkyd-urethane, polyurethane ...). Tinting gives the varnish a certain color, but at the same time it remains translucent, respectively, you need to put the varnish on the surface in an even layer, otherwise there will be transitions and spots. When applied with a brush, in fact it turns out to be far from simple. Varnishes on solvents are more viscous, they don’t want to apply thinly, they need to be diluted with a solvent, but the proportion must be observed, otherwise the varnish will greatly lose strength. Plus, the most unpleasant moment, continuing to paint the surface, you will apply fresh varnish on a slightly dried one and here you get a strip of more intense color, the varnish does not want to be smeared as it should, the upper fresh and lower layers seem to be connected. For this reason, we do not recommend beginners to take on solvent-based colored varnish. With water (acrylic) varnishes, the situation is much simpler, they are easier to apply and stretch, give a lot of time to work with them. In terms of ease of application, they are close to stains, if we tint varnish, then water-based!
Second option- applying stain, then varnish, the process is much more laborious, but the result is worth the cost. The stain is easy to apply, thinner, absorbs better and emphasizes the texture of the wood, that is, when applied, the color looks more natural. And if you wipe the damp stain with a rag while still, the result will exceed all expectations, the color will become, as it were, natural. The tree in its composition has hard and soft fibers, where the wood is harder, the stain is absorbed less, where it is softer more, here the color will be more intense. By wiping with a rag, you emphasize this contrast even more, the color becomes softer and more natural. The pros cover an ordinary Christmas tree in this way and make real expensive breeds (oak, teak, beech, mahogany, walnut, etc.) out of it in color, you can’t tell it apart. But if you pass only with a brush, the result will be slightly different, it will be seen that the surface is painted. Then, when the stain is completely dry, it is advisable, especially when the composition is water-based, to go through the wood with sandpaper, approximately number 180 - 240, this will remove the villi that have stood upright, they are almost invisible, but believe me, if you don’t do this, the color (under varnish) it will look worse. Then two layers of varnish, on any basis, the varnish is colorless, it will not create problems in application, even if you stretch it somewhere badly with a brush, it will practically not be noticeable, it is also convenient to apply a colorless varnish with an airbrush.
We hope this article was useful to you, but if you have any questions, write or call, we will be happy to advise you.
To restore the boards to their original color, renew their appearance and preserve the texture of the wood, the parquet is tinted. There are several options for implementing such a procedure and oil, varnish and stain are more often used. Tinting procedures are simple and you can carry them out yourself.
How to tint parquet?
Updating the coating has a number of advantages: the floor becomes more attractive, minor defects can be masked, and the overall design of the room can also be diversified. Toning, parquet scraping and other similar procedures can be carried out independently, taking into account the basic rules:
- The procedure for giving the desired color to the coating should be carried out at the last stage of construction work, that is, after finishing the walls and ceiling.
- First, pre-treatment is carried out and it is best to contact specialists for this.
- The result of tinting will depend on the material from which the parquet is made.
Oil tinting of parquet
It is a universal substance that gives the parquet a new look. After its application, it will be possible to rub the floor only with special impregnations. Tinted parquet oil can be with wax, one- or two-component. Before using such a tool, you need to make sure that it does not damage the wood. One-component oil is applied in several layers, and the other two options can cover the floor once. The process of tinting parquet is as follows:
- Apply a coat of primer oil to the surface first to improve performance.
- When it dries, the main layer of oil is applied, which should be thick. It is important to move the brush in the direction of the fibers.
- The floor will dry for exactly one day. If after that the color seemed too light, then you can apply another layer.

Parquet tinting varnish
To change the color of the floor, you can use it, which does not penetrate the wood, but creates a film on top. If you want to make the shade more saturated, then you need to apply several layers. It is important to keep in mind that the tinting varnish for parquet is short-lived and after a while it will begin to wear off and crack. The scheme for applying varnish is identical to the instructions presented for oil. After tinting, a layer of colorless varnish should be applied on top.

Toning old parquet
If the coating is already old, then it is recommended to first carry out grinding (sanding). The process is time-consuming and it is better to entrust it to specialists who have the necessary equipment. Parquet scraping with toning is carried out in several stages:
- First, the surface is ground with a coarse, granular abrasive. This removes the old coating layer and existing irregularities.
- To smooth out minor irregularities, medium-grain sandpaper is used.
- To remove traces of previous processing, a fine-grained abrasive is used.
- After that putty is applied - a special resin mixed with wood dust formed during grinding.
- After drying, another grinding is carried out with a fine abrasive. Then a primer is applied, which is selected for the type of wood.
- At the next stage, varnishing and interlayer final grinding are carried out. After removing the dust, the necessary layers of varnish are applied.
Is herringbone parquet tinted?
You can update any parquet and the one that is laid with a herringbone. The methods described above are suitable for tinting, and you can also use stain, which penetrates into the pores of the tree, like oil. It is not suitable for large rooms, as it is absorbed unevenly and the surface may turn out to be spotty. Toning parquet made of beech and other types of wood is carried out as follows:
- It is better to use a roller, which, after wetting, should not be wet, but only damp.
- Distribute the stain evenly over the surface. To avoid stripes, apply the first layer perpendicular to the parquet, and the second - along.
- To get a good result, you need three layers, so the first two should dry for three days, and the last one for at least a week. After that, you can open the floor with varnish.

Parquet tinting - colors
There are several popular color schemes for flooring, which must be selected based on the chosen style of the room. When choosing a color, it is recommended to test it on a part of the parquet flooring to make sure that the shade is suitable.
- White tinted parquet is popular because it is suitable for many design styles. Such a floor will visually enlarge the room.
- If you choose black or another dark color for tinting, then it is important to consider that scratches will be very noticeable on such a coating and the ceiling with walls should be light. Dark shades are best chosen for old parquet to hide existing flaws.
- Toning the parquet in red will give the room comfort and warmth.
- Brown is suitable for almost any design.
- Bright shades should be chosen carefully and only for modern design styles.
Pigment stains are the least sensitive to the chemical composition of the finishing layer applied over them. Almost any finish can be applied to the dried stain, such as oil or water varnish for wood finishing, tinted water or oil stain. The stain must be completely dry before applying the varnish. The drying speed is affected by temperature, as well as the humidity of the surrounding air and the wood itself, so you should not pay special attention to the instructions on the can. Use your nose: if you smell solvent, then the stain has not dried yet. Dyes are more capricious. If you apply a varnish containing the same solvent with a brush or swab, you can leave streaks and partially mix the dye with the varnish. Sometimes this can achieve greater color depth, but more often the quality of the coating is reduced. With the proper equipment, it is best to apply the varnish by spraying to avoid problems.
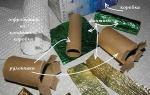
Dyes, pigments and methods for obtaining the desired color
You put together another project and carefully sanded all the surfaces. A can of varnish is already there, but this time you do not want the wood to have its usual color. You want this item to match the old decor of your living room or be indistinguishable from expensive furniture sold in interior salons. However, perhaps you just need to color-match the different boards from which the project is made, imitate exotic species, or make the texture of wood more expressive and its usual color richer. If you are facing one of these tasks, it's time to start toning.
Toning is based on two types of colorants - pigments and dyes. We'll help you choose the right tool for your project and show you how to work with it.
How to choose one option from many possible
What type of dye do you prefer? You have a wide choice (photo below). The decision depends on what kind of wood you use, what kind of look you want to give it, and what kind of coating will be applied at the final stage of finishing.
For regular toning, use pigment stain or dyes. These dyes work in different ways. (photo below), and the results of their work will differ, as can be seen in the above photographs. Pigment stains are sold in paint shops, and dyes can be found in specialized stores or ordered from catalogs.

Pigment stains unevenly stain wood with areas of varying density, such as maple, birch, cherry or pine. Dyes penetrate deep into the surface, regardless of the density of the wood. After choosing the desired shade, remember that all dyes fade over time. Pigment stains retain their color the longest. Among the dyes, the most resistant are water-soluble, and oil or alcohol solutions of dyes fade rather quickly. Do not use dyes for tinting if the wood will be exposed to sunlight - in such conditions they fade very quickly.
Ease of application
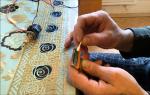
The technique of tinting with pigment stains and dyes is almost the same. Test it out on a trial cut, then generously apply the coloring compound to the surface of your product and wipe off the excess to even out the color.
Then let the surface dry completely, then wipe it again to remove the plaque that forms in some places. Remember that the color of the surface changes when the composition dries, and then changes again when applying a clear varnish (photo bottom left). Dyes for wood tinting can be purchased as a ready-made solution or dry powder. Thoroughly dissolve the powdered dye and strain the finished solution (photo bottom right). Typically, the color of wood stained with dyes does not change with an increase in the number of layers of the coloring composition. It becomes darker, but remains transparent. Each new layer of pigment stain further darkens the surface color and reduces transparency.

Possible defects and their elimination
Although tinting is considered a simple operation, problems sometimes arise. But many of them can be avoided if you know what can happen.
Raising the pile. The main disadvantage of aqueous compounds is that they raise the pile on the wood. You should be prepared for this, and it is better to lift the pile in advance and carefully remove it. (photo bottom left) and then start toning.
wood color difference. Even a good board sometimes has areas and stripes of different colors, and most coloring compounds cannot hide this difference. Working with such boards is shown in photo on the rightat the bottom.Spotting. The wood of some species is stained unevenly. By pre-treating the surface with conditioner, you can achieve a more uniform toning.


On the next page (photo below) examples of such processing are shown. Darkening of the ends. The end surfaces absorb more stain than the rest of the board. To reduce color differences, sand the ends one step finer than the rest of the surfaces. Then treat them with conditioner. Tinting with dyes instead of pigment stains also helps to reduce the difference in surface color without resorting to the use of a conditioner.

Color mismatch. Sometimes the color of painted wood is different from what you expected. If the shade matches your plans, but it is too light, apply another layer of the same coloring composition. If the resulting shade is not as desired, it can be covered with a darker stain.
If the color is too dark and the surface is not yet dry, it can be lightened slightly by wiping with a suitable solvent. Water stains are washed off with water, and for oil stains you need to use white spirit.
If the water stain is already dry, you can partially remove it with an ox and re-tint the surface. Dried oil stain can often be removed with organic solvents for varnishes and enamels. If this is not enough, use a wash, then lighten the remaining stains with bleach, and then proceed to tint again.
It is possible to slightly lighten the painted surface by wiping it gently with a suitable solvent, but care must be taken to keep the shade even and to avoid spots and streaks.
Variations on a theme

We have focused your attention on pigment stains and dyes, but there are five more products that can be used to tone wood. In some cases, it is better to prefer combined coloring compositions containing pigments and dyes, colored oil-lacquer mixtures, gel stain, universal finishing compositions or the so-called "lint-free" stains (that is, stains that do not cause lint to rise). The most convenient to use are combined coloring compositions. (photo above). However, in some situations, gel stain can achieve better results. (photo below).

Colored oil-lacquer mixtures, which include the so-called "Danish" oil, contain oil, varnish, thinner and colorants. Such compositions are easy to apply, penetrate deeper into the wood and, thanks to a moderately resistant binder, can serve as an independent finishing agent.
Universal finishing compositions, used as a final finishing layer, contain a varnish (for example, polyurethane) with coloring agents. The thinner for such compositions is white spirit or ox, and the coloring matter is a dye or pigment. With their help, the finishing coating is applied simultaneously with toning. They practically do not penetrate deep into the wood and are similar in properties to paints. Because of their fast drying time, they require some skill to apply evenly in a thin layer. Additional layers darken the color and make it less transparent. When applied with a brush, it is difficult to avoid overlapping areas that will stand out as dark spots. As a rule, the use of such compositions in the finishing in the workshop should be avoided.
"lint-free" wave-based stains can be thinned with alcohol or varnish thinner, and oil-based finishes can be used over them. They dry out too quickly, making them less comfortable than regular water stains, and most hobby carpenters do just fine without them.
Expand your color palette
Most carpenters buy ready-made compounds for tinting wood, the standard range of which is available in many stores. But if you want to go beyond the usual colors or just want to experiment, learn how to change these colors to your liking. One way is to mix standard colors, but first you need to make sure that the mixes are compatible. They must use the same solvent.
Much more possibilities are provided by the addition of primary colors to finished compositions or by applying them directly to the surface of the wood. Use artistic oil paints or so-called Japanese paints if stain and oil-based varnish will be applied afterwards. If the product is covered with stain and water-based varnish, you can use acrylic paints diluted with an aqueous solution of glue. Such paints are sold in art salons and art stores.
The color wheel will tell you how to get the desired color. The most famous color wheels show how to use red, yellow and blue paints to get all the other colors.
Nevertheless, restrained shades of the so-called "earthy" range traditionally dominate in the decoration of furniture. (see photo below). Various combinations of natural and burnt umber, sienna, ocher, black and white pigments give a rich palette of beautiful shades that are used in furniture making. Experiment on scraps and, having achieved the desired result, do not forget to write down the recipe.

If you want to achieve a special shade, use the available options that most carpenters are not even aware of. Acrylic and oil art paints and a color wheel will help you get any shade that will turn the most ordinary project into something special.

We used acrylic glazes and art-shop paints to get these results on oak wood. On the left sample, natural sienna was applied, the middle one was covered with burnt umber, and on the right sample, both paints were mixed together.
You can see the difference between dyes and pigment stains. The oak board on the right was stained with golden brown, and the board below was stained with the same color stain.
Like paints, pigment stains remain on the surface of the wood, almost without penetrating into the depths. Due to the high content of pigments, the paints are opaque. Stains contain the same pigments, but in smaller quantities, so they are relatively transparent (they can be considered highly diluted paints).
The smallest pigment particles are mixed with a binder - a substance that holds the pigment after drying on the surface. The most famous oil-type binder is drying oil. Other substances are used in water stains. All pigment stains should be thoroughly mixed before application to evenly distribute the settled pigment particles in the liquid and prevent the appearance of multi-colored streaks.
Dyes are very different from pigments. They are transparent, penetrate deep into any wood, and it is easier to achieve color uniformity with them.
You can purchase ready-made dye solutions, dry powders or liquid concentrates. Powders and concentrates are diluted with an appropriate solvent: water, alcohol or one of the petroleum solvents, for example, a solvent. It is important to use the correct solvent for each type of dye. Water dye, as a rule, cannot be diluted with alcohol.
Liquid dye concentrates can often be diluted with several solvents. Alcohol dyes are the fastest drying (perhaps too fast drying, making them difficult to work with). Water-soluble dyes are safe and most convenient to use.
When toning, it is most important to consider how the color changes when the coloring composition dries. Often the carpenter, seeing the dried surface, considers it necessary to apply a few more layers to enhance the color, but this usually leads to an error. If the color of the raw surface was as desired, nothing needs to be done. This color will come back after clear coat is applied as shown in the picture. . Some colorants dry faster than others, and if the stain is already dry, it will be more difficult to remove excess stain. Water stains dry faster than oil stains. Often the dry surface will appear dusty and dull in color, but this is nothing to worry about.
By mixing dry dye powder with alcohol or water, you will not be able to completely dissolve all its particles, despite the thoroughness of mixing. Let the solution stand, then stir again, and then strain through a paper coffee maker filter, cheesecloth or nylon stocking to get rid of undissolved particles. Always wear a dust mask when working with dry powder, as it is very dusty and can cause allergic reactions and respiratory problems. To achieve the desired shade, you can mix pigment stains with dyes, if they are diluted in the same solvent. For best results, mix products from the same manufacturer. You should also dilute each coloring agent separately before mixing them with each other. Do not add a powder or concentrate of one color to a ready-made solution of another color.
Water stains and dyes raise the pile on the wood. The tiny fibers swell and remain raised like bristles. If you apply a layer of finishing composition (lacquer or paint), the surface will resemble sandpaper.
The easiest way to deal with this phenomenon (before applying a stain or water-based dye) is to lift the pile and then remove it. Moisten the surface with clean water from a spray bottle and let it dry completely. Now, by grinding or scraping, remove the raised villi. Simple and effective scrapers are made from replacement blades for craft knives. Hold the blade almost vertically, as shown in the photo, and carefully scrape the surface.
Wood can have different colors, and it is not always possible to completely correct this difference with a single coat of stain. It is most difficult to do this on woods such as cherry or walnut, in which the sapwood is much lighter than the heartwood.
If you want the whole surface to be dark, apply stain only to the sapwood, as shown in this cherry plank example. After drying, apply another layer of the same stain, covering the entire part with it. If you want to achieve a uniform coloration of the entire surface, the color of the stain should match the color of the heartwood. Use this stain only on sapwood areas.
Pine, cherry, maple and birch wood on the surface of the same board has areas of different density. Such heterogeneity is the cause of uneven toning when using pigment stains. Soft areas absorb more stain than hard areas and appear darker after toning.
You can reduce the effect of heterogeneity with the help of a conditioner, applying it before toning. Conditioner is a type of binder that closes wood pores, and you can see the result of its application in the photo on the left.
We used Minwax conditioner and a red-brown stain on the left pine board, while the right board is stained only.
You can make your own conditioner. If polyurethane varnish is chosen for the top layers of the coating, make a conditioner from one part of varnish diluted with five parts of thinner. Apply this mixture to the surface, dry, lightly sand with #220 sandpaper, and then tint with a stain.
Combined formulations containing dye and pigment stain usually delaminate during long-term storage on the store shelf. The dye remains in solution, and the pigments settle to the bottom of the jar. To obtain the original color, the composition should be thoroughly mixed. You can determine such compositions with a stick by lowering its end to the bottom of the jar. If there is a clot on it, and the stick itself becomes colored (see. photo below) you are dealing with a combined composition. The dye stains dense areas of the wooden surface, and the pigment accumulates in the pores. Such compositions tint problematic rocks more evenly, but in order to further reduce color heterogeneity, it is better to apply a conditioner first. Combined formulations are applied in different ways.
At the top of the jar, when left unstirred, is a dye solution that can be used directly to tint wood or added to a compatible lacquer to make a toner (more on that in the next article in this series).
By slightly mixing the contents of the can, you will get a slightly different shade of the same color. Thorough mixing will give another shade. Finally, the pigment residue, if not stirred, is excellent for use as a patina, which will be discussed in the next article.
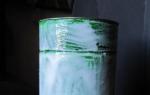
Stain-gel consists of a pigment, a dye or a mixture thereof and an oil- or water-based binder. Strictly speaking, it is a kind of paint that covers the surface without being absorbed into it. Such stains hide the texture pattern a little, but it is easier to achieve color uniformity with them (see photo). photo below). The left sample was coated with a conventional water stain, and a gel stain was used to tint the right sample. Stain-gel is great for applying the so-called patina. The patination technique allows you to add colored layers between the layers of the base coat and imitate a texture pattern on any surface. For example, you can make two different boards look like each other and turn the hardboard into oak.
Water-based varnish is chosen primarily because of their harmlessness, lack of a strong odor, and high drying speed. It covers wooden floors (board, parquet, etc.), wooden window frames, doors, furniture, everything that is made of wood.
What is water lacquer made of?
Water-based varnish ingredients: water + binder + additives.
Lacquer may be one-component containing polyurethane or acrylic as a binder. There is two-component varnish, in which both binders or some others are present.
Single component acrylic varnish water-based is more vulnerable. It does not differ in great strength, high humidity is contraindicated for it. Therefore, such a varnish is used to cover products that are not subjected to heavy loads. In any case, it is definitely not worth covering the floors with it.
Polyurethane water varnish is reliable- it is used where significant loads are possible on the coating, neither spilled alcohol nor even stronger chemicals “eat” it.
 High strength water-based polyurethane varnish
 Two-component water-based varnishes are good because they show the positive aspects of all the ingredients included in them, which complement each other.
What to consider when applying water-based varnish
- Water-based varnish is not diluted with solvents. You can add water, but not more than 10-15%.
- Stirring the varnish before applying to the surface is essential.
- Lacquering, as well as drying of the coating, should take place with closed doors and windows in order to exclude drafts.
- Avoid direct sunlight on the fresh coating.
- To avoid sagging or bubbles, before applying the last, final layer of varnish on the lacquered surface, you need to walk with sandpaper.
- At first, it is better not to walk on the already dried varnish in shoes with hard soles, but to place pieces of fabric or cardboard under the furniture - the water varnish gradually gains hardness and resistance to damage.
How to apply water based varnish
Apply a water-based primer to the surface to be varnished. After priming, the wood does not absorb varnish so actively, and its consumption will be less. In addition, the lacquered surface will be smoother, smoother.
If the surface has slight irregularities, it is better to use a matte varnish, since the glossy coating shows defects more strongly, and the matte one muffles them, masks them to some extent.
Water-based varnish can be applied over old varnish. Just before re-varnishing the surface, do a test on a small area of it - for the compatibility of the coatings. If the result is positive, which happens in most cases, treat the old layer with sandpaper, rinse with water (first with soap, then clean). Varnish - after complete drying.
And a spray gun are the best tools for applying varnish. The brush can cover small surfaces.
 It is convenient to apply varnish on the surface with a spray
  Paint brush and roller
 If the room is too hot and dry, postpone work. The moisture from the varnish will then evaporate too quickly, and this always leads to defects in the coating.
How to cover the surface with tinted water varnish
Stirring the tinted should be especially thorough, since the pigment particles can be unevenly distributed throughout the volume. By adding water to such a varnish or mixing several cans, it is better to prepare the mass at once for the entire surface. If you paint, diluting and mixing the varnish in parts, you can get areas of different shades.
 Test the tinted polish on selected areas
 You can tint water-based varnish yourself. To do this, pour into it a little (5-8% by volume) of tinting impregnation, which also has a water base.
Accuracy in applying varnish with a tone is required. If the layer in some area is thicker, the coating in this place will be darker. To avoid this, it is advisable to use a spray gun (spray gun) or a foam swab to apply tinted varnish.
2-3 layers of thin layers of tinted varnish are better than one thick one - with several layers, the color of the coating is obtained evenly.
To get a beautiful, visually deep layer of varnish, a darker varnish is first applied to the wood, and the upper layers are made colorless or lighter.
 Two-component varnish coating withstands heavy loads
 Never apply varnish on an old coating that has worn off in places on the surface - in these places the finish will look lighter. In this case, the old coating will have to be cleaned off. Although there is another option - to use a varnish darker than the old one.
Keep in mind that if the old varnish has worn off to the ground in some area, the exposed wood will absorb the new varnish more actively than the rest of the surface. It is not necessary to clean off all the old coating - it is enough to cover it twice with a primer, and the absorbency will even out. You can do it differently: instead of impregnation, cover the surface with a colorless varnish, and after it - with a tinted one.
Leave your feedback |
|