How to make autumn crafts with your own hands. What crafts to make in the fall for a competition in kindergarten. DIY autumn crafts for the garden and school - Exhibition of crafts from natural materials “Autumn is a generous time”
Children attending kindergarten and school are asked to make crafts on the theme “Gifts of Autumn”. And usually parents have to help their children, since turning unremarkable natural material into a real work of art is not so easy.
When making autumn crafts you can use:
- leaves of any trees;
- branches;
- stones;
- acorns;
- chestnuts;
- berries;
- plants' seeds;
- vegetables and fruits;
- colored paper, glue, cardboard and much more.
Below we will provide photos of various crafts from the gifts of autumn and tell you how to make them.
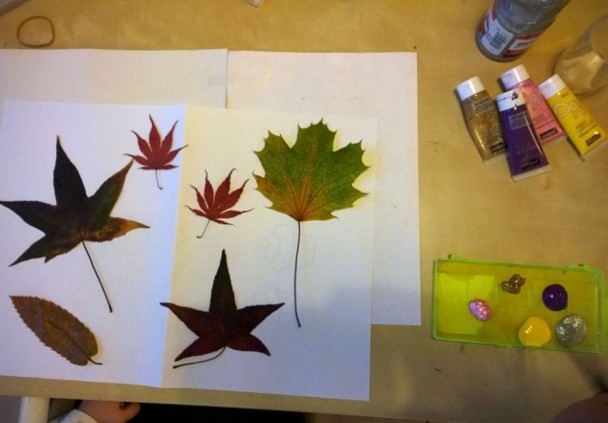
Autumn bouquets of maple leaves
Speaking about autumn crafts, one cannot help but dwell on the original bouquets of maple foliage. You can understand how they are made by looking at the photo:
This is how roses are made from leaves
The buds need to be tied with strong threads. After combining them into a bouquet, you can use whole leaves to disguise the “tails”.

Beautiful autumn bouquet

Yellow roses from fallen maple leaves
It will not be possible to make a craft in the form of a bouquet of leaves if they are dry. It is necessary to collect only fresh material that will bend well and will not crack when thin tubes are formed from it.
If the child is very young and attends a junior group in kindergarten, he can be offered to make a simpler leafy bouquet. For example, this one:

Multicolored autumn composition
To do this, you just need to collect the leaves different colors and sizes, and then carefully fold them and tie them with ribbon. To give the work a finished look, parents can use flowers, grass, and ribbons.

You can make a lot of fall crafts from acorns.
Bunch of grapes made from acorns
You can make unusually beautiful grapes from ordinary acorns.

Blue grapes made from acorns
You need to collect natural material and separate the caps. Then thread a thin wire through each acorn.

Preparing acorns for making a bunch of grapes
Then wrap all the acorns around a common thick wire. Cover the latter with green paper or decorate with threads. Acorn berries need to be given bright color acrylic paint, and then cover them with varnish. The result will exceed all expectations.

Bunch of green grapes

Yellow grapes
Vegetable crafts
The main gifts of autumn are, of course, vegetables. Therefore, it would be impolite to forget about them when making children's crafts. In the creative process you can use carrots, potatoes, cucumbers, zucchini, cabbage, pumpkin, eggplant, onions - everything that grows in the garden.
Eggplant makes a funny penguin. You need to remove the peel in the area of the future abdomen and move it to the sides so that you get wings.

Making a penguin
Penguin eyes can be made from plasticine. If you want to give him a hat, glasses, fashionable shoes- carrots to the rescue.

DIY eggplant penguin

Penguin couple

Another version of eggplant penguins
This plant also makes a wonderful zebra plant. To make it, you need to take two eggplants and connect them, as shown in the figure, using a toothpick.

Zebra requires the use of two eggplants
If you need to make little men, you can use onions as their heads. Of course, there is no need to peel the vegetable. But you can decorate it with markers.

Bride and groom whose heads are made of onions
It should be noted that onions are not stored for very long, so it is recommended to prepare the craft a maximum of a day or two before the start of the exhibition. This way it will last longer.
There are countless options for turning vegetables into crafts and toys. The best proof of this is the photo:

Sheep made of plasticine and broccoli

Pumpkin and carrot flowers

Potato bear

Cucumber crocodile

Vegetable machine

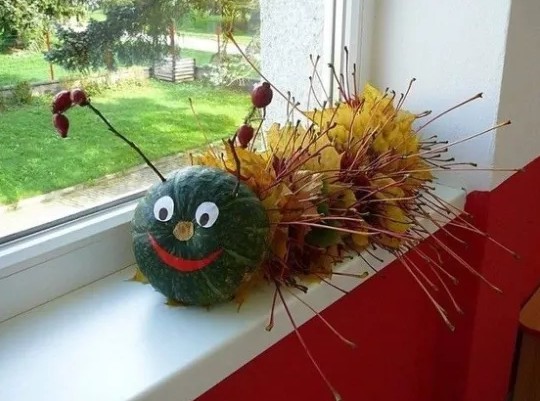
Green tomato caterpillar

Work from tomatoes and cabbage

carrot house

Corn leaf angel

Potato roses
Paper crafts on the theme “Autumn Gifts”
Reflect beauty autumn time It is possible not only with the help of natural materials, fruits and vegetables. Very often at children's exhibitions you can find beautiful work from paper, cardboard.
When preparing them, it is important to remember the main autumn colors and not skimp when using paints.

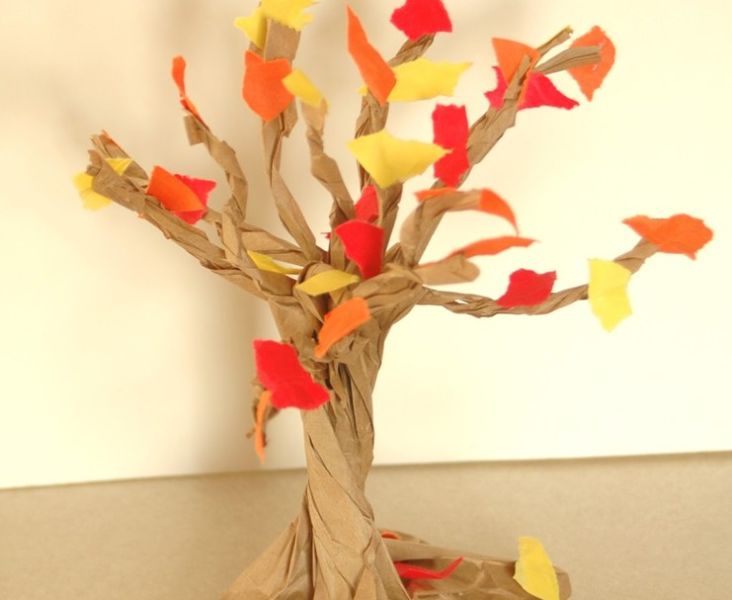
paper tree

Decorative garlands made of paper leaves

Paper pumpkin

Autumn forest made of paper and thread
Then the craft will turn out bright and cheerful, will attract the attention of the jury and will definitely take a prize.
Hello!
Today I again propose making crafts in an autumn theme. Look out the window and see how many colorful leaves are already lying there. Memories and lines from, for example, these immediately grab you:
“Suddenly it became twice as bright,
The yard is like in the sun's rays.
This dress is golden
On the birch tree’s shoulders...”
This time of year is good because there is something to craft from. Because you can take any and then you have, for example, a little man made of pine cones, or maybe you love it? Then you can also easily make a souvenir for an exhibition, for example.
You can even take ordinary leaves and create a masterpiece on paper. In general, the list can be endless. So let me introduce you to a bunch of cool and beautiful ideas about this theme.
I hope you will be inspired, and once you decide, you will immediately start making crafts with your children. After all, children of any age really love such work, be it primary schoolchildren or preschoolers.
In my previous note, we have already considered many options for what you can make with your own hands from various types of materials, it can be natural, fruits, vegetables, and even waste. This time I will show you a few more options, which are also no less beautiful and attractive.
And perhaps I’ll start with a non-traditional, but a paper-plasticine miracle. Take cardboard and make blanks of maple and oak leaves. You will also need glue for ceiling tiles and a CD for the job.

Take plasticine of different colors in your hand and roll it into a ball.
Advice! You can use modeling dough instead of plasticine.

Roll out with your hands, as if painting the surface of the leaves.

Glue the finished blanks onto the disk using glue.

Mask the middle oak sheets, and roll up the red rowan berries. This is such a cool masterpiece with an autumn theme.

Do you want to create something extraordinarily cool from real rowan berries? I propose to make a picture of rowan in the form of a squirrel. You need to draw the image of a squirrel on cardboard (from under a box, thick) and then cut it out.

Use decorative tape to connect the edges of two cardboards. Or glue with regular PVA. And then fill the image of the animal with berries. It looks original and beautiful! She's a charmer, isn't she?

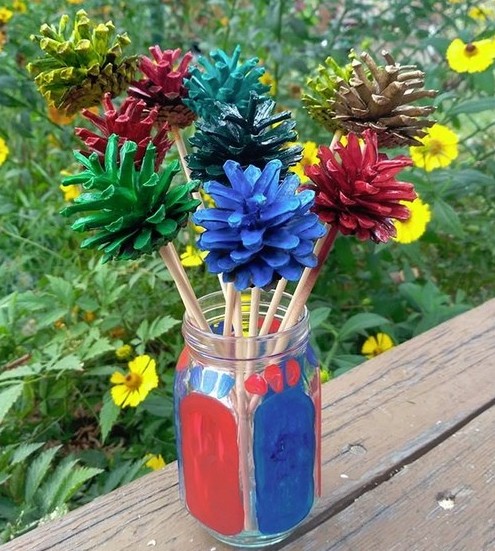
The next craft is a flower vase, you can make it yourself. Take any glass container and wrap it with woolen thread or twine. When doing this, first paint the jar with glue. You can see the stages of work below in this figure:

Now prepare the bouquet and place it in a vase. And a gift or souvenir for the exhibition will be ready. Good luck!

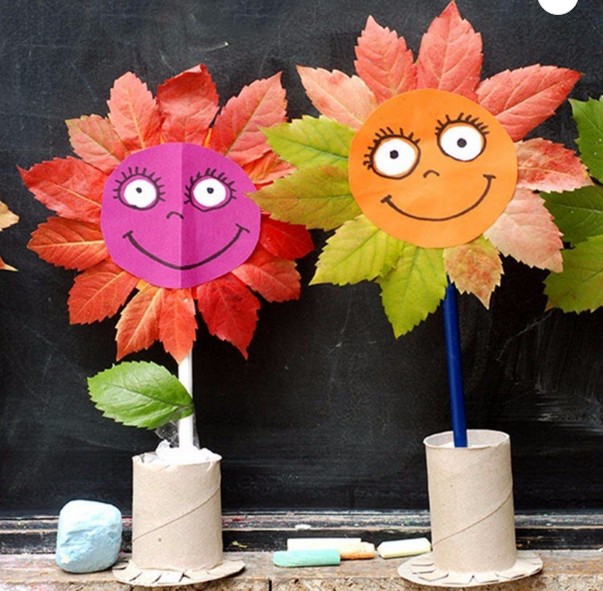
Now make a funny little guy in the shape of a sun. Cut out a circle from colored paper, glue eyes, mouth, and nose onto it. Or you can draw all these details with a marker.

Then cover the diameter of the circle with dry leaves.

Also, in order to comfortably hold the sun with your hands, glue a stick. Or then stick it in a glass, which you can also build yourself.
With children up to school age in the park, collect dry leaves and then invite them to decorate them with felt-tip pens, or better yet, acrylic paints.

It turns out to be quite wonderful and cool, you won’t be able to take your eyes off it!

You can go the other way and make a cool bouquet. I remember that I haven’t shown you anything like this before. But, I repeat.


You can give this to your mother, grandmother, or your favorite teacher.
DIY crafts for kindergarten on the theme “Autumn” (all new items)
With kids preschool age You can just imagine. Take and lay out magical multi-colored trees from plasticine balls. And indeed there will be a golden autumn.

In addition, you can also use paints and cotton swabs for hygiene; you can use them to create paintings and scenes on any topic.

Agree, there is nothing difficult about this, just sit there and put it on a piece of paper.

Another fun work from scrap materials, made at home, such as millet, is what the author offers.


You can also make pictures from rice and semolina, or pasta, in the same way.


Everyone knows that kids love to play with signets, so why not take advantage of it. Dip dry leaves wounds from the ground and dip them in liquid paint, you will get an excellent print.

You see how brightly and elegantly you can decorate any drawing.

Or you can go another way, put leaves (either real or paper) and use them as stencils, that is, paint directly on them, you will get prints.

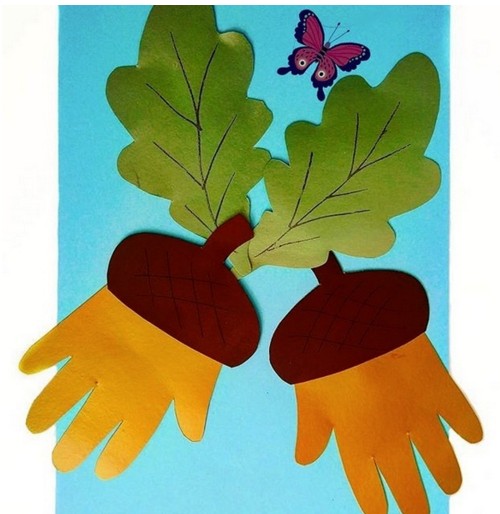
Works made from palms are popular. Well, let's use this idea.

You need to take a disposable white paper cup and recolor it green color. Make from toilet sleeve trunk, and glue it to the plate.

Draw the children's hands on cardboard and cut them out.

Glue one of them brown on the trunk.

And then, in this order, everything else.

Alternatively, you can make the work in the form of acorns and even squirrels, cool!

Kids also love to use natural materials in their creations; for example, you can get by with pumpkin seeds. Print out a picture of wheat or rye on an A4 sheet of paper and decorate it with these branches. Doesn't it look creative? And most importantly, it’s simple and charming!

Read the finished description with materials and description below:

Do you want to use only colored paper? So you will need to cut strips of different colors and a couple of circles. Decide on the sizes yourself.
Fold each circle in half.

Then draw the trunk and make the crown of the tree, cut it as shown in the photo with scissors.

Glue the trunk on white paper, and the crown, that is, two circles with each other, only asymmetrically.

What is missing is, of course, colorful leaves! Cut them out in red, yellow and green.

So, what else, but here's what. You can take paper plates disposable, these are sold at a fixed price or in any hardware store. Paint them in the desired color, for example brown, and then let them dry. Cut out the body of a hedgehog or other animal from white cardboard, draw parts of the body, and let it hold a pine cone or acorn with its paws.

Probably the most primitive, but also so bright souvenir from cotton pads. Dilute the paint in a glass beaker and take pipettes. Carefully paint the discs with them. Let them dry.

And then glue it to any background, wow, beauty! And my mood even lifted, it was so bright and cool!

In my classmates I came across another such landscape, only it was made in a different technique.

Original works made from cones and acorns
Of course, timber or waste material is always in great demand. Especially in the autumn period. Because the gifts of nature can be found on paths and in parks and forests. If you have a desire to create something ingenious from ordinary pine cones, then here is an idea for you, go for it.
Pour into a cup acrylic paint and dip each piece. After drying it, place it on any tray covered with oilcloth.

Then, from durable cardboard, you can even use a box, cut out a ring and decorate it with cones, they are glued using glue gun. Just be careful not to get burned.
Carry out this procedure only together with adults.

Try to glue the cones tightly to each other so that there is not much space between them.

Here's a wreath for you, isn't it cute? I really liked it. By the way, you can use it as

You can also make a bouquet from them, who would have thought, but it looks so beautiful, especially if the vase is made by your own hands.
I recently showed you a lot of ideas about what else can be done on this topic. These can be bunnies, hedgehogs, owls, foxes, etc. and any other animals. Here are a few more ideas for inspiration.


I would like to show you one more video. In it you will see a bunch of new products this year. Enjoy watching.
As for acorns, there are also creation options from them. People or animals are usually made, but also cutlery and cups. Additionally, matches or twigs are used.


Well, if you want to distinguish yourself, then make an original thing, this is a brooch. Good luck.
Crafts “Autumn Fantasies” for school (grades 1-4)
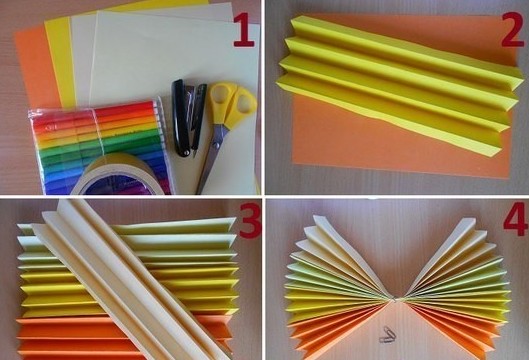
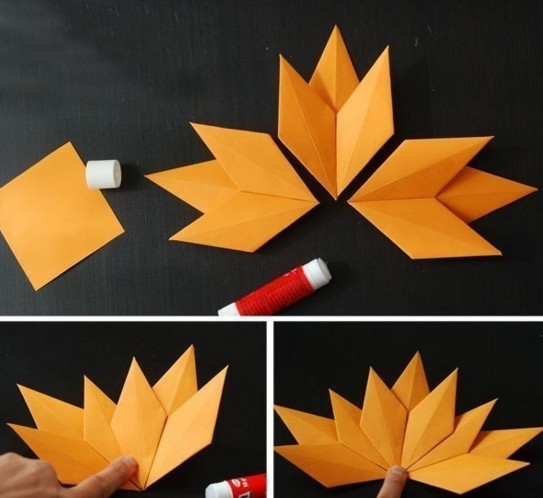
And now I propose to complete a craft according to this master class in the style modular origami. Wow, I’ve been asked for a long time to show how you can quickly and easily make maple leaves like this out of paper. So take note, because it is with these blanks that you can decorate the interior of a group, classroom, and even gala event, matinee.
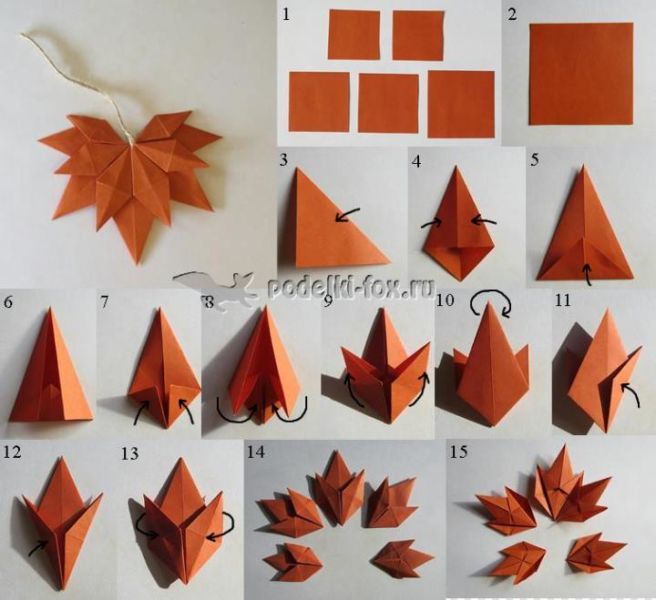
And then please, take it and fantasize. Here's how they decorated it on the Country of Masters website.

The next option, which is loved by younger schoolchildren, is of course main character- hedgehog.
In order to create it, you will need everything that you see in the picture below. This is colored paper, a glue stick, a felt-tip pen.

Take brown colored paper and fold it in half. Cut along the fold line with scissors, you will get two rectangles.

Then glue them together to form a stand.

After the glue has dried, draw and make round edges on the workpiece. Cut along the line. Using pink paper, also draw outlines in the form of a semi-oval.

It is also necessary to cut out ears and paws from it. round shape. Arrange the parts in the correct proportions as shown below and glue to the base. Scatter real dry leaves or cut them out of colored paper.

Now all that remains for the hedgehog to do is make the spines; make cuts along the edge of the brown paper.

Draw the eyes and face. Your fabulous little animal is ready.

Using an accordion, make the work in the shape of trees. Look how original it looks.

Also, one of the favorite characters among children at any time of the year remains. I propose to make it this time from a CD. And again you will have to fold the paper like an accordion, in general, look at the instructions in the pictures and create.


What an unrealistically charming sun it turned out to be; my spirits lift when I see it.

And if you don’t have colored paper, then use napkins, although take them in a single color. Cut into small squares and roll each piece into balls.

Draw any still life in in this case the author depicted trees and a river. And sit and painstakingly glue each ball until the whole image is formed.


Next idea, work from cotton swabs, which, as you can see, were originally painted, their heads, in the desired color.

And for those who want to comprehend quilling, or are deeply interested in it, I would like to invite you to consider such a masterpiece.


Here's another fascinating idea, look how cool the author came up with it. Do you want to make it happen? Then let's get down to business. It will turn out to be just a living corner.


And if this is too difficult for you, then take regular package and follow the photo description.
Beautiful souvenirs made from natural materials and vegetables
I think that every time you visit such exhibitions you always rejoice. Because such events are always fun. Thanks to positive and creative works. Which are made from all sorts of things.
You can take absolutely any vegetables and fruits and use them to build
The most simple idea and easy, it’s a basket with such characters. As you can see, the author used a lot of vegetables that are found in any home.


And even build the heroes Smeshariki and Minions, catch the description:


Here are a few more thoughts that will lead you to your next creation. You can see the rest here. By the way, you can create with it too! There would be a desire.
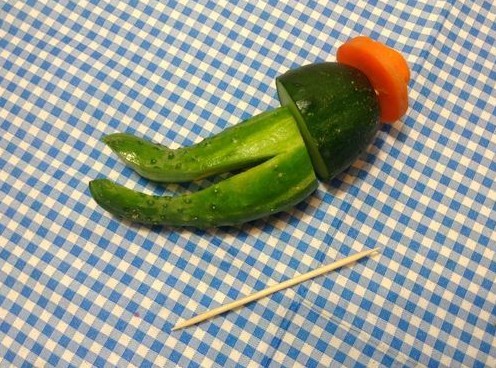
Well, I want you to build Gena the crocodile. Especially when there are instructions with a description. We don't need much: carrots, cucumbers, tomatoes and toothpicks.

Use a knife to cut a piece of the carrot into a cylinder shape, and then make something similar to a mushroom.

Cut off the tip of the cucumber, and cut the vegetable itself in half, but not all the way.

Connect the resulting parts with a toothpick. The result was the head of a crocodile.
Then make eyes from cucumber pulp and black olives.
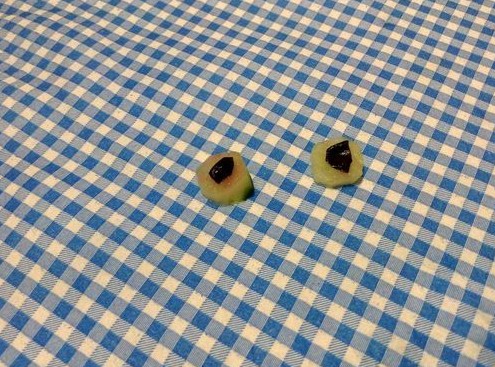
Stick them in your head using wooden sticks. Cut the tongue out of the tomato.

For the body, use a slightly rounded cucumber, and design the legs like this.

You can also make an accordion from the greens pulp, but this is optional.

Place the weirdo on a plate and run to school or kindergarten to amaze everyone.

And then there are these faces, oh, when I saw them, I was really scared). And you?

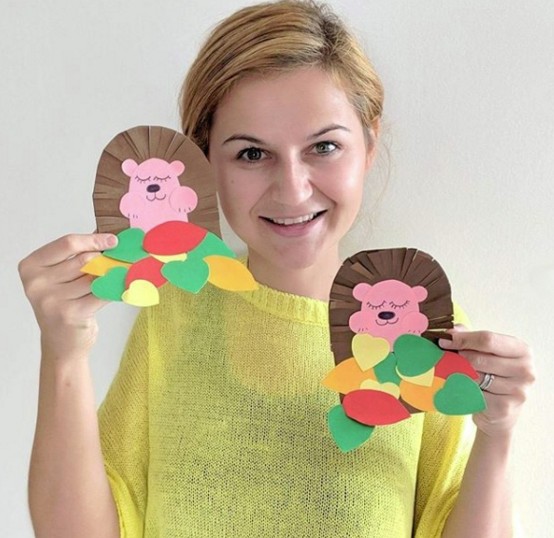
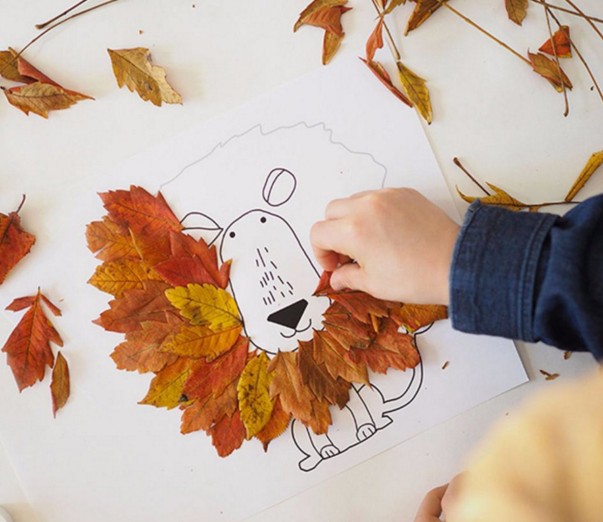
How to make an applique from leaves: quickly and beautifully
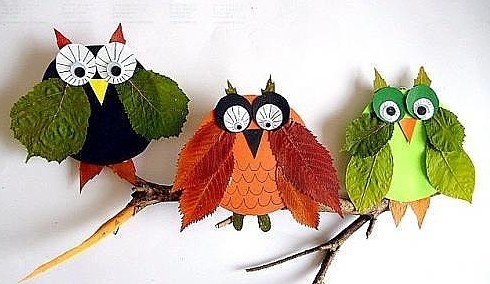
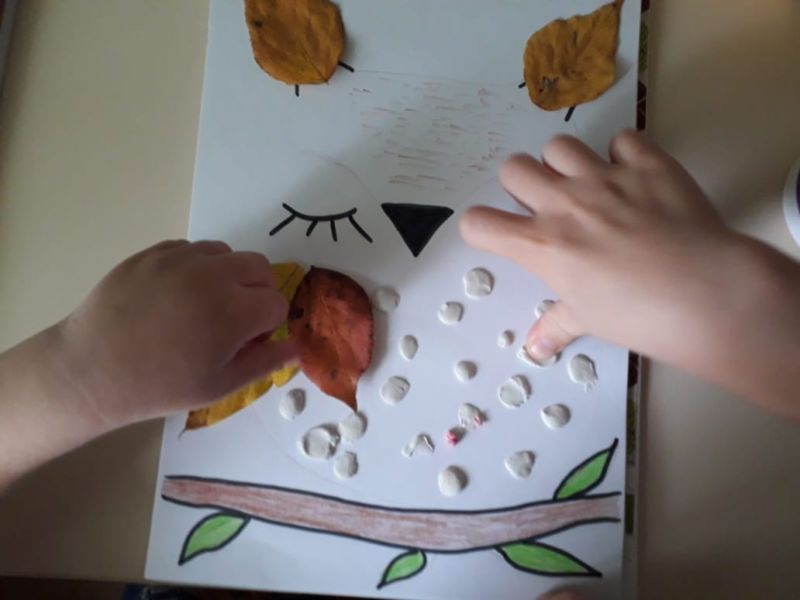
For such works, you can take absolutely any character and easily decorate it with dry leaves that you collected in the park. For example, you can lay out funny owls using cardboard and paper.
Or you can make a huge owl entirely out of leaves.

Or plant the birds on a branch decorated with bunches of rowan berries.

You can take any face, preferably some animal, cut it out, and then decorate it.

And with what, of course, leaves. Collect them and place them on a sheet of newspaper so that they do not shrink when drying.
Maple leaves are best suited as decoration, for example a lion.
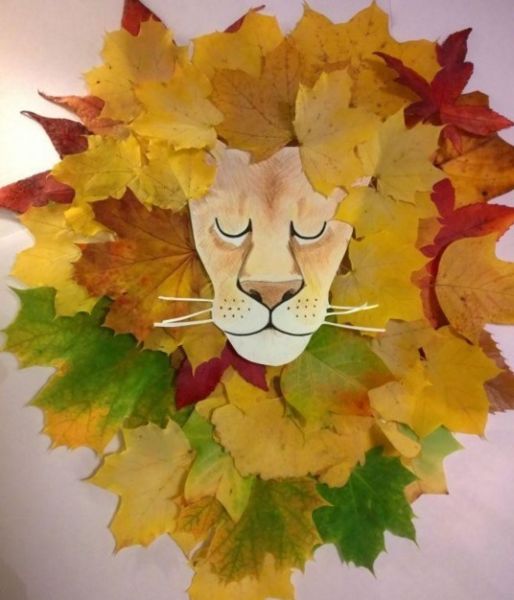
Or perhaps you will be interested in working in the form of a little lion cub.

Today my kids and I made these creations. And we actually sat down to do it, and then my mother remembered that she forgot to buy glue. I’m thinking what to do, mine are about to go broke))). It's good that there was plasticine. And this is what happened.

You can easily build a vase using a balloon.

Or make an applique of seeds and plasticine.

Or you can imagine the work in the form of a three-dimensional toy.


Autumn paper crafts for kids with templates
So we’ve reached another subtopic in which you can safely take templates and print them on a printer. And of course, create, get new masterpieces, adding some of your own twists.
If you use this drawing, then later you can color it, or you can safely make greeting card and write in it

You can take absolutely any piece of paper you like as a sample, or you can draw it yourself with a pencil. Fold a blank sheet of paper in half, and then cut out an image of the blank on one side. Cut crayon squares from office construction paper.

Scatter them in a chaotic manner and glue them with a glue stick.

This is how mysterious the postcard looks.

Now let’s take a closer look at one more master class. Before that, I already gave you some instructions, but this one is more understandable and the technology is different.

You need to cut 10 squares.

And then fold each of them like this.

This kind of work takes little time, don’t worry, you can do it in 20 minutes.

And then you have to glue each blank to each other.

Of course, looking at the pictures, everything becomes clear.

Don’t forget about other options; by the way, this craft somehow looks like


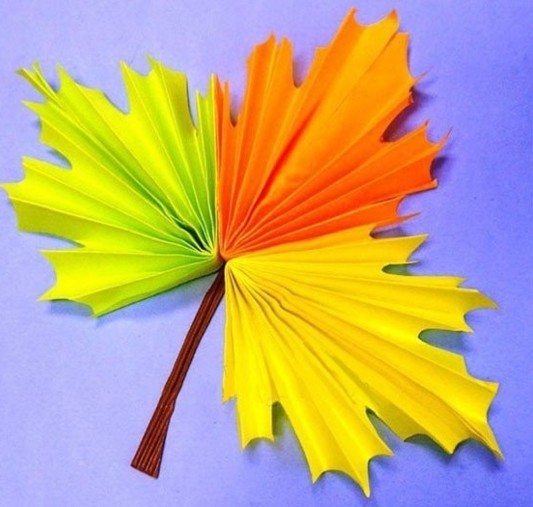
You can fold the leaf into a butterfly shape.

Also difficult, as you can see there is nothing, fold it like an accordion and glue it together.


And you can absolutely do it different forms, here you can use your imagination.


You can make it even more interesting so that the leaf turns out to be three-colored.


Or make a bookmark using thread.


In addition, you can make a pumpkin out of paper if you cut a bunch of long strips with scissors.


How you decorate it is up to you, you can use a toothbrush.

Well, and finally, take these ideas and dress up your favorite cartoon and fairy tale characters.


Well, according to tradition, I’m giving you a few coloring pages, in case they come in handy in your spare time.


Or use an anti-stress coloring book for creativity.

That's all, dear creators! I wish you a creative approach to business. And may autumn crafts win your heart and make you want to next year do more. I wish you success and patience! Bye.
Best regards, Ekaterina
Good afternoon everyone. “So autumn has come, our garden has turned yellow, the leaves on the birch tree are burning golden”... Reading it becomes a little sad, although the fact is undeniable that at this time of year nature becomes truly magical and indescribably beautiful. It is also autumn that gives us a generous harvest of vegetables and fruits, berries and mushrooms.
And it’s great if you have the opportunity to go out into nature at this time to walk through the autumn forest and breathe in the fresh and already cold air. And if you also have children, then turn your walk into a treasure hunt: collect bright and carved leaves, acorns and chestnuts, interestingly shaped cones and pebbles, and other natural materials. And then, when you come home, save all this natural beauty in crafts.
So I slowly but surely brought you to our topic. In this article we will create again, and again on an autumn theme.
Today for you I have collected all the new homemade ones, from zucchini, from acorns and cones, as well as from other things. So hang in there, there will be plenty of ideas for inspiration and creativity!
DIY autumn crafts for kindergarten and school (all new items)
If you're ready, then it's time to start viewing original and new works. Look what composition I found. It depicts a fragment from the cartoon “Masha and the Bear”. Notice how much different materials collected in one craft. There are painted cones, pebbles, leaves, and even beans. The house can be built a little simpler. We have already discussed options for their manufacture in previous articles.

That's it simple work, for which you will need moss, squash, twigs and leaves. Toys from Kinder Surprise are used as inhabitants of a forest clearing.

Here is an excellent decoration made from roses, but not real ones, but from yellowed leaves. Rowan berries, small cones and other attributes complement the entire composition.

You can create such a wonderful house from melon or pumpkin. And build a fence from twigs. Add some grass and your craft is ready.

At first glance, the example below may seem complicated, but if you look closely, you will see that this is not the case at all. Just collect more natural material and you will succeed.

How do you like the idea of making such natural watches? I think it's just great!

I also really liked the following manufacturing options autumn bouquets. Agree, they are very elegant and stylish.

If you have decorative pumpkins, then don’t rack your brains and arrange them in a bouquet too.

So the hedgehog will not leave anyone indifferent. By the way, the muzzle can be sewn from a gray sock, and thorns-cones can be glued on top.

These cute ones in autumn leaves are very easy to make. I am sure your child will be happy to make such a product.

Well, the level is more difficult. I think this hedgehog was made by a professional. Therefore, only school-age children can recreate such a craft.

Well, the mushroom is the master of the forest. Such a serious old man). Very beautiful work.

A selection of works for kindergarten and school on the theme “Gifts of the Golden Autumn 2018”
Let's look further. And if you came to this article, it means that you are a big fan of creative things, or, even most likely 100%, you have children who go to kindergarten and school. And they received an assignment for home - to make an autumn craft with their own hands. And since you are a responsible parent, you are happy to help your children.
And here I come to the rescue, throwing ready-made options. All you have to do is choose and repeat!
Here is a job for children in kindergarten. Perfectly develops imagination and hand motor skills. Plus, the materials for crafts are all simple and accessible to everyone.

Here's a fruit fantasy. Also an easy option. Any preschooler or schoolchild can do it.

How do you like this cute apple caterpillar? Or maybe your child will want to make it from walnuts? Or maybe he’ll just make chicks out of apples! Any idea is worthy of your attention.

But the turtle came to visit. Take a small pumpkin and squash and make round holes. Insert cucumbers into these holes. Draw or glue eyes. All is ready!

Here is a beautiful snail. By the way, I already talked about it in some article. Well, from the photo you can see that everything is done in an elementary way.

You can always build a kolobok like this, well, this is when you have absolutely no time or you forgot about the task).

Here are more variations with faces. White cabbage is an excellent material for creativity.

Judicious weirdos are driving a car. All you need to do is take plasticine and small fruits such as potatoes, onions, apples and pears. Well, the eggplant acts as a wheelbarrow.

Look what kind of stroller you can make from a watermelon. But the baby is made from white and Chinese cabbage.

Well, pumpkin carriages are always in fashion. Only they can be cut and decorated in different ways.

Well, the firebird simply amazed me. I wonder if anyone else can recreate it?!

Crafts from pine cones on the theme of autumn: make them quickly and beautifully
Of course, pine and fir cones are fertile materials for children's creativity. So many interesting things can be created from them.
Usually the cones themselves are taken as the basis, and improvised materials complement them. What matters here is how your imagination works.
I present to your attention following works. They can act as separate completed crafts, or as complementary elements of your product.
- “Plasticine hedgehog;

- "Kitties";

- "House for the Owl";

- "The Owl and the Owls";

- "Beautiful Swans";

- "The Spiny Hedgehog";

- "Fawn";

- “The bears went for a walk”;

- “So autumn has come”;

- "Autumn Wreath".

Simple autumn crafts from paper and plasticine for children in kindergarten
The easiest products are probably those that can be created from ordinary paper and plasticine. These materials are available in every home where children live. And there are plenty of options for making works on autumn themes. Let's take a quick look at some ideas of creation.
A popular and widespread technique is appliqué. You can make a whole picture in this style, and don’t forget about origami to get a voluminous work.

Here, by the way, is folding colored paper. It turns out to be an excellent composition of paper leaves.

I also liked the idea of a living tree. And what a great way to design the foliage. Just cut into arbitrary shapes and glue, cool!

Another fun and bright applique made from children's hands.

Cute hedgehogs that are so easy to make. The well-known paper accordion will help you).

Don't forget about the birds. And complement the products with natural materials.

Well, you need to paint plasticine pictures from plasticine. Oh, and children love to do this kind of work.

How do you like this one made with baskets of vegetables, just super!

I found a real masterpiece. And the rain comes and the leaves fall. You can use it instead of plasticine.

Well, autumn fairies. The result is a cheerful composition.

And this work causes a lot of applause. Bravo to the author!

The squirrel is no less original; you can make other forest dwellers instead.

New autumn pumpkin crafts
If you have decided exactly what material you want to make a product from, then this is very good. After all, very often pumpkin is such a material. Many people like to make various souvenirs and home decorations from it.
Let me remind you that we have already talked in detail about what pumpkin crafts you can make with your own hands. So I don't want to repeat myself again. I have already shown you all the new ideas for creativity from this vegetable. If you missed it, check out the information here.
Well, now let’s look at the stages of making a new craft called “Chicken and Baby Cockerel.”
Chicken and baby cockerel

You will need: pumpkins, leaves, tape, scissors, wooden skewer, plasticine (modeling mass), hairspray, gouache, brush, water.
Manufacturing process:
1. To make the chicken, take one large and one small pumpkin.

2. Using tape, glue autumn leaves on both sides of the large pumpkin.

3. Now connect the large pumpkin with the small one, using a wooden skewer.

4. Also decorate the chest and beard from leaves. The tuft can be made from a bud of the seeds of a southern tree, or molded from plasticine. Form the beak from modeling mass.

5. Blind the eyes and decorate the head with manufactured parts.

6. Make a tail from the leaves and attach it with tape.

7. Paint the beak red. Or make it right away from red plasticine. Spray the entire piece well with hairspray.

8. Make the cockerel from a small outstretched pumpkin. Just paint it with gouache. Use plasticine or modeling clay to form eyes, a beard and a beak.

9. Create a backdrop and display our pumpkin crafts.

Unusual crafts made from acorns and natural materials on the theme of autumn fantasy
I cannot ignore the products that can be made from acorns and natural materials. Again, there are a lot of ideas. In general, look and judge for yourself.
Small acorns can be used to make a large acorn. Such volumetric craft it will work out.

Or take chestnuts and make these funny characters.

You can also make a miniature topiary like this. Both natural material and acorns are present here.

The simplest snails, I think kids will like this kind of creativity.

And here are chestnuts and small shells. The result was funny animals.

See how you can create an entire composition from ordinary corks and acorns.

Well, how do you like this hut? What amazing crafts you can make!

And look what other mischievous little people can be made from various scrap materials.


And creative works that combine all natural materials. I arranged them in an interesting way and it turned out to be an exhibition panel.


Autumn craft from vegetables and fruits “Mushrooms”. Step-by-step master class
It’s no secret that, of course, at all competitions and exhibitions, the leading places are occupied by creations made from vegetables and fruits. Remember how much interesting ideas Have I already told you about this material? Today I want to offer two more works with a detailed explanation.
Mushroom meadow of vegetables

You will need: potatoes, tomato, dill, dry leaves.
Manufacturing process:
1. Cut mushrooms from potatoes as shown in the picture. Boil them in water until half cooked.

2. Then take a flat plate and cover it with leaves, decorate the edges with sprigs of dill.

3. Place the mushrooms in the clearing. Also make a fly agaric, but make the hat from a tomato, and draw white circles with mayonnaise or toothpaste.
4. Make a potato stump and insert a sprig. That's all. Simple, fast, beautiful and original.

Fun mushroom made from fruits

You will need: apple, pear, currant, gooseberry, cabbage, knife, plate, board, toothpicks.

Manufacturing process:
1. Make a stem for a mushroom from a pear, and a cap from an apple. Also, from the remaining piece of apple, cut out the palms and legs and pierce them with toothpicks.

2. Connect these parts together. Then make indentations in the pear for the eyes and nose.

3. Insert the berries into the indentations for the eyes and nose. Cut out the mouth and make and insert a tongue from the cabbage. You can also cut a fringe out of cabbage and tuck it under the hat. Place the resulting mushroom on a beautiful saucer.
We make crafts with our own hands from zucchini for the school exhibition
From such a vegetable as zucchini you can perform various works of any level. At the same time, getting this vegetable will not cause any difficulty. Zucchini is a pliable and unpretentious material. Therefore, it is 100% suitable for making crafts.
I would like to invite you to watch the video story. And maybe you will make and choose zucchini crafts from this video.
Ideas for autumn crafts in the aquarium style
And finally, a couple of original works, all made from the same familiar materials, but on a marine theme. Take a look, I think you will like this idea too.
Autumn leaves are mainly used in crafts. And they make fish out of them.
In this product, fish were made from walnuts, and grass and shells were also added.

This is how delicious it turns out if you also sprinkle the bottom with cereal.

And here it is gold fish, fish to all the fish!

Here is another variation of the aquarium.

Or this idea with the inhabitants of the seabed.

Well, and also work with fish from leaves, stones and plasticine.


As you can see, in addition to the usual work, you can always create something new and interesting. But don’t forget about old ideas. After all, in any case, handmade crafts always turn out special. And the autumn theme allows you to create endlessly! That's all for me. Bye bye.
7 484 001
Evening is an amazing time when the whole family gets together and unsuspecting parents find out that they need to bring autumn crafts to the kindergarten for tomorrow. To prevent this situation from taking you by surprise, we recommend preparing in advance and familiarizing yourself with ideas for children's crafts.
We have prepared for you many step-by-step and colorful master classes of varying difficulty levels. We are sure that you will definitely find something worthwhile for yourself.
Hedgehogs are all different
Did you know that the Soviet cartoon “Hedgehog in the Fog” 15 years ago was recognized as the best animated film of all time? You see what a difficult animal this hedgehog is. It is definitely worthy of repeated embodiment using various natural materials.Volumetric hedgehog made of seeds and plasticine
A cheerful and thrifty hedgehog, cheerfully carrying mushrooms on its back, may come to visit your apartment in the fall. To do this, you will need to stock up on simple natural materials, an hour of free time and involve young assistants in the work. For joint creativity you will need:
- foil;
- leg-split;
- black and brown
- unpeeled seeds;
- PVA glue;
- acorns and leaves for decoration.

Cover the hedgehog's body with black plasticine and its face with brown plasticine. This important stage can be safely entrusted to the child; nothing will be spoiled, and all the flaws will then be hidden.

Lubricate the muzzle with a thin layer of PVA. Also moisten the twine a little with glue and wrap it tightly, row by row, around the face, starting from the nose. You'll have to stop there for now and let the glue dry. Remember this has to happen naturally. On a radiator or when drying with a hairdryer, the plasticine will melt.
The next stage is the design stage. You need to make needles for the hedgehog from the seeds. Start work from the head, arrange the rows of seeds in a checkerboard pattern. Stick the “needles” into the plasticine as tightly as possible to each other.

Decorate the face with plasticine eyes and nose.
Mushrooms can be easily made from acorns by simply covering their caps with brown plasticine. If you wish, you can attach real leaves to them. Using plasticine, attach the mushrooms to the back of the hedgehog.
Such a cutie will definitely please your child, and will also allow you to enjoy joint creativity.
Hedgehog applique made from dry leaves
While walking through the autumn park, you collected beautiful bouquet yellow leaves? Great, add glue and cardboard to them and we’ll make a cute hedgehog.All you need is to draw an outline. Your baby will be happy to glue the leaves on himself. Just show him how it's done.

You can download the hedgehog template, we offer you 4 options:


Hedgehog applique made from seeds
Did you like the idea of using seeds for hedgehog needles, but a voluminous craft seems too complicated to implement? We have prepared another simple MK, which features a funny hedgehog, seeds and plasticine.With a little perseverance, you can make a surprisingly cute and easy craft for kindergarten.

Paper hedgehog
We bring to your attention another idea that even kids from junior group. An original and cute applique using autumn leaves it won't take you much time. It also comes with a paper cutting template, making it even easier for parents.
Template:

Mushrooms
You've already got your head full, what else could you do to surprise the seasoned kindergarten teachers who are waiting again and again for crafts from your child? We offer to capture their imagination with surprisingly realistic mushrooms made from the simplest materials at hand.
To work you will need:
- cotton wool;
- water; starch;
- long nails or thick wire;
- cardboard;
- paints and brushes;
- PVA glue;
- dry tea leaves or poppy seeds.

Pierce each circle in the middle with a nail. It will serve as the base for the leg. Instead, you can use thick steel wire. But it’s better not to bother and buy a dozen or two potential “mushroom legs” at your nearest hardware store.

Now it’s time to cook the paste. Boil a liter of water. Stir 5 tbsp in a glass of cold water. with a heap of potato starch. While stirring boiling water, pour starch into it in a stream. Stirring, bring the paste to a boil. It is ready to use, all you have to do is wait for it to cool to room temperature.

Coat the mushroom preparation with paste. Roll a cotton wool ball for the hat, dip it in paste and glue it to the hat. Wrap the mushroom stem with moistened cotton wool. Repeat this procedure several times until you get fungus desired size and shapes.

Don't forget to squeeze out excess glue from the cotton wool! The resulting blanks must be completely dried on a radiator or in a warm oven. Already at this stage the mushrooms turn out very nice.

The time has come for creative work - painting. It is she who will turn faded preparations into real autumn mushrooms. You can paint crafts with any paint: acrylic, gouache or watercolor.
Color the caps according to the selected types of mushrooms.

Wait for the paint to dry completely. Cover the end of the leg with a thin layer of PVA and dip it in dry poppy seed or tea leaves - this will simulate the remains of earth.

For additional shine and chic, you can coat the mushroom caps with any colorless varnish.
You can decorate a beautiful basket with mushrooms - your craft will not go unnoticed. And the secret of making realistic mushrooms will long excite the imagination of everyone who is lucky enough to see them.
Like these ones hand made Handsome people are the result of effort.

Don't have a suitable basket? No problem! The most beautiful composition using moss, coniferous or dry twigs and real dry leaves, you can arrange it in a regular cardboard box or on a small stump, or on your own.

Imagine and think outside the box - in kindergarten, and any other creativity, this is only welcome.
Autumn trees
Has your child already wondered why in the fall the trees change their green attire to a bright yellow-orange decoration? So it’s time to satisfy his curiosity, and at the same time his craving for creativity.Plasticine tree
We offer you a beautiful and simple plasticine application that even the youngest naturalists can handle.
For work, prepare colored plasticine and cardboard.
Draw a tree trunk on thick cardboard. Now let your child roll a lot of thin and long plasticine sausages in 2-3 shades of brown.

Glue them along the tree trunk, alternating shades for realism. Fill in the entire contour of the trunk and don't forget about the branches.

Add some more branches for a lush crown.

Roll out many thin sausages of red, orange and yellow flowers. Roll each sausage into a spiral shape. You will see that your child will really enjoy this exciting activity.

Glue the spirals in random order onto the crown of the tree. Shape the tree to the desired size.

Make blades of grass from green plasticine. “Plant” the grass near the tree.

Complete the applique with falling leaves.

This is the kind of man-made beauty we have. A bright frame will make the picture even more expressive.
Application “Confetti Tree”
An original idea for an autumn tree is to decorate it with paper confetti. Check out step-by-step master class by watching the video we suggested. Confetti can be easily and simply cut out using a regular hole punch. Using this technique, you can quickly grow an entire fantasy forest.Pumpkin seed trees
Have you noticed how much a pumpkin seed looks like a leaf? A creative personalities not only noticed this, but also used the similarity to create an original applique from this natural material.See our step by step photo MK and be inspired by your own masterpieces.


Unusual trees made from cereals
We continue to increase the level of creativity. Now, to create a craft, colored cereals will be used. Do you have rice, semolina or millet in stock? Then try to master this method of creating an application.Or this option:
"Macaroni" tree
The unusual shape and safe composition of various pasta products makes it possible to use them in preschool creativity. Find bow- or leaf-shaped pasta and “grow” your own unique tree.
Unusual "button" trees
And if you accidentally have a lot of unnecessary multi-colored buttons lying around at home, then we know how to use them for a good cause. Try to create a bright panel that will decorate your cottage or nursery. And armed with wire and pliers, you can master the art of button bonsai.


Pumpkin
Autumn is harvest time. And even if you didn’t plan to collect a real harvest, surprise everyone with a realistic nylon pumpkin. You can make it for a children's autumn crafts competition, or just for fun, and at the same time get acquainted with an interesting technique for making nylon vegetables and fruits.
To work you will need:
- painted nylon;
- filler (foam rubber or padding polyester, even ordinary cotton wool will do);
- needle and thread;
- thin wire;
- a small piece of wire;
- green tape;
- scissors;
- brush and paints.

Using a needle, make jumpers with thread. Do them at the same distance until you go around the entire workpiece in a circle.

Use small pieces of thin wire to make round blanks for the leaves.

Cover them with green nylon, secure its ends with thread and trim off the excess. Slightly deform the edges of the leaves, giving them a realistic look. Wrap the ends of the wire with tape.

Wrap a piece of wire with tape. Wind it around the handle and carefully remove the resulting spiral. The result is a branch-tendril, which we will attach to the pumpkin.

Collect a pumpkin branch, gradually connecting the leaves and tendrils with tape in a random order.

At the top of the pumpkin, fix a piece of wire and wrap it with tape. Attach a branch with leaves to the tail.

To achieve realism, tint the depressions orange. Blot excess moisture with a napkin.

As a result of the efforts made, it turned out wonderful gift autumn, made with your own hands.
Ideas for inspiration
We have prepared for you a photo selection of unusual autumn crafts to motivate you to take action. Watch and be inspired to create together.Spectacular composition made from natural materials
Dry twigs and grass, a bunch of viburnum, a few smooth pebbles, a pine cone and sand, thanks to imagination, turn into a cozy rural courtyard with a wooden house under a thatched roof. This craft looks very unusual, and you can get it absolutely free. All you need to do is go for a walk in the nearest park.
Yellow leaf bird:
Printable bird:


Bouquet of maple leaves
In autumn, fallen golden leaves just beg to be picked up. Walking through the park, it’s so easy to pick up a whole bouquet of maples, but its natural beauty instantly disappears in the apartment. It can be fixed. We will teach you how to do beautiful roses from maple leaves. Such a bouquet will create an atmosphere of autumn comfort in the room and will delight you with its warmth for a long time.
Autumn crafts from twigs and threads
With a little imagination, dry twigs collected during a walk can be turned not only into crafts for the kindergarten, but also into spectacular souvenirs or bright interior decorations.
Simple paper crafts
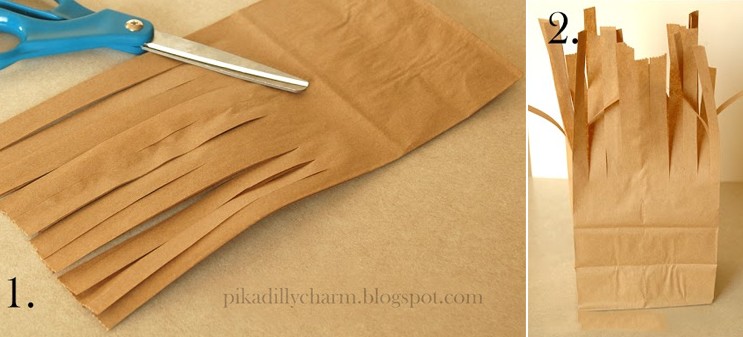
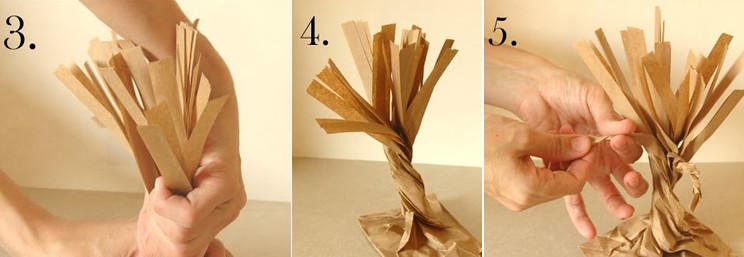
Unusual autumn leaves can be created with my own hands, and turn an empty paper bag into a picturesque tree with a spreading crown.A few more printable templates:


Just give free rein to your imagination and follow the step-by-step photo instructions.
Cute paper umbrella.
In contact with
Classmates
With the arrival of autumn, not only is it time for rain, but it is also time to create beautiful autumn crafts. It’s good that autumn is no less generous than summer and we have plenty to use for making autumn crafts for kindergarten.
Additionally, to work with natural materials you will need paints, brushes, a glue gun, small colored pompoms, feathers, leftover felt or fabric, beads, and other various decorative options.
Now, knowing what to make autumn crafts from, let’s quickly start creating them. For example, pine cones make these cute chickens. For them you will need cones, yellow gouache, a brush, a foam ball or large bead, a glue gun, plastic eyes, a piece of orange felt and scissors. Paint both the cone and the ball yellow, glue them together, glue a felt beak and eyes to the head, and a pair of legs to the bottom of the cone. If you have a couple of real feathers, you can glue them to the sides of the chicken.

A hedgehog from a pine cone can be made in two versions. In the first case, you will need a pine cone, a piece of light brown or beige felt, eyes, a small black pompom, and a glue gun. Cut out a piece for the hedgehog's face from felt, decorate it appropriately and glue it to the pine cone.

The second option assumes the presence large quantity fir cones, plastic bottle small volume with a black lid, glue gun, jute rope, ready-made peepholes big size or the remains of black felt and white. Wrap jute rope around the neck of the bottle and glue the pine cones over the entire surface of the bottle. Cut out the eyes from felt and decorate the muzzle.

You can make a wonderful owl if, after a trip to the forest, you have acorn caps, a piece of bark and a pumpkin seed. Just glue all the parts and secure the owl to the tree branch.

To make a snail, you will need chestnuts, plasticine and a pair of matches for the horns. If there are no matches, then you can replace them with toothpicks, however, it is worth protecting the child from injury and gluing a bead to the tips of the horns.

You can also turn a chestnut into an incomprehensible but funny animal by gluing huge paper eyes, a pair of paper legs and a braided hat to the chestnut.

Everyone's favorite bright bug, ladybug, you will definitely succeed if you find a chestnut, a pair of eyes, paints and two pushpins. You can read more in our master class.

Young fans of the cartoon “My Neighbor Totoro” can create their favorite character from an acorn and paper. Paint the acorn with gouache, and make the ears from tiny leaves or paper and glue them to the acorn.

A nut shell will turn into a boat in a matter of minutes if you glue a tree branch inside each shell and attach a sail made of a leaf.

The variety of autumn leaves stimulates children's imagination and as a result we can see completely unusual things.
For example, these funny little people made from leaves. Just glue the maple leaves to the paper, draw the arms, legs and glue the eyes and nose.

Every baby can make hedgehogs from leaves if the mother draws a hedgehog’s face on paper and trusts the child to glue leaves and needles to it.


Another forest dweller, red-haired and cunning, can become your autumn craft. To create it you will need a maple leaf, paper eyes and ears, a small pompom for the nose and PVA glue.

Another version of forest animals made from leaves and paper. To give your craft the features of the desired animal, simply draw a face on paper and glue on appropriately sized ears made from leaves.

With the help of leaves you can make not only animals, but also people. Cut out a head from felt, paper or foamiran, glue on eyes and a nose and make a fluffy hairstyle from maple leaves.

Woodsmen, the indigenous inhabitants of the forest, will be made from cardboard tubes, leaves, buttons, small stones and pieces of chenille. It is best to fasten all the parts with a glue gun.

Also, cardboard tubes can be turned into autumn trees if you paint them in Brown color, glue one edge to the cardboard, and attach autumn foliage to the second edge.
No paper? This means you can make leaves from cardboard and knitting threads. Cut out leaves from thick cardboard and wrap with thick, bright threads. Glue the end of the thread and hide it between the thread layers.

Don’t forget about buttons, another universal material for crafts.

If you repaint old and unnecessary puzzles, you can get a beautiful autumn tree. Make a tree trunk from leftover fabric, folded into a pigtail and glued to a thick base.
But, if, nevertheless, you managed to collect large stocks of autumn herbarium, then you can make such beautiful candlesticks. You will only need small leaves, PVA glue, a brush and a glass jar.


And you can decorate a photo frame with acorns, where you will place a photograph taken during your last trip to the forest.

As you can see, there are a lot of options for autumn crafts for kindergarten and school. All you need is just to stock up on natural materials for crafts in time and open our website.
In contact with