How snowflakes are made. How to make a snowflake from paper. # 8 Threads and Paper Plate
The new year is very close and in this lifehak we will analyze 140 different schemes, and simply. You also will be waiting for several video lessons, which will help better understand all nuances.
Most likely, each of you knows about how to make a round snowflake paper(whiteor color), but since we are only necessary for the New Year holidays, then the subtleties of production over the whole year are forgotten, so it's easier to google at the right moment and get to our site to remember everything. I think so most of you do, but this article will be useful and to those who want to find something new, something interesting and ambitious, for example here you will learn in the form of deer or cat. And so, we turn to the essence of the question.
How to make a simple snowflake paper
To begin with, we analyze the form of the foundations for future jewelry and start with the most standard. Try stepwise make a beautiful snowflake of paper And you will definitely succeed.
- The first thing you need to do is take a sheet A4 and cut the square from it. To do this, we take one corner and pull it to the opposite edge, and then bend, as shown in the picture.
- Superior cut and get the perfect box.Now bend it back

- Then again

- The resulting triangle turn over the top up, and the left edge pull to the middle (even a little further)

- Now the overstt pull right.

- It is important that in the end the edges were not in short and did not speak at each other, so try before forming the final fold.

- I turn over the resulting figure and cut down at the level of the formed strip.

Second base new Year's snowflakes made of paper Also simply and the first two steps will be the same, but further, after the formation of the square, there will be differences.
- Prepare a pair of fold in advance, from one corner of the square to another.

- Now we put a triangle and put the top down.

- The right edge is folded, as shown in the figure.

- I turn over and the same procedure is done with the second edge. The main thing is that everything is symmetrically.

- Bend the figure in half.

- The drawing must be applied by the edge where the inner corner is located, otherwise you will not succeed make the most beautiful snowflake paper on the window, After all, she simply disintegrate.

The last third framework scheme in order to as origami make a snowflake from paper (sheet) Begins, as the two previous two.
- From a square.

- Then bending the triangle.

- We fold again.

- Once again.

- Now I pull the vertex of the triangle in the opposite edge. The top of this figure should be with several tails, and the bottom is solid.

- Cut up the top and the basis in order to make a snowflake from paper A4 ready.

Now, when we disassembled all types of basics, go to their design, and for this we have prepared as many as 140 different schemes. So you will not see anywhere in one place. It remains to remind that if you want make a small snowflake(colorfor example), not big, then just take a leaflet of a smaller format, and all other actions are similar.
140 instructions How to make a snowflake paper
We collected the largest collection of schemes from around the world. Here you can find options. how to make an ordinary paper snowflake, how to make an openwork snowfight or hexagon. There is a perfect type for every taste for the holiday.
This is not all of them, you can read the rest on the board in Pinterest.
Now you know how to step by step to make a snowflake of paperBut if you like to watch a video visor, then specifically for you we picked up the best video with the instructions for creating and now you can watch:
How to do with a paper from paper video
How to make a beautiful snowflake paper video
We are accustomed to decorating our home for the new year, offices, where we work, the classes of Mishur, serpentine and snowflakes. If openwork circles are sturdy on the window glass, it means that there are not indifferent happy people. Despite the fact that real snowflakes are flat and thin, we want to see these winter journey three-dimensional. But how to make a bulk snowflake from a flat sheet of paper with your own hands? It is not difficult and very fast.


This beauty looks spectacular if it is collected from paper two or three colors. In order to make a bulk snowflake with your own hands, we will need:
- 6 squares of colored or white paper of the same size;
- scissors;
- ruler and pencil;
- stapler;
- glue.
Procedure for performing work
- Our bulk paper snowflake consists of 6 identical details. Every of them we will do according to the preparatory pre-stencil. Draw on the equilateral triangle 6 direct non-speaking Direct angle lines to each other and at the same distance. Leave between cuts at least 1 cm.

- Take a square sheet of colored paper, fold it diagonally in half.

- Make 3 stencils. If you think about making a big six-pointed star on the Christmas tree on this instruction from Watman sheets A11 format, the cuts will have to do more. Accordingly, turning, connect and shove too.

- Expand the square and fold together the angles of a small inner square. Build them with glue or stapler.

- Turn the leaflet with the other side. Fold the angles of the next inner square and also secure them with each other.

- Roll over our craft again and repeat the steps. At the same time, the first smallest cooked square will be inside your third square.

- Turn over the workpiece and secure the corners of the largest outer square. We have here such a volumetric multilayer icicle. This is just one sixth of our snowflakes.

- As already mentioned, our bulk snowflakes from paper, cutting and mounting schemes and which are above, consist of 6 identical parts. Therefore, we make 5 "icicles". Create them with brackets for three among themselves. Send your tail on which the fastening bracket is located.

- Build two halves to one whole snowflake. Use the stapler and do not spare brackets.

- So that the snowflake does not fall asleep on the components, it must be copped with a stapler at 6 points.

- Everything. You can tie a string and hang out the bulk snowflake to the ceiling or hoister on the christmas tree.

We can make this work from a single piece of paper.
Tip:Make a square square can be very simple and fast, without using a ruler and pencil. Bend the leaf, aligning the upper short side with a side long side, starting the fold line from the angle of the leaflet. All that remains below the two-layer "Pupbug" Cut Rovelyko. Expand the remaining and make sure you have a square.
We make a simple snowflake
- Take the square and bend it again diagonally.

- Bend twice from one corner twice and cut the leaflet in the form. Make two naps at the same distance from the edge of the "Leaflet".

- Deploy the workpiece. Bend internal stripes to the center and glue.

Cut two identical paper strips. Collect two harmonica of them. Fold them across in half and cut the same outline. It is difficult to do it, as it turns out too many paper layers. Therefore, it is more convenient to use a pre-harvested stencil. After drawing on it, the contour immediately on two sides of the accordion, you can cut, without folding in half. Options for different contours are shown in the photo.

Build the staplers of the centers of our billets and glue them with the help of PVA glue. Expand Veter and glue two more surfaces. You can hang snowflake on the Christmas tree.

Openwork Snowflake from Paper Striped
Cut from paper 15 strips of the same length and width. Fold them first with the cross, and then the snowflake for 5 pieces in the beam at the same distance from each other. Load the middle and let the glue dry so that our design does not scatter from the slightest draft.

Take the diagonal extreme stripes and fold them as shown in the photo, covering glue or metal brackets. Moreover, it is necessary to fix them to the central horizontal or vertical strip. Make the same with the second extreme diagonal stripes.

Excellent will give the winter fabulous atmosphere of snowflakes. So that they looked effectively, make them volume. In this article we will look at: how to make volumetric snowflakes from paper with your own hands.
You will need: Brilliant cardboard blue and purple color, stationery knife, adhesive gun, ruler, simple pencil, toothpick.

Master Class

Brilliant Volume Snowflake ready!
Exquisite snowflake

You will need: 6 blue square sheets, 6 white square sheets, blue paper circle, PVA glue, rhinestones.
Master Class

Exquisite volumetric snowflake from paper is ready! I recommend to view this video!
Beautiful snowflake

You will need: Two square sheet of blue paper, scissors, adhesive pencil, simple pencil, rhinestones.
Master Class

Beautiful volumetric snowflake made of paper ready! I recommend to view this video!
3d snowflake with shines

You will need: 6 Sheets of green color measuring 8x8 cm, scissors, simple pencil, pencil glue, rhinestones.
Master Class

Original Snowflake

You will need: 2 sheets of yellow paper of the format A4, scissors, simple pencil, white threads, adhesive pencil.
Master Class

The original bulk snowflake made of paper is ready! I recommend to view this video!
Volumented snowflake

You will need: White and blue paper, scissors, ruler, glue-pencil, decoration elements - wipers, beads, flowers ...
Master Class

You will need: 2 sheets of colored paper, scissors, adhesive pencil.
Master Class

Complete snowflake made of components
You will need: 6 square sheets of paper, scissors, glue.
Master Class
- Take a sheet to fold it diagonally, then in half.
- Make 3 wrap and deploy the workpiece.
- Slit the ends of the smallest strips, then through one strip on each side, glue others.
- Connect the remaining strips on the other hand.
- Repeat this process with the rest of the sheets, then collect a snowflake, gluing 6 blanks with each other.

You will need: paper. Scissors, ruler, glue.
Master Class

Snowflake from paper strips is ready!I recommend to view this video!

You will need: Paper sheets, circle pattern, glue, pencil, thread, needle, line.
Master Class
- Cut from paper 8 identical circles.
- Divide the circle on 8 equal parts and make cuts.
- Twist each part of the circle into the cone using a pencil, fixing glue.
- Repeat this process with the rest of the workpieces.
- Get down the blanks on the thread with the needle, secure and form the ball.
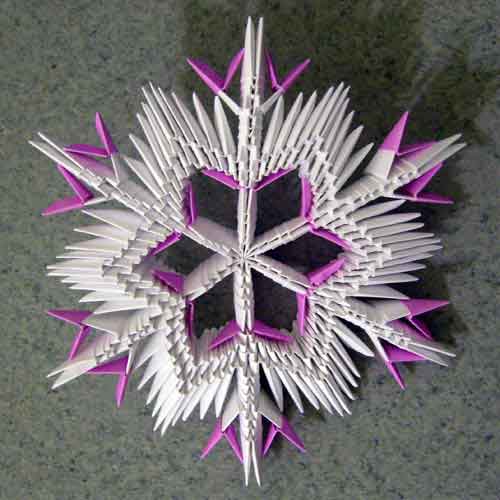
More than conventional origami is considered modular origami. Fold the first modulus according to the photo diagram, make them a huge amount and proceed to the assembly in the photo master class. Creating such a masterpiece requires a lot of time and patience. Also there are huge advantages - you develop a shallow motility of the hands and can surprise those surrounding so elegant snowflake.

Master Class
- Start an assembly from the middle formed a center of 12 modules.
- Insert the edges of the module in the karma of other modules.
- Attach the modules in a checker order from one edge, a chain of two bonded rows should be formed - an external number of 6 modules, and external 5.
- Remove the remaining module and connect the chain ends, forming the ring.
- Increase the length of the rays attaching modules.
- Add a different color module to each beam and continue to build the main one.
- Add modules until the snowflake becomes the desired size.


Snowflake in the technique of modular origami ready! I recommend to view this video!
Snowflakes always make an eye and raise the mood. Make the best, original bulk snowflakes and present them as a gift. Then your loved ones will feel a fairy tale at home, remembering you.
We suggest remembering the virgin and make a couple of beautiful paper snowflakes, and even better not a triple, but with a dozen two and decorate the room and the Christmas tree, as well as in the present present. Made bulk snowflakes from paper with their own hands, step-by-step instructions and photos in front of you, will become a good New Year souvenir for friends and friends.
In the article you will find a large selection of master classes of different snowflakes, as well as cutting patterns.

To cut the snowflake, then there is one important correctly: at hand it must be a good stencil. These templates can be downloaded by reference.
- White bulk snowflake
- Skinny Snowflake Flower
- With 3D effect
Simple and beautiful bulk snowflakes
New Year's preparations - no less magical time than the new year itself. What a pleasure is bringing pre-holiday hiking to the store, shimmering outdoor decorations showcases against the background of falling snow, drawing up a list of gifts and the creation of a New Year's decor. If adults are treated so tremendous preparation, then children are simply delighted with any opportunity to participate in such events. Let's delight our kids and make openwork bulk snowflakes with them, which can be used in the design of the Christmas tree, creating garlands, decorating windows or gift packaging.
Prepare the following materials for work:
- White paper sheets (it is better to use not too dense paper);
- simple pencil or marker;
- glue or bilateral scotch;
- scissors;
- stationery stapler.
How to make bulk openwork snowflakes from ordinary paper
Take the paper and the necessary tools. When the desired materials are at hand - work is coordinated. 
Divide a sheet of A4 format into two halves. 
Bend the strip from one edge to a small width (0.8-1.2 cm). 
Round the edge again, now in the other side. Canceling the edge again and again changing the position from the inside on the front side. Very important condition - the more assemblies, the better the snowflake will turn out. But too narrow bands should not be done - it will be inconvenient to cut the pattern. If everything is done correctly - you will get paper collected in the harmonica. 
Make so with all the harvested papers. Part "Garmoshk" divide with in half scissors. 
Bend each "harmonic" in half into the same way. 
Stapler Join the middle of each "accordion". 
Draw the pattern on each billet. 
Fold the "harmonic" in half and cut the pattern according to the planned pattern. 
The edges of the snowflakes can be combined with glue, but much faster and stronger - with the help of tape. Cut the bilateral barns and stir up on both sides. 
Remove the protective layer and connect the "harmonic" on one side by pressing the edge. 
Connect the second side. Scatter over the entire surface and you will have bulk snowflakes. 

Snowflakes will turn out openwork, different sizes. 
Beauty! Working hands and scissors with ordinary paper, extraordinary white snowflakes are obtained! 
Snowflakes will become a wonderful addition to the New Year decor. Also use the works of children's creativity in the decoration of gifts, postcards and invitations. Volumetric snowflakes can be taken to design garlands, mobiles or attached ornamental decorations. And if on top of apply a little glue and sprinkle with sparkles or shimmering dust - they will take off and play all the colors!
White bulk snowflake
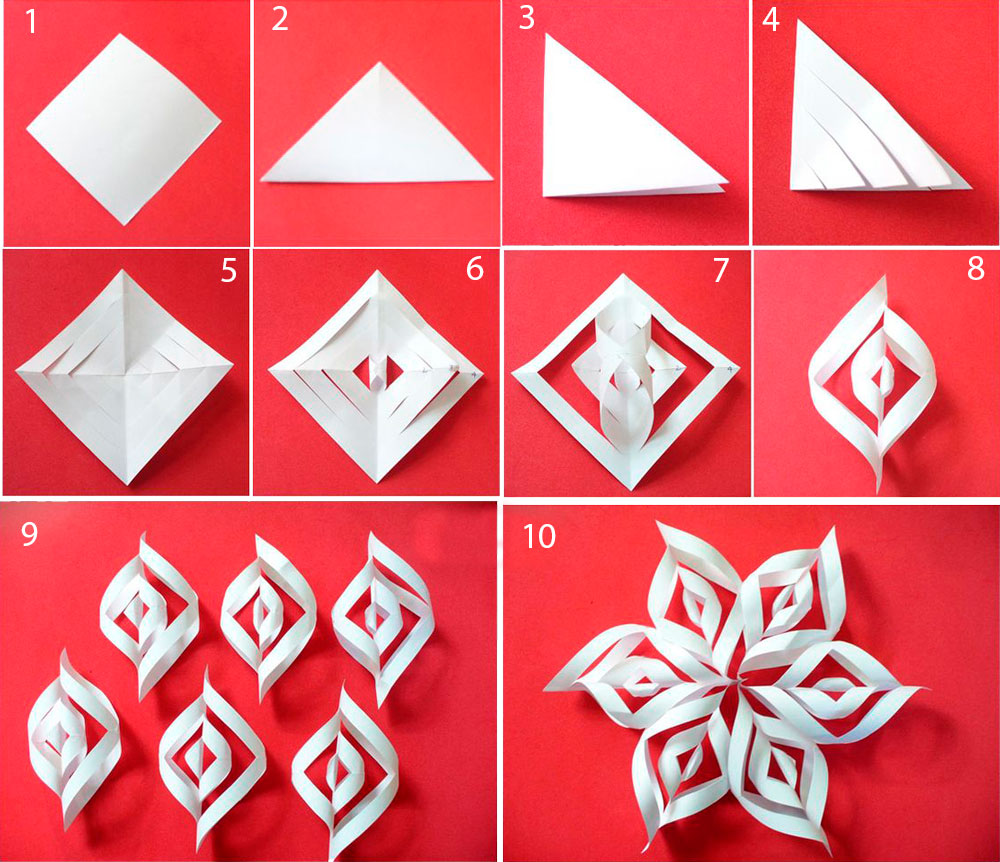
To create a bulk paper snowflake, you need to take:
- 6 paper squares with a size of 10x10 cm;
- scissors;
- glue;
- line;
- Pencil.
How to make bulk paper snowflake with your own hands
 1. Following our instructions, we put a paper square in half to get a triangle.


5. We glue the inner petals of bulk snowflakes, as shown in the photo. 


8. Similarly to the steps described with the remaining paper squares. 
We collect a bulk snowflake from paper:


11. Similarly, glue all the blanks. Volumetric beautiful snowflake made by hand ready! 
See also videos How to make a bulk snowflake from paper:
Skinny Snowflake Flower

It will take:
- Paper A4 of two colors,
- scissors,
- Pencil,
- glue.
How to make a bulk snowflake from paper stages:
1. The sheets of paper are folded so that the triangle is turned out, and subsequently the square. 

3. We fold the obtained triangles again. 
4. Draw lines on triangles, as shown in the photo. 
5. Along the lines, we make cuts, cutting the triangle in the middle and do not do the middle line to the end. 

6. Deploy the future snowflake. 
7. Slip the corner of the middle strip with glue. 
8. Glit to the middle of the snowflakes. 
9. We also repeat with a parallel strip. 
10. And with two other stripes, thereby connecting everything in the middle. 
11. We glue the snowflake of yellow to the snowflake of white. 
12. Now we glue the middle strips of white under the already glued yellow. 
13. We repeat on the other hand. 
14. And with the rest. Snowflake is ready. 

Beautiful bulk snowflake is ready, thread thread through it and decorate our home. I hung on the wall, where the snowflake harmoniously was in a common interior. What and you wish you. By the way, snowflakes can be created not only from paper, but also make them.
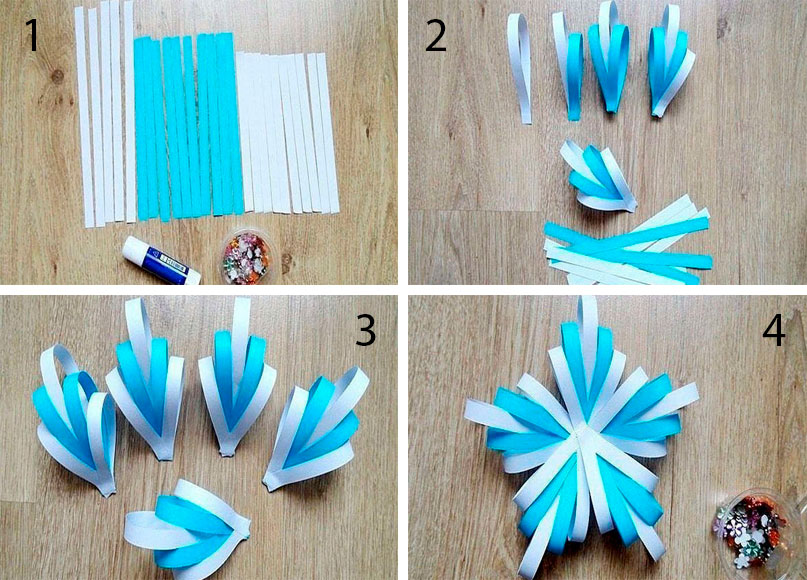
Bulk snowflake from strips with their own hands

Materials and tools will require the most ordinary:
- double-sided colored paper,
- line,
- scissors,
- glue.
And if you want more holiday, add sparkles, sequins and something like that, for decor.
In this example, I took sheets for printing format A4: one blue, one white and one purple. Since in the amount we will need 20 strips, then we twist along the long side of each sheet of the strip of a centimeter wide. 8 blue, 8 white and 4 purple. 
Such a bulk snowflake made of paper consists of two identical parts. For one part, we take 4 blue stripes, 4 white and 2 purple, intertwine them with each other as in the photo (linen weaving). So that such a design is not crumbling, fasten the stationery glue in several places. 
Extreme to the corners of the strip (blue) in pairwise glue, so that a straight angle turns out on the tip. If the glue is not captured immediately, then temporarily, before drying the glue, use the clips. 
Then we lump up the back of the white stripes. It came out one part of the future snowflakes. 
Web and glue the second, exactly the same, part. 
Connect two parts. The races first should be between the rays of the second. The remaining free stripes (purple) we pull into the rays and glue the tip. The case of snowflakes is ready, now it is solid and can be suspended. Sut off on the rays is superfluous, sticking out that the tips are pointed, and if there is a desire to supplement the figure with something that is complementary. I tried to use pearl sequins. 
As a result, we get a rather large bulk snowflake of paper, about 25 cm in diameter. If less needed, cut the A4 sheet across across, along the narrow side, and take the width of the strip 0.5 cm. 
With any size it turns out the original air decoration for the house made by your own hands. If children still seem complicated to children, they can participate in cutting strips of paper, and then watch the work of adults and decorate at the end, gluing shiny elements. 
Three paper bulk snowflake

To create snowflakes need:
- paper of three colors (one can and one),
- scissors,
- Glue pencil or PVA.
How to make a bulk snowflake paper with your own hands:
In the work we will use the extra stripes that we cut into the manufacture of previous snowflakes - white, blue and purple colors. To begin with, cut the squares of the same size. Then each square will begin to fold in half, forming a triangle. 
Then we fold for the second time. 
Next, you can use a pencil, and you can simply make smooth cuts along the longest edge of triangles. It is not necessary to start cutting from the last bend, but from the side of the sides of the triangle, as shown in the photo. 
We deploy each resulting cut square and begin to glue all corners. First the middle. 
Then through one strip, two stripes. 
Then glue the remaining stripes to the other side. Thus, the petal of the future snowflakes thus. 

So do it with all other snowflake blanks. 
We start gluing them among themselves three jokes. Selecting a specific combination of colors, we glue the bottom edge of the snowflakes and among themselves in contacting strips. 
Next, glue two blanks with each other in the middle and again among themselves coming strips.
Snowflake is ready, you can hang it on the wall or even on the Christmas tree. Moreover, you remember the tradition for each meeting of the new year you need to hang a new toy on the Christmas tree. So let it be the snowflake made by you from paper. 

Paper snowflakes: Cutting patterns, volumetric step by step are shown in this section of the material. These products with such a strange title are in appearance more voluminous, and on the cutting process more complex. It is extremely important at the very beginning properly folded the workpiece, otherwise when cutting will be completed, the product may simply operate into several parts.

To make a snowflake for such a technique, a dense paper is required. It can be white or any other color, everything already depends on the specific creative idea of \u200b\u200bman. You will also need to have sharp scissors and a stationery knife at hand (used to cut small parts, you must definitely put something under the product so as not to cut the table).

Before you begin to make such a snowflake, you must definitely fold the workpiece. To do this, the usual sheet of paper is twice and draw a line along the bottom edge on it. Next to it is perpendicular. On our sheet will turn out two angle of 90 degrees. After that, you need from the point where the lines intersect, spend the line so that it turns out an angle of 60 degrees. Then you will need to spend two more lines that reach the edges of the sheet. If you are confused, reading all this, just look at the photo and will definitely become clear how exactly and what to do.
Now the square sheet is taken, it must be addressed diagonally, it will turn out to be a triangle. To make stencil, checking the coincidence of all angles. The base of the triangle must coincide with the line that goes along the edge of the sheet (which at the very beginning of work, see the previous paragraph, was carried out the very first). The sharp corners of this triangle are bend to the opposite lines that go to the corners of 60 degrees.
It turns out quite beautiful in shape of a figure, reminiscent of a flower bud. All, preparation is ready. Yes, it will be difficult to make it and, perhaps, it will not work first time, but the bulk snowflake is obtained delightful and very original.
Further in the case how to make snowflakes from paper: templates for cutting, volume, you need to check with photos. If everything is done correctly, apply on the pattern pattern, then when the cutting work is over, you should erase all lines that could stay on the surface of the festive snowflake.
Tip! To cut the snowflake was easier, you can fold twice the workpiece. But then you need to understand that the pattern of the template is applied in such a situation only one half of the workpiece.
When the snowflake is cut out, then you will need to bend small details, after this step, the product will appear a cute and pretty volume. Additionally, such a snowflake can be painted, decorate with sequins, beads.
You can also watch the video, how do the bulk snowflake from paper do it yourself for the new year:
The next pretty interesting option is made by paper snowflakes on cutting patterns, the volumetric options. To make this snowflake you need to have three ordinary paper snowflakes, you will also need glue, thread and needle. Other options are made.

First, select any snowflake templates, which will only like it and print it. Next, on three leaf of paper, simply circle this stencil cut. Such a template is more convenient to cut out with no scissors, but using a stationery knife, only under the product you need to put a cutting board to avoid damage to the table.

Next, you will need to bend the product on the dotted line, it is also marked on the template. It remains now to glue or sew snowflakes together along the fold line. Of course, such an elegant bulk snowflake must necessarily hang somewhere, and it is impossible to do without an additional looping. To do it, it will be enough to skip the thread or a thin satin tape through the upper rays and tie a knot.
I would like to consider another option to create a bulk snowflake paper from paper snowflakes without using a cut-out template. This snowflake will be made from two blanks, each will be at once four corners. For the manufacture of snowflakes you need to have two sheets of paper at hand, they cut them the same squares in size.

Then add each square to get a triangle. This triangle will need to fold again. Stage of work is simple, it is used almost for all snowflakes. Next, you need to arm a simple pencil and draw the lines for which the snowflake will be cut. You must first remove the extra part of the triangle: the figure will turn out, on the form similar to the tail of the mermaid (see photo).
From each edge to spend two lines by making a small indentation between them. The top corner is left as it is. The lines should not reach the upper angle and ends somewhere behind the centimeter to it. It remains to make slits and deploy details. It will turn out two beautiful snowflakes with four corners, reminiscent of the appearance of color.

Now we need to make a snowflake from flowers: we are talking about New Year's decoration. Middle strips on each best bend to the center and bind over each other. Put one blank to another, rays should not coincide. As a result, it turns out a snowflake with 8 angles, which looks great on any side. The details remains to glue, and the snowflake on your own willingly can be decorated with beads, sequins or than only your creative soul wishes.
With 3D effect
It seems to many, judging by the photo that such a bulk snowflake made of paper with their own hands for the new year is easier than the previous version, which was considered. In fact, there is someone like. It seems that the second version of the manufacture of snowflakes is actually easier and easier, but, on the other hand, if you do it together with the kids, you still need to spend time and strength.
The advantage of this embodiment of the snowflake is that it will be possible to use a variety of ornaments. This means, people who constantly complain that master classes do not give them to exercise fantasy in full force, will be able to finally give will imagination.

What you need to work:
One sheet of paper of any color;
Pencil and scissors;
Slapboard with braces for fastening the pieces of snowflakes.
The paper is needed in the form of squares with a side of 10 cm. To make a fairly large snowflake for such a master class, there will be ten pieces of such squares from paper. First of all, you need to cut the snowflake in any way of one square paper. To do this, you follow the square bend in half, it turns out a diagonal. Now bend everything again and draw the pattern by which the snowflake will be cut.
Important! Patterns can be very different, but it is important to repeat it happened several times. Therefore, it is possible from the thematic article on our website to simply print the finished pattern (or through the screen to translate it on paper), which is used for the manufacture of bulk snowflakes as a result.

According to the outlined lines, it will be necessary to cut a triangle, simply speaking, in the usual way, using sharp manicure scissors, cut the snowflake and decompose it. The same billets make from those nine leaves of the square, which were prepared for work, but have not yet been used. Recall once again that the pattern of all snowflakes should be the same.

Now the time comes to make a big figure from ordinary flat snowflakes. You need to take five snowflakes flat for the beginning and using a stiplant to bore them with each other.
Next, again, de take five blanks and exactly the same principle as the top five,
Crop to each other. It remains the most difficult part of the process that requires the most accuracy. Two halves of one big snowflake should also be copped with each other. A large bulk snowflake is ready and to hang it, you just need to tie it in any area of \u200b\u200bthe tape or thread.
It is impossible to imagine the new year without snow and beautifully decorated at home. And not only at home. On New Year's days, the whole city is dressed up and shines with lights. I suggest making beautiful paper snowflakes and decorate your home. And children can attribute such snowflakes to school (or in kindergarten) and decorate their class. And cut the snowflaps is a pleasure: it is always nice to realize what you do something beautiful!
Beautiful simple paper snowflakes (10 schemes)
Snowflakes made in this way are obtained very beautiful. And schemes for which you can cut, unlimited quantity. You can come up with a scheme yourself and embody her. I will show some options for the manufacture of beautiful, openwork snowflakes of paper. Snowflakes made in this way are obtained by six highly, as real.
More ways to make very beautiful snowflakes look in this article.
How to fold the sheet of paper
First you need to fold the paper correctly. For all snowflakes, which I will continue to show, the paper folds in the same way. It differs only the pattern for which it will be necessary to cut. The main thing, carefully repeat each step so that the snowflake is turned out.
In order to make a snowflake, you need a square sheet of paper. By the way, now paper is for origami (in book, stationery stores), it is immediately square, multicolored, with patterns. In general, you can choose anything to your taste. And paper for origami thinner than standard paper for the A4 printer. Accordingly, it is easier to cut out of it.
To make a square from ordinary paper, A4 format, you need to collapse, as shown in the photo.

You got a square, folded diagonally (triangle).
Next, this triangle needs to be folded again. A fold will determine where the center of the snowflake is located (the place of bend, I designate the dotted line). Moved and laid back. Before you will be just a square, folded once diagonally.
So that the snowflake is perfect, the vehicle will need. Measure an angle of 60 degrees from the center of the snowflakes to the left and right side. It is over these lines that will need to bend the paper.

Bend the left corner first, then right. Flex gently, as shown in the photo below.

Now turn your workpiece and bend it in half along. In the resulting figure, cut all the extra elements, leaving the triangle.

That's all! Everything is quite simple, the main thing first will carefully read the instructions and repeat everything. And you will succeed. Now on the resulting triangle you need to draw any pattern and cut it.
Some schemes of openwork snowflakes of paper
First option: Snowflake with hearts. A simple pencil draw the pattern as shown below and cut. Better to be sharp scissors. It was convenient for me to cut with manicure scissors, especially elements where there are smooth, curved lines.

This is such a beautiful snowflake according to this scheme.

Another scheme for an example of a six-pointed snowflakes. This is a snowflake flower.

But the result. Like? Write in the comments, what snowflake most liked most. Or maybe you got a very beautiful snowflake on your invented scheme?

Third pattern for you! Everything is simple: folded, painted, cut out, got a beauty!

This snowflake is very openwork, straight lace.

Fourth scheme of simple paper snowflakes.

And the final result in front of you.

Such snowflakes will be decorated at home, christmas trees, windows in the pre-New Year's Eve. And if you still mince, you can decorate them with sequins. Make a snowflake of white paper and paint it with colored markers. As you noticed these snowflakes, I did large, from a whole sheet A4. But snowflakes can be made from the square of any size. Only too little snowflakes will be more difficult to cut and draw on them a figured pattern.
And now a bonus! 6 more schemes for cutting simple snowflakes from paper.

Volumetric "fluffy" paper snowflake
This snowflake is very beautiful, fluffy. Such a snowflake from paper will raise the mood and make it a truly New Year. Other options for beautiful bulk snowflakes from paper are sure to see! The more different snowflakes, the more beauty.
This option is made of eight-beam snowflakes. The billet is turning not as in the previous, six-weather option. But at the beginning you need a square. Take the A4 sheet and make a square from it. Sliced \u200b\u200brectangle Do not throw away from it later make small snowflakes.
The resulting square already folded on the diagonal, it turned out a triangle from it. Next, this triangle must be folded once again to get a smaller triangle.

And once again, fold in half the resulting triangle. It turns out that the square will be folded three times. At the output will be a small triangle.

Now take this triangle for the fold line and adjust it to the longest side. The figure is like on the first photo below. Now you need to cut off the excess part of the workpiece. Sut off the conditional line, which is shown in the photo and get a ready-made billet from which the snowflake will be cut.

Take the workpiece with a snowflake center up. The bottom of the snowflake should be trimmed, to do something like a fringe, because of what the snowflake will get lush. Cuts need to make a width of about 4 mm. The more cuts make, the more realize the result.
Now neatly deploy the snowflake. It is important not to rush here in order not to break the "fringe." It turned out the bottom of the bulk snowflakes. Now you need to do another 2 (and it is possible 3) the same snowflakes only smaller. Part of different colors will look beautiful.
That is, if this snowflake was made of a square of 20 × 20 cm, then do the following in the same way, only the square should be 15 × 15 cm. The third snowflake will be even less - from a square 10 × 10 cm.

Put a little snowflake to a lot so that the rays do not coincide. Shill them in the center. In the same way, put the third, the smallest snowflake, also stick it. Optionally, the center can be glued with sequins, beads or in a different way to decorate their creation. Making several such snowflakes in different colors, you can very beautifully decorate the apartment, a house or class at school.

I wish you all a happy new year! And let your snowflakes be the most beautiful!