Crafts from straw and weaving with their own hands. What can be made of straw? How to make from straw crafts, such as goby or house? How to make a straw for crafts from paper
Today I would like to talk to you about the beautiful natural material - straw, how they are collecting and prepared for work.
Surely you at least once met the amazing beauty of the application, woven figures and flowers.
And perhaps you yourself had a considerable experience in working with this material and are ready to complement my story. In addition, straws are very often used for crafts with children in school and circles.
What is she, straw for crafts?
As a rule, the straws of various cultural cereals are used for crafts, namely: rye, rice, wheat, millet, barley and oats. The straws of each of the cereals have their own shade and properties.
Collection of straws:
Well, of course, it is better and easiest to collect straws in the fields. And if the process of creating craft will become your hobby, you can grow it yourself.
As a rule, they collect straws in different periods, but only before the harvest is started.
Cut the straw can be scissors or a secateur at the bottom of the stem. As a rule, the lower part of the straw is rarely used, the upper part is very thin, but it is possible to work with it. But the middle part for craft is just perfect.
Treatment and blank straw:
The stem is divided into interstilizes by very strong partitions - nodes. For crafts use interstices. But we cut the nodes, after which you easily remove the sheet.
And of course, straw is best sorted right away. The middle part is one heel, top to another. Also, many craftswomen are additionally sorted in thickness, color and length. But if straws are a bit, then there is no point in it.
If you plan to use straw for applications, I recommend immediately to start its further preparation. Because if you store in the form of the tubes, then it is too much breathing and working with it more difficult.
Getting Started:
For further work, the straw must be unpiring, or rather boil at least 30 minutes, and if it is overpowering, then it is possible for an hour. After you can hold the straw in hot water.
For appliques from straw in the tubes, it is necessary to make a break down along and stroke straw iron.
In this form, it can be stored as much as you like.
Painting and whitening straws:
For whitening Used vinegar at the rate of 1 st. Composition per 1 liter of water. Straws need to be boiled in this solution until the desired shade is obtained.
To obtain a golden shade The straw is boiled in water with soda at the rate of 1 h. Composition per 1 liter of water.
Give straw pink shade It is possible by boiling in potassium mangartage solution.
Also straws can be painted with aniline or vegetable dyes. Staining with vegetable dyes give more muted, soft tones. But the aniline paints give a saturated and bright color. Minus them is that they burn in the sun faster. If you are painted pre-bleached straw, then the color will be even more saturated.
Panel from straw:how to prepare straw for appliqués, technology execution of straw, step-by-step master class for children.
Punk from Stolski: Step-by-step instruction and master class
Solomka has long been used for the manufacture of useful things (hats, toys, decorations, appliqués, panels, ornamental compositions for home decorations).
The manufacture of a panel of straw is very beautiful, but still a very rare kind of needlework with children. And most often this is due to the fact that many do not know how to prepare straw to perform panels and compositions and how to properly perform work from this material.
From this article you will learn:
- from which plants can be made straw for the manufacturers of panels and applications with children,
- How to properly prepare a straw to appliqués,
- Parot technology from straw,
- How to make a panel of straw "Autumn Bouquet" with children.
Technology performing panels in straw appliqués
Panel from straw: from which plants can be made straw

Straw (straw) call the stem of the cereal, hollow inside.
For the manufacture of panels and applications, you can use the straw of any cereal: rye, rice, wheat, millet, barley, oats, mint, thymofeevka and others. From each plant, a straw with different pattern and tint is obtained, so the craftsmen are usually harvested with straws of different plants for their combination in one panel.
It is harvested by straw after ripening plants during harvest when it becomes a golden shade.
How to cut the straw: Cut the stem in its lower part with scissors or a secateur. The stem of cereals is divided into interstilizes with strong partitions, which are called nodes. It is interstice that we use for the manufacture of panels, and the nodes from the plants cut off, they will not use us in the manufacture of crafts. After cutting knots from the stem, remove the sheet. You can cut off the stem, or immediately cut it on the field on the nodes - it is so convenient to transport and store straw.
What part of the stem is used to make a panel of straw: For creative children's work, the middle part of the stem of cereals is used, since the upper part of the stem is too thin and brittle and crafts from it would be too time-consuming.

Which straw is suitable and not suitable for the manufacture of panels . Collect the straw fresh and even on the side of the field, which did not pass the combine. Crumpled of the combine of the straw or firmly not suitable for panel.
How to store straw for appliqué. It is impossible to store straw in the form of tubes, as it will dry, and the children will be more difficult to work with it. It is necessary to prepare straw ribbons in one of the ways described in this article and store them.
When to start processing straw after her collection? Hot colors and its transformation into straw ribbons need to be done immediately after her collection - the sooner, the better.
How to prepare a straw for the manufacture of panel and appliqué
After collecting the straw, you need to prepare it for performing a panel, that is, from the tubes we need to create a flat-shaped ribbon, of which we cut the items.
Ways to prepare straw to the manufacture of panels in the applique technique
Method 1. Soaking straw in water.We select smooth round parts of the stem from intersals (nodes cut off, we do not need it) and put the straw in the pelvis or a bowl of hot water (60-80 degrees) for sprinkling. Spreading time about one and a half - two hours.
When the straw becomes soft, cut the tube along the stem and smoothed the hot iron on several layers of paper (you can use a folded newspaper). After that, straw can be stored and used later during the school year.
This method allows you to get softer and elastic, comfortable straws for children and appliques.
If it happened that you were overpowered by straw (handle it after time after collecting), then we break it differently. Boil straw in water approximately 45 minutes - 1 hour. Turn off the stove and keep it in hot water. We take out, make a cut along the stem and stroke the iron through paper.
Method 2. Stroking the iron. We take several layers of paper (you can use newspapers), they put straws on them. Stroke their hot iron. We get narrow dense straw ribbons. They are tougher and embossed than the bands obtained in the first way.
Depending on the temperature of the iron, different shades may turn out.
Processed solomins cut the sharp knife or scissors along the stem.
All the preparation of straws to the manufacture of appliqués and panels conducts an adult. Children get ready-made straw strips to work.
Prepared stripes and panels - straw sheets can be stored.
How to make a panel of straws with young children
For young children (preschoolers or children of 1-2 class), an adult can not harvest non-straws, but to give children ready-made "straw sheets" to appliqué.
How to prepare a sheet of straw (panel of straw tapes) for children's appliqués:
- We take a sheet of paper (ordinary album sheet) and PVA glue.
- We glue straw strips on this sheet (pre-prepared) very close to each other, avoiding lumen. We select in color so that one sheet is one shade.
Children We issue ready-made such golden sheets - panels of straw tapes - for the manufacture of a panel of straw. They cut out of them with scissors with scissors, as usual, they are cut out of colored paper. And the elements make up a panel, gluing them to the base using PVA glue. Such unusual "straw sheets" for applications very much like children and are very unusual for them. Try!
Older children can not be issued no sheets, but straw strips, and they perform panels of straw as adults, independently performing all the stages of the technology described below.
What is the basis for performing a panel of straw
Stripes straws are ready! Now you need to choose the basis for our panel.
The basis for a panel of straw is always taken paper or a dense dark cloth. For example, it can be black velvet paper or dense black flax, plywood, suede or cardboard, knocked with veneer. Fabric for panels stretch to the subframe or plywood sheet.
We picked up the foundation, prepared the basis. It's time to proceed to appliqué. But first you need to make a sketch of work and learn about technology intricacies to prevent typical errors and that your panels look neat and beautiful.
It is important: In the panel of straw, you can "play" its pattern, determining the straw direction in the detail in the sketch. How will we glue a straw in a sheet or in a middle of a flower, in his petals? Stolomka will be located in this detail vertically, horizontally or diagonally? If it is important for your drawing, the direction is marked on the sketch.
Typical errors in the manufacture of straw panels
Error 1. Children immediately glue straw on the basis and get inaccurate work.
Correct Option: First create a sketch. And only after that, glue out the outlets based on the basis.
The main error, which leads to non-accuracy of the work, is the performed by a panel with glue immediately based on. In order for the applique from straw during the manufacture of panels, it turned out neat, first draw sketch. Next, the sketch is printed on the printer or translate on the tracing. Elements cut out, getting patterns. Templates are decomposed on straw, cut out. And only after that stick on the basis of the panel in the figure.
Error 2. Children violate the technology of performing a panel of straw.
Correct Option:
A) if the details are large.
Cut the detail pattern on the sketch. Next, we take the paper, on it we draw our part on the template. I turn over the paper to the side without a picture, and we put the strips of straw next to each other. Watch that there are no clearance between them. Ends of straws go beyond the edges of the workpiece.
B) if the details are small.
We make a blank rectangular shape made of paper. On paper, tightly to each other glipulate strips of straws on PVA glue so that the lumens between them remain. It turned out a blank for appliqué.
C) Little children should receive ready-made straws for cutting parts.
I remind you that small children (at the age of about 8-9 years old) do not make this step, and get from adult already ready-made straw sheets, of which they simply cut the desired elements with scissors and glued them according to the sketch on the background.
Error 3. Children stick the parts by Panel by the stationery glue.
For the application in the manufacture of panels from straws use PVA glue. In no case do not need to perform a panel of straws using the stationery glue, since the work will be very inaccier and will last long. You will not be able to wait for you from the child, but disappointment.
PVA glue should be applied to a small amount so that it does not perform on the basis of panel and there are no stains.
Adults can use the Titan glue panel in the manufacture of a straw.
Error 4. Children are glued at first small parts, and then large. As a result, the composition may not fit on the background.
Correct Option: We glue on the background first the main, the largest details. And then around them - small details on the sketch.
Manufacture of a panel of straws with children
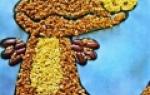
This panel from the straw "Autumn Bouquet" is made in the applique technique. Parastayev Daria, 11 years old (Republic of Bashkortostan Sterlitamak district with. Big Kuganak). Leader: Pedagogue Additional Education Svevak Maria Viktorovna.

How to make a panel of straw "Autumn Bouquet" with children:
- Collect and prepare straw.
- straw cut along the stem, deploy and swallow it with a hot iron
- Create a sketch of work and transfer it to black fabric.
- glue the prepared straw on the basis. It is necessary to glue very carefully, to apply it in small quantities so that the glue does not flow and do not smear along the background.
How can I paint straw for making panels
Sometimes for the manufacture of plot panels from straws, straw is required of a certain shade or color. Vegetable dyes give very soft, restrained shades.
- To get different brownish shades of straws, you need to use the iron. The longer we keep the straw under the iron, the darkest the color of the straw.
- So that the straw has become yellow - golden shade, it is boiled in water with soda (1 teaspoon of soda per 1 liter of water).
- The reddish color of the straw is obtained in a rag of onion husk. The more rich decoction and the more husk in it, the rich color will be.
- To obtain a pink shade, the straw is boiled in the solution of manganese.
More ideas for making a panel with children can be found in the site headings:
Get a new free audio course with game application
"Development of speech from 0 to 7 years: what is important to know and what to do. Cheat Sheet for parents"
Large scope for fantasy is in the manufacture of toys and straw dolls. This material has one unique property - it is easy to breast and retain a new form. Therefore, applying it, you can create sculptures and figures of people, as well as funny animals - dogs, birds.
Certain rules adhere to the creation straw sculptures. They are not complicated, so everyone can absorb them without difficulty. It will give the opportunity to create a wide variety of toys.
First of all, you need to prepare the material from which toys - straw will be created. It is soaked in water for 5-6 hours. And then sprinkled. It will make it soft, it will acquire the necessary flexibility. Then you need to sort out raw materials. With straw stems need to remove leaves. If spoiled or uneven straws come across among the straws, then they also need to get rid of them.
From the manufacture of the foundation of the figure should begin work on the product. The base itself consists of a frame, the elements of which fasteners or wire beams. The form of a person or animal, depending on who you are going to do, you need to give it. Thereafter frames soaring straw. Very tougher dressing must be done in the right places. This will give the product ready form. If the straw is connected, then its compression occurs. And straw, extending from dressing, make a product similar to Fan. If the straw dressing is performed when it is in a wet state, then after drying it will save its form well. In the manufacture of hands and feet of dolls, this property is used quite often. It is also used and then when dolls and toys create elements of clothing.
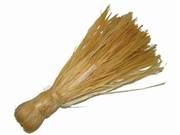
Basic doll
As a basis for creating a plurality of other crafts can serve as the design of this doll. Therefore, the development of work with it is so important.
The following materials will be needed during the work on the creation of the basic doll: wheat or barley straw. From the tools you will need: durable threads, knife, scissors, as well as a goat device for crafts from straw.
Progress
It is necessary to take a bundle in the amount of 60-70 pieces. After that, to cross it in half in such a way that the thickened nodes in the middle of the beam are absent. You can provide it, if up and down to push the knees by using the doll head. In the event that in the place of the inflection will be the knee of the straw, it will break. And this will lead to the fact that the appearance of the doll will deteriorate. The ends of the straw beam after such a bustle will be uneven. But it does not matter, after at the end of the work they will have to trim. Note that picking up the stalks, it is necessary to try to make a beautiful, evenly painted straw, was on the front side of the product.

Now you can go to the manufacture heads and Togs Dolls. To do this, you need a special fat harness to multiply in several techniques:
-Bed hands you need to take a bundle so that between the palms there was a plot without a knee;
- Once again, repeat this action, trying to smooth and smooth to do harness;
- At the end, the bundle needs to be twisted as underwear pressed.
If you want to create beautiful crafts with your own hands, then weaving from straws for beginners will help to fulfill the dream. How often do you want to do something interesting that you can attract attention and interest others! And many dreams of changing the design of their home or apartment, make a new jet, "highlight". Often, simple paintings do not always bring so much pleasure as homemade items made on their own. Straw is an excellent solution to the interior problems. First, it is useful to work with the material and pleasant. Secondly, it is an opportunity to transform the room and is suitable for all styles!
Old product
Straw is an affordable material that is suitable for various works. Historians believe that needlework is the first occupation of folk art. What are made from straw? Baskets, hats, boxes, boxes, kitchenware, appliqués. If in ancient times it was a means of living, which is at home, now for many - a hobby. In addition to him, many craftswomen make products to order, which are quite expensive in the modern market.

Before work, the material must be prepared. Rye straw is the main material, because it is the highest and tough. The stem reaches sizes from 40 to 50 cm.
To create applications, you need to use oatmeal or barley straw, because the stems are short and not suitable for weaving. But such material is very soft with a beautiful tint.
Professionals are preparing an rye straw during the wax ripe grain. They offer to cut the material with a knife near the root, and then folded under the sun's rays to purchase a golden color.
In order to deal with the main stages of work, you need to watch different video lessons and read learning books. They will help remember the movements, will teach the right to choose tools and prepare the material.

Flowers are especially beautiful from straw. This is the case when the color does not matter. Of course, they do not look like real, but become an excellent decoration for any apartment.

For work you will need:
- rye straw;
- tape;
- fabric of any color, threads;
- wire;
- paper and cardboard (take thin);
- pVA glue (not pencil);
- knife and scissors;
- large capacity;
- for solution - ammonia (10%, 1 tsp), hydroperite (9 tablets) and water (500 ml).
We start the master class from the main one.
- To begin with, make a solution, mixing all the ingredients.
- Pour a solution into a container, put straw there. Remember that the "prepare" straw should be about 6 hours. Stir the material to whiten the straw. After "Marinovka" rinse straw and start working.
- Take 10 tubes, cut them out. Tip - Cut is needed along the fibers. Expand the material with your hands.
- Iron stroke strips, do it on the inside. This procedure is necessary for straightening.
- Get strips on paper with glue. Click tight, but not much so as not to deform the straw. Rolling the reservoir.
- After the previous steps, we make stencil from cardboard. We put on the reservoir, drawing on the back of 12 leaves. Cut carefully. Tip - Use gloves to not be hurt. And remember that the knife should be sharp.
- Each leaf is glue to the fabric. Take threads, dear glue and stick to the edges of leaves. Leave the craft for a while to drop the material.
- Cut the work. Draw on the cardboard a circle (diameter 1 cm), also cut out and glue 6 leaves.
- From the reverse side of glue leaves. Remember that using glue, leave the craft to push.
- Purify the seeds of floweries in two places, bring to the wire.
- Tape wrap wire. And voila - flower ready.
- For a bouquet, repeat all the steps. Such a plant can be put in a vase so that it pleases the eye.
This result:

World of Towns
Screw weaving are used for edging of the crafts. To work, you need to use wet straws of the same size and thickness. The scheme shows the stages of work:
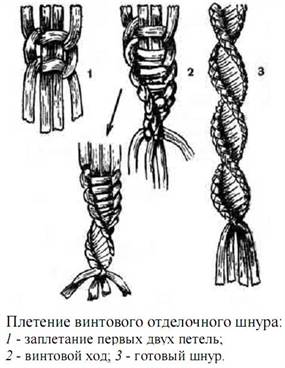
The masters believe that in the process of work there may be difficulties with weaving. Therefore, you need to turn the Pletivo, continuing the work inside out.

There is a lot of MK on creating. The cord must be placed to the required size. This option is suitable for edges of frames, bags, accessories, caskets. Often it occurs for looping and buttons. For crafts of screw weaving, it is necessary to use the straws of the first grade so that the crafts are high-quality and durable.
In addition to plants, you can make beautiful hats.

They will add to any image. According to the innovations of the fashion, such an accessory is becoming more and more popular. Create a craft is easy, but you need to use the detailed scheme that is on the Internet. To complement the headdress will be able to ribbon or gum. On all the will of fantasy, so the master herself decides how to improve the work.
Straw is a simple and affordable material from which you can make various crafts. The manufacture of products from straw is an original occupation of folk art. It was made of toys, baskets, boxes, paintings, appliques, kitchen utensils, and more. Currently, straw crafts are very popular among Hand-Maid lovers.
Straw crafts: blank
Raw materials for work serve even segments of the middle part of the stems. The leaves will help you create background products, and the knees are cut. Stems form straw ribbons, which are used for crafts. Material can be painted in any colors using aniline paints for fabric.
Folk remedies can give the material noble shades. So, with the help of a hot iron, you easily change the color of the straw on the brown, and the hydrogen peroxide will add a silver-white shade. When boiling in a manganese, the material will acquire gently pink color, and a solution of food soda makes it yellow-gold.
There are 2 ways to manufacture straw tapes: hot and cold. If you use the cold way, it is enough to cut the stalks along and smooth them with rings of scissors. A cold way helps strips to remain brilliant and elastic for a long time.
A hot method includes pre-sparking of straw stems at a temperature of 80 degrees. After boiling, the stems are cut along and stroke the hot iron. Ribbons are widespread and shiny, completely ready for work.
What can be made of straw?
Flower

You will need:
- Straw;
- Fabric purple or other color;
- Threads in tone tissue;
- Yellow ribbon;
- Wire;
- Thin paper;
- Thin cardboard;
- PVA glue;
- Scissors;
- Wide capacity;
- Ammonia 10 percent - 1 tsp.
- Hydroperite - 9 tablets;
- Water - 500 ml.
Instructions for weaving a flower straw:
- Prepare the solution, mixing in the tank hydroperite, ammonia and water. Put the straw into a wide container and pour the prepared composition. Leave for 6 hours: Mix the material several times to evenly whiten.
- After bleaching, rinse thoroughly. For a flower you will need 10 straw tubes. Cut them with scissors along the fibers and expand their hands. Using a hot iron, swallow strips from the inside to straighten.
- Stick strips on thin paper using PVA. Click tightly so that there are no clearance. Using the rolling pin, ride the cooked layer.
- Make a stencil from the cardboard, impose it to the layer. From the reverse side, draw 12 leaves and cut out.
- Squeeze each carved glue cut and glue the fabric to it. Take threads, treat them with glue and stick to the edges of each leaf. Give the songs dry, then cut out.
- Cut from cardboard Cut the circle with a diameter of 1 cm and glue 6 leaves to it. Let dry. From the reverse side, glue the remaining leaves and again wait for drying.
- Punch the middle of the flower in two places and tie to the wire. Watch the wire ribbon. Flower ready! To create a bouquet, make several colors, make a beautiful ribbon and put in the vase.
See also: Worm up with their own hands
Straw doll
Cut the straw to the same length. Bend in half. With the help of wire or twine, create a head, without forgetting to push into the node toothpick or a skewer.
Divide the body into 2 parts, tie it up with a rope and insert hands from straw. Glowing your hands with a pigtail or wipe straight.
The ends of the hands can be tied to the belt, determining the waist of the straw doll or leave them free. Straw doll is ready.
Straw weaving
Zlatogryy horse
To work, you will need only straw, twine and wire.
- The horse is assembled from 3 straw and stones. One sheaf tight twist near the end slice, fixing the wire. Leave two long end. Throw straw through a wire ring in the opposite direction. Watch the ends to be inside the beam of straw. Tie the bunch of the twine and generate the upper part of the arc - it will be the basis for the head and neck.
- Now proceed to the execution of the mane. It is assembled from individual Solomin. Each wreck the neck of the horse and twist the rope made of straw. When the mane is fully ready, take a new bundle and wake it around a horse's body, having dragging the twine.
- Return a short distance, drag the bundle once again by the twine, designating the body of the horse. The remaining part of the straw harness is divided into 3 parts - it will be hind legs and tail. Bend 2 pieces of the harness at a right corner to the body and tie up to the twine near the end cuts.
- Separate in half the first bundle of straw so that the ends of the wire turn out to be in the middle of each half - it will be the front legs. The knees are denoted by twisting the middle of the legs with the twine and straw strips. Sticking ends of the wire cut or generate so that they are not visible. Carefully bend the legs to create the impression of the movement.
- Take several straws and tighten them with scissors or screwdriver. Attach the tail to the body of the horse.
- The final stage of the product is the finish of the figure: tie out the place with the grinding strains. Zlatogry's horse is ready! It can be given to a child or a friend who appreciates handmad.
Pictures of straw
Straw paintings are especially beautiful and original. It is not difficult to make this work, the main thing follows the basic rules.
You will need:
- Straw;
- Scissors;
- Cardboard;
- Glue;
- Iron;
- Tassel.
Instructions for performing paintings from straw:
- For the manufacture of any picture you need a sketch. Take color pencils and on the landscape sheet sample the future craft.
- Before performing paintings, prepare a straw with a hot or cold way. Prepare a cardboard - it will be the basis of the picture. Using a pencil, draw on the cardboard the contours of the details.
- Cut the necessary pieces of straw in the size of the details of the picture. Cover the back of the straw with glue and attach tight to the cardboard in the right place. The main thing is not to rush to not spoil the product. Wait until the item sticks well to the cardboard. Enter so with every detail until you get a planned picture. Now smoke it with the paints and put behind the glass.
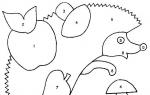
Picture "Butterfly"
Cut out the wings, butterfly torso and drawing details on the wings. Make sure the pair of wings is symmetrical. Head and mustache cut out of one wide straw strip.
Draw a picture on the cardboard and glue each straw detail to the right place. First, it is better to glue the wings by placing patterns on them. Place the torso, head and mustache from above. Using paints, show off your butterfly.
Picture "Protein"
Cut from the straw plate Squirrel details: head (circle), torso (triangle), tail (big oval), ears (small triangles). Stick parts to the cardboard, creating a protein: first a torso, then tail, head and ears. Eyes and mouth cut out of a wide plate.
Straw is the perfect material for creating crafts. You will receive not only a lot of pleasure, but also beautiful original products. Create from straw paintings, baskets, boxes, toys, bags, etc. You can decorate your home or give your home or to give your home or friends to some holiday. Surely they will appreciate such an unusual gift!