Do-it-yourself kangaroo head mask. Children's animal masks (pictures of templates). Downloads
Fairy-tale mask-application "Deer" with your own hands. Master class with step by step photos.
Melikhova Natalya Valentinovna, primary school teacher, MBOU secondary school No. 12, Kamyshin city, Volgograd region
The master class is designed for students of primary school age 7-8 years old, their parents and teachers.
Purpose: costume element for ecological fairy tales and children's holidays.
Target: production of a mask for carrying out ecological fairy tales.
Tasks:
1. Arouse interest in creating an application mask by opening the door to the amazing and mysterious world of the surrounding nature.
2. Develop creative imagination, fantasy, fine motor skills of the hand, accuracy.
3. To form a sense of belonging to nature, personal responsibility for it.
Technique: application.
Materials and equipment: colored cardboard, a simple pencil, scissors, glue, brush, detail templates.
Safety precautions when working with scissors
1. Store the scissors in the indicated place in the closed position.
2. When working, keep the ends of the blades parallel to the table.
3. While working, hold the material with your left hand so that your fingers are away from the blade.
4. Do not widen the blades too much and snap the ends,
5. It is more convenient to cut with the middle part of the blades
6. Don't leave scissors with open blades
7. Pass the scissors rings forward, keep the blades in your hand.
8. During work, you can not get up, so as not to injure your neighbor.
Glue Safety
1. Be careful with glue!
2. Apply glue to the surface of the product only with a brush.
3. Do not spill glue, have a napkin to wipe the brush
4. It is impossible for the glue to get on the fingers, face, especially the eyes.
5. If the adhesive gets into the eyes, immediately rinse them with plenty of water.
6. At the end of the work, be sure to wash your hands and brush.
7. Tidy up the workplace
1.Updating knowledge

Teacher: Each of us has a home. Leaving it, we find ourselves in another house - an immense one, common to all people. This is a special house - Nature. Everything is very closely connected in it: animals - with plants, plants - with plants, animals - with other animals. And all together - with the gentle sun, fertile land, clean water, fresh air. Therefore, it is necessary to carefully treat each inhabitant of our house and observe rules of conduct in nature.
"Let
To strive for
To be loved
Both the beast and the bird
And they trusted us everywhere.
as the most faithful
To my friends!"
I. Maznin

Game "Air, water, earth, wind"
The teacher calls one of 4 words: air, water, earth, wind - counts up to 5. During this time, children must name a bird, fish, animal or circle in place (wind). Who did not have time to answer during this time, sits down.
Guess the riddles:
In the spring it is cheerful, in the summer it is cold,
Nourishes in autumn, warms in winter.
(Wood)
“The beast is afraid of my branches,
Birds will not build nests in them.
In the branches is my beauty and power.
Tell me quickly, who am I?
(Deer)

- Who is the baby deer? (Deer)

I propose to make a mask-application of a deer for ecological fairy tales and conversations about nature.
2. Stages of work:
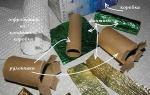
1. For work we need:


2. Print templates on A3 format.
3. Cut out the base of the deer's muzzle.

4. Complete the design of the muzzle, not forgetting to cut out the eyes along the contour in all details.


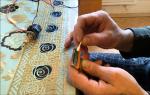
5. Decorate the ears of the animal.


6. Decorate the nose and eyes.


7. And the final touch - spots!

8. Here is such a beautiful muzzle of a deer turned out.
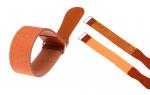
Next, you need to turn it into a mask: using a clerical knife, you need to cut out divisions for the tape.

9. Insert the tape and glue it.


10. Do the same on the other side.

11. It turned out such an interesting fairy-tale mask!
Another series of children's matinees with masquerade costumes is being prepared in kindergartens again.
Parents once again have to prepare a mask for the matinee. It is best to do this with your child.
The topic of today's post is a master class that answers the question of how to solve this difficult task.
We need to turn mask making into an educational game.
The mask should be the most beautiful and cool in the kindergarten. This requirement implies an extraordinary approach on the part of parents.
Today, together with the children, we will make a mask for the matinee.
Today, together with the children, we will make masks of a deer, deer, deer, moose, moose, elk and fallow deer with our own hands.
Below are pictures that need to be printed, laminated, cut along the contour and threaded with twine or elastic to fit the child's head.
It is also possible with a strip of cardboard or laminated paper at the bottom of the mask, rolled up with a rim to fit the child's head (if you connect not with threads, but with a stapler, then the staples should be directed with sharp ends to the outside (so as not to scratch the child's head)).
To make the mask original, you need to print out the black and white mask templates available here, color them with gouache or watercolors with the children and also laminate them, after which you need to thread a string or elastic band to fit the child’s head or attach the mask to the prepared rim.
Doe 002. Carnival masks of animals and animals made of paper - doe. Doe mask. Doe 001. Carnival masks of animals and animals made of paper - doe. Doe mask. Elk 004. Carnival masks of animals and animals made of paper - elk, elk, calf. Moose mask.
Elk 003. Carnival masks of animals and animals made of paper - elk, elk, calf. Moose mask. Elk 002. Carnival masks of animals and animals made of paper - elk, elk, calf. Moose mask. Elk 001. Carnival masks of animals and animals made of paper - elk, elk, calf. Moose mask.
Deer 005. Carnival masks of animals and animals made of paper - deer, deer, deer. Deer mask. Deer 004. Carnival masks of animals and animals made of paper - deer, deer, deer. Deer mask. Deer 003. Carnival masks of animals and animals made of paper - deer, deer, deer. Deer mask.
In the store today you can buy any children's animal masks. But they are unlikely to be original. And it is much more interesting for a child to dance around the Christmas tree in a mask made by himself.


Mask made of paper and cardboard
Masks for children do not have to be rigid and reusable. For one themed matinee in kindergarten, you can glue the simplest voluminous animal masks for children and teachers. We only need a set of colored paper, glue, scissors, a pencil and a small piece of elastic.

A bear or fox mask is made in just an hour. Cut out a muzzle from paper. Having folded the workpiece in half for complete symmetry, outline the holes for the eyes and correct the contour. Straighten the edges.

The most important thing is cutting out with your own hands and gluing a voluminous nose. His drawing can be borrowed from the next section. After the wolf or fox mask is glued together, paint it and sew on an elastic band to attach it to the head.

It looks great, made according to the same pattern, a bear mask made of cardboard.
hat mask
This necessary accessory of a carnival costume made of paper or cardboard does not cover the face, but is worn on the head in the form of a hat. This approach easily and quickly solves the problem of how to make a wolf or bear mask.


Before starting work, measure the circumference of the head and calculate the perimeter of the workpiece in the drawing. Based on the obtained sizes, calculate the size of the cells.
For example, your baby's head circumference is 54 cm, and in the wolf mask drawing it consists of 8x2 + 7x2 = 30 cells. This means that each cell should have a size of 54/30 \u003d 1.8 cm. Now we draw a pattern for the cells, based on our calculations.

Next, a blank is cut out and a wolf or bear mask is glued together. You can color the mask, but it is better to use colored paper. Such disposable children's hats-masks made of paper or cardboard are made by hand in one evening with the child.
Felt is a fertile material. It not only does not crumble, it is well processed, it is easily stitched. Felt masks have a pleasant touch on the skin, do not scratch the face of children and fit perfectly. Such children's felt masks are cut out according to paper patterns for any flat paper masks. For example, a paper hare mask can be successfully used for a felt pattern.

We will need:
- ruler.
- pencil;
- scissors;
- glue;
- the cloth;
- thin synthetic winterizer or felt;
- foam rubber;
- cardboard;
- We measure the distance between the pupils and, based on this size, draw a sketch of the future mask. We cut out the blank from cardboard, and then from foam rubber, gluing the two materials together. From the side of the foam rubber, we impose a fabric and, wrapping the edges, glue it to the cardboard.

- We cut out the nose of the bear, a thin synthetic winterizer according to the drawing in the photo and also glue it with a cloth.

- By the same principle, we make bear ears, fixing them with a stapler, glue or sewing to the mask.

- Glue the bangs and attach the nose. Cut out two crescents for the eye sockets from white felt. We glue them in diameter. We sew on the sides an elastic band or ribbon cut from the same material as the muzzle.

The most important thing in this work is to correctly outline and then cut out the holes for the eyes. This voluminous mask for children does not restrict freedom of movement, it is not hot, convenient and comfortable.

If you are going to celebrate a holiday in an unusual way, whether it is New Year, a party or a birthday, then you can prepare a mask for this occasion for yourself and maybe for the rest of the participants.
Making a mask is not difficult, you just need to know a few simple rules and have the necessary materials with you.
You can find several not very difficult mask making workshops here, including New Year's and carnival masks, as well as masks for children and adults.
DIY carnival masks
You will need:
Scissors
Black fabric paint
cling film
Mask template.
Glue (moment, superglue, fabric glue)

1. Prepare the template for the mask using paper and a marker or printer and place it on the table. Cover the template with cling film.

2. Prepare a tulle and cut a rectangle from it with dimensions of approximately 25 x 13 cm.

3. Start tracing the black part of the mask with fabric paint.

4. Let the paint dry, and then carefully remove the tulle from the film.

5. Cut out the mask, including the holes for the eyes.

6. Prepare the tape, and cut 2 pieces from it, each about 50 cm long.

7. Using glue, attach the tapes to the mask. Let the glue dry.

You can make the ribbons shorter. The main thing is that you can tie them freely.
How to make a cat mask

You will need:
Scissors
Lace trim
Satin ribbon
Small decorative feathers, optional
1. Cut the lace trim so that you get two equal parts.
2. Connect the halves of the inlay, as shown in the image. You should get the main part of the mask. Glue in the middle.
3. Cut off unnecessary parts to get the desired shape.
4. Glue the feathers so that they resemble cat ears.
5. Prepare a satin ribbon, cut it into two equal halves and glue each piece to the left and right ends of the mask.
How to make a Halloween mask

You will need:
Nylon mesh
Lace
Scissors
Super glue
sticky aerosol

1. Prepare the mask template first.

2. Put 2 rectangles of nylon mesh and lace on the mask pattern (lace first, and mesh on top). The size of each rectangle is approximately 25 x 13 cm.
3. Connect the fabrics together using a sticky spray. Put the workpiece under something heavy, and wait a bit.
4. Using scissors, cut out the mask, including the holes for the eyes.

5. Prepare the tape, cut it in half and glue each half to the mask so that you can put it on.
DIY New Year's masks

You will need:
Artificial flowers
Sequins.

1. Cut out the mask from felt, having previously drawn it with a simple pencil. To make it easier to figure out where to cut the holes for the eyes, attach the mask to your face and circle the approximate place with a pencil.

2. Separate the petals from the artificial flowers and stick them to the mask as you like.


4. Glue or sew the tape to the back of the mask so that it can be put on.


DIY paper mask

You will need:
Scissors
Stationery knife
Thread (preferably elastic) or not very wide elastic band
Pencils/markers, etc.
Hole punch, if desired

1. Prepare a sheet of thick paper or cardboard and fold it in half.
2. Use a utility knife to cut out holes for the eyes.

3. Make holes for attaching thread or elastic with a hole punch or knife.
4. Decorate the mask to taste. If this is an animal, you can draw a nose, mustache, ears, etc.

How to make a carnival mask

You will need:
Mask template (available from specialty stores) or cut out a mask from cardboard.
colorful feathers
sequins
Super glue
Toothpick

1. Prepare a sample mask and think about how you want to decorate it.
2. To gently stick the rhinestones, use glue and a toothpick - dip it into the glue and apply to the mask. Glue rhinestones around the eye holes.

3. You can stick rhinestones on the top side of the eye hole, and apply glitter on the bottom. To do this, apply glue to the bottom and gently sprinkle glitter on it.

4. Also add multi-colored feathers with glue. How many feathers, and where they will be placed, you choose.

5. It remains to add an elastic band or tape to put on the mask and leave the glue to dry.

DIY cardboard mask

You will need:
Scissors
Leaves of different colors and sizes
Sticks, twigs, seeds, feathers, etc.

1. Cut out a mask from cardboard
2. Glue the leaves as shown in the image (or choose your own option) to make the mask look like an Indian attribute.
3. Start decorating the mask with various details to your liking, the main thing is not to overdo it and make everything symmetrical.
How to make a paper mask. Decorate with paper roses.

You will need:
A simple papier-mâché or plastic mask (without drawings or patterns) bought at a store or you can cut it out of cardboard yourself
corrugated paper
Scissors
Feathers, optional

1. You will need to cut approximately 25 strips of corrugated paper. Their length can vary from 25 to 40 cm. Fold each strip in half.

2. To make a rose from a paper strip, start twisting it, as shown in the picture. As you curl the paper, flip the strip 180 degrees. To keep the flower, you can fix some places with glue.

If you want to know what other flowers can be made from paper, check out our articles:
3. Start gluing the roses to the mask. Add glue to the bottom of each flower.

4. If desired, you can add decorative feathers.


You can try different colors and types of paper.
Masks for children with their own hands. Animal noses.

You will need:
Egg carton
Tassels
Rubber
Thread and needle
Heavy paper
Scissors

1. Take an egg carton and cut out the details with indentations - they will play the role of noses, which you need to decorate next.
2. To be able to breathe through the nose, make several small holes in the workpiece - use a needle or carnation.

3. Start decorating the cardboard nose with the colors of your favorite animal. Draw some details like nostrils, teeth, etc. Look in books or on the Internet for what animals look like to create a better mask.
4. Prepare thick paper and cut out the antennae from it. Glue them to the workpiece.
5. It remains to sew on an elastic band so that the nose can be put on.
New Year's masks for children

You will need:
mask pattern
Fabric (purple in this example)
Lining fabric (thin fleece);
Lace (in this example, the color is black)
Thread and needle
Scissors
pins
Velvet Ribbon
Decorations.

1. Prepare the main and lining fabric and cut out the details of the mask using a pattern.

2. If your lace has a seam on both sides, you need to cut the seam on one of the sides.

3. Using pins, attach the lace to the sides of the mask (you need to do this from the wrong side), while making medium-sized folds.

4. Now the lace needs to be sewn to the main part and cut off the excess.


5. Insert a velvet ribbon under the lace and secure it with pins.

6. Using a sewing machine, sew the lining fabric to the main part, as well as the slits for the eyes.
7. Decorate the mask to taste, for example, you can add a small spider or a snowflake.

DIY masks (photo)


DIY Venetian masks


Festive matinees in kindergarten or elementary school are often held in the form of theatrical performances. Every child participates in the celebration. For an interesting performance, you need appropriate costumes and head masks. You can buy them in specialized children's stores or make your own.
Various materials are used to make masks. Most often - paper and cardboard. The picture is downloaded, enlarged on a computer screen, then printed.
Sketches can be colored, it is enough for the kid to cut out the model. There are black and white or theatrical coloring masks. These need to be painted with pencils or paints at your discretion. Also in the manufacture of used leather, foam rubber, felt and other materials.
The shape of the masks is also different. Some are made on a wide rim. The image of an animal or a fairy-tale character is glued to the headband, put on the head, while the child's face is not covered. Other sketches hide the face, cuts are made for the eyes. There are respirator masks, gas masks (rubber elements are usually used for their manufacture) or on a stick.
From paper


Cardboard


Leather


From felt


From foam rubber

on a stick


Headband sketches


For girls


When choosing sketches for girls, they prefer funny animal faces. For example, a bear or a bunny with a pink bow, masks in the form of powerful fairies or beautiful princesses.
For boys


A mask for a holiday for a boy depends on the nature and preferences of the child. Some kids love to portray not only kind animals (bear cub, cockerel, piggy, hippopotamus), but also pirates, sorcerers, supermen, villains.
Muzzles of animals

Costumes and masks of forest and domestic animals are a common option for holding a matinee. Some children prefer to dress up as cats, dogs, hares and other recognizable animals (bull, goat, wolf). Others want models of less common animals - a raccoon, an elk, a platypus or a koala.
The universal option is the “mask of the Year”. It symbolizes the animal according to the Eastern calendar. For 2019, the faces of a pig, a pig, a boar are relevant. They can be made not only from paper, but also sewn from fabric. Patterns and sewing patterns make it easy to cope with the task.
Foxes


hare


Bear

wolf


lion


tiger


Raccoon


crocodile

frogs


fish


hedgehog


Zebras

deer


Leopard

elephant


Monkey

snakes


squirrels

rhino

Turtles


Giraffe

Rats


hamster


polar bear

Panthers

sharks


lizards

Bird patterns

Having selected ready-made sketches, they are saved or copied for subsequent printing, the masks are cut out. Usually they are used for a headband without covering the baby's face. To make a full-fledged mask, you need to make an effort. The specificity lies in the anatomy of the bird's head. You need to separately prepare a template for the head and beak. The bird's beak is glued along the marked lines. Its size and shape depends on the bird - for an owl it will be small and hooked, for a crow it will be long and sharp.
Sparrow


Eagle

Galchonka

owls


Crow


Cuckoos


parrot


Herons


Peacock

insects

Masquerade masks of representatives of the insect world are less popular among children. But they are also suitable for the holidays. And baby centipedes, cockroaches, flies or mosquitoes will stand out among dozens of cats and dogs. Children will love the costumes of Kuzi the grasshopper, Mila the ladybug, Grandfather Sher and Baba Kapa and other friends of Luntik.
Ant

spider

bees


Grasshopper

butterflies


beetle

ladybug


Pictures of pets

Masks are often used for photo shoots. Parents can take funny photos of the child themselves. The image will be created by cat ears with a ponytail, paper glasses, a fun hairstyle.
Mouse, goat or chicken masks are suitable for a theater or circus, when kids are taken to New Year's performances. Older children or parents of preschoolers can make voluminous masks according to the drawings. They are put on the head, close the back of the child's head. Cuts are made for the eyes and nose. As models, children will like the head of a horse, wild boar, donkey.
Dogs


Cats and Kota


Horse


cows


Pigs


Mice


A rabbit


goat


ram


donkey


Rooster


chickens


chickens


ducks


goose

Mask drawings for cutting

There are different patterns that do not always symbolize animals. Children love cool costumes, for such a mask of a plague doctor, a mad genius or a gypsy is suitable. Someone plays evil characters at matinees. In this case, masks with the face of a devil, an old sorcerer or uncle Chernomor will be relevant.
Black and white masks are painted by the children themselves. The advantage of sketches is that the child is creative. His cow is purple and his goat is flowered pink. After the matinee, the organizers arrange competitions for the most interesting or original face mask.
When creating a New Year's image, masks of snowflakes, Santa Claus, Snegurochka or Baba Yaga are suitable. If the child does not want to wear a full-fledged mask, then the ears of a hare, a fox or a bear will suit him.
Emotion masks will convey a joyful or sad mood. They are made in the form of a sun or a popular emoticon.
Cool


funny


Beautiful


Carnival


New Year's


scary


Evil


coloring pages


Sketches

Of great importance are the facial expressions of the mask. Even the most ordinary characters convey a palette of moods. They can be sad and cheerful, kind and evil, surprised and indifferent. This is achieved by drawing the eyebrows (raised, lowered, with a house), a smile on the face, the position of wrinkles, if we are talking about the mask of an old man or an old woman. Emotions are conveyed not only by the faces of people and animals, but also by inanimate images: mask patterns of flowers (bells, roses, daisies), vegetables and fruits (apples, tomatoes, plums).
grandfather

Robot

Indian


Carrots

aliens