Weave a Christmas tree from beads step by step. Beaded Christmas tree and New Year's decorations: the best master classes
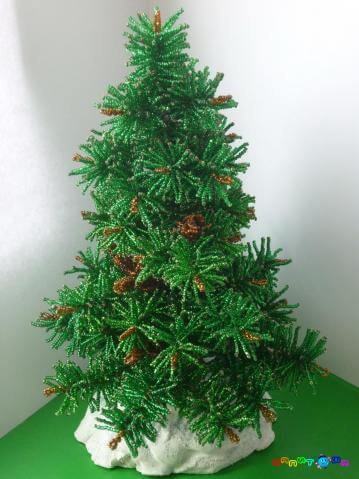
New Years is soon! What would New Year be without a fluffy green beauty? Today we will fix this and make a Christmas tree with our own hands.
For this we need bugles (green, but who said that the Christmas tree should only be green?), round beads, silver wire 0.3 (for weaving needles, 0.2 is too soft and does not hold its shape well, so the wire is thinner than 0.3 should not be taken), silver wire 0.55 (for branches) and silver wire 1.0 (for the base, i.e. for the trunk (but depending on what kind of tree it is, this wire may not be needed) ).
I’ll say right away: it took me about 300 grams of glass beads, 50 grams of round beads, about 150 m of 0.3 wire (but I can’t say for sure, a couple of spools might have fallen out of the count), 10 m of 0.55 wire, and 5 m wire 1.0 (but you can do without it, as I already said, my tree is relatively heavy, so I decided to strengthen the trunk).

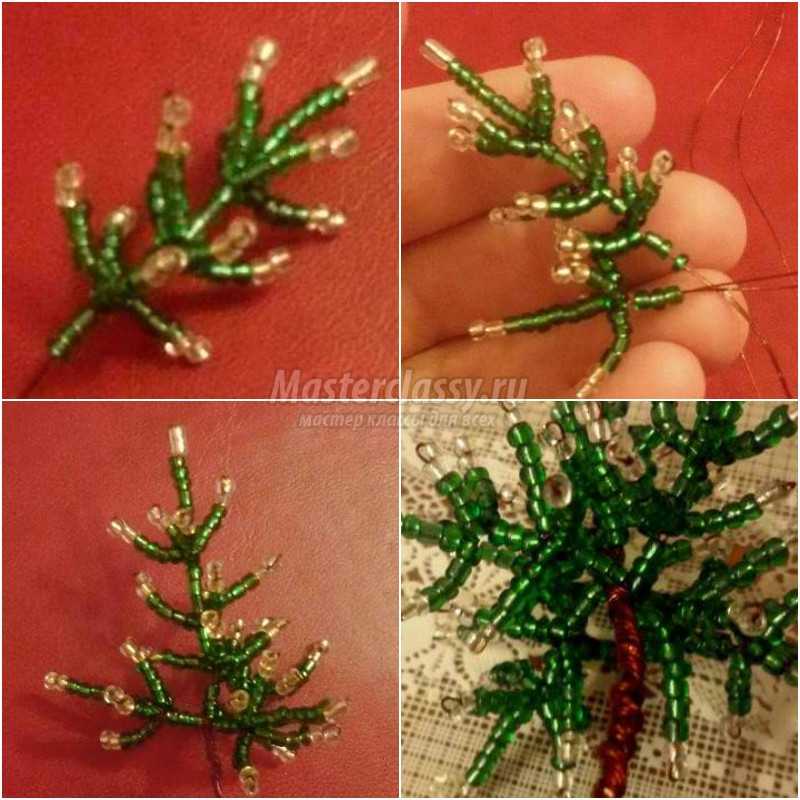
Let's start weaving needles
Cut off a piece of wire. (I cut it to the span of my arm, cut a piece that will be convenient for you to work with). We string one glass bead and one bead. Passing the bead, insert the wire into the glass bead and tighten.

We continue to do this until a piece of wire is enough.

We make several of these.
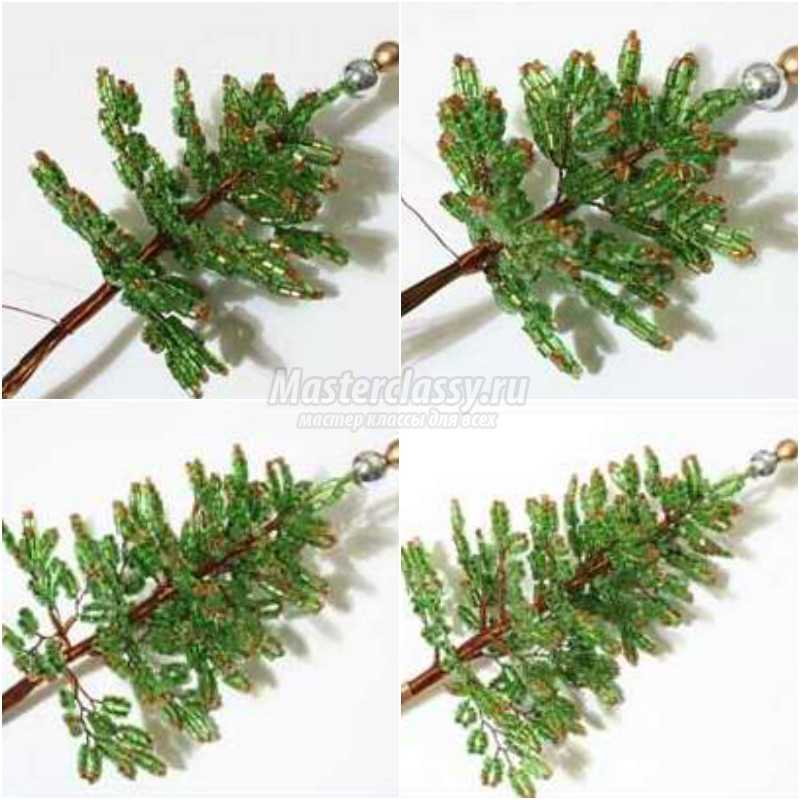
Now we make the first branch. Cut off 10-15 centimeters of wire with a thickness of 0.55. We take one “fence” of needles. We wind the tip of the free wire from the needles. Try to put the first glass bead on the base of the branch.


So, we have our first piece of twig.

If this size of branch is not enough for you, then wind a couple more “fences of needles”. And we make several of these branches (again, it all depends on how fluffy your tree is).

Now let's proceed directly to the Christmas tree. We start making the Christmas tree from the top. This is much more convenient, since you can adjust the height and fluffiness of the tree, as well as the length of the branches.
So, we select one branch, which will be central. We take the second branch.

We begin to twist the secondary branch around the central one.

We wind the remaining branches in the same way. Here we have the top. I got one central branch and five branches around.

Next we proceed to the second row of branches. In the second row, I decided to make the needles longer (it seems like the space is filled faster and the work is done faster). We do everything the same, only we take two bugles each. 
We string two bugles and one bead. We return along two glass beads, leaving a bead.

Let's make a second needle.

We continue making needles until the piece of wire runs out.

I suggest you make more fences like this right away. J

And again we start with the branches. We do everything the same.
We wrap the branches to our top

We continue this procedure until you get a Christmas tree of the size you need.
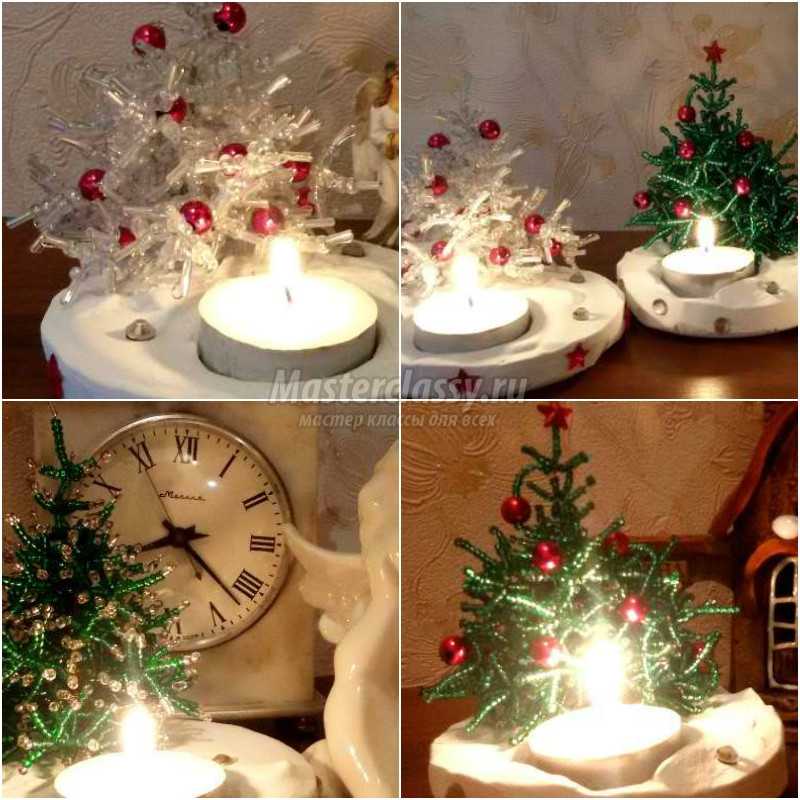
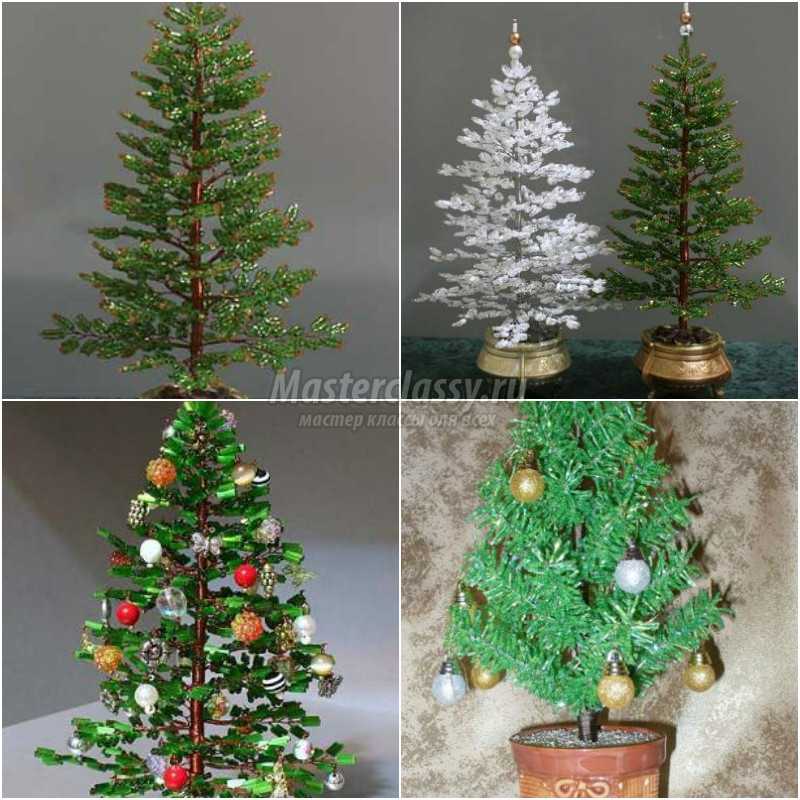
Here is a piece of my Christmas tree with a homemade snowflake toy.

December 24th, 2011 , 02:25 pm
Soon New Year and I decided on a beaded Christmas tree. Although I’m not really into beaded flowers and trees - it’s more about decorations anyway :)
But I really like my Christmas tree, so I hope you will like MK too and maybe someone will make a Christmas tree for themselves :)
So let's get started. We need bugles, round beads and a lot of wire.
Let's start with needles :)
Cut off a piece of wire. (I cut it to the size of my arm) We string one glass bead and one bead.
Passing the bead, insert the wire into the glass bead and tighten. This is how we got our first needle.
We continue until the cut piece of wire runs out.
We make several of these “fences”.
Let's start making the first branch. Cut off 10-15 centimeters of wire with a thickness of 0.55. We take one “fence” of needles. We wind the tip of the free wire from the needles, try to place the first glass bead on the tip of the wire (the base of the branch).
The twig is ready!
If this size of branch is not enough for you, wind a couple more “fences of needles”. We make several branches (it all depends on how fluffy your tree is).
Now let's proceed directly to creating the Christmas tree. We start making the Christmas tree from the top. This is more convenient, as you can adjust the height and fluffiness of the tree, as well as the length of the branches.
So, we select one branch, which will be central. We take the second branch.
We begin to twist the secondary branch around the central one.
We wind the remaining branches in the same way. Here we have the top. The number of branches in a row depends on how fluffy you want your tree to be.
Next we proceed to the second row of branches. In the second row, I decided to make the needles longer (it seems like the space is filled faster and the work is done faster). We do everything the same, only we take two bugles each.
We string two bugles and one bead. We return along two glass beads, leaving a bead.
Let's continue.
I suggest you make more of these fences at once :), so that you can then sit down and make a bunch of twigs at once and slowly assemble the tree itself. And so you will constantly be distracted by creating needles.
And again we start with the branches. We do everything the same.
We wrap the branches to our top
We continue this procedure until we get a tree of the desired size.
Here is a piece of my Christmas tree with a homemade snowflake toy.
Christmas tree made of beads is an excellent New Year's craft that is created to decorate the interior during winter holidays. If you have not yet mastered all the intricacies of beadwork, then do not worry - we will tell you how to create the simplest New Year's tree. But, of course, even experienced craftswomen will find something interesting for themselves in our selection.
Beaded Christmas tree for beginners - master class
If you don’t know how to weave beads, you can still please yourself and your household a wonderful craft. The principle of making such a New Year's tree is extremely simple, but the result is a rather spectacular New Year's tree.So, you need to take several ordinary sewing pins (you can buy them at a sewing store) and string several large beads on them. The material must not only have green color– it can be red, yellow or blue. The amount of material to be strung can be arbitrary, the most important thing is that one part of the pin is completely filled. Prepare 5 of these filled pins for the first tier of the tree and 8 pieces for the second.
Take a red ribbon (the toy will then be hung on it) and attach 5 pins to it, tighten it and form a triangle. In order to fix such a triangular position, you will need to use a decorative star - it will also be the main decoration for the upper part.
Take a small piece of wire and attach it to the bottom of the first pin of the first tier, then begin to form the second tier, gradually attaching the rest of the pins, alternating with large green beads. To make the bottom tier more voluminous, you should attach large green beads. So I'm ready beaded Christmas tree - beginners They can easily repeat this master class.
Christmas tree made of beads - master class
A coniferous tree with golden cones will become a real interior decoration on the eve of the winter holidays. To create a craft, you first need to weave a lot of blank legs, which consist of three loops. One loop should fit 9 beads. Weave also 60 pieces of gold cone blanks.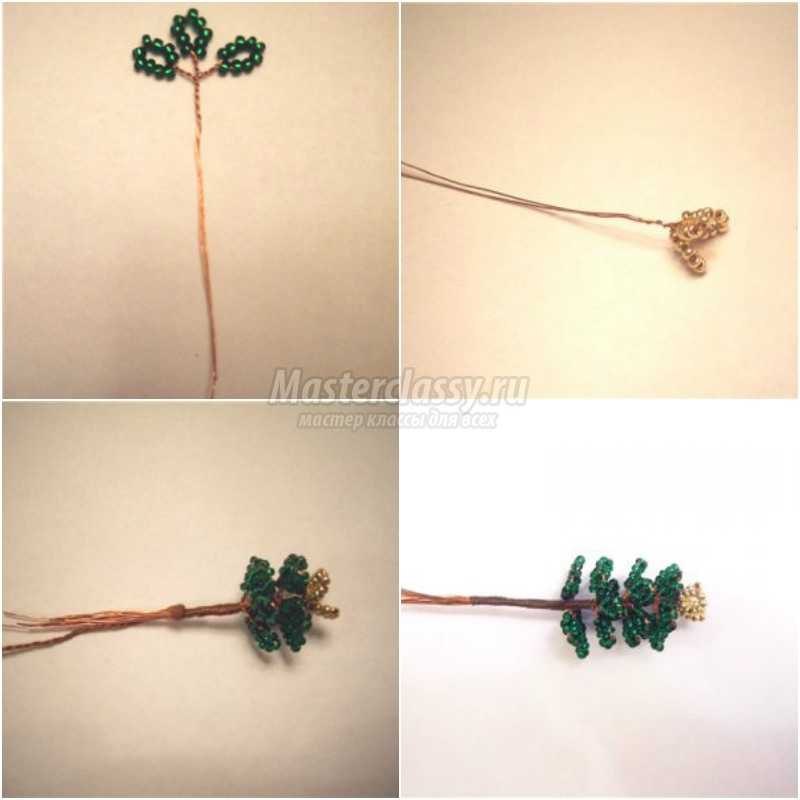
Now start shaping the crown. Weave an apical loop consisting of 15 pieces. bead, surround it with exactly the same loops in the amount of three pieces. Go down below and attach 8 greenish branches. As a result of your efforts, you have 4 tiers, all that remains is to attach 3 branches and the crown is ready.
Add 4 more pieces of strong wire to the free ends of the wire, which will serve as a base for the trunk and roots.
Take a golden cone blank and screw 4 greenish branches to it in pairs, then wrap it with thread. Make another five heels of the same blanks and screw them three in a row to the top of the head. For the next couple of rows, you should also make six branches, but each of them should have 6 green legs.

Do not forget that every time you attach the workpieces to the barrel, you need to tighten them tightly with thread.
Pour plaster into a beautiful flowerpot and place it in it, securing the bent wire roots. Dry and then coat the surface of the plaster with glue - this will help secure the shiny decor.
Christmas tree made of beads - master class, photo
Creating a Christmas tree-candlestick can be called real New Year's magic. Just think how beautiful such a figurine will look on festive table! In addition, such beautiful souvenir Can be presented to family or friends.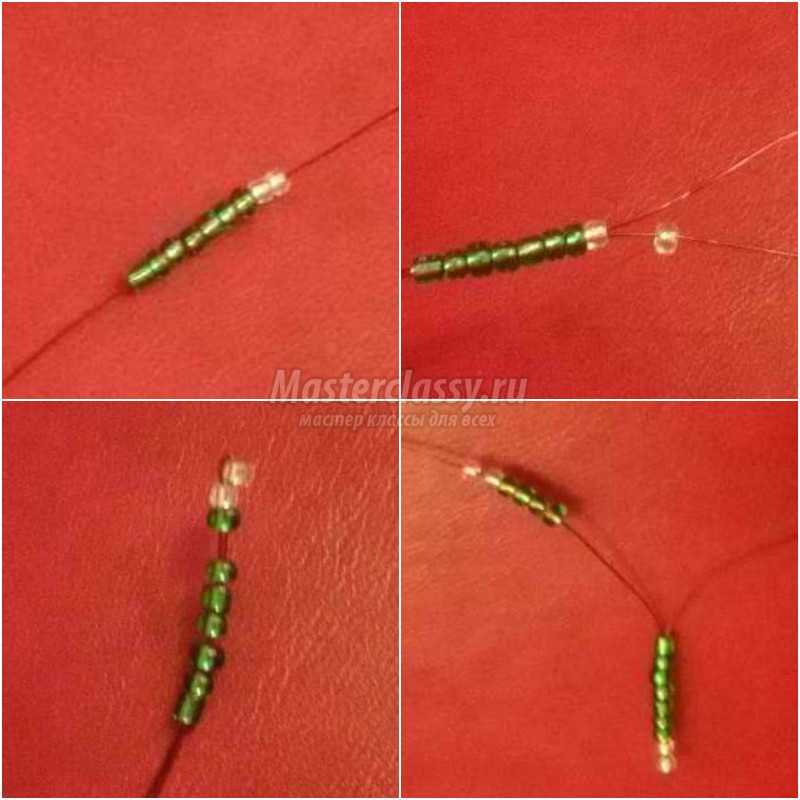
Weaving should start from the top. To create the top needle, put 7 green and 2 white beads on a thin wire. Thread the end of the wire back from the white side, skipping the very first one. Tighten the beads and you can say that the top needle is ready.
Proceed to making the side ones: using the photo as a guide, string 4 green ones and 2 white ones. Pull them tightly to the base and again thread the end of the wire in reverse, excluding the first round piece. You have got the first side needle, using similar manipulations, pick up the second side one, then the third and fourth in turn - the result should be a cute twig.
Place 3 more beads on the barrel and repeat everything a couple more times to get 2 more circles of side needles - in the end you will get a top with an upper needle, as well as three side circles, with a gap of 3 beads on the barrel.
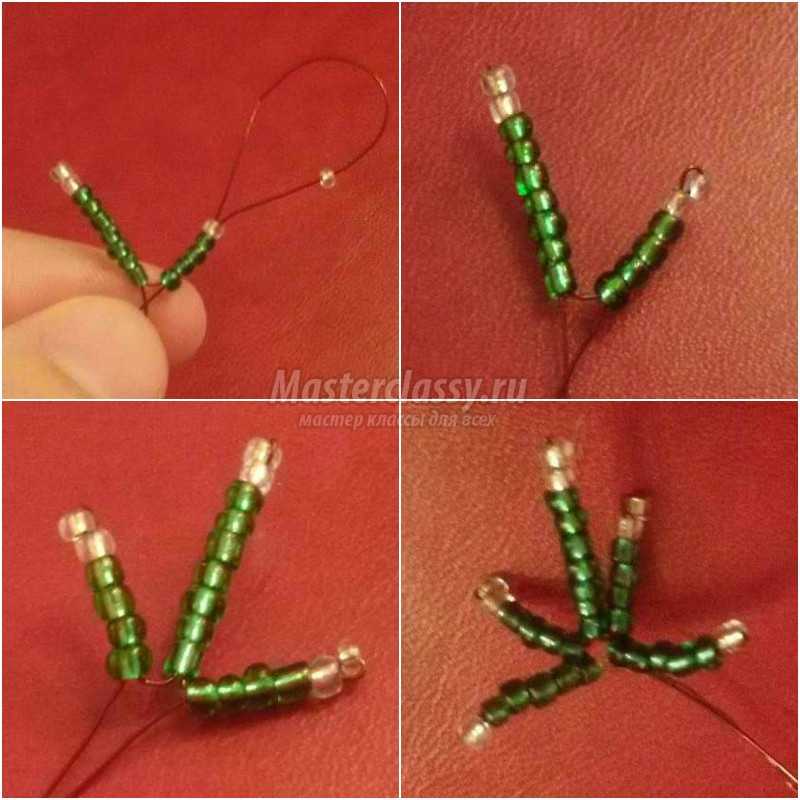
We can congratulate you - you have mastered the needle technique, using it, make 3 identical branches, consisting of an upper needle, as well as a number of side ones. They will need to be attached to the top, put on the side, tighten the beads on the barrel and twist the pieces of wire together, and you need to twist them tightly enough so that the barrel is cut hard and strong. Add a couple more “Christmas tree paws” in the same way.
The blanks for the fourth tier will simply be one row longer, and for the fifth they will be exactly the same as for the fourth, only 2 of them should be made in total, and then connected in pairs. Now your wonderful one is ready, but now you need to worry about creating a decent stand.
In order not to stain the fluffy figurine, you need to wrap it in cling film or foil. Dilute the gypsum (or alabaster) to a thin sour cream using ordinary water (pour the gypsum into the water). Fill in suitable form diluted plaster. Twist the wire tail of the craft into a loop and quickly place it in the mass, also place a tea candle nearby.
Then comes the moment of decoration - the delivery itself can be painted in any color, decorated beautiful rhinestones. Well now in New Year's Eve you can put a wonderful craft on the table, light a candle and enjoy the beauty.
Christmas tree made of beads – photo:
You will find many beaded Christmas tree patterns, be sure to use them in your work.
Christmas tree made of beads - step-by-step master class
Cutting beads are also perfect for needlework; this material will produce equally beautiful products.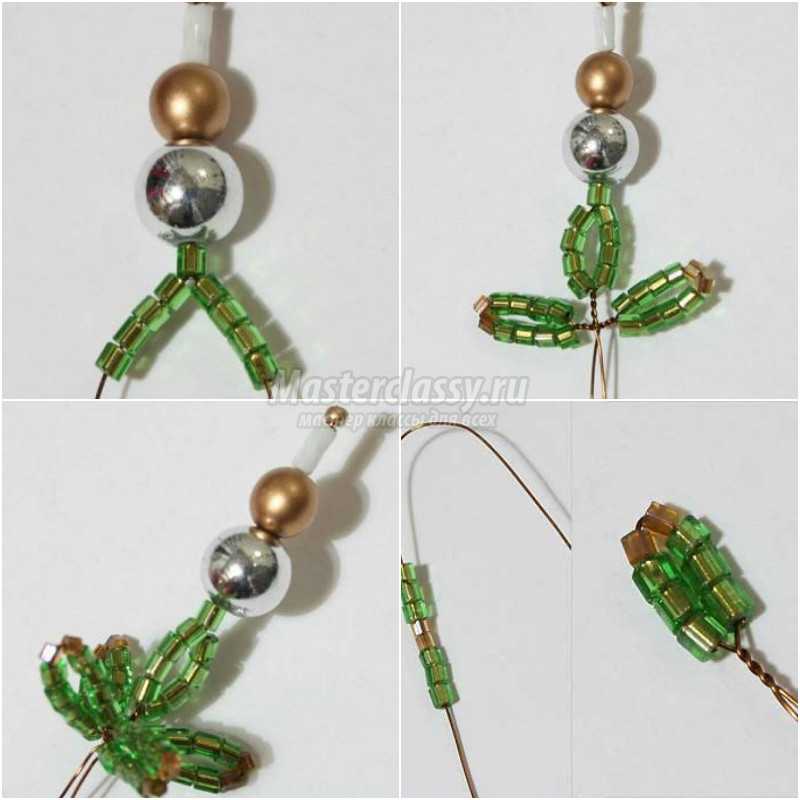
So, the work will start with making the top. You need to cut a piece of wire 45 cm long (the wire should be copper or simply brown). String a golden bead into the middle of the piece, followed by a sequence of white bugles, gold and silver large beads, and green beads. Pass the second wire tip through this entire typed sequence. On each tip, collect 4 light green cuts.
Then twist both wire ends together 3-4 turns, add 4 green-2 brown-4 green cuts at each end, twist with loops. Twist the ends 2 turns, and then make 2 exactly the same loops again - you have the first tier.
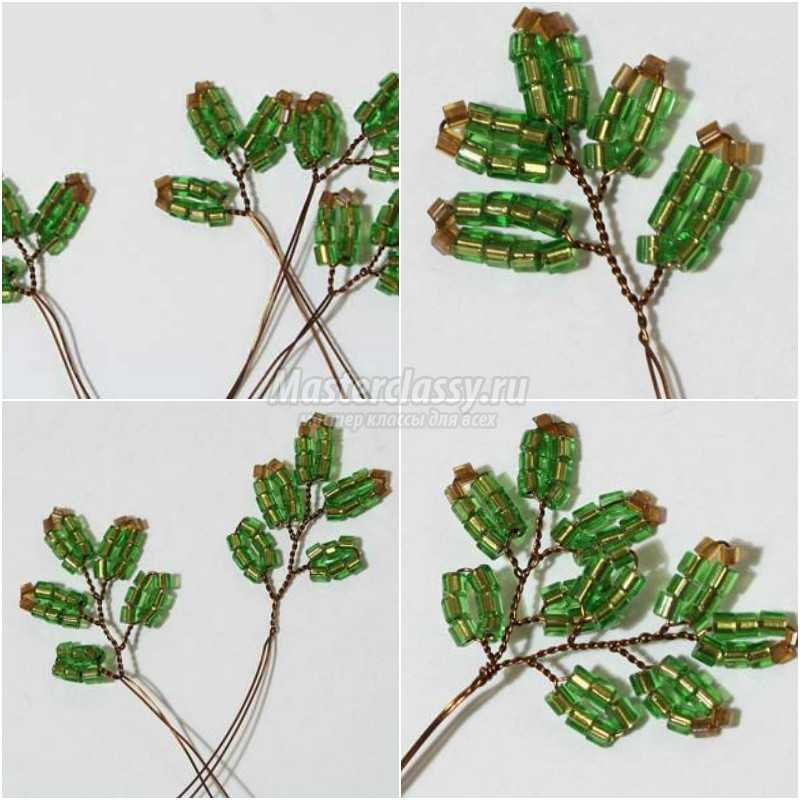
Proceed to creating the second tier - for this you need to cut off 4 wire pieces, the length of each should be 25 cm. Transform them into 4 branches, each of which should contain 3 loops, which should be cast on like this: 3 green-2 brown-3 green . Twist the wire from loop to loop 4-5 turns, from the last loop 3 turns.
For the third tier you will need 4 wire pieces 30 cm long, you will get branches of 5 loops, the first 3 will be made as for the second tier, and in the next 3 green ones together you should make 4.
For the 4th tier you can’t do without 8 pieces of wire, their length will still be the same - 30 cm. Each branch will have 5 loops: do the first 3 in exactly the same way as for the second tier, in the next 2, dial 6 light-colored ones. green. Place these blanks in pairs, screwing them with a spiral 3-4 turns.
For the 5th tier, prepare 4 pieces of wire 35 cm long, i.e. you will get 4 blanks of 7 loops each. The last 4 should be different - collect only 6 pieces of green chop in them.
Start the 6th tier in exactly the same way as the fourth, but at the same time assemble the pieces together differently. Cut an additional piece of 20 cm. From the last loop, wind 12 turns in a spiral with this additional piece, then attach the second piece with 15 spiral turns.
7th tier: prepare 4 pieces of 60 cm each. Make the first loop in the middle of the wire, then make 6 more pieces, as on the sixth tier, while the second wire end should remain long. After the last loop, twist it 7 turns. Also twist 7 loops on the long tip. Using an additional piece of wire, twist the branch downwards in a spiral of 8 turns.

For the 9th, repeat as for the eighth, only the number of turns should be 18.
For the 10th tier - 4 x 70 cm, 4 x 35 cm. A large branch should have 8 and 9 loops, a small one - 7, spiral turns - 22. Using the photo as a guide, assemble the tree.
The most logical New Year's bead decoration would be a snowflake. There are an incredible variety of patterns for beaded snowflakes: from the simplest for beginners to incredibly complex ones, consisting of several tiers. As a connecting element, you can use fishing line, wire, thread, as well as pins and the most common glue.
#1 Quickly made snowflake from beads: make Christmas decorations with your own hands
For those who have absolutely no time to prepare, a snowflake made of wire and beads would be an ideal option. To create such a masterpiece you will need: wire, glue or thread (for fastening the wire), beads or beads. Cut several identical pieces of wire (3 or more), fasten them in the middle (with glue or thread), and string beads onto the free ends. The snowflake is ready!
#2 Quick snowflake made from pins and beads: DIY New Year’s craft
For such a snowflake, it is best to have in your arsenal not only beads, but also other beads of different sizes. You will need: pins, fishing line, beads of different sizes, scissors and glue. Below see step-by-step photo instructions.

#3 Master class from beads: making a snowflake for the New Year with your own hands
So, let's complicate our product. This snowflake has its own manufacturing pattern that must be followed. You will need: fishing line, scissors, beads and beads. Detailed diagram See snowflakes below.

#4 Snowflake made of beads: master class with step-by-step photos
For beginner craftswomen, this scheme New Year's snowflakes will be a great start. The tools you will need are: fishing line, scissors, needle, beads. It is better to take beads in two colors, so the craft will look more impressive.

#5 DIY snowflake made of beads for the New Year: diagram
To make such a craft, you will need several types of beads: this way the snowflake will look incredibly realistic. See below for a detailed diagram with bead sizes.

#6 Bead crafts for beginners: snowflake pattern for the New Year
To make such a snowflake you will need beads of different sizes and colors, as well as fishing line. A detailed beading diagram is described below; the diagram also shows the sizes of beads that should be used in making this New Year's craft.

#7 New Year's bead craft: DIY snowflake pattern
And another unusual pattern for a New Year’s snowflake that you can bring to life with your own hands. A detailed diagram is described below indicating the sizes of beads required for the craft.

#8 Snowflake pattern made from beads: making New Year’s crafts from beads
Another quite simple, but at the same time charming snowflake pattern from their beads. You will need fishing line and beads of different sizes and colors. A detailed manufacturing diagram is shown in the photo below.

#9 Beadwork: snowflake pattern
Any needlewoman can make such a charming craft. It might be a bit difficult for beginners, but nothing is impossible. Below is a detailed diagram that will help you master the beading technique.

New Year's Angels made of beads
An angel is rightfully considered another symbol of the New Year and Christmas. You can make cute angels from beads, and then decorate a Christmas tree or house with these beautiful crumbs. You can give an angel made of beads as a gift to people near and dear to you so that it protects and helps.
#1 Simple angel made of beads and wire: master class with step-by-step photos
A very simple angel that even beginners can make. It will take about 10 minutes of your time and your cute beaded angel for the New Year is ready! See the step-by-step photo master class below.

#2 New Year's angel made of beads: making crafts for the New Year with your own hands
Another variation of bead crafts on the theme of angels. The pattern is quite simple. You will need: wire, scissors, beads and beads of different sizes, a chain or ribbon. Below see step-by-step photo instructions for making the craft.

#3 Angel made of beads: do-it-yourself New Year’s crafts
A more complex version of a Christmas angel made of beads. You will need patience and experience in creating masterpieces from small glass beads. See the step-by-step master class with photos below.
#4 Cute angel made of beads and beads with your own hands: diagram
Here is another diagram of an angel made of beads and wire. Very similar to option number 1, but there are small differences that make the craft more realistic. See the photo below for the diagram.

Christmas tree made of beads
The most important attribute of the New Year holiday, without which it is simply impossible to imagine it, is the New Year tree. If for some reason you do not have the opportunity to acquire a large green beauty, you can replace it with a miniature Christmas tree made of beads. Here you will find master classes on making a Christmas tree from beads for both beginners and beadwork professionals.
#1 Simple Christmas tree made of beads and wire: New Year's crafts from beads for beginners
Even a child can handle this New Year’s craft. By the way, the beads develop well fine motor skills, which is useful not only for children, but also for adults! Step-by-step instructions with photos are given below.

#2 Christmas tree made of beads: making crafts with children
Another option for a simple New Year’s craft that you can do with your children. The Christmas tree will turn out bright and cheerful if you use beads different colors and sizes. Step by step wizard see class below.

#3 We make a Christmas tree with our own hands from beads and glue
Such a craft can become very original decoration or even a gift. You will need glue, construction paper and scissors. Draw the silhouette of the future Christmas tree on paper. Then carefully glue the beads along the contour. wait until it dries and cut out the finished product. The work is painstaking, but if everything is done correctly, the result will be indescribable beauty!

#4 Beaded tree: master class on making a Christmas tree
A miniature Christmas tree made of beads will be an excellent decorative element. To create it you will need two types of wire, a lot of green beads and red beads of a slightly larger diameter. See the photo below for a step-by-step masterclass.

#5 Beadwork: masterclass on making a Christmas tree for the New Year
From beads you can make such a cute Christmas tree pendant, which, by the way, can be hung like a toy on christmas tree. You will need wire, green beads, white and orange beads. See the step-by-step masterclass with photos below.

#6 Making a Christmas tree from beads with your own hands: diagram
You can also make a small Christmas tree in this way: You will need a toothpick or other thin stick, beads and fishing line. According to the pattern, weave several cross-shaped bases with a round hole in the center. The bases must be of different sizes. Next, string them onto a stick, starting with the largest ones. The top can be decorated with beads of a different color.

#7 Christmas tree made of beads: masterclass + photo
Let's complicate the task. In this masterclass you will learn how to make a Christmas tree from beads and wire. For this craft you will need wire and beads of two colors (green and white). Make each branch separately, and then twist them together and get a fluffy Christmas tree. Detailed photo instructions are given below.

#8 DIY beaded Christmas tree pattern: making New Year’s crafts
Another Christmas tree pattern made of beads and wire. Additionally, you can use multi-colored beads of different sizes, which will look like Christmas balls. The diagram is described in detail in the photo below.

#9 DIY mini Christmas tree made of beads and beads
Miniature Christmas tree made of beads and beads. Suitable for more experienced craftsmen. A detailed diagram is shown in the picture below.

#10 Christmas tree made of beads: master class with step-by-step photos and diagram
Another version of a Christmas tree made of beads and wire. At first glance, some of the Christmas tree making workshops in our article are similar. And indeed it is. They are similar, but the execution techniques are different. Experienced craftsmen will immediately notice the difference, but for beginners we recommend that you strictly follow the instructions and carefully study the MK.
#11 Christmas tree with beads: masterclass with photos
This version of the green beauty is a little simpler than the previous one, but in general the manufacturing scheme is similar. You will need fishing line, green and white beads and step-by-step instruction beading.

#12 Christmas tree made of beads: step-by-step masterclass
For the most experienced needlewomen we offer a master class on making a Christmas tree from beads. Very painstaking work awaits the craftswoman when creating such a masterpiece. Each branch is made separately and then wound onto the main stem. See step-by-step photo instructions below.

See also:
Other New Year crafts made from beads
For the New Year, you can make other crafts from beads, for which you have enough imagination. Well, what are the New Year holidays without gifts, Santa Claus, pine cones, sweets, wreaths, stars? All this and much more can be made from beads with our step-by-step master classes.
#1 New Year's bell made of beads: master class with photos
A beaded bell would be an excellent New Year's decoration. To create it you will need wire, beads and beads, scissors, a safety pin, chain or ribbon. See step-by-step MK with photos below.

#2 Peppermint candy made from beads: doing beadwork for the New Year
You can also decorate a New Year tree or interior with themed mint candies made from beads, which we know well from Hollywood films. The weaving pattern and step-by-step master class are shown in the photo.

#3 New Year's gift made of beads: making crafts with your own hands
A craft gift will look very symbolic as a decoration. You will need wire, beads and beads of different sizes. Master class with step-by-step photos, see below.

#4 Santa Claus made of beads: diagram and master class
Well, what would a holiday be without a kind old man delivering gifts? Here we will make a bourgeois colleague of our Santa Claus. The scheme is simple, suitable for beginners. You will need red black and white beads.

#5 Master class on beadwork: making a New Year's cone from beads with your own hands
Well, what is a Christmas tree without pine cones? Now we will tell you how to make a bead cone with your own hands. To do this, you will need a foam oval blank, brown or golden beads, and fishing line. For beginners, such a craft will be difficult: they will have to spend a lot of time and effort. But experienced craftswomen will love the New Year's cone made of beads. See the step-by-step masterclass below.
#6 Master class: weaving a Christmas wreath with beads
Usually decorated with Christmas wreaths front door, sometimes it is also hung on the wall to create festive atmosphere. But you can make a small wreath of beads and use it as an element New Year's decor. See beading instructions below.

#7 DIY beaded Christmas wreath: MK with photo
There can be a great many variations on the theme of a Christmas wreath made of beads. Having gained a little experience, you will be able to generate ideas for patterns on your own, but for now, take note of our crafts and patterns.

#8 Beaded wreath for the New Year: master class on beadwork
Well, the most complex version of a beaded wreath. You will have to try, but the result will exceed all expectations. With such a craft, there is no shame in going on a visit, taking a wreath as a New Year's souvenir.

You may be interested in:
#9 Beaded star: do-it-yourself New Year’s craft masterclass
You can make such a cute bright star with your own hands using our step-by-step master class. You will need wire and beads of different colors and sizes.

Bead jewelery
It’s worth preparing thoroughly for the New Year: you need to decorate not only the Christmas tree or the house, but also your loved one. You can use beads to make incredible themed decorations with your own hands and illuminate good mood everyone around. By the way, you can make identical jewelry for friends, sisters, or mother and daughter. In general, turn on your imagination and go ahead - create!
#1 New Year's snowflake pendant: making decorations with your own hands, MK
It is relevant during the New Year holidays, and in general with the beginning of winter, to wear themed winter decorations self made. You can make this snowflake pendant from beads with your own hands following the instructions in our master class.

#2 New Year's pendant Christmas wreath: master class on making
A pendant in the form of a Christmas wreath will also look relevant on the eve of the Christmas holidays. You will need beads of two colors and fishing line. You can hang the pendant on a cord or on a chain.

#3 DIY New Year’s snowflake earrings made of beads: step-by-step master class with photos
New Year's holidays are just around the corner, which means it's time to think about dressing for the holiday itself. It would be nice to appear on gala evening in a unique handmade decoration. With the help of this MK you can create beautiful themed winter earrings with your own hands.

#4 Simple, quick and easy beaded earrings: diagram + step-by-step photos
If you don’t have time, but you really want a handmade themed decoration, you can make these simple earrings in the shape of snowflakes. You will need: wire (6 identical pieces), beads or beads. For one earring, take three pieces of wire and twist them in the middle to form a solid six-pointed structure. String beads onto the ends and secure. Add a hook and the earring is ready!

#5 DIY beaded earrings for the New Year: step-by-step instructions with photos
You can make these cute earrings in the shape of fir branches yourself using our detailed photo instructions.

#6 DIY beaded Christmas deer earrings: MK with photo
You can make funny earrings in the shape of deer from beads with your own hands. The scheme is very simple, even beginners can handle it. But such a product looks very funny, and most importantly - thematic!

#7 DIY earrings in the shape of a New Year’s wreath: weaving pattern
Beaded jewelry can be diluted with additional decorative elements, for example, with tape, as in this master class. The result is an original product, which you can’t even tell that it took just over 10 minutes to make!

#8 Bead decoration: making flat earrings with your own hands
To make gift-shaped earrings you will need three types of beads and wire. We weave the base from square flat beads. Bugles and small beads will be needed for the bow. See the step-by-step master class below.

#9 DIY beaded jewelry: Tutorial on weaving earrings
And here is another variation on the theme of beaded earrings in the form of a Christmas wreath. You will need beads of two colors (green for the base, red for decoration), fishing line and our diagram.

#10 Beaded earrings: DIY mistletoe leaf, MK + photo
Earrings can also be made in the form of mistletoe leaves. The scheme is incredibly simple, so novice craftswomen can safely get to work. See the photo below for a step-by-step masterclass.

A beaded brooch will also become a themed New Year's decoration. In this master class you will learn how to embroider a beaded brooch in the shape of a bullfinch. You will need beads of four colors, stones for the eyes and chest, and rhinestones for decoration.

#12 Bead embroidery: making a New Year's mask with your own hands
You can embroider with beads New Year's mask. To do this you will need a blank openwork mask. And then embroider it to your taste with beads of different colors.

Beaded crowns
For the New Year, you can make chic beaded crowns for little princesses. Small glass beads look real gems on New Year's holiday a little snowflake or princess will look unique. In addition, a beaded crown can be made together, keeping the child busy and the mother happy!
#1 Master class on how to make a crown from beads: the crown of the Snow Queen
You can make a real Snow Queen crown with your own hands from beads and seed beads. The work is painstaking and will require a lot of effort and time from you. However, the result is worth it: see the step-by-step master class with photos below.
#2 Snowflake crown made of beads: MK + photo
You can make a headband with a snowflake for a small snowflake, which will look like a real crown. See below for a detailed diagram and step-by-step master class.

#3 How to make a crown from beads and beads: MK princess crown
Detailed diagram for making a princess crown from beads and seed beads. Treat yourself and your little princess with a handmade product.

Help us improve: if you notice an error, select a fragment and click Ctrl+Enter.
The New Year is coming soon, every person now faces a large number of questions: “Where to celebrate”, “Who to celebrate with”, “What to give to relatives and friends” and many others. We want to help you figure out at least one.
We bring to your attention a Christmas tree made of beads. Such a gift looks aesthetically pleasing and fully matches the theme of the holiday. In addition, a DIY beaded Christmas tree is an excellent proof that you have creativity, as well as showing attention to who this gift is intended for.
We will teach you how to make a Christmas tree from beads, and also tell you about some weaving methods that will be useful to you in making other crafts such as.
The first way to make a Christmas tree from beads with your own hands
If you decide to give your loved ones this original gift, prepare the following:
- scissors, if desired, you can replace them with pliers;
- wire, preferably thin, so that it can easily pass through the beads;
— beads No. 12, green, two shades of green, one darker, the other lighter and white;
- brown thread. You can use dark green.
Beaded Christmas tree weaving pattern:
1
.
 We begin to weave the tree from the top; to do this, you need to collect 4 white beads on the wire. Then insert the other end in the opposite direction, through the last 3 beads.
2.
The free ends of the wire must be separated, and for each, collect 1 light green, 2 green and 1 dark green beads.
3.
Bring both ends of the wire together and add another dark green bead.
4.
Next, we place beads on one end in the following sequence: 2 dark, 2 green, 1 light, 3 white, 1 light, 2 green, 1 light, 2 green. 1 dark. Insert the free end of the wire through the last dark green bead. Do the same with the other end and repeat step 4 again for each edge. Twist the ends of the wire together so that there is a small distance between the tiers.
The top of the beaded Christmas tree is ready with your own hands, let's move on to weaving the next tier.
1.
Place the following beads on one end of the wire: 1 dark, 2 green, 1 light, 3 white, 1 light, 2 green, 1 dark. Pass the free end through the last dark bead and repeat the entire step 4 more times. This will give you 5 petals. Do the same with the other end, then connect both ends of the wire.
2.
For the next tier of the beaded Christmas tree, the weaving pattern is the same, with one exception, the number of petals should be greater and additional branches will be added. Just after between the loops -  petals, add two dark beads.
3.
Weave the next tier according to the 1st point pattern.
4.
The weaving pattern for this tier corresponds to the pattern described in paragraph 2.
Next, continue to alternate tiers, increasing the number of branches and petals. After making a Christmas tree from beads, you need to hide the wire by wrapping it with thread.
As you can see, the beaded Christmas tree weaving pattern is quite simple; not only an adult, but also a child, who can also be involved in the making of New Year's souvenirs, can handle it.
The finished Christmas tree can be decorated with tinsel, or you can leave it like that, planting it in a small pot filled with plasticine. You can create an imitation of snow on top by placing cotton wool or foil.
With such a handmade gift, you will definitely surprise all your friends and family.
SELECTION OF IDEAS