Children's socks on knitting needles - diagrams and microns step by step. Short socks with a black cat Children's socks on two knitting needles - a master class with a description
One of my friends, a lover of cats, wanted to get "purr-r-r-growling" socks. And in the process of knitting, I decided to make a master class, maybe it will come in handy for someone.
I took the yarn so that the socks were not thick, but warm. They are very comfortable and warm on the feet :)
So let's get started.
For work, we need 2 incomplete skeins of ADELIA OLIVIA yarn, made in Australia (white and black), red thread for embroidering a muzzle and a set of 5 knitting needles No. 2.5, hook 1.75 for knitting a lace.
I give a description on my socks: size -39, foot girth 19-20 cm, toe height 17-18 cm. Knitting in 1 thread. You may have more or less depending on how you knit (tight or loose) and what yarn.
1. Cuff
We collect 56 loops on 2 knitting needles - a black thread (I always dial 1 loop more, when knitting into a ring, I knit the last and first loop together, and I get the right number of loops).

We distribute the loops on 4 knitting needles, 14 loops for each, start knitting the first row with facial ones and connect the knitting into a ring.

We continue to knit the cuffs with the front and back rows:
1st row: knit.
2nd row: purl.
3 row: facial.
4th row: purl.
5 row: facial.
6th row: purl.
7 row: facial.
8 row: 2 persons together., nakid - holes for the lace.
9 row: facial.
10th row: purl.
11 row: facial.
12 row: purl.
13 row: facial.
14th row: purl.
15-18 rows facial.
19 row: purl.
20 row: facial.
21 row: purl.
22 row: facial.
23rd row: purl.
from 24 to 27 row: only facial.
28 row: purl.
29 row: facial.
30 row: purl.
from 31 to 34 row: only facial.
35 row: purl.


3.Heel
We turn to knitting the heels: in the continuation of knitting from 1 knitting needle, we knit 14 loops on the 4 knitting needle and get 28 loops (we temporarily leave the 2nd and 3rd knitting needles). We knit 22 rows of facial and purl rows (front surface with turning rows).

28 loops are divided for knitting the heel 7-14-7 loops (can be marked with a marker or colored thread):
on the 23rd row (I have this purl row) - purl 20 loops, 2 together, unfold knitting (6 loops remain untied)
24 row: 1 remove, 12 facial, 2 together, turn (6 loops remained unknitted)
25 row: 1 remove, purl 12, 2 together, turn (5 loops were not knitted)
26 row: 1 remove, 12 front, 2 together, turn (5 loops remained unknitted)
And so on, we knit until 14 loops remain. I have 14 stitches left after all decreases in the front row.

4. Wedge instep (transition from heel to sole)
We continue to knit: we raise the side loops, 15 loops on each side and divide 14 heel loops into 2 knitting needles to them, i.e. we get 14 loops on the 2nd and 3rd knitting needles, 22 loops on the 1st and 4th knitting needles. Thus, we again switched to knitting in a circle on 5 knitting needles.


5. Foot
We continue knitting with the front stitch with the same black thread.
We knit 10 rows.
On the 11th row, we begin to knit the ears, add a white thread (I tied a separate white thread to each eyelet so that there are no long broaches, when we knit 5 rows and switch completely to the main knitting with a white thread, we will break the second thread and fix it later).
So, row 11:
The first knitting needle is unchanged - 14 loops are black;
- it is better to transfer the loops of the second and third knitting needles to one: 6 loops are black thread, 1 loop is white, 14 loops are black, 1 loop is white, 6 loops are black;
- the fourth knitting needle is unchanged - 14 loops are black.
12 row:
- second and third - 5 black, 3 white, 12 black, 3 white, 5 black;
13 row:
- the first knitting needle - 14 loops black;
- second and third - 4 black, 5 white, 10 black, 5 white, 4 black;
- the fourth knitting needle - 14 loops are black.
14 row:
- the first knitting needle - 14 loops black;
- second and third - 3 black, 7 white, 8 black, 7 white, 3 black;
- the fourth knitting needle - 14 loops are black.
15 row:
- the first knitting needle - 14 loops black;
- second and third - 2 black, 9 white, 6 black, 9 white, 2 black;
- the fourth knitting needle - 14 loops are black.
In the 16th row, the first knitting needle is 14 black and the thread is cut off leaving about 1 m, in the future we use it to embroider eyes and mustaches, from the second knitting needle we switch to knitting with a white thread, we leave the first thread, and cut off the second white one (this is for those who knitted from two white ones) For the convenience of knitting, we again switch to knitting with 5 knitting needles.
16 row and all subsequent knit white thread.

We knit to the size of the foot you need (I got another 45 rows).

6. Toe
Toe (we knit and close, who is used to it and who is comfortable) In these socks, I decided to knit such a toe:
Dec 2 sts in every 2nd row 6 times until 8 sts remain on each needle (on 1st and 3rd needle behind the front walls of the loops at the end of the row, on 2 and 4 - behind the back walls of the loops at the beginning of the row);
Decrease 2 loops in each row 4 times, when 4 loops remain on each knitting needle, break the thread, remove these loops on a thread with a needle, tighten and carefully hide on the wrong side.

We hide all the extra ponytails on the wrong side, and embroider the eyes and mustache with the left black thread.
Embroider the nose with red thread.
7. Drawstring
We take a hook and knit a lace:
150 VP, decorate the edges of the lace as you like: bead, tassel, pompom.
We knit the second sock in the same way as the first, swapping colors - we start with white, continue with black and finish.
These are the socks we got :)

The size: 37/38
You will need: yarn (100% cotton, 165 m / 100 g) - 50 g light lilac and 50 g black, set of stocking needles No. 3, hook No. 1.75.
Description of knitting socks
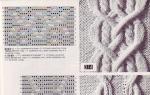
Cast on 48 sts with a light lilac thread (12 sts per needle) and knit 4 rows of faces. satin stitch. Then make an ornament according to scheme 1, then knit 4 more rows of faces. satin stitch light lilac thread. After that, start knitting a straight heel according to the general rules for knitting socks. Knit the fabric of the heel, alternating the colors of the threads. After the heel, continue to knit as follows: knit 4 rows with a light lilac thread, knit the next 2 rows, alternating light lilac and black.
Next, on the loops of the 1st and 2nd knitting needles, knit the pattern according to scheme 2, and knit the loops of the 3rd and 4th knitting needles, alternating colors. Then knit 8 more rows as follows: * 2 rows with a light lilac thread, 2 rows, alternating colors *. Repeat from * 2 times. After that, start knitting the cape according to the general rules for knitting socks, alternating colors. Crochet the top of the sock with 2 rows of st. b/n.
In the cold season, knitting children's socks with knitting needles is a must. It is so important that the child's feet are warm. For a year, 2 and 3 years, choose wool yarn or yarn with alpaca, mixed with artificial fibers, such as polyamide. While knitting the heel, it would be nice to add a thin bobbin thread. Summer openwork socks for beginners are knitted from cotton yarn. At the end, you will find cat patterns for knitting jacquard.

How to calculate the number of loops for knitting a sock
In order not to start work again and again, before knitting children's socks with knitting needles, we calculate the required number of loops. In order for the socks to fit the child perfectly, you need to take into account the height of the leg lift, the size of the lower leg and the size of the foot itself.
- There are circumstances when fitting a sock is not possible - then the formula is used: X: 3 x 2 = Y, in which X means the size of the shoe, and Y is the length of the foot. X: 3 x 2 = Y
where X is the shoe size and Y is the foot size in centimeters. For children's socks with knitting needles, you will need 50 gr. yarn. - If this seems complicated to you, there are tables that indicate how many loops to cast on according to the knitting density. It is necessary to knit a “probe” - 10/10 cm in order to calculate the required number of loops.
- Another option for determining the number of loops. It is necessary to take 2 measurements of the baby's leg: the 1st measurement is the circumference of the instep, it is measured in centimeter at the widest point of the leg instep. 2nd measurement - leg circumference, measured above the bone. Next, we find the average circumference: we add the circumference of the volume and the circumference of the leg and divide by 2. By so much, see and do the calculation for the set of p.
- And the last option. Everyone knows that the anatomy of the leg has its own proportions. Look at the size ratio of the leg. You can’t go wrong if you cast on the needles the number of stitches that match the size: (top of the foot + sole = 100%). This size is what you need for the correct set of loops. Next, we will knit beautiful socks with a step-by-step master class.

A set of loops according to the anatomy of the leg.

Size chart for different knitting densities.
Here we will knit such original socks in stages with knitting needles for a child at the age of 3-4 years. We will knit on five knitting needles in the simplest “grandmother's” way. Knitting children's socks is something that is suitable for beginners who are just starting to knit. This easy way to knit baby socks with knitting needles will also come in handy for those who knew, but forgot this technique.
Abbreviations: p. - loop, p. - row, l. - front, from. - purl., sp. - knitting needles, vm. - together.

For work you will need:
- 5 double knitting needles, 3 mm thick.
- Yarn - wool with polyamide (150 m / 50 gr.) - 1 skein of gray and 1 skein of blue.
- Black and red thread for the cat's face.
- Eraser at the end of each needle - so that the yarn does not slip off the needles.
- Pins or markers.

Table number 1, which helps to knit children's socks with knitting needles.

The foot of a child at 3-4 years old corresponds to 26/27 shoe size and the size of the foot is 16-17 cm. We collect 44 points with gray yarn. We focus on table number 1. We distribute all 44 sts into 4 knitting needles - on each knitting needle we get 11 sts. We will knit first an elastic band, and then circular rows. Mark the place of transition from one to another p. (between the 1st and 4th sp.) - a marker. The elastic band can be knitted, as in the photo (1 person / 1 out.), But, as a rule, such an elastic band quickly stretches out. Therefore, it is better to tie an elastic band 2/2. Knitted 10 p. rubber band and go to the faces. smooth surface. We knit as many rows as high as you want to make socks. In this model, there are only 6 p., Usually it is 10 cm. In this place, drawings and patterns with jacquard are usually knitted.

Next, we will knit the wall of the heel. We will do this on the 1st and 4th sp. facial smoothness. We do not touch the 2nd and 3rd knitting needles yet. We look at table 1: heel wall - 22 p. (44: 2), heel wall height - 14 p. (4 cm). If you knit the first and last stitches with a garter stitch, then this will make it easier for you to calculate the p.

Next, you need to tie the bottom of the heel. We divide 22 p. into 3 parts (7; 8; 7). We mark with markers. We got 7 p. on both sides, and in the middle - 8 p. We start with the front p.: 14 persons. p., 2 persons together., turn the work over (6 remaining p. do not knit, leave it like that.
2nd p.: 8 out., 2 vm. out., turn over (5 p. leave untied).
3rd p.: 8 persons., 2 vm. persons., turn knitting.
4th p.: 8 out., 2 vm. l., turn knitting.
And so on until there are 8 stitches left on the needle.

Here we have 8 sts left. Next, you need to dial as many sts from the edges on the knitting needles as we have in table number 1 (the number of loops for dialing along the lateral edges of the heel is 11, but we will take a little less - 9 sts. ). In the place where the tail of the thread sticks out, we pick up 9 sts on the knitting needle and knit their faces, then we have 11 sts of faces, another 11 sts of faces, and again we pick up 9 sts on the knitting needle, knitting their faces. And here again we have circular knitting. There are now 48 sts on the needles in total.

And in this place it would be good to measure the toe on the leg. If it's too wide, turn it down. If the number of p. suits - we knit further in a circle, distributing the p.: 12 p. For each knitting needle. The beginning of the circular row is in the middle of the lower part of the heel (marked with a marker). We have 48 sts on the needles. We knit through a row of 2 faces together. Let's focus on the marker. Knitted 8 p. and subtracted 4 p. Remained 44 p., on each sp. - 11 p each. Next, we begin to make ears for the cat. Our scheme is 32 p., so we add 12 p. to the scheme, 6 on each side, and start knitting from the ears, from the 30th p.:

In order not to interfere with a long blue thread from the inside, make 2 blue balls. Gray yarn: 14 persons. n. gray, 1 person. p. blue, 14 p. gray, 1 p. blue, 14 l. n. gray.
29th p.: 13 y.o. n. gray, 3 l. p. blue, 12 l. n. gray, 3 l. p. blue, 13 l. n. gray.
28th p.: 12 y.o. item gray, 5 l. p. blue, 10 l. n. gray, 5 blue, 12 l. n. gray.
27th p.: 11 y.o. n. gray, 7 l. p. blue, 8 l. n. gray, 7 l. blue, 11 l. n. gray.
26th p.: 10 l. n. gray, 9 blue, 6 gray, 9 blue, 10 gray.
25th p.: 44 y.o. n. blue.
The length of the foot to the toe is 13.5 cm (see table). We knit according to the scheme up to this point. We reach the little finger on the leg. Next, we begin to make a toe. Decrease is done at the end of every 11 p. (2 together l.). So we decrease until 2 sts remain on the knitting needles. Cut the thread. We stretch the end of the thread through these loops. We remove the tail.

The second sock is knitted in the same way, only it starts with blue yarn, with an elastic band.
On the video: how to knit children's socks on 5 knitting needles.
Children's socks on two knitting needles - a master class with a description
Children's socks on two knitting needles - this master class is useful for those who do not like to knit on 5 knitting needles. We knit socks on 2 knitting needles, three more knitting needles are auxiliary. Then we sew the product with a needle with a native thread. The product corresponds to the size 22/23, the length of the foot is 15 cm. The socks are knitted for the age of 3 years.

For work you will need:
- Yarn - wool or wool mixture - 1 skein 50 gr.
- Hosiery knitting needles 3.5 mm thick.
- The needle is thick.

We knit the upper part of the sock. We collect 39 p. And plus 2 p. Edge, total - 41 p.
1st river: edge, 1 person. p., 1 out., and so on until the end of the river, at the end - edge.
2nd p.: chrome., 1 out. p., 1 l. etc., and so on to the end, at the end - chrome.
And so continue with an elastic band for 28 rows.
Next - we make a “tongue”: we knit it for 13 points, do not touch the rest of the points!

1st row: chrome, 26 persons. p., turn the work.
2nd p.: 13 persons. p., turn the work.
3rd p.: 13 persons., turn.

And so we knit with a garter stitch (one person. P.) 34 rows. We got: 14 sts on the first needle, 13 - tongue, 14 sts on the second needle.

35th p. without chrome. p .: 2 persons together., 9 persons., 2 persons together.
36th p.: all facial.
37th p: 2 cm. persons., 7 persons., 2 vm. persons.
38th p: all persons.
39th p: 2 vm. persons., 5 persons., 2 vm. l.
Next, knit the width of the girth of the sock.

Tied to the end of the tongue. We have left on sp. 7 p.
1st p. girth of the toe: we raise 19 p. along the left side of the “tongue”, we knit plus to these 19 p. another 13 p. from the second knitting needle and chrome. Knit faces. Turn.

It turns out 7 p. "tongue" while on a separate knitting needle.

2nd p: chrome., 32 persons., Plus 7 more p. Of the “tongue” of persons. - total 39 p.


In total, it turned out 71 points plus 2 chrome. (73 p. on the spread).
1st p.: chrome., 2 vm. persons., 28 persons., 2 vm. l., 3 l., 2 vm. l., 3 persons., 2 vm. l., 27 persons., 2 vm. l., chrome.
2nd row: chrome, 66 persons. chrome
3rd river: chrome, 2 vm. l., 26 l., 2 vm. l., 2 l., 2 vm. l., 2 l., 2 vm. l., 26 l., 2 vm. l., chrome.
4th p.: chrome., 61 persons., chrome.
5th river: chrome, 2 vm. l., 24 l., 2 vm. l., 1 l., 2 vm. l., 1 l., 2 vm. l., 25 l., 2 vm. l., chrome.
6th row: chrome, 56 sheets. p., chrome
7th: 2 in. l., 22 l., 2 vm. l., 2 vm. l., 24 l., 2 vm. l., chrome.
8th: chrome, 51 sh., chrome.


Then we sew the top, heel and foot. We hide the end of the thread. Knit the same sock.

On the video: an easy way to knit socks with knitting needles for the age of 1-2 years old.
Openwork socks are knitted for the age of 6-8 years with cotton yarn of medium thickness on 5 knitting needles 3 mm. Foot length - 20 cm. Size 30-31. We will knit fishnet socks in the round. To make it easier for you to knit, refer to table number 1 in the first master class.

We collect 48 sts on 2 knitting needles, distribute them on 4 knitting needles (12 sts each) and knit further in a circle:
1st r.: the entire r. - facial.
2nd row: purl.
3rd: persons.
4th: out.
5th, 6th, 7th - persons.
8th: out.
9th: persons.
10th: out.
11th and 12th: persons.
13th we make small holes for the laces: chrome., nakid, 2 persons together., nakid, 2 vm. l., and so on until the end of the river.
14th row: repeat the pattern from the 1st to the 12th row
Next, we knit the heel: 24 p. Knit 7 cm in height (16 rows) in two sp., The rest 2 sp. we don't touch.
17th p.: Divide the same 24 p. heels into 3 parts (7; 10; 7) p. Knit only the middle 10 p. So: 6 l., 2 wm. l., 10 l., 2 vm. l., 6 l. Work rotation.
18th: 5 out., 2 vm. out., 10 persons., 2 vm. out., 5 out.
Next, we raise the side sts from one side and the other (see the first master class). You need to raise 12 sts on each side. We distribute the sts as follows: 28 sts on 2 sp., 26 sts on the remaining 2 s. 28 p. - this is our rapport (see diagram), on these p. we will only knit a pattern (top of the sock).

On the remaining 2 sp. gradually decrease 6 extra sts so that 48 sts remain in the circle. Work 16 cm to the toe and start decreasing. Decrease do this: divide the entire canvas into 4 parts and do after each - 2 cm. (11 p., 2 vm., 11 p., 2 vm., and so on) we knit the toe to the end. We stretch the thread through the last p, fasten inside. Openwork socks are ready.

Cats - patterns for jacquard
Interesting jacquards for children are useful for decorating socks, scarves, mittens, mitts, clothes, and so on. Do-it-yourself children's things do not happen much. According to table number 1, you can independently knit socks for a child for 1 year and 2 years, as well as for 7-8-9 years. Children love bright socks with jacquard - now you can knit children's socks with knitting needles.


Do animals need clothes? Anyone who claims that animals do not need clothes is fundamentally wrong. Our smaller brothers also get cold, their coat also gets wet, like our hair, so they also need wardrobe items. And if you think about the fact that glass fragments are often found on our streets, roads are treated with chemicals that fall on the feet of animals, and then into their stomach and cause all kinds of diseases and even death, then every loving pet owner will certainly want to put shoes on his four-legged friend .
Do-it-yourself socks for cats are also relevant, especially in cold weather. Of course, for the street, when the ground is covered with snow or puddles, ordinary socks are not suitable. But for the home - it's quite a reasonable idea.
People who have “golden hands” can easily make cute cat socks themselves. In general, it is good when a person has the talent to create and create beautiful and necessary things with his own hands. My friend's father built a beautiful two-story house out of a small house. The whole family helped him.
Nicely done, nice to see. He did all the necessary work himself, plastered himself. Of course, it's great when a person can do everything beautifully, but if it's difficult for you, then you can turn to professionals for help. Fortunately, there are worthy specialists who are well versed in the types of decorative plaster and in their hands decorative plaster will delight you to fame. It's nice to come to a beautiful, cozy house, full of love and harmony.
How to make socks for cats with your own hands?
If desired, socks for Murka can be purchased at a pet store, but why spend money if these clothes can be made by hand. This is a fascinating process in which you can show your imagination. This can be done in several ways. For example, you can use children's socks. For work you will also need: scissors, needle, thread.
Initially, you should purchase children's socks. The length of the foot of the sock should reach the cat's knee joint. By the way, when choosing socks, preference should be given to natural fabric, which perfectly retains heat, breathes and does not cause irritation. It is best to buy socks from which the fibers do not fall out and the color of which is the most natural. Next, you need to take scissors and cut off part of the sock along the entire width of the product so that it fits the animal's leg. Then we sew the sock in the place where we made the cut, turn it inside out and put it on the mustachioed fashionista.
Read also the article on how to make shoes for a cat yourself: and
Usually adult cats are not very fond of clothes, so they need to be taught this from about six months. This must be done carefully so as not to cause the pet to be “allergic” to wardrobe items.
See how in this video the cat is completely delighted with the wonderful socks that she received as a gift from loving owners.
Good day dear crafters!!
My name is Irina, this is my first online experience (so don't be too strict, I'll be glad to correct comments)

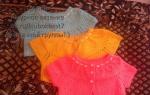
These are the socks I knitted for my eldest granddaughter (she will be 5 years old in two weeks)
And I still need to tie my youngest granddaughter (also soon 5 years old) and grandson (2 years old).
Simple ones with stripes are somehow boring to knit. These are the socks I came up with.
I will say right away that Nastya liked it very much. Warm, not prickly and, most importantly, cheerful.
So I decided, why not connect with you in a friendly company.
Here is a small presentation
Shall we knit together?
134 users took part in the survey.
So, let's begin.
Knitting for kids(it is possible for both girls and boys of kindergarten age) My socks are designed for a 5-year-old girl.
We knit with needles. Hosiery knitting needles 5 pieces, diameter 2.5 mm.
Yarn. Usually socks are knitted from leftovers. But, like a true grandmother, I bought the story yarn a year ago. Especially for socks.

As you can see in the picture, the yarn is thin. The footage is 600 meters in 100 grams.
I knitted in two threads from two balls (I never wind two threads into one ball - because of the different tension of the threads, the fabric can turn out to be clumsy)
You can use other yarn. The main thing is the calculation of the number of loops after the connected sample, which we will discuss below.
Knitting technique: Italian set of stitches, knitting in the round, double heel knitting, wedge knitting, turning knitting, intarsia, stitch embroidery. (We will try to describe the process in detail in each case by joint efforts).
Girls, your skills and advice are welcome.
The size:. We take the following measurements:
-Foot Circumference for Toe Width: My variation is to measure the circumference of the foot at the intended toe height and measure the circumference of the foot at its widest point. And choose the average. (in my case 19 cm)
- Height of the sock: measure from the beginning of the heel to the estimated height (in my case: the elastic band is 5 cm, the front surface is 5 cm, the heel itself is -5 cm) Total 15 cm (this time I decided to knit high socks, under boots) You can do less. The main thing is to leave 5 cm on the heel, 5 on the front surface. Believe me, a deep heel sits better on the leg).
- Length of the sock on the foot: from the beginning of the heel to the end of the little finger. In theory - to the middle of the little finger, but in our case, there will be a decrease in the toe in each row). In my case, 17.5 cm.
For today:
We knit a sample with front stitch. I cast on 30 stitches and knitted 20 rows. The sample is washed and dried.
Tomorrow we do the calculations and start knitting.
Good evening everyone. Till tomorrow
Second day:
So the sample is tied, dried.
Doing payment:
I have 30 stitches in my sample, which is 11.5 cm wide; 20 rows -4.5 cm long.
We make a proportion: 19x30: 11.5 \u003d 49.5, I decided to round up to 48 loops. Although by all rules you need to round up. But here she took a risk and did not miscalculate. The socks are tight on the leg. After all, she originally planned for her granddaughter to wear them with boots.
It is also convenient - 12 loops per hosiery knitting needle.
Let's start knitting.
We take a waste (contrasting) thread. Here's advice - it's better to take a cotton thread (it will be easier to weave)
We collect in the usual way with waste thread on stocking needles half as many loops, i.e. 24 loops plus one loop for closing in a circle. i.e. 25 loops. Tie both ends of the thread into a knot. We cut off the contrasting thread - we will no longer need it.
We take out one of the spokes.
We knit first row white thread already in a circle. The first loop is the front one, then the yarn over, the front one, the yarn over, etc. There are 12 loops on the needle, the last one is the yarn over. And so we do with each of the 4 spokes.
We turn to knitting in a circle, i.e. we distribute 49 loops on 4 knitting needles, 12 loops on each. On the last 13 loops. We make sure that when the circle closes into a “well”, the loops do not twist. A waste (contrasting) thread will help us with this - this edge should be, as it were, inside our well.
The spokes are conventionally denoted as 1st, 2nd, 3rd, 4th.
So on the 4th needle -13 loops, the last front. From the left 1st knitting needle, we transfer this front loop to the right 4th knitting needle. And we stretch the reshot left loop through the right one and return it to the 1st knitting needle. This stretched loop will be the first in the next, second row.
Second row:
Third row: we knit the front ones, remove the wrong ones without knitting, the thread BEFORE work.
Fourth row: We remove the facial ones (thread FOR work), we knit the yarn over the wrong side.
This is the Italian set. Learned from this great post: 
But in the process of wearing the elastic band stretched. Now I decided to knit with an elastic band 2x2.
To do this, in the fifth row, you need to change the loops as follows: We knit the first loop of the 1st knitting needle, knit the second purl on an additional knitting needle (or, like me, on a broken plastic needle) FOR work, knit the third loop on the front, knit the removed second purl, the fourth - purl , fifth-facial; we remove the sixth purl on an additional knitting needle FOR work 
For control: at the beginning of each knitting needle 2 faces, at the end of 2 purl.
Next, we knit with an elastic band 2x2 to a height of 4-5 cm.
Girls, for those who are not good friends with stocking knitting needles, advice: we knitted one knitting needle, we transfer it to the bottom of the next one. Get used to it later and like clockwork))))
The elastic was knitted - I got 20 rows.
.
Then we knit in a circle with the front stitch with a white thread. Also 20 rows.
I already knitted. Photo did not take. I looked at the previous ones, the quality is bad. It's because of the lighting. Outside the window - a gray day, rain.
Tomorrow we start knitting the heels.
Good evening everyone.
Day three
So we knitted 20 rows of front stitch with white yarn: 
The essence of the "double" heel: in the front row we knit one front, remove the 2nd, without knitting and so on until the end of the row, in the wrong row - we knit all the loops with the wrong ones.
The first row of the heel: front (edge), front, remove the third front without knitting, etc. until the end of the 1st and 2nd knitting needles. 
The photo shows: the white loops are removed, the red ones are knitted. We turn the work and knit all the loops purl. Moreover, we knit the purl loops. way: taken off the back wall, knitted behind the front. Edge loops should form a path (pigtail) Avoid knots (we still need to dial loops along the edge) 
Somewhere on the fifth row, the first and second knitting needles can be combined 
Having knitted 5 cm (22 rows) in this way, we begin to form the rounding of the heel: 
We have 24 loops on the needle. We divide them into 3 parts. it turns out 8 loops. And with this calculation, we mark the loops of the central part with markers (8 loops)
It turns out 8-8-8 (eight central and 8 side each) Remove the edge loops at the beginning of the row. The last loop at the end of the row is purl.
The rounding of the heel occurs due to the reduction of the lateral (8) loops of the heel. We begin the reduction on the wrong side.
To do this, in the purl row we knit 8 side loops, 8 central loops, we knit the next two loops together with the purl. We turn the work. We remove the first loop, we knit 8 loops of the central part, we knit the next two loops together with a slope to the left (remove the first one without knitting it, and stretch the next one through it). Do not forget about the drawing in the central part.
We are expanding the work. remove the first purl, then knit 8 central purl loops, the next two loops together purl. Repeat dec until 10 sts remain on needle. All-heel formed. 

We transfer 5 loops to another knitting needle and along the edge of the side part (we collect loops from the edge pigtail. I got 12 dialed plus 5. It turned out 17.
We leave the red thread, we knit 24 loops with white yarn from two "bored" knitting needles. Here the nuance is this: we will not knit the foot in a circular pattern, because we need a red sole, and the top of the toe should be white. Therefore, we will knit with intarsia.
So, we knit 24 with white yarn and unfold the knitting. Another tip - for a neater junction of white and red yarn, transfer a couple of white loops to red loops on an adjacent knitting needle.
Having expanded the work, we knit a purl row of 24 loops of red color, cross the white and red threads, knit 17 loops of the side and central part.
Then we knit 5 five heels. With another knitting needle we raise (DO NOT COLLECT) 12 side heel loops. Like this: 
The photo shows that 5 loops are knitted, the thread is in front of the raised loops. Purl these 12 stitches.
We turn knitting. We have the front. As a result: on the 1st needle there are 17 loops of red yarn. On the 2nd -17 loops of red yarn plus 2 loops of white, on the third 10, on the 4th-12. The cut is formed by turning knitting, between the 1st and 4th knitting needles.
Again a nuance. The needles should have an equal number of loops of 12 on each. When lifting the loops on the first and second knitting needles, it turned out more loops -17, as if 5 extra loops. Here we will decrease them at the beginning of the 1st and at the end of the end of the 2nd knitting needle in each front row .. This decrease is the knitting of the "wedge".
We reduce the extra "red" loops next. way: the first edge, then decrease with an inclination to the right, remove one loop, knit the front one, and stretch the removed one through the knitted one with the left knitting needle. Next, knit to the end of the first knitting needle and to the end of the second, without knitting 3 loops .. Expand two loops and knit together behind the front wall. The last one is the front.
Next, cross, two white loops, then 22 loops from the 3rd and 4th knitting needles. The last loop is purl.
Turn knitting inside out. we do not make reductions on the wrong side.
Thus, we decrease until we have 24 red loops left. Well, whites remain unchanged.
Here is what the wedge looks like: 
And this is the wrong side, it shows the interweaving of white and colored threads: 
Day four
I have another idea here. You can knit the sole in a stripe. There will be a red tabby cat. (I will do this when I knit for my grandson)
So, we continue to knit the sole.
Let's decide on the size. My foot length is 17.5.
The heel is 3.5 cm. The pattern from the beginning of the ears is 25 rows (5 cm). 17.5-3.5-5=9 cm.
Thus, from the side line of the heel we knit 9 cm with intarsia. 
After that, on the white part of the canvas, we begin to knit the ears. For this, I unwound a meter of white yarn and two red threads.
And here is the drawing itself. 
Sorry for the quality of the diagram. I also made a diagram in a Word file, but I couldn’t insert it into the text. Can someone tell me how to insert.
But for now we have.
Here are my explanations for the diagram. A cross is a red thread, an empty cell is a white thread.
Day five:
So they tied 9 cm of the canvas of the foot with intarsia.
In the white part of the canvas, we begin to knit a pattern. That is, after 24 loops of red yarn, cross, we knit 6 loops of white, the next 1 loop from an additional ball of red yarn. Broach - 10 loops of white yarn. 1 loop from another ball of red yarn, crossover, 6 loops of white yarn. This is the first row of the drawing.
Then we follow the diagram.
From the eighth row of the scheme, we knit only colored (red) yarn. In the same row, we switch to knitting in a circular way: that is, again we distribute 12 loops into 4 knitting needles: 1st and 2nd - 12 loops of red yarn each, 3rd and 4th - 12 loops of white each.
If you wish, starting from the 10th row of the scheme, we knit the eyes.
But for me, small details became the basis for stitching. And I really like this process. Learned from this video:
https://www.youtube.com/watch?v=ilRCucaledM&feature=youtu.be
If you are with me, we continue to knit in a circular red yarn until the 22nd row of the pattern.
Then we begin to make reductions (that is, we knit a toe) - the end of the sock.
In theory, for a toe we need to decrease on each spoke. But...
We have a muzzle of a kitten)))))
Therefore, we will do the reduction in every row in the following way:
at the beginning of the 1st knitting needle, knit 2, knit 2 together with a tilt to the left, then according to the figure ... and at the end of the 2nd knitting needle, without knitting 4 loops, knit 2 together with a tilt to the right; Further:
at the beginning of the 3rd knitting needle - 2 facial, 2 facial together with a slope to the left, then according to the figure ... and at the end of the 4th knitting needle, without knitting 4 loops - 2 facial together with a slope to the right, two facial. 
Ufffff, girls, I hope I described the reductions normally
We continue to make decreases until there are 2 loops on each knitting needle. We cut the thread, leaving the tip 10-15 cm, thread this tip into the needle and drag it through the remaining 8 loops. From the wrong side we fix the thread in a convenient way.
We carefully weave a waste (contrasting) thread and close the tip of the main thread at the beginning of knitting. We fill all the ends of the threads from the wrong side. I do this with a crochet.
All socks are ready.
If we are going to embroider in the future, then we DO NOT sew the side seam.
We start knitting the second sock. Everything is the same, only the side seam is formed in a mirror image.

Girls, we knit the second sock, fill all the tips and erase both socks, Dry.
Next time, embroider. In principle, I have provided a link to a video of loop embroidery.
I also posted my schematic.
Maybe you have some decor schemes? 

In the course of embroidery, I changed my own scheme. I added 1 more loop of green iris.
We embroider a ponytail. Sew the side seams. 
W socks and ready: