Double-sided knitting mittens. Children's mittens for the boy "Minions" (knitting). Knitting mouse mittens for kids from grass: a diagram with a description
Actual models of children's knitted mittens. Description and diagrams of works.
Winter with frost and snow gives a lot of joyful emotions while playing with children. Parents are worried about maintaining the health, warmth and comfort of their children, in particular about the handles.
Even in the case of a dislike for wearing mittens and gloves by a child, mother-needlewomen come up with options for knitted warm products.
In progress are:
- yarn color and texture combinations
- patterns and ornaments on canvas
- decor with beads, ears, eyes, buttons
We will talk about the most successful options for knitted mittens for children in the article.
Mittens with braids for children 5 - 10 years old: diagram, description
children's mittens and a hat knitted with a braid pattern with a shadowBraids on mittens give originality to the product and add warming properties.
For work, choose yarn with wool and knitting needles, the diameter of which is equal to the thickness of the thread.
Before knitting:
- take measurements of the child's arms, draw a diagram of mittens
- knit a rib and braid pattern
- determine the knitting density
- convert cm values to loops
We offer as an example knitting mittens with braids for a teenager:
- Cast on 52 sts and work 20 rows in 2x2 Rib,
- in the last row of it, add 2 loops,
- knit the braid pattern according to the pattern added at the end of the section,
- from the 10th row, add loops for the branch of the thumb - 2px3p, 3px3p, 2px3p. Perform all of them facial,
- slip the thumb sts onto a loose needle or pin, add 2 sts and continue knitting the mittens in the round with a braid pattern,
- at the height of the tip of the little finger, start decreasing loops at the beginning and end of both parts of the fabric. You should form a triangle for your fingers,
- pull the final 4 loops with a thread, cut it and hide it from the inside,
- return to the auxiliary knitting needle with delayed loops, get 2 loops and knit in a circle,
- at the height of the beginning of the nail plate of the thumb, divide the canvas into 2 parts and close the loops at the beginning and end of each,
- pull the final 2 loops with a thread, remove its tip to the wrong side,
- do the same work on knitting the second mitten.
Knitting patterns for mittens and a pattern with braids are below.

 pattern patterns "braids"
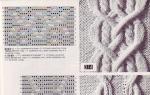
 knitting pattern for mittens with braids
 Owl knitting mittens for girls: diagram, description
 ready-made mittens with an owl pattern are worn on the hands of a girl
 Warm and interesting mittens with owls on the front side are easy to make even for needlewomen with minimal experience.
Before starting work, complete all the preparatory steps as in the section above.
For mittens with owls, prepare:
- wool yarn
- 5 garter needles with a diameter, different thread thicknesses
- auxiliary needle
- hook
- contrasting thread for embroidering the eyes and beak of owls
Note:
- for a small child, knit straight fabrics of the palm and thumb,
- the front side of each mitten is a background of purl loops. Knit owls on it with facial ones,
- instead of embroidering the eyes and beak, sew on beads that match in color and shape.
The actual knitting patterns for an owl pattern and a pattern for performing in a contrasting color are presented below.

 scheme of drawing an owl with knitting needles with a decoding of symbols
 owl pattern on a mitten for embroidery or jacquard knitting
 As well as a detailed description of knitting mittens with owls.
 description of the work on the creation of children's mittens with a pattern of an owl with knitting needles
 pattern and description of knitting mittens mittens for children with knitting needles
 Warm double knitted mittens for girls and boys from 1 to 10 years old: description
 ready-made gray-white double mittens for a child with knitting needles
 Warmer models of knitted children's mittens are double. But before you start working on their creation, consider the appearance.
In order for the baby to dress and wear them with pleasure, needlewomen mothers choose:
- yarn color combinations with imitation of cartoon characters
- unusual patterns resembling animals and birds, such as owl braids
- simple knitting of two mittens of different colors and then putting them on top of each other in the hands of a child
Having determined the density of knitting and drawing a diagram of mittens, get to work.
A feature of the double model is one-piece knitting of the top and lining. That is, first you work on the front mitten, and then on the inner, wrong side.
- pick up loops on the auxiliary thread and insert it in the place for knitting the thumb. Then it is convenient to pull it out, and transfer the open loops to the knitting needles and continue knitting,
- knit the inner mitten with the front stitch in a mirror image from the outer one. That is, place your thumb on the same side.
For a description of the work for double mittens for boys, take, for example, from the figure below. But be sure to continue to either knit the inner mitten from the elastic, or cast on loops for a new work.

 description of knitting mittens for a boy
 For double mittens, brighter yarn colors are suitable for girls. And the knitting process itself is similar to that discussed above in the figure.
Knitted mittens for girls and boys: diagram, description

 ready-made knitted mittens for a child with a cockerel pattern
 Things with an ornament - a classic in knitting. Mittens in this case like:
- for kids - a durable pattern that does not interfere with bending the handles during games and walks
- mothers - for a flight of fancy in choosing a pattern and the beauty of the finished product
There are as many children's patterns of ornaments for mittens as there are needlewomen mothers. Here are some interesting examples.

 children's patterns for mittens and schemes for them, option 1
 children's patterns for mittens and patterns for them, option 2
 children's patterns for mittens and schemes for them, option 3
 Tie your child mittens with an ornament, focusing on the following job description:

 description of knitting children's mittens with ornaments, example 1
  description of knitting children's mittens with ornaments, example 2
 description of knitting children's mittens with ornaments, example 3
 Mittens hedgehogs knitting for kids from grass with a description
 gray mittens hedgehogs knitted for a child
 Original hedgehog mittens will warm the hands and delight the kids with their interesting look.
Knitting with knitting needles of a similar model is not particularly difficult, but requires care and patience.
- You will need 2 types of yarn of a similar shade - regular and "grass".
- After taking measurements from the child's arms, drawing the pattern and completing the knitting pattern, proceed to create mittens.
- Knit them with knitting needles in any way convenient for you without drawings with a regular front surface.
- From above, on the row of transition of the elastic band into the front loops on the outside of the mittens, type the loops with weed. Use a hook to lift them up. Collect on knitting needles.
- In total, the number of grass loops is equal to 2 knitting needles of the knitted fabric plus 4 for rounding.
- Connect the beginning and end of each front row with the main fabric of the mitten.
- Sew the last row of "needles" with a needle to the finished mitten and cut the thread.
- Crochet the ears. They are semicircular in a hedgehog and slightly elongated upwards, located after the end of the prickly hair, and not in it.
- With black or pink yarn, embroider the nose of the hedgehog and add eyes. Ready-made elements made of plastic or crocheted are suitable.
- For greater resemblance, sew decorations in the form of apples, leaves on top of the grass.
See below for a detailed description of knitting hedgehog mittens.
 description of knitting hedgehog mittens for children
 Knitting mouse mittens for kids from grass: a diagram with a description

 funny pink mice-mittens for girls from "grass" knitting needles
 Fluffy mittens with a muzzle of a mouse will appeal to kids and preschoolers. The presence of "grass" makes them soft and pleasant for little hands.
Prepare:
- ordinary yarn and "grass" 50 g each, if you plan to knit mittens for a child 3-4 years old
- garter needles with a thickness equal to the diameter of the thread
- remnants of black yarn for spout embroidery
- hook
- black beads for mouse eyes
Operating procedure:
- knit mittens according to the pattern that is most understandable to you,
- after the completion of the elastic band on the product, go to the "grass" and the front surface,
- continue knitting until the beginning of decreasing loops on the main fabric of the mitten,
- return regular yarn and decrease 4 loops in each row at the beginning and end of 2 wedges, or alternate rows of decreases through one,
- tie your thumb,
- repeat the steps to create the second mitten. Be careful with determining the place for the thumb on it,
- the mouse's ears are rounded and stretched upwards. Therefore, crochet them from 4-5 air loops and 2 rows of single crochets. Place the top row not over all the columns, but only over the central ones,
- sew on the ears and bead eyes, embroider the nose with black yarn,
- for greater resemblance, crochet the tail of the mouse from air loops and sew grass in the first row on the outside of the mittens.
Mittens transformers with folding top knitting needles for a girl and a boy: description
Active children sometimes in the game or to answer the phone you need to get your fingers out. It is so inconvenient to take off the whole mitten, and then put it on again. The way out is to knit the child with folding mittens.
Outwardly, they resemble mitts with a cap, which is attached to the outside of the fingers. Another difference is that they have a connected thumb house.
For knitting transformer mittens, choose interesting patterns, for example, from braids or voluminous "rice".
The preparatory steps are similar to those discussed in the sections above.
Operating procedure:
- since the basis of mittens is mittens, the beginning and end of the main fabric is an elastic band. Her height is greater at the bottom,
- leave 8-10 sts for the thumb and knit/pattern to the crook of the little finger,
- change the pattern to a 2x2 elastic and continue to work until the beginning of the nail plate on the little finger,
- at the level of the knuckles, lift the loops from the main fabric in the amount of 2 knitting needles and get the same amount minus 4,
- on the inside of the palm of the loop, knit with an elastic band to a height of 1-2 cm, then go to the front surface,
- continue knitting in a circle to the tip of the little finger,
- decrease the loops in the usual way for yourself,
- tie your thumb either after completing the convertible top or before starting work on it,
- repeat the steps for the second transformer mitten.
Knitted fingerless mittens for a girl and a boy: description

 knitted mitts on the hands of a boy
 The mitts are comfortable with a combination of warmth in the palm of your hand and free fingers for games, work, and communication on your smartphone.
Craftswomen knit mitts for girls and boys:
- to the middle of all fingers
- with thumb hole
- in one piece as a continuation of the sleeves
- openwork, braid patterns, with jacquard motifs
Choose the color of yarn that suits your son / daughter under the rest of the wardrobe and proceed.
Below is a description of knitting mitts. Reduce the number of stitches and rows in proportion to the measurements of your child's hands, select other patterns and yarn colors as desired.
 description of knitting women's mitts with knitting needles, option 1
  description of knitting women's mitts with knitting needles, option 2
 How to knit mittens for newborns with knitting needles?

 colored mittens for a newborn with knitting needles
 Young parents protect newborn babies from frosty air as much as possible. For them, it is easy to knit mittens with knitting needles, since the thumb does not need a separate location. That is, all fingers are placed together.
Mittens for newborns are a kind of warm scratches.
You will need:
- yarn 100% wool or with a maximum content of 50 g
- circular knitting needle set
- hook
Operating procedure:
- dial the number of loops, a multiple of 4,
- distribute them on 4 knitting needles and knit the first 10 rows in a garter stitch,
- after 5 rows, knit 2 alternately together and yarn over in a circle. These holes are needed for the lace with which you will fix each mitten on the crumbs handle,
- go to the front surface and after 20 rows, cut the loops to round the product,
- pull the final 2 loops with a thread.
- Knit the second mitten in the same way.
- Crochet 2 chains of 30 air loops each.
- Carefully slide each of them into the holes on the mittens.
- If desired, sew a lining for mittens from cotton fabric.
How to knit two-color mittens with knitting needles for a girl and a boy?

 two-tone ready-made children's knitted mittens
 The order of work for knitting mittens with knitting needles from 2 colors of yarn is similar to one-color. But there are many more combinations and weaves of yarn.
Needlewomen, depending on their imagination and knitting skills, choose:
- simple alternation of colors, for example, in the form of horizontal stripes,
- jacquard patterns, when on the outside of the mittens are decorated, for example, with butterflies, deer, snowflakes, snowmen, bullfinches, and on the inside - the colors of the yarn alternate through 1 loop or vertical stripes,
- embroidery of finished mittens with a thread of a different color. At the same time, they imitate the knitting of the loop, denoting both parts of it with contrasting yarn,
- inserting the second yarn only on the elastic band, thumb and tip of the mittens.
For inspiration, let's insert a few photos of finished works for a boy and a girl.

 ready-made two-color children's mittens, example 1
  ready-made two-color children's mittens, example 2
 ready-made two-color children's mittens, example 3
 ready-made two-color children's mittens, example 4
 ready-made two-color children's mittens, example 5
  ready-made two-color children's mittens, example 6
 Knitted minion mittens for a boy 1 - 10 years old
 ready-made knitted mittens minions for a boy
 Mittens, reminiscent of cartoon characters, will appeal to the boy, especially in cases of refusal to wear their usual models.
Cheerful minions-mittens, half the strength to tie a beginner needlewoman.
You need:
- yellow and blue yarn, a little black
- knitting needles and hook
- big eye needle
- ready-made bead eyes or a little time to crochet them
Work features:
- mittens are made up of primary yarn colors of blue and yellow. The first makes up the elastic and the bottom of the canvas, the second - the top and thumb,
- insert the black strip before the mittens start to decrease, at the end of the thumb. And also embroider the top of the finished product, imitating the hair of a minion,
- on the back of the top on the black strip, sew on the eyes and add a smile with black yarn,
- to warm the mittens, knit the lining, continuing the knitting of the finished ones in a mirror order. Then tuck the lining inside each minion.
How to knit white and black children's mittens with knitting needles?
 white mittens for a child with braids and rice patterns
 Knit white children's mittens with patterns:
- voluminous
- openwork
- braids
- rhombus with rice
- garter stitch
- stockinette stitch
Black mittens hide patterns, so be careful when choosing the latter. Pay attention to:
- purl and front surface
- garter stitch
- combination with white yarn and jacquards
- large braids
Knitted chanterelle mittens for children: a diagram with a description
 cute fox mittens for a child, knitted
 Continuing the theme of animals on children's mittens, let's turn your attention to chanterelles. Needlewomen knit them in different ways, trying to please the children with a warm and cheerful thing.
We conditionally divide the knitting techniques of chanterelle mittens into 2 categories:
- simple
- advanced
In the second case, you have separate elements:
- the tail is the thumb
- head with ears and eyes - sewn on top on the back of the mitten
- 2 paws - hanging under the head. Some models do not have them, this is optional.
See below for a detailed description of knitting chanterelle mittens for children.

 description of work on knitting children's chanterelle mittens with knitting needles
 Children's mittens with knitting needles with bullfinches: a diagram with a description

 lilac mittens with bullfinches for girls knitting
 One of the winter birds that stay with us in the cold is the bullfinch. Even if your winter is milder, warmer and without them, knit mittens for your child with their portrait.
Needlewomen knit such mittens in 2 ways:
- knitting bullfinches according to the scheme
- create separate parts of the body of a bird with a hook from multi-colored yarn, followed by sewing to the finished product
The first option is good for mittens for a teenager and older. For a very tiny hand, for example, a 5-year-old baby, such painstaking work on a pattern can alienate a mother-needlewoman because of the length of knitting.
Therefore, a good alternative is the second option for knitting bullfinches. And the birds are more voluminous in this case.
Tie the mittens in any of the previously discussed ways or in what is closer and more understandable to you personally.
For a girl, add openwork holes on an elastic band of mittens. Pull crocheted laces with fur pom-poms at the ends through them.
In the variant of mittens for a boy, draw a bullfinch with a laconic branch and / or a couple of rowan berries.
Knitting pattern for a bullfinch pattern with knitting needles below.

 pattern for knitting a bullfinch pattern with knitting needles for children's mittens, example 1
 pattern for knitting a bullfinch pattern with knitting needles for children's mittens, example 2
 For crocheting, such a scheme is suitable.

 crochet pattern for knitting bullfinch elements for children's mittens
 Detailed job description:

 description of work on knitting children's mittens with bullfinches
 Children's mittens of a cat with knitting needles: a diagram with a description

 funny mittens cats knitted for a child
 Before starting work, decide on the appearance of mittens:
- they will be with a picture of a cat
- have the right shape
In the first case, find the picture that you want to transfer to the mittens for the child.
For example, these:
 pattern for knitting cats on mittens for children, option 1
 pattern for knitting cats on mittens for children, option 2
 pattern for knitting cats on mittens for children, option 3
 In the second case, decide on the color scheme of the mittens. For example, you should get a striped smiling cat. Then knit the mittens with knitting needles, alternating strips of yarn. But make the toe in one color to embroider eyes, nose, mustache and a smile on it. On both sides of the toe, tie the ears of the cat with the second color.
As a basis, take any of the above descriptions of knitting mittens for children, just add a pattern of cats or give them the appropriate shape.
How to knit scratchy mittens for newborns?
 knitted mittens scratches with a scythe for a newborn
 The smallest crumbs fit scratchy mittens without a thumb. Such a fabric is convenient to knit even on 2 knitting needles.
We examined in detail the description of knitting mittens for newborns in the section above.
Note that in addition to front, back and garter stitches, braids are also suitable for decorating small mittens.
Children's mittens paws with knitting needles: a diagram with a description

 mittens paws in a knitted set for a child
 For children - lovers of cats and cat themes in the wardrobe, knit mittens-paws.
You need:
- dark yarn 70 g and white 20 g for paws
- knitting needle set
- leftover yarn in any contrasting color
- hook
- scissors
- needle with thread in the color of the main yarn
- flexible meter or ruler
Work description:
- take measurements of the child’s hand, tie a sample of the fabric with an elastic band and the main pattern, draw a diagram of mittens with the designation cm and the number of loops,
- dial the required number of loops, distribute them on the knitting needles and knit in a circle with an elastic band to a height of 7-8 cm,
- switch to the main pattern and, if desired, to larger needles,
- mark the place for the thumb by knitting the loops with a contrasting thread,
- at the height of the tip of the little finger, start decreasing the loops. Since the cat's paws are more oval than triangular, then knit 2 loops together the whole row. After a series without reductions. Next - again 2 loops together,
- pull the rest of the loops with a thread. Hide its end inside the mittens,
- Crochet a chain of air loops with white yarn. Gently fold each in a circle to form the base of the foot and toe pads.
- Either connect the chains into finished round webs, or wind them on finished mittens. In the second case, fix each circle on 4 sides with a needle and thread.
Knitting pattern for mittens paws: 
 burgundy children's mittens with knobby knitting needles
The “knob” pattern is quite voluminous, therefore, for knitting mittens for a child, do not get carried away with it too much. The bulges on the canvas can prevent the handles from bending.
For example, continue the elastic on the back in the middle of the fabric, followed by crossing the loops into a braid. At the top, add a fan of facial loops that end in bumps.
Or tie a wide sleeve zone with an openwork pattern with the addition of bumps. Separate this zone on the wrist with an elastic band 1x1 or 2x2, reducing some of the loops. Then continue knitting mittens in a way convenient for you.
Knitting mittens for a teenager girl and boy
 fashionable knitting mittens for a teenage girl
 Mittens for a teenager are in many ways similar to knitting patterns for adults. The calculated number of loops differs to a small extent, as do the parameters of the palm.
For example, choose an interesting model for mittens for a teenager, taking into account the measurements of his / her hand, among the models that we will consider in a future article on knitting men's and women's gloves with knitting needles.
Set for children - hat, scarf, mittens with knitting needles: photos of models

 knitted set of their hat, scarf and mittens for a child
  knitted set for a child - hat, scarf, mittens, example 12
 Video: how to knit children's minions mittens with knitting needles?


Yarn for hand knitting. Soft, slightly fluffy yarn with camel hair in the composition is suitable for knitting for both adults and children.
Skein weight: 100 g
Thread length: 204 m
Composition: 15% camel wool, 25% wool, 60% acrylic
Manufacturer: Turkey
Brand: Nako
Knitting density: 18 loops of faces. stitch on knitting needles №5=10cm
Left mitten:
Cast on needles No. 5 32p. Knit in the round, mark the beginning of the row with a marker. Run 24 rows with an elastic band 2 * 2 on the needles No. 4.
Go to needles number 5. Run a row with decreases: 6 persons., 2p. together facial * Repeat 3 more times (= 28p.)
2 rows of facial.
Track. row: 20 persons., 2 out., 6 persons. (28p)
Start increasing for thumb wedge:
1p: 3 persons., persons. behind the front and back wall (i.e., add 1 p.), 15 persons., 4 out., 5 persons (= 29 p.)
2p .: 4 persons, persons. behind the front and back wall, 14 persons., 6 out., 4 persons. (= 30p)
3r.: 5 persons., persons. behind the front and back wall, 13 persons., 8 out., 3 persons. (= 31p)
4p: 6 persons., persons. behind the front and back wall, 12 persons., 10 out., 2 persons. (= 32p)
5p: 7 persons, persons. behind the front and back wall, 11 persons, 12 out, 1 persons (= 33 p)
6p: 8 persons., persons. behind the front and back wall, 10 persons., 14 out. (= 34p)
7p: 9 persons, persons. behind the front and back wall, 10 persons, 14 out. (= 35 p)
8p: 10 persons, persons. behind the front and back wall, 10 faces, out. behind the front and back wall, 2 out., 8 persons., 2 out., out. behind the front and back wall (= 38p)
9p: 11 persons., persons. behind the front and back wall, 10 persons., 4 out, 8 persons, 4 out (= 39p)
10p: 12 persons, persons. behind the front and back wall, 10 persons, 4 out, 8 persons, 4 out (= 40 p)
11p: 13 persons, persons. behind the front and back wall, 10 persons, 4 out, 8 persons, 4 out (41 p)
12p: 14 persons, persons. behind the front and back wall, 10 persons, 4 out, remove 2 sts for additional. knitting needle at work, 2 persons, knit persons. loops with additional knitting needles, remove 2 sts for additional. knitting needle before work, 2 persons., knit persons. loops with additional knitting needles, 4 out. (= 42p)
Separate the loops for knitting the thumb:
13r: 16 persons, remove to the spare needle 10p., 4 out, 8 persons, 4 out (= 32 in work)
14r: 16 persons., 4 out, 8 persons, 4 out. (= 32 p)
Repeat 14 p. 7 more times.
22r: 16 persons, 4 out, remove 2 sts for additional. knitting needle at work, 2 faces, knit faces. loops with additional knitting needles, remove 2 sts for additional. knitting needle before work, 2 faces, knit faces. loops with additional knitting needles, 4 out.
23r: 16 persons, 4 out, 8 persons, 4 out.
Repeat 23r. 3 more times
27r: 16 persons, 4 out, snt 2 p. for additional. knitting needle at work, 2 persons, knit out. loops with additional knitting needles, remove 2 sts for additional. knitting needle before work, 2 out, knit faces. loops with additional knitting needles, 4 out.
28r: 16 persons, 4 out, 2 persons, 4 out, 2 persons, 4 out.
29 p: 16 persons, 4 out, 2 together front, out. behind the front and back wall, 2 out, out. behind the front and back wall, 1 broach (remove the loop as a person., 1 person., stretch it through the removed loop), 4 out. (= 32p)
30r: 16 persons, 16 out.
31r: 17 persons., 14 out, 1 persons.
32r: 18 persons., 12 out, 2 persons.
33r: 19 persons., 10 out, 3 persons.
We begin to form the top of the mitten
34 p: broach, 12 persons, 2 p. together front, broach, 2 persons, 8 out, 2 persons, 2 p. together front (28p)
35r: broach, 10 persons, 2 p. together front, broach, 2 persons, 6 out, 2 persons, 2 p. together with the front (24 p)
36r: broach, 8 persons, 2p. together facial, broach, 2 persons, 4 out, 2 persons, 2 p. together facial (= 20 p.)
37r: broach, 6 persons, 2 p. together front, broach, 2 persons., 2 out, 2 persons, 2 p. together front (= 16 p)
38r: broach, 4 persons, 2 p. together front, broach, 4 persons, 2 p. together front (12p.)
39r: broach, 2 p. together front, broach, 2 persons, 2 p. together persons. (8 p)
40r: broach, 2 sts together front, broach, 2 sts together front (4 sts)
Break yarn, pull through remaining sts and fasten off.
Thumb:
Transfer the reserved 10 loops to the stocking knitting needles.
Preparatory row: 10 persons, dial 4 p. (14p)
Next row: K10, knit 2 together, knit 2 together (12p)
Knit 9 rows (or the number of rows you need)
Decrease 1 row: 2 together front, repeat until the end of the row (3 p.)
Break the thread, collect the remaining loops on it.
Right mitten
Knit as left to increase on the wedge of the thumb.
Further:
1p .: 9 persons, persons. behind the front and back wall (i.e., add 1 p.), 9 persons., 4 out., 5 persons. (= 29 p.)
2p.: 9 persons, persons. behind the front and back wall, 9 persons., 6 out of 4 persons (= 30 p.)
3p: 9 persons, persons. behind the front and back wall, 9 knit, 8 out, 3 knit (= 31 p)
4p: 9 persons, persons. behind the front and back wall, 9 persons, 10 out, 2 persons. (=32)
5p: 9 persons, persons. behind the front and back wall, 9 persons, 12 out, 1 persons (= 33 p)
6p: 9 persons, persons. behind the front and back wall, 9 persons, 14 out. (34 p.)
7p: 9 persons, persons. behind the front and back wall, 10 persons, 14 out (= 35p)
8p: 9 persons, persons. behind the front and back wall, 11 persons, out. behind the front and back wall, 2 out, 8 persons, 2 out, out. behind the front and back wall (= 38p)
9p: 9 persons, persons. behind the front and back wall, 12 persons, 4 out, 8 persons, 4 out. (= 39 p)
10p: 9 persons, persons. behind the front and back wall, 13 persons, 4 out, 8 persons, 4 out (40 p)
11p: 9 persons, persons. behind the front and back wall, 14 persons, 4 out, 8 persons, 4 out (= 41)
12p: 9 persons, persons. behind the front and back wall, 15 persons, 4 out, remove 2 sts for additional. knitting needle at work, 2 persons, knit persons. loops with additional knitting needles, remove 2 sts for additional. knitting needle before work, 2 persons, knit persons. loops with additional knitting needles, 4 out (= 42p)
Separate the loops for knitting the thumb:
13 p. remove on a spare needle 10 p, 16 knit., 4 out, 8 knit, 4 out (32p. in work)
 Educational video course of artistic knitting “Secrets of Irish lace”
  Carpet "Extravagant" - video master class
  TRAINING AUTHOR'S COURSE OF ARTISTIC KNITTING
  "150 Exclusive Knitwear Ideas" by Zoe Woolwich
VIDEO COURSE "All the best for children" Part 1 (for boys) VIDEO COURSE "All the best for children" Part 2 (for girls)
VIDEO COURSE OF BRAIDS AND BRAILS without “jambs”  VIDEO COURSE “For beloved men”
VIDEO COURSE "I will knit myself a dress ..."  VIDEO COURSE "Secrets of working on the BROTHER CK-35 machine"
  VIDEO COURSE “Working with SILVER REED SK – 280/SRP 60N”
  VIDEO COURSE "BASICS OF WORKING ON THE MACHINE SILVER REED SK 840/SRP60N"
  VIDEO COURSE “Calculation and knitting of the finished product”
  VIDEO COURSE “Machine knitting for beginners”
  VIDEO COURSE “Working with the BROTHER KH-868/KR-850 machine”
  VIDEO COURSE “Working on the machine BROTHER KH-970/KR-850”
  VIDEO COURSE “Working on the machine BROTHER KH-940/KR-850”
  VIDEO COURSE “Calculation and knitting of the finished product-2”
Knit mittens with knitting needles so that your hands do not freeze even in the most severe frost!
Mittens are the most practical and comfortable accessory for a cold winter. Today on the market you can buy mittens of different models, but it is more pleasant to wear if you knit them yourself.
- If you learn how to knit clothes, then you can create whole sets for winter - a hat, scarf or snood and mittens. These things complement each other perfectly if they are created in the same style using the same pattern.
- To learn how to knit beautiful mittens, you must first create a simple model of mittens - with a simple pattern and without a seam.
- Based on the ability to knit such accessories, you will be able to knit any warm items of clothing for your husband and children.

Mittens, like woolen socks, should be able to knit every woman. Let's look at how to create simple mittens for women and men with knitting needles without a seam.

Scheme and description:
Such a product can be plain, or you can add a thread of a different color to an elastic band or front surface. The knitting pattern for such mittens is simple: 2x2 elastic on the wrist, the rest is the front surface.
- For the knitting process, prepare woolen yarn- 70 grams and 5 short knitting needles No. 3.
- For a wrist circumference of approximately 20 cm, you need to dial 36 loops(9 stitches on each needle).
- Knit the right mitten first. Mentally, for yourself, number the knitting needles: on the 1st and 2nd knitting needles - the loops of the lower part of the product (palm), on the 3rd and 4th - the top.
- Tie first an elastic band 2x2 7 cm high.
- Then knit in the round facial loops to the beginning of the thumb - 7 cm.

We continue the steps:
- Knit the thumb on the right part on the first knitting needle, and for the left - on the second knitting needle. So, knit the first loop of the first knitting needle with a regular front stitch, and remove the 8 others on a safety pin, fasten it.
- Then cast on 8 yarn over on the same needle. and knit the last 9th loop with the front stitch. The mitten has a hole for the thumb.
- Now knit to the nail of the little finger - 8 cm.
- Toe mittens knitted with decreasing loops. On the 1st and 3rd needles, knit the first two loops together behind the back wall. First turn over the first loop. On the other needles, knit two loops together at the end behind the front wall.
- So knit until there are 2 loops on each knitting needle.. Tighten the loops and fasten from the inside out.
- Thumb knitting- remove the pin and insert one knitting needle in place of this pin, and thread the second on the opposite side. It turned out 7 loops on the lower needle and 6 loops on the top.
- Divide sts over 4 needles: three will have 4 loops each, and one will have 3 plus one loop, pull out from the side edge.
- Knit your finger in a circle to the beginning of the nail.. Then start subtracting.
- Decrease on the finger is made, as on the toe. When there is one loop left on each knitting needle, pull off the loops and fasten from the inside out.
- Knit the left mitten in the same way as the right, but in a mirror image.

If you have mastered the knitting technique with front stitch, then you should start knitting openwork patterns. Mittens with this pattern look original and stylish.
Knit such openwork mittens with knitting needles, it will turn out interesting, and your hands in such an accessory will be feminine and beautiful.

Patterns with descriptions:

- Cast on 44 sts - 11 sts on each needle. Knit a 2x2 rib.
- Knit the first row with knit loops.
- On next row, dec 2 sts together with RS. Do this on each spoke.
- Two knitting needles - front stitch. The other two knitting needles begin to knit a pattern: the wrong side, the rest are facial, the last is the wrong side.
- Again on two knitting needles facial loops.
- One purl and 6 front, yarn over, front, yarn over, remove one loop, remove 2 loops on the left side. Pass the next loop through the loop that was removed and pull through it. Next, knit to the end of the needles.
- Two knitting needles again with front stitch.
- Purl stitch, knit 7 stitches, yarn over, knit stitch, yarn over, knit stitch, slip the stitch onto the right needle and subtract two stitches from the knit stitch. The loop that was thrown over, pull through the next loop. Then knit to the end of the needle.
- Again 2 knitting needles facial loops.
- Purl, throw 3 loops on a free knitting needle and leave at work. Knit 3, then slip sts off of an auxiliary needle and work in stockinette stitch. 2 front loops, yarn over, knit, yarn over, knit 2, throw 1 loop on the working knitting needle, decrease two loops. Pull out the thrown loop, 2 facial, purl.
- Two knitting needles in stockinette stitch.
- Inside, 9 front loops, naid, front, nakid. 3 facial, 3 facial. Throw a loop and 2 together. Pull out the thrown loop, inside out. Rapport is ready. Continue like this until the toe of the mittens.
See the video for details on knitting such a pattern. The craftswoman made double mittens with a knitted lining.
Video: Knitting Mittens double-Openwork leaves with braids. Part 1
Video: Knitting Mittens double-Openwork leaves with braids. Part 2
Video: Knitting Mittens double-Openwork leaves with braids. Part 3
Video: Knitting Mittens double-Openwork leaves with braids. Part 4
Video: Knitting Mittens double-Openwork leaves with braids. Part 5
Video: Knitting Mittens double-Openwork leaves with braids. Part 6
Video: Knitting Mittens double-Openwork leaves with braids. Finish.
Here are a few more patterns of openwork patterns for knitting mittens:
You can knit mittens and a shawl with this pattern - you get an interesting set.

An original pattern that is easy to knit on the needles. Leaves and bumps will perfectly decorate your mittens.

Beautiful rhombuses superimposed on each other will look great on the top of the mittens.

Mittens for lovers are a stylish accessory that symbolizes the warmth of feelings and unity. In such mittens it is pleasant to feel the warmth of a loved one, walking together in severe frost.

Knit mittens for lovers with a white heart on a red background, or vice versa, a red heart on a white background. In addition, you can make a common mitten so that when walking through the streets of the city, always hold hands and bask in the warmth of each other.
Scheme with a description of the general mittens:
- The photo shows that the elastic band of the mittens for each hand is knitted separately. 7 cm knit with a pattern 2x2 - 2 pieces. Cast on 16 stitches on each needle. We will knit with two knitting needles.
- Now join two elastic bands on circular needles.

We continue:
- Knit in stockinette stitch in the round. There is no need for a finger hole on this mitten. Therefore, knit until the beginning of the creation of the heart 7-8 cm.
- Knit the heart according to the pattern, first making 6 loops in the middle of knitting on one side, with a white thread, through 2 loops.
- In the next row there will already be 7 loops with a white thread through one red thread. Next, continue along the pattern, first knitting the loops with white thread, then reducing the white color until one loop remains.
- Tie the toe of the mitten as described above and when 2 loops remain, tighten them and fasten from the wrong side.
Here are a few more photos of how to knit mittens for lovers:


The pearl pattern is often used for knitting. Even a beginner needlewoman will be able to knit mittens with such a pattern, as it is simple.
How to knit women's mittens with pearl pattern? Scheme:


Description:
- 1st row alternates 1 front loop, 1 front loop.
- 2nd row - again alternate purl 1 and knit 1, but knit the wrong side over the front loop of the previous row, and knit the front loop over the wrong loop.
- Then repeat the 1st and 2nd row until the end of knitting.

Double mittens are comfortable to wear in the cold or when you want to play in the snow, especially for children. Such mittens will not get wet quickly, and your hands will always be warm.

How to knit winter women's and men's double mittens with knitting needles? A few tips:
- If knitting is still difficult for you, then knit the inner and outer mittens separately.
- Knit the inner mitten first. Then create the elastic of the outer mitt and the front surface to the base of the thumb. Pull the outer mitten over the inner one, straighten your finger so that it is outside and start tying it - it will be more convenient.
- To prevent the bottom of the mitten from slipping, make a couple of stitches in several knitting points, and fix the details.
- For knitting the lower part of the mittens, use a thin yarn, and for the upper one - a dense woolen thread. As a result, mittens will turn out warm and beautiful.
Tip: You can link separate two mittens and then insert one into the other, connecting the bottom of the gum with a regular needle and thread or crocheting the edges. You can also tie with a single cloth, and then insert one part into another. A simple fold is formed exactly in the center of the knitted elastic band.
Classics of the genre - jacquard mittens for the winter in Russia. The knitting is double and dense, thanks to the interweaving of threads of different colors. The product will be warm, and hands in such mittens will never freeze.
How to knit jacquard women's mittens with knitting needles? Scheme:
Beautiful and very stylish pattern. The diagram shows all the colors of the threads used.

These mittens are knitted from only two colors of yarn, but how interesting they look.

The jacquard pattern "Owl" is stylish and fashionable.

Deer jacquard pattern. Only a real needlewoman can knit mittens with such an ornament.


Aran mittens look luxurious. Products with such a pattern are knitted for both adults and children. They are warm and beautiful.
How to knit women's long mittens with rhombuses and arans with knitting needles? Scheme:

Important: Maniches, snoods and hats turn out beautifully with such a pattern. Therefore, you can knit a whole set - elegant and stylish.


From mohair, you can knit warm downy mittens with knitting needles. You can use any pattern. Suitable "Scythes", "Arans" and others. Here are some sample knitting patterns for mohair mittens:


You just want to put on mittens with a snowflake and go for a walk in the cold, brushing snow from the branches of trees and shrubs. It is easy to knit such mittens: cast on 44 loops, distribute on 4 knitting needles, knit an elastic band 2x2 (7 cm) and a front surface of 7 cm. Next, a hole for the finger is left, as described above, and the knitting of the snowflake itself begins.
Below is a diagram and description of how to knit New Year's mittens for women with a snowflake. This pattern is also called "Norwegian":


The elegance of the hand, the uniqueness of the image, the gentle style - all this is emphasized by the "Princess" mittens. An interesting pattern, reminiscent of arana, will make the products original and beautiful.
So, we are learning to knit mittens "Princess" with knitting needles. Scheme and description:


Mittens model "Princess" can be associated with different patterns. For example, the picture "Owls".


The pattern with plaits looks beautiful on the mittens. Here is his knitting pattern:


The deer, like the snowflake, is a symbol of winter and the New Year. Therefore, for knitting sweaters, socks and mittens, a pattern depicting this animal is used.
How to knit men's and women's mittens with deer knitting needles? Schemes, description:

Here is another pattern for knitting a deer on mittens.

Tip: You can invent your own deer, draw a diagram yourself and knit mittens on it. Get a unique and original accessory.

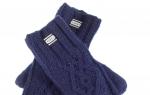
Gorgeous and unusually intertwined harnesses on knitted things. Mittens with such a pattern will definitely pay attention. Such an accessory will add individuality and originality to your image.
Knitting mittens with plaits is easy. Below is a diagram according to which you can create the outer part of the mitten on two knitting needles. On the other two knitting needles, the inside of the product is knitted with the front stitch.

How to knit such patterns, it is better to see visually. The video tells in detail how to create an interesting accessory - mittens with harnesses.
Video: Knitting mittens with plaits Part 2 The main pattern.

Transformer mittens are convenient because when necessary, you can open your fingers without removing the product itself from your hand. In such gloves it is convenient to use a mobile phone in the cold. It is also comfortable to work, for example, for trade workers if their activities take place on the street. When you need to accept and count money for a purchase, it is enough to remove the valve from the mitten and your fingers will be free.
Tip: Transformer mittens for men and women without fingers with a folding top are easy to knit with knitting needles. For a woman, you can take yarn in delicate shades: beige, white, pink, and for a man - blue, black, brown.
Scheme and description:
Knit these mittens with regular front stitch. Elastic band according to the scheme 1x1 or 2x2. Below is a knitting pattern for transformer mittens.

Work description:


The braided pattern looks unusual. If you knit mittens using Braids, you get a stylish accessory. Knitting such a pattern is easy - from the 9th row, the rapport is repeated.
How to knit braided mittens with knitting needles? Scheme:

Description of the knitting of this pattern:

Stages of work:
- First, knit 7 cm of elastic, dialing 36 loops and distributing on 4 knitting needles.
- Then, on two knitting needles, knit with a regular front stitch, and on the other two, knit with the Braid pattern.
- Leave a hole for the toe and knit to the beginning of the toe.
- Now begin to make decreases of loops, 2 on each knitting needle: on the first two, first knitting, and on the other two, at the end of knitting.
- When there is 1 stitch left on each needle, pull them off and fasten from the inside out.

Norwegian patterns are winter, Christmas trees, deer and snowflakes. Even if you knit only a snowflake, this will already be considered a pattern in the Norwegian or Scandinavian style. On mittens, you can create separately both deer, nature or snowflakes, or combine them in one pattern. Fantasy has no limits!
How to knit mittens "Norwegian patterns"? Scheme with description:
Important: When knitting such an ornament, it is important to be able to stretch the thread, because you need to constantly change the yarn of one color to another. Watch the quality of the broach so that the thread tension is uniform and the pattern does not lose its shape.


The broach process is performed as follows: straighten the knitted loops on the right knitting needle, pull the thread along them, and hold the thread with the index finger of the right hand, pressing it to the last knitted loop. On the wrong side, it is more convenient to press the thread with the thumb of the right hand.
Tip: Knit on RS and pull yarn in unused color so that it stays under the right needle. On the wrong side, knit with purl loops and pull the other thread with your left hand before work and under the right knitting needle. From the wrong side, the threads are pulled in front of the loops.

If you have learned how to stretch a thread of a different color, then you can start knitting Norwegian patterns according to any of the patterns. One cell in the diagram is one loop of a certain color.
Video: Knitting (mittens "Norwegian pattern")
This type of knitting can be done without broaches, but the fabric will be thinner than with broaches. Watch the video on how to knit jacquard without broaches.
Video: The easiest way to knit jacquard without broaches

How to knit mittens "Braid with a shadow": description

See how original these mittens look. Unusually, and few women knit like that. Make such mittens with your own hands and surprise your friends and relatives.
The pattern of knitting an Indian wedge on mittens with knitting needles:
- Knit the back side of the mittens as usual - with any pattern or just front loops. On the palm: 1st row- 15 front, from the 16th loop, tie 2 for the front and back walls, 4 front.
- 2nd row- 15 front, from the 16th loop, tie 2 for the front and back walls, 5 front.
- Knit in this pattern for 15 rows. with additions to the palm of the loops in each row. As a result, there should be 15 + 20 loops on the first two knitting needles.
- In the 16th row slip the finger loops onto the thread, knit in a circle and continue knitting to the required length of the mitten.

You have already knitted mittens with different patterns, but you want something unusual and original. Knit thick yarn gloves. It will turn out very interesting, and the products will be warm and comfortable.
How to knit warm women's and men's mittens made of thick yarn? To knit mittens from such yarn, cast on half as many loops as for knitting mittens from thin threads. But, in order not to be mistaken with the number of loops, you need to make some calculations:
- Knit with a pattern of 10 cm thick yarn and calculate how many loops you have in 1 cm of knitting.
- Now you know how many loops to dial for one mitten - 18-20 or a little more.
Important: Knit mittens made of thick yarn with simple patterns - front or back stitch, tangle, and so on.
If you know how not only to knit, but also to embroider, then you can create beautiful model mittens. Knit the mittens in one color and make beautiful embroidery on the back.
Photo of mittens with knitting needles with embroidery:


Knitted mittens with delicate embroidery: photo
Set - hat, snood and mittens with knitting needles: photos of models
Knit a set for yourself, your child or husband - a hat, snood and mittens. It will decorate any image, and things made by the hands of a loved one will warm in severe frosts.
Set - hat, snood and knitting mittens - photo models:
Beautiful products associated with the use of Arana and Braid patterns.

Set - hat, snood and mittens with knitting needles in pink: photos of models
A dark set created by knitting with a braid with a shadow pattern. It will look great with a coat or jacket in a contrasting color.

Set - hat, snood and mittens with knitting needles with an interesting pattern: photos of models
And again, a green tint - the color of the Christmas tree. Aranas and braids adorn the hat, mittens and snood.

Green set - hat, snood and mittens with knitting needles: photos of models
A gray set, but not at all boring, and even very stylish and interesting.

Gray set - hat, snood and mittens with knitting needles: photos of models
And again the “Braids” pattern, but the set is already knitted in beige. Classics always decorate and add originality to the image.

Set in beige color - hat, snood and mittens with knitting needles: photos of models
Knit things with your own hands. Please your family and friends. If you knit a set, then it can be a great gift, for example, for the New Year.
Video: MITTENS WITH SPOKES. CHILDREN'S MITTENS FOR THE AGE OF 2 YEARS. HOW TO CONNECT MITTENS OF ANY SIZE?
Knitting mittens from your fingertips is a great way to get a neat rounded blunt top of the mittens. This method is distinguished by a peculiar set of loops, which is also used for knitting socks from the fingertips.
For knitting mittens, it took 100 grams of yarn (100m / 100g), a set of stocking needles No. 4.
Palm width 8 cm, length 17 cm.
For a set of loops, you need 2 knitting needles, which you hold in parallel in your right hand. Make the initial loop, leaving a small end of the thread for the cast-on and put it on the second knitting needle from you. Place the ends of the threads in your left hand as with a classic set of loops
Begin to wrap the threads around the knitting needles one by one: for the first loop, thread from the index finger - the first knitting needle, thread from the thumb - the second knitting needle, in the same direction.
So alternately dial an equal number of loops on both knitting needles, which should be equal to the width of the three main fingers at the palm of your hand.
Having finished the set, take both knitting needles in your left hand, twist the ends of the threads and, holding the free end, knit the loops in the circle, first from the first knitting needle, then from the second, two circular rows.
In the 3rd row, start making additions. To do this, pick up the loop of the previous row with the right knitting needle from the side, put it on the knitting needle and knit it together with everyone.
Having knitted the last loop from the knitting needle, with the left knitting needle pick up another loop of the previous row from the side and also knit it with the front one.


Moving in a circle to knitting loops on the second knitting needle, also before the first loop, pick up the loop of the previous row and after the last one, pick up another loop. Thus, 4 loops are added in each circular row.

Repeat inc for 2 more rounds on each side and distribute sts evenly over 4 needles. 
After knitting to the base of the thumb, leave a few loops, removing them on a pin, and above them, dial 5 air loops and continue knitting in a circle to the base of the palm.

Then work the cuff of the mitten in 1 x 1 Rib (knit 1, purl 1). Having knitted the cuff to the desired length, close the loops, it remains to finish knitting the thumb. To do this, transfer the left loops to the knitting needle, type on the base and sides of the loop holes on 2 additional knitting needles and knit in length to the middle of the thumb nail. Then make decreases on each knitting needle: remove the first loop, knit the second one with the front one and stretch it through the removed one; Knit the last two stitches from the needle together. When the minimum number of loops remains on the knitting needles, cut the thread, pull the tip of the thread through the loops with a hook, pull them together and fasten on the wrong side.
The second mitten is worked in the same way, with the only exception being the finger loops left on the other side. 
Mittens are ready, you can start decorating them.
Hello, my dear! I am glad to see you on the page of the site "Irena Handmade"!
Excellent mood to all. It's great for me today. The description of the long-awaited double mittens "Hoarfrost" in lazy jacquard technique is ready. They are light and at the same time extremely warm. And also, one might say, airy. When I weighed them, they are like snowflakes - about 65 grams. Luxury, elegance and noble simplicity - in a single whole.
The color is the most New Year's, it seems to me. Ah, those lovely NAKO Mohair Delicate threads! A stunning combination of shades of the most delicate turquoise and dazzling snow-white ... I have already knitted a magnificent turquoise scarf and airy openwork mittens with a Leaves pattern from this yarn. Master classes on them are also available on the site. And if you have a desire to knit such a kit, there is always the opportunity to use the description. I don’t just like the yarn, it bewitched me: the thread is even, with a light, but not very pronounced fluff. I tried to convey my impressions about her with the help of photos.

I thought for a long time how to take a picture of my “fluffies”: I wanted to hang it on the Christmas tree as an imaginary New Year's gift, and wrap it in an elegant ribbon. Can you imagine what kind of surprise you can make for someone on a holiday ?! And if you also hide something tasty inside, and, perhaps, a decoration, then your idea will not leave anyone indifferent!
That's it, I turn to a brief description of the product. Again I want to warn and reassure beginners, there is nothing to be afraid of, everything and everyone is absolutely within their power, there would be a desire. In the master class I will try to state everything as simply and clearly as possible. If you have any questions, or suddenly you meet an inaccuracy in the text, be sure to write to me on the website or in the VKontakte group “Irena Handmade - knitting and crochet” in the “Discussions” section.
According to the consumption of yarn. It is indicative, it is about 30-35 g of each color. I already wrote earlier that the total weight of the mittens after washing is 65 g. It also depends on the individual knitting density of each craftswoman. One will spend a little more yarn or, conversely, less than her needlework colleague. I knitted quite loosely, especially the top part of the mittens.
I want to note that the number of rows for the inner and upper parts of the mitten is significantly different. The inner one is knitted with the front surface, the rows turned out to be much smaller. The Zigzag pattern ties the knitted fabric a little, plus it is also the top part, so the number of rows here is different from the inner part.
We will start knitting the mitten from the toe of the inner part, and finish, as when knitting a regular mitten, with the toe of the upper part.
So, be patient, this process will be longer. If you compare it with previous models of mittens, expect that you will have to knit not two, but as many as four mittens, but I think I was able to convince you with my reasoning about both the process and the yarn that this work is worth it. The result will certainly please you. I promise at least I won't disappoint. Everything, forward, to the intended goal. And I, of course, believe in your capabilities and have no doubts! Good luck!
The size.
Palm circumference - 21-23 cm, length - 25-26 cm, including the cuff.
Materials.

- NAKO Mohair Delicate (40% mohair, 60% acrylic; 500 m ⁄ 100 g) - 35 g. Tone 6101 "white".
- NAKO Mohair Delicate (40% mohair, 60% acrylic; 500 m ⁄ 100 g) - 35 g. Tone 6134 "blue turquoise".
- Hosiery knitting needles No. 2.
- Markers.
- Needle.
- Hook.
Knitting patterns and symbols.
- Thread A tone 6101 "white".
- Thread B tone 6134 "blue turquoise".
Scheme number 1. Curly elastic band.
- 1 row.
- 2 row.* 1 front loop behind the back wall, 1 wrong loop *. Thread A.
- 3 row.
- 4 row.* 1 loop to remove the thread at work, 1 purl loop *. thread B.

- Repeat from 1 to 4 rows.
- Pattern rapport is 2.
Scheme No. 2. Elastic band 1 × 1.
- 1 row.* 1 front loop, 1 purl loop *.
- The second and subsequent rows knit similarly to the first.
- Pattern rapport is 2.
Scheme No. 3. "Zigzag" right.

Scheme No. 4. "Zigzag" left.
- Thread A tone 6101 "white". In the diagram, the cells are white.
- Thread B tone 6134 "blue turquoise". Purple cells in the diagram.

- The diagram shows the front and back rows.
- The rapport of the pattern is 12. Repeat from 1 to 16 rows.
- Even rows in the pattern with circular knitting are read from right to left.
Scheme number 5. The front surface.
- The front row and all subsequent - front loops.
Attention! Thus, the front surface pattern is knitted only with circular knitting.
Work description.
Left mitten.
We start knitting mittens with a toe internal details.

For circular knitting with white thread A, cast on 8 loops on stocking needles No. 2. Divide sts evenly over 2 needles as follows. 1 loop will go to the first knitting needle, the second - to the second, the third - again to the first, the fourth - to the second, respectively, and so on. You should get 4 stitches on each needle.

First, if necessary, you can set markers to indicate the loops on which the additions for the toe of the mittens will be made.
- 1 spoke. 1 front, marker, 2 front, marker, 1 front.
- 2 spoke. 1 front, marker, 2 front, marker, 1 front.

We will increase in each row, from rows 1 to 10, with crossed crochets after the first loop and before the last one on each knitting needle. The added loops in the next row must be knitted with the front loop behind the back wall so that no holes form. I worked without markers, focusing on the first and last loop on the needle and on the “tail” of the thread, it’s more convenient for me. Decide for yourself what your option will be in this case. Here, someone is comfortable with markers, they will interfere with someone. I knit the toe of the mitten on three knitting needles: on two - loops, on the third I knit.
- 1 row. Scheme No. 5 front surface. *K1, marker, 1 yarn over, knit 2, 1 yarn over, marker, knit 1*- repeat 2 times. Thread A. There are 12 loops on the needles.
- 2 row. Scheme No. 5 front surface. * K1, marker, 1 yarn over, knit 4, 1 yarn over, marker, knit 1*- repeat 2 times. Thread A. There are 16 loops on the needles.
- 3 row. Scheme No. 5 front surface. *1 knit, marker, 1 yarn, knit 6, 1 yarn, marker, knit 1*- repeat 2 times. Thread A. There are 20 loops on the needles.
- 4 row. Scheme No. 5 front surface. *K1, marker, 1 yarn over, knit 8, 1 yarn over, marker, knit 1*- repeat 2 times. Thread A. There are 24 loops on the needles.
- 5 row. Scheme No. 5 front surface. * K1, marker, yarn over 1, knit 10, yarn over 1, marker, knit 1*- repeat 2 times. Thread A. There are 28 loops on the needles.
- 6 row. Scheme No. 5 front surface. * K1, marker, yarn 1, knit 12, yarn 1, marker, knit 1*- repeat 2 times. Thread A. There are 32 loops on the needles.
- 7 row. Scheme No. 5 front surface. * K1, marker, 1 yarn over, knit 14, yarn 1, marker, knit 1*- repeat 2 times. Thread A. There are 36 loops on the needles.
- 8 row. Scheme No. 5 front surface. * K1, marker, yarn 1, knit 16, yarn 1, marker, knit 1*- repeat 2 times. Thread A. There are 40 loops on the needles.
- 9 row. Scheme No. 5 front surface. * K1, marker, yarn 1, knit 18, yarn 1, marker, knit 1*- repeat 2 times. Thread A. There are 44 loops on the needles.
- 10 row. Scheme No. 5 front surface. * K1, marker, yarn 1, knit 20, yarn 1, marker, knit 1*- repeat 2 times. Thread A. There are 48 loops on the needles.

The height of the toe is 3 cm.
Next, we knit in circular rows with the front stitch to the hole for the finger. If necessary, you can switch to knitting with five knitting needles. It is convenient for me to knit on 4. I knit the loops of the palm on two knitting needles - 12 loops on each, the back of the mitten - 24 loops - on the third knitting needle, the fourth knit directly. But I give a description for working with five knitting needles, with a uniform distribution of loops on 4 knitting needles - 12 for each. Knitting on the first and second needles forms its lower part (palm), on the third and fourth - the back side.
- 11-45 row. Scheme No. 5 front surface (35 rows). Thread A.
The length is 11 cm.
- 46 row. Scheme No. 5 front surface. Thread A.

V 46 row we form a hole for the finger. We knit 12 loops from 1 knitting needle with front stitch, 2 loops from 2 knitting needles, remove 8 loops on a pin or an additional thread, we collect 8 additional loops on a knitting needle, 2 front loops from 2 knitting needles.

- 47-70 row. Scheme No. 5 front surface (24 rows). Thread A.
The height is 7 cm.
- 71-80 row. Scheme No. 2 gum 1 × 1 (10 rows). Thread A.
- 81-85 row.

We make out the place of the fold of the mittens and start knitting upper part mittens.
- 86 row. Scheme No. 5 front surface. Thread B. * Nakid, knit 2 loops together with the front behind the front wall * - repeat until the end of the row.
- 87-91 row. Scheme No. 5 front surface (5 rows). thread B.

We continue knitting the cuff of the upper part of the mittens.
- 92-103 row. Scheme No. 1 curly elastic band (12 rows). Thread A and B.
- 104-119 row. Scheme No. 4 "Zigzag" left (16 rows). 1 pattern repeat.
- 120-135 row. Scheme No. 4 "Zigzag" left (16 rows). 2 pattern repeat.
- 136-151 row. Scheme No. 4 "Zigzag" left (16 rows). 3 pattern repeat.
V 140 row, and this is the 5th row of rapport, we form a hole for the finger on the upper part of the mitten. We carry out the work in the same way as on its internal part. We knit 12 loops from 1 knitting needle and the next 2 loops from 2 knitting needles according to scheme No. 4 “Zigzag” left, then we remove 8 loops on a pin or an additional thread, we collect 8 additional loops on a knitting needle, 2 facial loops from 2 knitting needles, we continue to knit the next 24 in circular rows according to the pattern.
- 152-167 row. Scheme No. 4 pattern "Zigzag" left (16 rows). 4 pattern repeat.
- 168-183 row. Scheme No. 4 pattern "Zigzag" left (16 rows). 5 pattern repeat.
- 184-199 row. Scheme No. 4 pattern "Zigzag" left (16 rows). 6 pattern repeat.

V 200 in a row from the beginning of knitting, we switch to knitting with thread A according to scheme No. 5, the front surface and form a toe on the upper part of the mittens.
- 1 spoke:
- 2 spokes: 9 front loops, 2 loops together with the front “broach”, 1 front loop;
- 3 spokes: 1 front loop, 2 loops together front behind the front wall, 9 front loops;
- 4 spokes: 9 front loops, 2 loops together with the front “broach”, 1 front loop.
We decrease until there are 2 loops left on each knitting needle (8 in total).
- 200 row. Scheme No. 5 front surface. Thread A. There are 44 loops on the needles.
- 201 row. Scheme No. 5 front surface. Thread A. There are 40 loops on the needles.
- 202 row. Scheme No. 5 front surface. Thread A. There are 36 loops on the needles.
- 203 row. Scheme No. 5 front surface. Thread A. There are 32 loops on the needles.
- 204 row. Scheme No. 5 front surface. Thread A. There are 28 loops on the needles.
- 205 row. Scheme No. 5 front surface. Thread A. There are 24 loops on the needles.
- 206 row. Scheme No. 5 front surface. Thread A. There are 20 loops on the needles.
- 207 row. Scheme No. 5 front surface. Thread A. There are 16 loops on the needles.
- 208 row. Scheme No. 5 front surface. Thread A. There are 12 loops on the needles.
- 209 row. Scheme No. 5 front surface. Thread A. There are 8 loops on the needles.
After that, the thread must be cut off, the end of it should be pulled with a needle through the loops, pull them off, and leave the thread.
Big toe.
Getting Started with internal detail mittens. You need to transfer the removed 8 loops on needle No. 2 and knit them with thread A according to scheme No. 5 front surface. Then you should pick up 1 an additional loop from the broach, knit the upper 8 1 a loop from a broach. In work 18 loops. For the convenience of knitting, you can distribute the loops on 3 knitting needles and knit until the length is equal to the middle of the thumbnail (6 cm - 18 rows).
- 1 spoke: 1 front loop, 2 loops together front behind the front wall, 3 front loops, 2 loops together with the front “broach”, 1 front loop;
- 2 spokes: 1 front loop, 2 loops together front behind the front wall, 3 front loops, 2 loops together with the front “broach”, 1 front loop.
We perform uniform decreases of loops until 10 loops remain on the knitting needles (2 rows of decreases). Pull off the remaining loops.
finger on top you can make the details of the mitten with thread A or B according to scheme No. 5 on the front surface, here at your discretion. My option is a little more complicated - with a figured rubber band.
It is necessary to transfer the removed 8
loops on the knitting needle No. 2 and knit them according to the scheme No. 1 curly elastic band. Then you should pick up 2
additional loops from the broach, knit the top 8
additional loops and add more 2
broach loops. In work 20
loops. Next, we knit in circular rows according to scheme No. 1 curly elastic 28
rows. In height, repeat the pattern 7 times.
Next, we distribute 20 loops of the finger on two knitting needles and with thread A, we proceed to decrease the loops in the same way as when knitting a finger for the inner part of the mitten.
- 1 spoke: 1 front loop, 2 loops together front behind the front wall, 4 front loops, 2 loops together with the front “broach”, 1 front loop;
- 2 spokes: 1 front loop, 2 loops together front behind the front wall, 4 front loops, 2 loops together with the front “broach”, 1 front loop.
We perform uniform decreases of loops until 8 loops remain on the knitting needles (3 rows of decreases). Pull off the remaining loops.
Right mitten.
It is knitted similarly to the first, with the only difference that the hole for the thumb is made on 1 knitting needle in a mirror image.

The pattern on the upper part is made according to scheme No. 3 "Zigzag" right.
Finished product processing.
Connect the details of the mittens with the help of the threads left by us when knitting the toes: toe - to toe, finger - to finger. Fasten the threads and mask them between the details of the mittens with a hook.
After washing in warm water, the mittens remained as soft and fluffy as before, retaining their magical turquoise hue!

With the decor for the mittens, I didn’t have to invent anything special, and they turned out to be good without that. But still, the soul asked for some more lightness and airiness. With the help of a hook, she tied a chain of 50 air loops, made two tassels each. There is also a master class on the site for this method, so I don’t dwell on the process of making yarn brushes in detail. I added these, it seemed to me, very appropriate beads, and here, in front of you, my friends, is an incredible winter accessory.

These magnificent mittens with the romantic name "Hoarfrost".
With all my heart I wish you by the New Year or by Christmas to impose such, and, quite, perhaps, even more beautiful and warm mittens! Let not only small but also big hands be warmed by your sincere gift!
I invite you to further joint creativity. Send photos of your works related to this description, with a link to the master class "Irena Handmade".
I enjoy reading your comments and am always ready to answer any questions.
My contact details are on the website...