A crochet bag for a girl is a rainbow world. Knitted children's handbag Knitted handbag for girls knitting
There is a princess in every girl, and everything should be perfect for a princess. This also applies to handbags. For girls, it is an opportunity to appear more mature, if only a little. If mom knows the art of needlework, then it comes to the rescue, and sewn or woven products appear. The knitted handbag (crochet) is no exception. Children's, it will certainly be cheerful colors or with funny animals.
The idea with the "grandmother's square"
This knitting element, it turns out, is very popular. It can be used in absolutely any product. Crocheting a baby handbag does not stand aside.
After all, what could be easier than to connect two squares? You just need to choose a denser yarn and a pattern without holes. Then the canvases must be connected on three sides, and a zipper or button with a loop should be sewn on top. It remains to supplement the handbag with a handle that is suitable in length. The little fashionista will be satisfied. The capacity of such a handbag for girls will be quite sufficient. And you can decorate it in different ways - with a flower or a bow, appliqué or ribbons.
Rectangular version with animal face
For example, a (crocheted) children's handbag can look like an owl if you place a beak between the eyes. When the beak is replaced by a snout, the muzzle becomes a piglet. Change the nose and pupils in the eyes - and we have a cat in front of us.
But the base of the handbag is the same: two rectangles of cotton yarn. If the thread is thick enough, then a width of only 16 loops will be required. In height, it will be necessary to tie rows 6-7. The element must be selected again, based on the thickness of the yarn. Somewhere, only a single crochet will be enough, but in another case, you can safely tie a half-column or even a double crochet.
The handbag looks prettier if it is made of two colors. The border will be the conditional middle of the muzzle. Then you need to connect two circles - they will be the eyes. For large, and for a cat - oval. Then you need to sew them on, adding pupils (buttons or embroidery). It remains to tie the nose with a triangle or a round one, depending on the type of animal.
A handbag (crocheted) for children will receive a special charm and coquetry if you decorate it with a flower or a bow. It remains to tie a strap in the same style.

Handbag-strawberry
She will complement the New Year's costume. It will be fun to go shopping with mom with her, because she is so unusual.
You will need yarn of two colors: red and green. White and yellow are needed to create flowers to make the most elegant baby bag (crocheted).
The description of the process begins with knitting the bottom with red yarn. It can be round or oval - it all depends on the desire of the needlewoman. But you still need to make it a little elongated. The knitting element in the entire purse will be one: single crochet. Such a pattern is quite suitable for a strawberry and a leaf that frames it.
Then from the oval you need to knit upwards, slightly expanding from the middle so that it becomes shaped like a cut strawberry. And at the top again reduce the number of loops. At this point, it is recommended to change the thread to green and knit several rows. Then fasten the thread and attach it to the border of two colors. Now knitting will go down. Run small triangles - they will imitate the petals. It remains to tie them with a crustacean move. Then knit two small strips for handles. The bag is ready.
For decoration, you can tie two or four flowers, so that they easily fit on the green part of the berry. And the red half can be embroidered with yellow beads. So it will become even more like a real strawberry.

Clutch bag with a narrow handle
It must be knitted from a typesetting chain on both sides at once. It is recommended to use cotton and select a suitable hook for it. The dial chain will consist of 51 air loops. On it, you should perform single crochets in each loop, starting from the second from the hook.
Then the work goes in circles. The first one starts with three lifting loops. Then, in the same base, you should knit a double crochet, then skip two loops and make two more columns in the next. The action must be repeated until the end of the circle, and then everything is connected to the third lifting loop.
The second circle repeats the first. Only columns need to be knitted in between. Get a chess order. From the third to the eighth, the work is repeated.
The ninth and tenth rounds consist of one instep and single crochets in each previous row. There should be about 50 columns in total.
In the eleventh circle on both sides you need to leave spaces of 15 loops for handles. Above them you need to dial the desired length of the chain.
The last three circles are formed by single crochets. Moreover, they need to be knitted on the dialed chains. And now the handbag (crocheted) for children is ready, it remains only to decorate it with additional accessories.

Round fancy bag
This bag is sure to come in handy for a festive costume. Its beginning is at the round base. Its diameter will dictate the size of the finished product. A small handbag is usually enough for an evening dress. Therefore, the circle can be made in 10-15 cm.
For knitting the warp, you do not need a special pattern. It is enough to perform it with a single crochet. Then knitting continues vertically. To get an elegant nursery, it must be openwork.

Plain jacquard bag
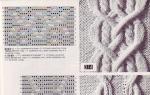
All the beauty of the product in the picture. It can be chosen by anyone. Even a cross stitch pattern will do. The main thing is that it is convenient to knit in one color. The pattern will have to be adjusted so that it fits on a square of fifty loops and 45 rows.
You will need to take yarn from 100% cotton in balls weighing 50 g and a thread length of 180 m. In this case, the bag will turn out to be 22 by 28 cm in size, provided that the knitting density is 24 loops by 28 rows in a square of 10x10 centimeters.
The knitting of the handbag begins on the reverse side. To do this, you need to take the main thread and dial the chain. If it matches the indicated yarn parameters, it will have a length of 50 air loops.
Then 45 rows will consist of the same elements - single crochets. The front side of the handbag is also formed by single crochets, but here you already need to knit. This is another 45 rows.
To assemble a handbag, it is supposed to be folded in half and the sides sewn with the main color. With the same thread, you should tie the top first with single crochets, and then another row consisting of double crochets.
Handles for such a children's handbag are best purchased at the store. Tie blanks made of plastic or wood with the same yarn and sew to the finished product.
There are bright children's things, looking at which the mood immediately rises. Lovely crochet handbag for girls - from this series. You can put your favorite treasures in such a bag: a wallet, hair ties, felt-tip pens, a toy, and many necessary things.
Crocheting is a useful activity in every sense. We offer mothers or grandmothers to pick up a hook and make crochet crocheted handbags. All master classes with diagrams, and a detailed description. You just have to choose the most beautiful bag.
How to crochet a handbag for a girl so that she is delighted with the gift? Choose any option. For example, this knitted bag. Suitable for little princess of any age, suitable for both 5 and 9 years old. In finished form, the dimensions of such a crochet bag are 13.5 cm in height and 15.5 cm in width.
But the bag can connect even more if you just repeat rows 14 to 22. In this case, take a larger hook, for example 5 mm.
A bright, multi-colored look is given to the product by cotton yarn. Yarn can be used both ours, Russian, type "Violet", and imported cotton. In total, such a handbag will need 50-60 grams of cotton. In great detail, with explanations, we are laying out the work: a crochet handbag for a girl a detailed master class.
For work you will need:
- Green, yellow, purple, red, orange, blue, and light blue cotton threads.
- Hook 3 mm thick.
- 9 beads for decoration.
- VP - air loop;
- CCH - double crochet;
- PSN - half-column with a crochet.
- RLS - double crochet;
- SS - connecting column.
Crochet handbag for a girl is knitted in the round, first we knit a round bottom, starting with the well-known African flower. Our flower will have a hexagonal motif. We continue to crochet in multi-colored rows. At the end we knit a belt: it can be either short or long, at the request of the princess.

Diagram of an African flower.
Children's handbags, like children's toys, often start with a ring. We start knitting with an amigurumi ring. We will make a simple ring in one turn of the thread.

- We make a loop.
- Let's insert the hook under the ring, grab the thread, and pull it out on us. There was a loop on the hook.
- Grab the thread again and pull it through the loop.
- So we get the first loop (the so-called sliding loop).
- We bring the hook under two threads at once. Grab the working thread.
- We drag the working thread through 2 loops that are on the hook. So we got the 1st RLS.
- Next, for the design of the first row, we knit 5 sc.
- We pull the end of the thread so that the ring is tightened. Tighten so that there is no hole left.
First row: light blue yarn 3 VP, 1 SSN in the middle of the amigurumi ring, 5 times: 1 VP, 2 SSN in the ring, 1 VP, 1 SS in the 1st SSN. You should get 6 identical shells. We close the last loop.

Second row: with blue yarn, we introduce a hook for 1 VP from the first row, and we knit the entire loop for this VP (3 VP - like CCH, 1 CCH, 2 CCH), in the photo - on the left. Then we knit 2 dc, 1 dc, 2 dc, 1 dc - we knit all columns for 1 VP from the first row. Repeat this until the end of the row. At the end of the row we make 1 sl-st in the first dc. You will get 6 shells, in the photo - on the right.

Third row: continue with a blue thread: 7 dc for 1 VP of the second row, 1 SS for the next VP of the second row. We repeat this until the end of the third row, it turns out only 6 times. We cling 1 SS to the VP of the second row, close the loop. It turns out 6 blue petals.

fourth row: with a green thread, we introduce a hook for 1 VP from the second row, we knit 1 VP, then we knit 1 RLS in 7 loops of the third row, 1 SS for 1 VP from the second row. This element is repeated until the end of the river. Then 1 sl-st in the 1st loop of the row, and close the loop. You should get 48 loops.

Fifth row: with a green thread, insert the hook into the 1st sc from the fourth row, knit: 1sc in three loops, increase, 1 sc in the next three loops, skip 1 loop. We repeat this element 6 times, you should get 48 sc. Then we knit 1 sl-st in the first sc, close the loop.

Sixth row: with a green thread, we introduce a hook into the 1st RLS of the fifth row, we knit: (3 VP - like CCH, 1 CCH in the same loop), next. 3 loops skip, knit (2 dc, 1 ch, 2 dc, 1 ch) - in the next loop, skip 2 loops, knit (2 dc in the next p., 1 ch), skip 1 loop, (2 dc in the next loop, 1 VP), Skip 2 loops, and knit (2 CCH, 1 VP, 2 CCH, 1 VP) - in the next loop, skip 1 p., (2 CCH in the next p., 1 VP), close in 1 th loop of the sixth row of the SS. We should get 24 motives from 2 CCH and 1 VP. The row is complex, but this is necessary for the symmetry of the bag.

Seventh row: knit with yellow thread 3 VP, as 1 SSN, 1 SSN for 1 VP from the sixth row, 1 VP, (2 SSN for 1 VP from the sixth row, 1 VP) - repeat until the end of the row. You should get 24 motives from 2 CCH and 1 VP. 1 sl-st in the first sc, close the loop.

Eighth row: with a yellow thread, 3 VP, as the first CCH, 2 CCH for 1 VP from the seventh row, 1 VP, (3 CCH for 1 VP from the previous p., 1 VP) - repeat until the end of the row. You should get 24 motives from 3 CCH and 1 VP. 1 sl-st in the first sc. We close the loop after the end of the row.

Ninth and tenth row: with an orange thread we knit 5 VP, 1 SS for 1 VP of the ninth row - repeat until the end of the river. You should get 24 motives from 5 VP and 1 SS.

Eleventh to thirteenth row: with a bright pink thread 5 VP, 1 SS for a chain of 5 VP of the tenth row - repeat to the end of the row. After the 13th row, close the loop.

You should get 24 motives from 5 VP and 1 SS.

Fourteenth and fifteenth row: with a lilac thread 3 VP, as the first CCH, 2 CCH for a chain of 5 VP from the thirteenth row, 1 VP, then 3 CCH for a chain of 5 VP from the 13th row, 1 VP - repeat until the end of this row . You should get 24 motives from 3 CCH and 1 VP. 1 SS in the 1st RLS. Close the loop.

Sixteenth and seventeenth rows: repeat 14 and 15 rows with pink thread. You should get 24 motives from 3 CCH and 1 VP.

Eighteenth row: we knit with a green thread 5 VP, 1 SS for 1 VP of the 17th row - repeat to the end of the row. There should be 24 motifs out of 5 VP and 1 SS.
Nineteenth through twenty-first row: With a green thread, knit 5 VP, 1 SS for a chain of 5 VP of the 18th row - repeat to the end. We close the loop after 21 p. You should get 24 motives from 5 VP and 1 SS.
twenty second row: with light blue thread 2 VP as the first PSN, 2 PSN for a chain of 5 VP of the 21st row, 3 PSN for a chain of 5 VP of the 21st row - repeat 2 times, 2 PSN for a chain of 5 VP previous. row, 3 PSN per chain. from 5 EPs previous. - repeat 3 times. 2 PSN for a chain of 5 VPs of the previous one. R. - repeat 5 times. 1 SS in the 1st PSN. You should get 66 PSN.

twenty third row: light blue 1 sc in each loop of the 22nd row. We close the series with SS.
Twenty-fourth: light blue 1 sl-st, skip one p., 5 sc in one loop, skip 1 loop - repeat to the end of the row. 1 sl st in the 1st st of this row, and bind off the st.

Tie: we knit a chain of 175 VP, close it, leave part of the tail for beads. We pull the chain with a pin through the 23rd row, string the beads, and fix them.

Strap: with light pink threads we knit a chain of air loops 82 cm long. Close the loop. With red thread we knit 1 SS in each of the loops of the previous row. Close the loop. Sew a strap inside the bag. Crocheted baby bag is ready.


Such an original crochet handbag for a girl will definitely appeal to a young fashionista. The cat handbag can be used as a wallet, and a cosmetic bag, and if you tie a strap, you can wear it on your shoulder. The dimensions of the cat bag are small - 18 cm - length, and 8 cm height. A cat handbag is knitted from any yarn with a crochet hook of 2.5 or 3 mm. Mostly used single crochet. You will also need a 20 cm zipper and buttons for the eyes. Schemes are attached. Such a kitten wallet will appeal to the princess at 3-4 years old, and at 9 years old.

Single crochet.

Two single crochet from one.

Two single crochets together.
A bright summer handbag that will delight both the little princess and the girl. There can be a sea of options here: you can make a multi-colored wallet, or a shoulder bag. For the product, any remnants of threads, beads, lace are suitable - in any combination. It all depends on your imagination. We tried to make the patterns and the master class in more detail, so that even a novice craftswoman would understand how to knit such a thing.

The bag is knitted from CHARM cotton yarn, hook 2.5 mm thick. The length of the handle is 125 cm, it is made of a metal chain crocheted. The handbag has a diameter of 26 cm. The bag consists of two parts, and the valve is an even circle, which is tied with arches. You can connect according to the scheme below, or a master class.

According to scheme number 1, a valve for a bag is knitted. Knitting begins with an amigurumi ring. We collect 12 CCH in the ring, in the second row we make 12 increases from CCH. In the last row we knit in two VPs of 5 CCH each - we get an arch.


If you don’t understand how to knit according to patterns, knit according to a detailed master class.

For work you will need:
- The rest of the threads, color and combination are at the discretion of the needlewoman.
- Hook 2 mm thick.
- Beads.
- Needle, thread.
At the beginning you need to dial 5 VP. Connect the ends of the chain into a ring using the SS (see the symbols in the first master class), then we knit 3 VPs to climb to the second row.
Many needlewomen are familiar with the situation when, after tying the main product, a little yarn remains. We suggest you use it to knit a small bag for your phone and keys. Such handmade knitted bag will look quite attractive in the winter season and can become a fashion accessory in addition to the previously knitted hat and mittens. It may seem to many that such a thing as a small knitted handbag will be very brand. Here I want to warn you, it is erased very easily, for which I use ordinary laundry soap.
In order to tie such a handbag - a clutch, we need:
- remnants of white yarn (approximately 1/3 skein),
- straight knitting needles (3.0 mm),
- small hook,
- two needles (with a large eye and a regular one),
- scissors,
- white thread,
- lining fabric
- small white snake (16 cm).
How to knit a bag with knitting needles
On two knitting needles we collect 44 loops. Loops should be dialed quite tight, otherwise, the finished product will be deformed.

Next, we knit eight rows with facial knitting. Knit also should be quite tight. 

Having connected the specified number of rows, we proceed to the formation of the pattern. To do this, we knit the loops as follows: 3 facial, 3 purl, 6 facial, 3 purl, 1 facial, 3 purl, 6 facial, 3 purl, 1 facial, 3 purl, 6 facial, 3 purl, 3 facial. Next time we knit according to the pattern. So it is necessary to knit four rows. 
In the fifth row of the picture, we will make a bevel of braids. We will get pigtails where we knitted 6 facial loops. We knit loops according to the pattern to the pigtail. Then we remove the first 3 facial loops on a pin. 
Then immediately we knit the second 3 facial loops. It is not necessary to knit them very tight, so that later you can easily continue knitting the pattern. 
We transfer the facial loops removed to the pin to the knitting needle from which they were removed and then we knit them. Then we knit according to the pattern. We also knit the remaining two bevels of the pigtails. 

After we have made a bevel, for the next we need to knit seven rows according to the pattern. In total, we need to make three full links and two half links in each pigtail.
Then we continue to knit the handbag with the front fabric. In total, you need to knit 45 rows. 
Having knitted the rows, we fold the product. The front canvas will become the back wall of the bag. Also, the front canvas should be slightly visible from the front (3-4 rows). If necessary, the number of rows can be increased. 

We finish knitting, closing two loops together. Each time we return the resulting loop to the knitting needle and knit it again. 


As a result, we should get a neat pigtail. It must be knitted tightly so that the back side of the knitted bag is not stretched. 
Next, from the wrong side, we fold the connected base of the bag. From above it can be fixed with a pin. This will help us sew the sides of the bag evenly. 
With the thread with which we knitted the bag, using a needle with a large eye, we sew the sides of the bag. The sides should be sewn tightly. 


turning inside out knitted bag, we should get a neatly sewn product. 
Then we take the snake and with the help of a needle and thread we sew it to the bag. We do this with a “back needle” seam. 
We sew the lining from the fabric and sew it inside the bag. If you don't have a sewing machine, you can do it by hand. Also, if desired, you can place cardboard between the knitted fabric and the lining. It will help the purse keep its shape and it will look more even. But when washing, if you do not get the cardboard, then it can become sour. 

Then, using a hook, we knit a small chain of air loops, which in the future will become a handle for a handbag. 


Having connected the chain of the required length, we attach it to the base of the bag and knit the second row of loops with a crochet along the chain. 


As a result, we should get such a handle for a handbag that can be put on a chicken. 


Our bag is ready! Wear it with joy and keep your essentials in it. 
Now you know how to tie a handbag with your own hands. 
All crochet baby handbags are wonderful because they are very easy to make! Any mom, having tried and spending quite a bit of time, will be able to create it with her own hands from the remnants of yarn or by buying a few hanks of a new one.
Crocheting a baby handbag for beginners
This wonderful thing is made in the shape of a stylized owl. The knitting technique is simple and perfect even for inexperienced knitters. The main pattern is a pillar. with nak. (canvas handbag). For denser handles, a pole is used. without nak.
Now you need to dial a chain of 26 air. loops (calculate according to your pattern) and knit RLS in all loops. So, you should knit about 30 cm.
Then fold the large rectangle in half inside out and fasten the sides by tying it on three sides of the RLS. Turn the bag inside out, straighten the corners. Sew a button in the middle on top - a lock.
The most pleasant and interesting part of the work remains - decorating the handbag with roses. Cut a strip of 10 cm from the green ribbon and, folding it with a figure eight, sew it to the base of the rose - this is a leaf. Now thread the ends of the yarn remaining on the flower in the right place inside the purse and tie it in a knot. So, fix all the decor.
So you have crocheted an amazing handbag - childish, bright and fashionable!
Flower knitting patterns for decoration
From the threads left with you after the completion of the work, you can knit some more fashion accessories. For example, a flower for a headband or an elastic band for hair, a necklace, a bracelet, etc.

So you can create an original set that pleases the princess herself and everyone around her! Also, flowers are often used to decorate children's handbags. Try to connect them according to the suggested schemes.
For those mothers who have a little fashionista growing up, it is no secret how many bright and colorful accessories are required for a daughter.
Sometimes it is not always possible to acquire another beautiful handbag or. And then mother's knowledge and skills in needlework come to the rescue, and if there are none, you have to learn. What is there to do?
But how many beautiful and original handbags can be crocheted or knitted (who knows how) while spending a minimum amount of time and effort. And if you consider that there are a huge number of detailed master classes on the Internet, then even a mother without experience in knitting will cope with such work. After all, according to children, mothers can do everything.
In the last round, we knit 5 double crochets in two air loops, fixing the loop between the 2nd and 3rd lower columns. This is what the top looks like. 

In the 8th row we knit 8 single crochets, then to the last 8 loops of the circle, double crochets and 8 single crochets. In the 9th row, we knit 10 single crochets, single crochets and the last 10 loops with single crochets. In the last row, we knit the first and last 12 loops with single crochets, between them in a circle with double crochets. Thus, we need to connect 2 identical bases.
The scheme for knitting a handbag crochet for girls No. 2

Here is such a basis for a children's handbag and its upper part should work out for us. 
For greater spaciousness and giving the handbag volume, we knit the side part, which consists of a strip of 90 air loops long. In each loop we knit one column with a crochet. Turning the knitting in the opposite direction, we knit from the beginning to the end of the row a half-column with a crochet in each subsequent loop. 
When all the components are ready, you can start assembling.
First of all, we connect the back of the bag with the side, for which, having folded them to each other, we tie them with single crochets. 

From above we apply the second half and do the same work. 
We determine how the upper part will be located, and sew it to the purse. 


Weave a river in the form of a pigtail from air loops of four colors of yarn. We determine the length ourselves. 

Sew it to the bag on both sides. 
Sew on a button - this will be a clasp. 
Let's make a brush for decoration from threads. We wind the thread on the brush 4 fingers wide. 
We will tie the future tassel with a thread in the middle on one side, cut it with scissors on the other and shorten it to the desired length. 
From the remaining thread we will knit a chain of air loops to attach the tassel to the girl's purse. 
Wrap around at the base and tie in a knot. Cut off the excess thread. 

Let's make a keychain from multi-colored beads. Attach all jewelry to a crocheted bag. 


Our beautiful crocheted handbag for girls is ready! And I wish you to create something wonderful with your own hands. I hope the proposed version of the master class will be useful.