Knitting for beginners step by step photo. What can be knitted quickly and easily: master classes for beginners Learn to knit according to patterns with knitting needles
If you want to learn how to knit, then following the beginner-friendly step-by-step explanations can easily master this skill.
“Thinking is like cosmic knitting,” wrote Waldorf Rudolf Steiner almost a century ago. He developed a comprehensive curriculum for Waldorf students based on this idea, filled with knitting, sewing, and woodworking, believing that "a person who is unskillful in his fingers will also be unskillful in his intellect, having fewer mobile ideas and thoughts." Today's Waldorf students still knit socks and kitchen spoons, and many Waldorf schools eschew the use of technology. These two things - manual work and technology - may seem at first glance to be inconsistent. But there is a case where handicraft and computing, and the process that links them, are more closely related than one might think.
When electrical engineering professor Dr. Karen Schoop of Queen Mary University in London took over her first knitting shop, she immediately noticed that knitting was very similar to writing computer code. "I've noticed that knitting instructions are mostly binary (like computers) - in other words, knit or purl," she said. "More interesting were the knitting instructions, which read the same as the codes used for string matching and coding manipulation." Schoop also acknowledges that the earliest stages of computing were inspired by handwork: “Of course, computers ended up partly inspired by weaving. Probably some of the earliest programmers were people making card/paper hole patterns for weaving patterns.”
It is recommended to purchase bamboo needles for beginners because they are considered the easiest to work with. Metal and plastic needles can be a bit slippery, which can be problematic for beginners if the stitches slip. If you've never picked up knitting needles, this is a great time to start.
Where to learn
You can learn to knit using different methods, depending on personal qualities:
- Other knitters. For most people, the best way to learn to knit is to sit next to someone and teach you the basics. If you have a friend or relative who is a knitter, this is also a good way to spend quality time together.
- Knitting groups. If you're unfortunate enough to know people who can show you how to knit, then it's time to meet some. Your local yarn store has classes or knitting groups that you can join.
- Books. If you're the type who learns best from diagrams and written materials (or you avoid human contact), the above options may not work for you. As far as books are concerned, copies are popular for their clear illustrations.
- Useful sites. Of course, you can learn everything from a book or one of the many online classes and tutorials.
Once you've learned the basic stitches and vocabulary, there's still tons to learn about knitting. If you don't want to choose something too difficult to start with, gradually improve your skills by trying projects that challenge and motivate you to learn new techniques and stitches.
If you get confused or stuck, just ask another knitter. Most of them are more than happy to help you.
Practical minimum
The basics of knitting are quite simple, you need two basic stitches and everything else is a variation or combination of them. These stitches are "knitted" and "curvy" (mostly back to front knit). Then from there it gets more complicated.
- Start with a slip knot and place a loop on the left needle. Now insert the right needle into this stitch from front to back and wrap the yarn around the back of the right needle.
- Then pull out the correct needle, bringing the yarn to it.
- Place the tip of the left needle under this loop and thread the loop over the needle from the right needle.
- Remove the correct needle and tighten the stitch. You should now have two stitches on your left needle. Keep doing this until you have as many stitches as you want. For your first pattern, it is recommended to start with about 20 stitches, but remember that this is unlikely to turn into anything. It's just for practice.
- Knit stitch starts exactly the same as this bait. Insert the right needle into the first stitch of the left needle and wrap the yarn around the right needle. Pull out the right needle, bringing a new loop to it.
- This time you will leave the new stitch on the right needle and slip the stitch you just slipped into the left needle (this loop is at the tip of the needle). It may seem scary to straighten the stitch, but you'll be fine.
When you're learning to knit, the most common mistake people make is not slipping the stitch they just worked with their left needle. Instead, they work on that stitch again, which increases the total number of stitches.
At the end of your row, you will switch your needles so that the one with all the stitches will now be the left needle. Work on the knitting stitch over and over again until you get comfortable with it and create stitches that are relatively even. As you improve, your seams will line up. Once you've mastered the knit stitch, go back to start learning another basic stitch: the crimp.
Here are five tips for learning anything new based on your knitting experience:
- Understanding a new language takes time. You need to understand the size of the needle, the weight of the yarn, and what these stitch code words mean. It is always worth remembering that learning a new language takes time. It can be overwhelming to drop everything after seeing a whole new set of terms without giving them time to understand what they mean and practice them.
- Learn the rules. When someone is learning for the first time, they need small wins and don't try to take on too much in the beginning. Failure early can be repulsive.
- Following a pattern makes it easier for you to learn. Following a pattern is a good way to learn some basics while trying to take on too much at once, resulting in overflow and missing some fundamental building blocks.
- Create a safe environment. People need a safe environment in which to learn, where mistakes can be made and risks taken. This may mean taking time to study with the close support of other people.
- Seek advice from others. People should be able to explore new ideas while being able to learn from others and not be afraid to explore new ones. There is a lot of knowledge that is readily available.
3 Beginner Knitting Mistakes
Along the way, you will make mistakes. Mistakes are part of learning so expect them. If you drop a stitch, keep moving forward. First the goal is to complete the basic knitting steps. Once you are comfortable with the knitting stitch, your hands will naturally settle into the rhythm of the knitting and you will make fewer mistakes. Think of your first ten lines as practice. Once knitting is comfortable, consider starting a new scarf. You will be much more confident and your scarf will have fewer mistakes. Knitters from time immemorial and knitters of the future have and will make the same mistakes.
- Drop stitches. At some point, you will drop the stitch. It takes less than a minute to fix it.
- Adding stitches. This happens to most beginners. There is one way to fix the added stitches - to trace the place of the error.
- Tight knitting. Sometimes the nervous side takes over and you start grabbing your needles and pulling on your yarn.
- The best way to prevent these three beginner mistakes is to keep knitting.
How to read a knitting pattern
Once you've learned the basics of knitting - how to lay on and knit, how to work knit and loop stitch, you'll be ready to start your first pattern. In the beginning, looking at a knitting pattern can be confusing. This is a special knitting language that uses a lot of abbreviations and terms to save space and make patterns easier to read. So, the first thing you need to do is familiarize yourself with knitting abbreviations.
Some of them are easy to understand, for example:
Basic stitch abbreviations: K or k = knit stitch, P or p = stitch.
The terms represent what you should do, for example:
- CO= Enable. (This is how you start each pattern).
- BO= Disable. (This is how you finish most jerseys, sometimes called discards. They mean the same thing).
- Inc= Zoom in. (Add one or more stitches. The most basic increase is to work on the front and then back again on the same stitch.).
- Dec= decrease. (Eliminate one or more stitches. The most basic reduction is to make two stitches together as one. This can be done with both knitting and knitting stitches. Various ways to increase and decrease change the way a project works, and most designers have a specific method. Therefore, usually your the template will tell you how to do it.)
- Rep= repeat. (Repeat the same again for the number of times specified in the pattern.)
- Sl= slip. (Slide stitch or stitches from one needle to another without working).
- YO= yarn. (Take the yarn over the needle.)
- tog= together. (Work two or more stitches together to form a reduction.) This is usually used when you are working with a pattern and increasing (or decreasing) at the edges. This means that you keep the center piece in the pattern as you have already set, and will add (or subtract) stitches at each end without breaking that pattern. When enough new stitches have been added, they should be included in the pattern.
With abbreviations and deadlines in mind, let's take a look at a typical knitting pattern. Jerseys can be worked back and forth in rows to form a flat piece, or in rounds to form a seamless tube such as socks or hats. Special needles are used to work in rounds.
First, the instructions will prompt you to cast a certain number of stitches. But wait - before you can begin, you must place a slipknot on one of the needles. Templates will never tell you this - they just assume you know it.
There are many ways to get started. Some give a nice stretch edge; others provide a solid foundation. If the template doesn't tell you otherwise, use the method you know.
How to read a knitting chart
Learn how to read a knitting chart with this easy step by step tutorial. Basic beginner patterns include both written instructions and a knitting chart. Once you understand the general structure of a knitting pattern, you will find yourself wanting to conquer even more complex patterns and textures.
Knitting charts are a tool to help you understand how to knit a pattern. Most patterns come with both written knitting instructions and a chart. Think of a knitting chart as an extra help in visualizing and understanding your project as a whole. The diagram itself is laid out in a grid quite simply. And this grid has small cells like an excel document or graphic paper. Each of these drawers represents one stitch on your needle. The whole diagram represents your knitting pattern.
Stitch symbols are small patterns that represent knitting technology that can be used on each stitch of your design. Each box will be filled with either a knit symbol or down stitch. Each box of your knitting chart grid has a different stitch symbol in it, which helps you know when it's time to knit each stitch on your needle.
The overall diagram helps you see how the pattern is pulled in and the repetition part is highlighted.
So we have our stitches on our needle. The very first stitch on your needle is here to the right of the row of stitches. When we knit our piece, we start from the bottom of our work. So that first stitch in the bottom right corner of our knitted pattern is in the same place as the bottom right corner of our knitting chart.
Knitting instructions for beginners
Knitting- a centuries-old craft, mostly practiced out of necessity; if you wanted socks or a sweater, before you would have to knit it yourself. Today, knitting is more of a hobby, although it is also an art form and some might say it is becoming an obsession.
Knowing how to knit can seem overwhelming after looking at all the yarns and patterns. But don't let it get to you - even the most experienced knitter was once a beginner.
"Stitch cast" is the name of the technique used to get the first row of stitches on the needle, which is important for beginner knitters. There are several dialing methods. This is a versatile and durable basting that can be used for most projects.
It all starts with a loop, which is a knot that pulls up easily once you place it on the needle.
How to loop the right way:
- With the tail of the yarn in the palm of your hand, wrap the working yarn around your index and middle fingers and fold the working yarn over the tail end, forming an X.
- Massage your fingers a little and push the working yarn with your fingers from the back of your hand.
- Pull this loop a little while holding the tail of the yarn to form a knot.
- Place the loop on the knitting needle and pull the working yarn to adjust the tension.
How to knit: long tail method:
- Make a loop and place on the right needle.
- Place the index finger of the left hand between the ends of the yarn so that the working thread is around the index finger and the end of the tail around the thumb.
- Using other fingers, secure the ends a few cm below the needles. Keep your palm up while making a V.
- Raise the needle over the loop on the thumb, take the first thread around the index finger with the needle and go back down the loop on the thumb.
- Lower the loop from your thumb and, placing your finger back in a V configuration, carefully tighten the resulting stitch on the needle.
- The stitches should slide easily back and forth over the needle without looking loose or looped.

Beginner knitting practice: for 20 stitches
Now pull all the stitches out of the needle and make 20 stitches again. Repeat this process until you feel really comfortable with this technique. When you're just learning to knit, it takes time to build up your memory.
One of the objects of the knitting game is to move stitches from your left needle to your right needle, bringing new rows of stitches into the process.
- Hold the needle with the overlay stitches in your left hand, the empty needle in your right hand. Hold the needles a few cm from the tips, between the thumb and the first pair of fingers.
- With the working thread at the back of the needle, insert the right needle into the front of the first stitch (closest to the tip) from left to right.
- Now, using your right index finger, bring the yarn between the needles from front to back.
- With your right hand, pull the right needle - which now has a loop of yarn around it - towards you and through the stitch. Now you have a stitch on the right needle. All you have to do to finish the stitch is slide the old stitch off the left needle. Pull gently on the working thread to secure the new stitch.
- Repeat this process at the end of the line. When you have knitted each stitch in the row, you will have an empty needle in your left hand. Change the needles so that the “full” arrow is in the left hand and the empty one is in the right hand and do it again.

Continental knitting method
There are several ways to achieve a knit stitch; the two most popular are the English method (also called "throwing") and the Continental method (also called "gathering"). The above information refers to the English method, in which the working yarn is held in the right hand. In this method, the yarn is held in the left hand. Practice both methods to see what works best for you. There is no right or wrong way to knit. To use the Continental Knitting Method, follow these steps:
- With working thread under and at the back of the needle, place the tip of the right needle between the front and back of the first stitch on the left needle. The tip of the needle should point towards you.
- Wrap the yarn counterclockwise around the right needle (the one you just passed through the stitch.
- Pull the right needle back enough to slip under the left needle and pull the yarn with it through the stitch on the left needle.
- Remove the stitch from the left needle. You have just created a new seam.
Binding
Once you have finished knitting, you will need to remove your needles if your stitches are not undone. This process is called linking. Even beginners will be able to connect easily by following these simple instructions.
- Knit two stitches as usual, moving to the correct needle.
- Place the left needle in the first stitch (the one furthest to the right).
- Pull this stitch up and over the second stitch and pull it completely out of the needle.
- Knit one more stitch and repeat the third step. Pull the stitch further to the right and new stitch and release the needle completely.
- Repeat step four until there is only one loop left on the right needle.
- Finish the yarn by cutting it off and threading it through the last loop. Pull yarn to tighten.
If you make a mistake, keep moving. You do nothing but practice knitting, so you can ignore the mistakes and just keep doing the knit stitch.
Once you start knitting stitch down, you will be confident.
Why not start with a super simple scarf like the one shown above. This scarf is knitted from super bulky yarn. To start, take size 13 needles, put on 12 stitches and knit until you have 12 cm of yarn left, then tie it and sew to the ends.

Needle selection
All knitting needles perform the same important function, but different types of needles are available on the market depending on the type of knitting project. These are single point, bidirectional and round needles.
Single needles, also sometimes called straight needles, are pointed at one end and driven into the other, allowing you to knit from one point. Are these needles used for knitting back and forth? and creating flat knitted products.
Double pointed needles are straight needles with both ends and are sold in sets of four or five. These needles are used as a set to create tubular items such as socks.

Circular needles are two straight, unidirectional needles connected together by a flexible cable. They can be used for both flat knitting and bulk knitting. As a result, they are increasingly becoming the type of knitting needle of choice among knitting enthusiasts who don't want to stock different needles for different projects. Round needles are available as fixed round needles and as interchangeable round needle kits with the ability to change cable length and needle tip size to suit project requirements, giving them great value.
Today's lesson "Knitting for beginners with knitting needles" will be relevant for beginners -
those who first picked up this instrument. Or even not yet taken, but really wants to try.
Do not be afraid, everything is not as difficult as you think! Well, let's go figure it out together, shall we?
Lesson one: we select knitting needles and yarn for knitting
spokes
To begin with, it is important to remember one obligatory thing: the knitting needles are always matched to the thickness of the yarn! If you ignore this rule, your knitwear will either be too tight or too stretched.
Determining the thickness of the yarn is easy: correlate the weight of the thread in grams and the footage of the skein. For example, if the packaging indicates that there are 130 meters of thread in a skein of 50 grams, this is quite thin yarn. If there are 50-70 meters per 50 grams, this is a fairly thick yarn. Accordingly, the shorter the length with the same weight of the skein - the thicker the yarn.
As a general rule, the size of the needles should be twice the thickness of the yarn. Almost all yarn manufacturers indicate the recommended needle thickness (in millimeters) on the packaging of their products. From personal experience, we can say that knitting needles with a diameter of 3, 3.5, 4 and 5 mm are most often used, and we advise you to purchase them.
Knitting needles are divided into two types: straight and circular. Straight ones are ordinary (2 pieces), about 30 cm long, and hosiery (5 pieces), 15-20 cm long. There are also flexible, curly ones, but they are used extremely rarely and only by experienced knitters.
What can be knitted? Yes, whatever! Sweaters, hats, socks, scarves and snoods… and even coats! But first we will try to make small samples.
Needle tips
Almost all knitting needles from the sets are double-edged. This is very convenient in work, for example, with socks, where they are periodically removed and change their location during work. To prevent the loops from flying off the other side of the knitting needle, it is better to purchase tips for the selected knitting tool number.
They will be useful to you not only at the very beginning of training, but also later, when, for example, you want to postpone work on the product for a while: just close all the knitting needles on both sides with tips and the loops will not come off anywhere.
Yarn
The variety of threads for knitting is simply amazing: natural and synthetic, cotton and wool, silk or mohair ... Of course, you choose, but we recommend using a yarn consisting of wool with acrylic to begin with. It is much easier to learn on it than on cotton, and you can knit products from it for every taste! Choose a tightly twisted, not fluffy thread in light colors - this way you will better see the knitting pattern.
The ideal yarn thickness for a beginner is no more than 200 meters per 100 grams.
knitting needle
It is very different from ordinary sewing needles: thick, long, with a large eye and a blunt tip, which helps to sew parts of items such as sweaters without damaging the yarn fibers.
Lesson two: what a knitting row consists of
In fact, patterns knitted with knitting needles consist of two types of loops: front and back, which alternate in the sequence specified by the scheme.
With standard knitting, the loops are parallel in relation to one another. Anterior lobule (wall) is located in front of the spoke, and the posterior lobule is behind. The thread that connects the first loop to the second from the bottom is called a broach. Pay attention to the photo below:
All rows in knitting are divided into front (l.p., as a rule, even) and purl (p.p., odd). It is important to remember that the same loop on one side is the front, and on the other - the wrong side. Odd rows are considered knit, even rows are purl. L. p. turns out to be smooth, but also. item is characterized by the presence of the transverse part of the loop of the previous row. Look closely at the photo:
Any work with knitting needles begins with a typesetting row, edge loops are located on the sides of the panel, and closed loops go at the end of knitting. There are a lot of ways to set and close loops! However, as well as variations of knitting edges. A little later we will tell you about how the simplest of them fit. By the way, remember that most often the pattern schemes do not take into account the cast-on row, edge loops and the row with closed loops.
Lesson Three: Learning to Cast on Loops
How to measure the length of the thread
Each knitting begins with a set of loops. Today we will learn how to make a set in a basic way, which is suitable for almost any knitted item. Such an edge turns out to be quite dense, but at the same time remains elastic. The disadvantage of this method is that when casting on a large number of loops, it is sometimes difficult to determine in advance how much yarn to leave. Alas, if there is not enough thread, you will have to dissolve the row, unwind more thread and dial the loops again.
The approximate length of the thread can be calculated as follows: we take the thread and one knitting needle on which we are going to knit, freely wrap it with a thread 10 times and get a segment that will be needed for a set of 10 loops (1 loop \u003d 1 set of thread). Set aside the number of cuts proportional to the desired number of loops +/- at least 15-20 cm for every 10 loops.
We collect loops
Having measured the required length of the free edge of the thread, we clamp it with the thumb and forefinger of the right hand, as shown in the photo below. The free tail is located in the direction "away from you".
We put the end of the thread that comes from the hank on the left palm, and draw the thread between the index and middle fingers of the left hand.
Note! The end of the thread must be placed exactly in the direction “away from you”, otherwise the set of loops will not go from the skein, as we need, but from the free edge of the thread that we measured earlier. It simply may not be enough.
Next, you need to throw the thread through the index finger and wrap around the thumb of the left hand in the direction from the bottom up, as a result of which a loop should form. The ends of the threads, folded together, are clamped in the palm with the help of the ring finger and little finger.
In the loop formed on the thumb in the direction from the bottom up, we introduce two knitting needles folded together, like this:
In the loop on the thumb, we introduce two knitting needles, folded together from the bottom up.
Picking up the thread located on the index finger, we pull it into a loop, as shown below:
Next, we need to push the threads apart with the help of the thumb and forefinger - so we tightened the loop on the knitting needles! It should sit tight on the tool, but not tight (this is done so that the loops do not slip off, but at the same time they can be pulled over the knitting needles).
We collect the loops to the desired number according to the above scheme.
https://youtu.be/awp0Y95D17g
Lesson four: front loops, edge and garter stitch
How to knit classic front loops
Having completed the set of loops on two knitting needles, carefully pull out one of them. We transfer the first loop from one knitting needle to another without knitting (this will be the edge).
Now we knit the front loop. Gently start the right knitting needle behind the front. the wall of the first loop in the direction from left to right and holding the working thread behind knitting. Like this:
Grabbing a working thread with a pointer. finger in the direction from top to bottom, pull it through the loop and remove the loop just knitted from the previous row from the knitting needle.
We knit in the same way until the end of the current row.
Knitting pattern for beginners
How to knit a simple hem in the form of a pigtail
After knitting the first row, we turn the work and, as we said earlier, the front loop on the wrong side is the wrong side. We remove the first loop, as in the first row, on the right knitting needle without knitting: we insert the knitting needle behind the back wall in the direction from right to left, holding the working thread on the left, as shown in the photo:
We continue to knit the facial loops, as before. At the beginning of each new row, we remove the first loop without knitting. Having connected several rows in this way, we will see a garter stitch pattern (the same on the front and on the wrong side), consisting entirely of front loops. This fabric is quite dense and holds its shape remarkably! Previously, garter stitch was used for knitting patches, from which it got its name.
Important to remember! In order to get a pigtail edge, the first loop of the row, if it is wrong, is always removed without knitting, grabbing the back wall. Here's how it should turn out:
The problem that beginner knitters most often face is knitting too tight. Try to relax your hands, do not rush! Remember that the loops should not walk on the knitting needles with a creak, just like falling off them. Try knitting a small swatch first and keep knitting it until you adjust the thread tension and get a smooth, soft and elastic fabric.
https://youtu.be/Lv0U3-0jjmY
Lesson Five: Closing a Row and Terminating Threads
How to knit a closed row
Today we offer to learn how to close the edge of knitting in a classic way. It is simple in execution and suitable for closing rows on almost any product.
So, we remove the first loop, as before, without knitting, after which we knit the second loop. Here is what we should get:
We go with the left knitting needle in the direction from left to right into the first right loop and pull it in the direction “toward ourselves”, like this:
How to hide the tail of the thread
This is where the knitting needle comes in handy! We need to carefully pull out the last loop of the row, cut off the working thread, leaving about 10 cm, and thread it into the eye of the needle. We insert the needle into the loop and tighten it tightly, like this:
Stretching the thread 4-5 cm, cut off the remnants. Look how neat it turned out!
By the way, in the same way, you can hide the tip of the thread, which we unwind to the typesetting row.
https://youtu.be/z3Rh3D9FR0s
Lesson six: purl loops and stocking knitting
The classic purl stitch is a little more difficult to knit than the front stitch. First we need to dial the loops and knit the first row l. etc., then we turn the knitting and, as usual, remove one edge.
Now we start knitting the purl loops directly: we go with the right knitting needle to the center of the loop, the thread is located in front of the knitting:
We grab the working thread with the right knitting needle and wrap the knitting needle with it clockwise like this:
We remove the loop from the left knitting needle and continue to knit in the same way until the very end of the row.
Purl loop: knitting for beginners according to the scheme
We turn to the front side of knitting again. Looking more closely, we will notice that the first loop in the row is the front one. To make a pigtail edge, we remove it, as before, the first purl ones, only a little differently. We go with the right knitting needle in the direction from left to right and pull it over the front wall.
It is very important here that the edge loops be the same in density: the loose one will not hold the edge, and the dense one will pull it together.
Next, we knit the front odd rows of l. p., and even purl - and. n. The pattern of the canvas, which we will eventually have connected, is called stocking stitch. The front and back sides of the stocking knit look like this:
Lesson Seven: Crossed Loops, Increases, Yarns
Crossed loops
Classic crossed loops will not be an obstacle even for beginner knitters. Basically, they look like this:
In the picture you see the usual loop, slightly to the right crossed to the left and right.
If you want to cross a classic loop, knit it behind the back wall, and if inverted - behind the front.
The front cross is knitted behind the back. Art. In the process of knitting classic. the loop turns and crosses:
To knit the purl crossed, we pick up the loop by the back. Art. and knit classic. way.
Decrease
You can reduce the loops in two ways: by knitting several of them together at once or by reducing them with a broach. Since the first of the methods is the most common, we offer him and learn.
As a rule, in the descriptions, 1 loop is reduced by knitting two at the same time. Decrease happens with an inclination to the left and to the right.
So, for the sample, we need to dial 30 p., After which we perform faces. ch. 4 rows. Now we make reductions: on the right we tilt to the left, and on the left - to the right.
Having removed the edge p., perform 3 persons. n. To obtain a tilt to the left, we knit loops for the back walls: remove the loop, starting the sp. behind the front wall, then we put the loops on the left knitting needle and knit them behind the back walls:
If the description provides purl. reduction, it is performed by analogy. If you knit 2 loops in the usual way, the slope will be to the right, if behind the back walls - to the left.
As you can see, if you follow the instructions in the description and photo, knitting for beginners with knitting needles will not cause any special problems. Smooth loops! .
/ 06.02.2017 at 11:51
Hello, dear knitters, friends and guests of the blog!
I especially want to turn to beginner knitters - those who tried to learn how to knit from the lessons from this blog. Thank you so much for your feedback and comments. Thanks to them, I better understand what exactly may not be clear to you, and, as far as possible, I try to improve the information delivered to you.
This article will rather not be a lesson, but in some way a “guidebook” on how to move on in learning for those who want to learn how to knit, well, let me give you some advice. I think I have the right to do so, based on my almost 40 years of experience as a knitter and those trials, errors and some experience that have been acquired over the years.
But I will also turn to experienced knitters. My dears, if you take the time to read this article, and if you can add something from yourself, or correct me, please write in the comments, share your experience!
This blog contains the most basic things you need to know and be able to learn to knit from scratch. Some initial skills can be learned by stepping through lessons for beginners. So, you already know how to cast on loops, knit front and back loops in different ways. Knit 2 and 3 loops together, yarn over, add loops, close the loops at the end of knitting. In principle, this is already enough to start knitting the first patterns and the first simple things.
More in-depth information and further techniques and "subtleties" are described in the articles of the heading "improving knitting skills". In particular, there you can find a step-by-step master class about displaced loops (or how to knit braids), about elongated loops , armhole design and neck, knitting raglan from the top, and other. Of course, these materials will continue to be replenished, as well as lessons for beginners.
And you can find information about the terms most used in knitting in "Dictionary of terms". Look there too, just in case...
If you are satisfied with the description given in the article - leave this article bookmarked so that you can return, share it on social networks. If something is not clear - do not hesitate to ask directly in the comments to the article - I always try to answer, and in some cases, thanks to your questions, I supplement the article, or eliminate my shortcomings.
And now - some tips for beginner knitters.
About the choice of knitting needles and yarn.
Girls starting to knit now - how lucky you are! Now there is such a huge selection of knitting needles, yarn, and various knitting accessories! When I learned to knit somewhere in the mid-70s, there was a shortage for all this.
I remember that my father made the first knitting needles for me at the factory himself - several pairs of different lengths, but the same thickness (approximately 2.5 - 3 mm) - from durable stainless steel wire, sharpened the ends, and fixed the turned wooden balls on the other ends ... I have these my first knitting needles are still kept, as a memory of the first steps in knitting, and the memory of dad ... It was later that they bought me a set of factory knitting needles.
And the threads? It was not so easy to buy normal yarn in the store, especially high-quality imported yarn - such happiness did not often fall out. Why didn't we knit? Basically, they unraveled old factory items, knitted acrylic braid, dragged thin threads from scarves, connected, tied ... oh!
However, she digressed. So, for starters, I would advise you to take both knitting needles and yarn of medium thickness. Knitting needles 3 - 3.5 mm, in my opinion, are the most convenient for training. It is more difficult to pick up loops with thick knitting needles, they need to be knitted freely, to take thick yarn - it’s difficult to hone the skill, as it seems to me.
You should not take wooden, plastic, bamboo knitting needles. The yarn slides over them worse, they bend in the hands (and beginner knitters can hold the knitting needles with tension). In my opinion, smooth, durable steel spokes are the best place to start!
Take straight or circular - at your discretion. They say that on straight knitting needles, knitting is more even, that is, the loops are smoother. But it can be uncomfortable for me when their non-working ends rise sweepingly along with the knitted fabric - it’s somehow hard on my hands, so I often knit on circular ones. But this is all very individual. And I think it’s better to learn on straight, but not too long knitting needles.
But take the simplest and most inexpensive yarn - preferably woolen, or half-woolen, not slippery (without silk, viscose, nylon in the composition). If you suddenly accidentally miss some kind of loop, on slippery yarn it will quickly unravel down the rows, “shoot an arrow”, like on tights.

However, you should not take fluffy yarn with mohair. On the contrary, it clings to the villi, and if you suddenly need to dissolve the sample (and beginners, and not only beginner knitters, have to do this quite often), then it will be quite difficult to do this, and then the yarn is deformed, becomes thin and with lumps.
And do not take multi-twist yarn at first. This is a yarn in which the thread consists of several thin threads. In knitting, of course, it lays evenly and beautifully, but beginners may have problems when it is difficult to “keep” all the thin threads in the loop at the same time - you can miss one or two threads from the knitting needle and then the knitting gets confused, does not look.
How to read diagrams and pattern descriptions.
 For knitting, there are many different patterns both simple and more complex. To figure out how to knit them, there are diagrams and descriptions.
The descriptions describe in detail, in rows, which loops, how and in what sequence to knit, taking into account rapport(repeating combination), which, as a rule, is marked with "*" signs, or is taken in brackets.
Knitting patterns are more visual, since they better show the relationship between the elements of the pattern. The patterns should be read from right to left, in the same direction as we knit a row. However, it must be taken into account that different loops (elements) can be depicted differently on different diagrams, so you should always carefully follow the legend and explanations for the diagrams.
The set row (row of a set of loops) does not apply to diagrams or descriptions. This is not the first, but, as it were, the zero row, and the first is the one where the loops are already knitted directly. Edge hinges, as a rule, are also not mentioned in descriptions and diagrams. The first loops of the row according to the description or scheme are knitted after, as if for granted, the edge loop. However, there are exceptions, and then the edging is discussed separately in the description.
About some psychological aspects of the knitting process.
 So, the basic techniques are mastered. And how you want to quickly connect something!
My advice to you - do not immediately grab to knit something complex, ornate. Everything has its time. Any needlework requires skills that need to be honed. And they are honed, sometimes, for years, and this process has no boundaries. Everything comes with practice.
If you immediately take on something difficult for you at the initial stage, and you suddenly fail, then some may be disappointed, and the desire to continue studying further may disappear (although this is all very individual).
Therefore, first try knitting samples of various patterns in order, as they say, to fill your hand. If something doesn’t work out, don’t be discouraged: everything will work out, but a little later, or with the next attempts. Start with something that is within your reach so that you can see the result, and it will bring you satisfaction. The process should be fun!
If something doesn’t work out for you, then you shouldn’t get angry, nervous, or draw conclusions that knitting is not for you, and that you don’t have enough patience for this. Knitting causes tension only at first, while you are learning. Later, you yourself will understand how it captures and relaxes. After all, it is not in vain that there is an opinion that this activity helps to relieve stress, relaxation and contemplation.
And when the process reaches almost automaticity, you will be able to do knitting between chores, and combining it with other things. And even the very question “where to get time for knitting?” recedes into the background...
What products to start with?
If we talk about what products to start with, then in my opinion the ideal option is from some kind of scarf: an even, not too wide canvas, and you can choose a simple pattern. So what, what a long and long knit. But the hand is gradually stuffed, the loops are aligned, and at the exit you will get a finished product, about which you can proudly say: “I knitted it myself!” At least here's how this, or this scarves. Or, if for a beloved man - tie English rubber band, will be a win-win option.
In general, do not be afraid to try to knit everything! Well, something complicated did not work out - okay, put it aside for now, and tie something simpler. But just don't give up and don't back down if you want to learn. Remember - practice and patience, combined with your desire, will definitely bring results!
Feel the strength in yourself - start knitting something more complex: children's blouses, hats, some cushion covers, simple clothes for adults, socks ... And for yourself, always know:
there are no things that you can't knit, there are things that you just haven't knitted yet!
Many begin to knit according to ready-made descriptions from magazines. But in my opinion, the description in the magazines is already designed for more or less advanced knitters - much is not explained in detail there. And then infrequently, according to the description, you can get a product that fully corresponds to the sample in size and appearance - you need a very accurate hit with yarn and
Subscribe and get more interesting articles along with gifts and bonuses.
Over 2000 people have already subscribed to the best content of the week
Great, now check your email and confirm your subscription.
Oops, something went wrong, try again 🙁
Hobbies are an integral part of our life. They help put the nerves in order, calm down and relax after a hard day's work. Someone plays the guitar, others read books or paint pictures. Someone chooses knitting - one of the most popular leisure activities in the world.
In the article you will learn:
1. How to choose the right knitting needles?
The quality of the product and the comfort of working with yarn directly depend on the tools you use to knit. Knitting needles should be light, strong, comfortable and match the thickness of the thread.
Types of knitting needles:
1) Ordinary
2) Hosiery
3) Circular
4) Auxiliary
The material from which the spokes are made can be anything: plastic, iron or wood.
Of course, each has its pros and cons: plastic and wood are comfortable and light, but break easily. Aluminum knitting needles are good for everything, but if they are of low quality, then light-colored threads will be stained. Steel spokes are heavy enough to work, but it is almost impossible to break them.
In addition to the material, consider the size of the knitting needles with which you will knit. It is indicated by a number and varies from 1 to 8. The number corresponds to the diameter of the needle in millimeters.
 How to choose knitting needles depending on the thickness of the yarn
 In order for the knitting pattern to be clear and well-fitted, the thickness of the yarn and knitting needles must be the same.
2. How to choose yarn for knitting?
Beginners may be intimidated by a wide range of knitting threads, but everything is simpler than it seems at first glance. Yarn can be either natural or synthetic. Each has its own advantages: the first "breathes" and fits perfectly, the second has a better texture, and it does not "prick" when worn.
On the packaging of yarn, the manufacturer always indicates the optimal size of the knitting needles for these threads. Do not forget: the material must match the tool.
3. Types of knitting
There are only two of them: planar and cylindrical.
Planar. It is performed with two knitting needles and one working thread: the first row goes from right to left (front side), the second - vice versa (wrong side). Scarves, shawls and blankets are knitted in this way.
Cylindrical. Used for knitting socks, leggings, gloves, sleeves and necklines. It is performed with circular or stocking knitting needles, the wrong side is always inside.
4. How to make a set of loops with knitting needles?
It is with a set of loops that any knitting begins. Here we will analyze the simplest and most versatile way, and the more complex and elegant options are best studied with professionals.
The order of the set of loops when knitting
 How to dial loops on knitting needles, a simplified way
 1) We put the thread in the middle of the palm across, leaving the “tail” on the left and the ball on the right.
2) We wrap the upper part around the thumb from right to left and lead to the index finger, grabbing it from behind.
3) We pass the yarn between the second and third fingers, put it on the palm, holding the two tips formed with the middle, ring and little fingers.
4) We connect 2 knitting needles together and pick up the loop on the thumb from top to bottom with them.
5) We continue to move towards the thread on the index finger, prying it from top to bottom, and again thread the tips into the first loop.
6) Remove the thumb while tightening the knot on the right needle.
7) Holding the resulting loop on the knitting needle with the index finger of the right hand, we lower them down towards ourselves.
8) We hook the thread on the thumb from the bottom up from the side of the palm with knitting needles and again stretch it into the loop on the index finger.
5. How to knit front and back loops with knitting needles
All knitting is based on the front and back loops, and depending on the scheme, only their number will have to be changed. There are two main ways to knit facial loops.
 How to knit front and back loops with knitting needles
 Method one. The thread is always kept behind the product. The free needle must be inserted into the middle of the loop and the thread is pulled from the side of the back wall, grabbing it with the needle from top to bottom. Then you need to drop the loop from the left knitting needle.
Method two. The scheme remains unchanged, only now we clasp the working thread from the front wall of the loop.
Wrong side, the first way. We hold the yarn in front of the product, insert the free knitting needle behind the front wall of the loop and transfer the working thread under the knitting needle in the right hand and pull the captured thread into the loop.
The second way. We insert the free knitting needle behind the front wall of the loop and move the knitting needle to the right so that the surface is under it.
6. How to knit an "elastic band" with knitting needles?
This is the most popular type of knitting, without which no work can do. It includes the alternation of two types of knitting: front and back, 1, 2, or 3 loops of each option. They process the necks and sleeves.
We collect the number of loops we need, as we learned to do earlier, we throw off the first loop without knitting it on a free knitting needle, and with the second loop we knit two front ones, then two wrong ones and continue to alternate them until the end of the row, the last loop is always wrong, regardless of the pattern.
7. Decreasing and adding loops in knitting
This technique is used when the fabric of the product needs to be slightly enlarged or reduced.
Reducing loops with an inclination to the right. Having knitted the fabric to the place of the intended decrease, insert the right knitting needle into two loops on the left knitting needle behind the front wall
With a knitting needle, grab the working thread and pull it into a loop.
Following the described sequence of steps, you will get a decrease in loops with an inclination to the right. Using this technique, you can knit an imperceptible decrease when making a V-shaped neckline.
Decrease in the way of two loops together front. Having knitted to the place of decreasing the loops, remove the last loop on the right knitting needle without knitting.
Knit the next loop. Then pull the knitted loop through the removed one.
Adding loops. When the product is already connected until the loops are increased, the thread that is between the loops should be pulled out with a working knitting needle, the so-called broach.
We throw the elongated thread or broach onto the knitting needle on the left. And only then it can be knitted with a front loop, using only its back wall.
8. How to close the loops when knitting?
When the work is almost finished, you need to properly close the loops so that the fabric does not come apart when removed from the knitting needles. To do this, we need to knit the first 2 loops, eventually getting one, then we throw it on the knitting needle.
Next, we need to repeat this movement, only using the resulting loop. Through 2 loops we stretch the thread and get a loop again, throw it on the knitting needle and continue until the end of the row until all the loops are over.
We knit the last one, pull out the knitting needle and tighten the thread.
As you can see, everything is really simpler than it seems at first glance. A competent selection of tools and materials for knitting, a few minutes to master the basic skills of knitting - and now you can already please your loved one with a handmade scarf or even open your own shop of knitted designer items.
Try, knit and you will succeed!
So, how to learn to knit? 8 steps to help knit the first product:
- Choose yarn based on the type of your product (light top, warm scarf or wool mittens)
- Choose the right needles and decide on the type of knitting (determine the thickness and size of the needles, decide whether you will knit in the round or in a straight way)
- Cast on the first row with enough stitches to match the size of your product (see the item about the set of loops)
- Knit, purl or pattern stitches for as many rows as the length of your piece.
- Decrease or add loops if necessary according to the shape of the product.
- Finishing the product, knit an elastic band
- Bind off and finish knitting.
- Gently stretch the finished product and steam it with an iron through cheesecloth or with low iron power
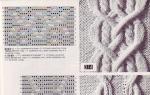
Types of loops and their conditional notation in the pattern repeat:
- Two or more loops together with a face crossed loop
- Three loops together, after swapping the second and first loops
Set of loops of the initial row
Knitting a product or sample begins with a set of loops of the initial row. The loops are cast on two knitting needles folded together. This is done so that the loops of the initial row are easily stretched and it is easier to knit the loops of the next row.
There are many options for a set of loops - from one thread, from two, thickened yarn, with fringe and others. You should choose the type of set that is more consistent with the knitting pattern. Let's take a look at some of the more common methods.
The simplest set
Starting knitting, you need to dial the main loops. This set is formed by using two knitting needles connected together. The thread is measured three times longer than the expected width of the product and placed on the index finger of the left hand so that the thread coming from the ball is between the index and middle fingers. The end of the thread, from the side of the palm, is wrapped around the thumb.
The threads are held in the palm of your hand, and the thumb and forefinger are taken away from each other. Two knitting needles are taken in the right hand and inserted under the loop of the thumb from the bottom up. Then they grab the thread on the index finger and make it through the loop on the thumb (Fig. 202, A).

The loop from the thumb is dropped and the thread thrown over is pulled up to the knitting needles (Fig. 202, B). The first main loop is formed.

The set is continued, the knitting needles are first placed under the loop on the thumb, then the thread is grabbed on the index finger and pulled through on the thumb, the thread is evenly tightened on the knitting needles (Fig. 202, B).
Set of loops with one thread
This set is mainly used in the formation of buttonholes or at the edges of the product, continuing any ledge.

Knitting with a knitting needle is held in the right hand and with the index finger of the left hand they put a loop on the knitting needle (Fig. 203). Thus gain the required number of loops.
decorative set
The decorative set is used in the erasers of mittens or in the collars of jackets and jumpers. It is formed as follows: the yarn intended for the set is folded in half, then it is folded in half and knitting needles are placed in the middle. So, in the middle, the yarn is fourfold.

Three threads are placed on the thumb, one thread on the index finger, the needles remain in the middle (Fig. 204, A). The loop is dialed in two steps.

First, as in a simple set (Fig. 202), the knitting needles are inserted under the loop on the thumb, the thread on the index finger is grabbed, and under the thread on the thumb, the knitting needles with the new loop are pulled to their original position (Fig. 204, B). The second time, the thread around the thumb is wrapped from the side of the palm against itself and the knitting needles are inserted into this loop from above under the thread of the palm.

With the tips of the needles, the thread from the index finger is pulled through the loop of the thumb, the loop from the thumb is dropped and the thread is not pulled too tight (Fig. 204, B).
Double knitting set
Double knitting is typed on a colored thread, which is then removed. At the end of the yarn, a loop is formed into which a knitting needle is placed - a thread on the index finger.

Colored thread on the thumb. The needle is placed under the colored thread, then the yarn is grabbed from the index finger (Fig. 205, A).

Each next loop is dialed like this - first, a knitting needle is passed under the yarn on the index finger, then under the colored thread and a loop is drawn on the knitting needle from the yarn of the index finger (Fig. 205, B).

The first row is knitted as follows: 1 loop is removed without knitting (thread behind the knitting needle) and 1 loop is knitted with facial knit (Fig. 205, B).

In each subsequent row, the removed and front loops are interchanged (Fig. 205, D).
Basic loops

The arc around the spoke forms a loop (Fig. 206). The loop has front and back walls, and the lower arc between the two loops is called a broach. The simplest and the basis for other loops are front and back loops.
The front loop can be formed in two ways: knitting for the front or back wall. Knitting the front loop for the front wall is considered to be "classic". Usually in the literature, under the front loop, this is exactly the way of knitting that is meant, of course, if there is no reservation that this should be done differently.

front loop knit as follows: the right knitting needle is inserted into the loop in front of the front wall on the left knitting needle, the thread is grabbed under the knitting needle of the right hand and pulled through the loop. The new loop remains on the right needle (Fig. 207 A).

Purl loop , as well as the front one, can be knitted in different ways. The right needle is inserted into the loop from right to left under the front wall. The thread is grabbed from above and pulled through the loop (Fig. 207, B), the new purl loop remains on the right knitting needle.
There are other ways of knitting front and back loops, but with them a pattern is formed well only from the front and back loops. When knitting other types of patterns, the loops lie in a different direction than with the "classic" method of knitting front and back loops.
flat knitting
Sweatshirts, jumpers, scarves, scarves and other products are knitted on two knitting needles, one row is knitted from right to left (front side of the product), and the other back (wrong side of the product). Therefore, if it is necessary to get the front surface, then they knit it with front loops, and back - the wrong side - with purl loops.

Figure 208 shows the front and back sides of knitting.
Cylindrical knitting
When knitting socks, mittens, skirts, jumpers on five or circular knitting needles, there are no reverse rows. When knitting on five knitting needles, first they pick up on two knitting needles together the same number of loops that are supposed to be knitted on one knitting needle, then pull one knitting needle from the set, put them together again and dial for the second knitting needle. Do the same with the third and fourth spokes. When the required number of loops is dialed on 4 knitting needles, they start knitting in a circle with the fifth knitting needle.
Beginning of knitting
Facial knitting forms a one-sided pattern. This knitting is also called hosiery, its front side is the front surface, the wrong side is the wrong side.
If the product starts with the front or wrong side, then in both cases the edge is wrapped on the front side. Therefore, usually the product starts with a double-sided pattern that does not twist.
If the product is supposed to be knitted with facial knitting, then the lower edge is knitted with cloves or purl loops.

1 way: 5-10 rows are knitted with a stitch, then one front row is knitted like this: 2 loops together with a front loop, 1 yarn over (the thread is placed on the knitting needle away from you, (Fig. 211). Then the same number of rows are knitted with the front stitch as it was before the openwork row. The chain of the set is cast on an additional knitting needle and the product is folded along the line of openwork (teeth).Before each loop, one loop of the chain of the set is placed on the knitting needle and knitted together with the front loop.Make sure that the loops coincide vertically, otherwise the edge of the product will be skewed.If desired, the edge you can not knit, but hem.
2 way: 5-10 rows are knitted with front stitch, then one row on the front side is knitted with purl loops, then the same number of rows are knitted with front stitch as it was before the wrong side. On the wrong side, the knitting is folded and tied or sewn in the same way as in the previous case. Then continue the front pattern.
Having learned to knit only two types of loops (front and back), you can master any type of knitting. First, the simplest, and then more complex patterns, you will find in the "Patterns" section.
Edge or edge loops
Edge loops do not participate in the rapport of the pattern. After counting the loops for the pattern, regardless of their number, two more loops are added, which serve only to form the edge.
The edge of the product can be knitted even (pigtail) and with knots.
Smooth edge (Fig. 209, A).

1st way. At the beginning of knitting a row, the edge loop is re-shot, while the working thread is in front of the knitting needle. The last edge loop is knitted front.
2nd way. At the beginning of knitting a row, the edge loop is re-shot, while the working thread is in front of the knitting needle. The last edge loop is purl-knitted.
Edge with knots (Fig. 209, B).

At the beginning of knitting a row, the edge loop is re-shot, while the working thread is behind the knitting needle. The last edge loop is knitted front.
Fastening loops

After the knitting of the product or sample is completed, the last row of open loops is fixed. You can do this in two ways.
1st way- using a knitting needle (Fig. 210). The edge first loop, as usual, is re-slipped onto the right knitting needle untied. The next loop is knitted with the front one, then the previous loop is pulled off with the end of the left knitting needle, and the right knitting needle is pulled through the front one. After that, the drawn loop is dropped and repeat all over again until the end of the row. The thread is cut off and pulled through the last loop, thereby securing the knitting.
2nd way- with a needle. Leave the end of the working thread about three times longer than the cloth to be closed and make it into the needle. The needle is passed into the extreme loop of the last row of loops from the front to the wrong side, then into the 2nd loop from the wrong side to the front and the working thread is pulled through these three loops. After that, the needle is inserted into the 1st loop from the front side to the wrong side and into the 3rd loop from the wrong side to the front, etc.
With this fastening of the loops, the last row stretches just as well as when fastening the loops with knitting needles, only pigtails do not form.
Types of loops and their conditional notation in pattern repeat
Facial loop (Fig. 2).

The end of the right knitting needle is inserted into the loop on the left knitting needle from left to right, grab the working thread behind the knitting needle and pull the loop towards you.
In the rapport of the pattern, write down: 1 front.
Facial crossed loop (Fig. 3).

The end of the right knitting needle is inserted into the loop on the left knitting needle from the right to the left, grab the working thread behind the knitting needle and pull the loop towards you.
In the rapport of the pattern, they write down: 1 facial crossed.
Purl loop (Fig. 4).

The thread is thrown on the left knitting needle. The right needle is inserted under the working thread and into the loop from right to left, grab the working thread in front of the knitting needle and pull the loop away from you.
In the rapport of the pattern, write down: 1 Purl.
Purl crossed loop (Fig. 5).

The thread is thrown on the left knitting needle. The right knitting needle is inserted under the working thread and the loop on the left knitting needle from back to front from left to right away from you, grab the working thread in front of the knitting needle and pull the loop away from you.
In the rapport of the pattern, they write down: 1 Purl crossed.
Two or more loops together front (Fig. 6).

The right knitting needle is made in two or more loops on the left knitting needle from left to right, grab the working thread behind the knitting needle and pull the loop towards you.
In the rapport of the pattern, they write: 2 together with the front.
Two or more loops together with the front crossed loop (Fig. 7).

The right knitting needle is made in two or more loops on the left knitting needle from the right to the left, grab the working thread behind the knitting needle and pull the loop towards you.
In the rapport of the pattern, they write: 2 together with the front crossed.
Two loops together, the first is turned (Fig. 8).

With the end of the right knitting needle, first turn the first loop on the left knitting needle, and then knit it like two loops together with the front crossed.
In the rapport of the pattern, they write down: 2 together with the front, the first is turned.
Two or more loops together with a purl loop (Fig. 9).

The thread is thrown on the left knitting needle. The right knitting needle is inserted under the working thread into the loops on the left knitting needle from right to left, the working thread is grabbed in front of the knitting needle and the loop is pulled out.
In the rapport of the pattern, they write: 2 together wrong side.
Two loops together with a purl crossed loop (Fig. 10).

The thread is thrown on the left knitting needle. The right knitting needle is inserted under the working thread into the loops on the left knitting needle from back to front from left to right towards itself, the working thread is grabbed in front of the knitting needle and the loop is pulled out.
In the rapport of the pattern, they write: Two purl crossed together.
Three loops together, having previously swapped the second and first loops (Fig. 11).

With the help of an additional knitting needle, the second and first loops on the left knitting needle are interchanged so that the second becomes the first and, when knitting the loops, closes the edge ones together. Knit loops as with the front crossed.
In the rapport of the pattern, they write down: 3 together, swap the second and first.
Nakid (Fig. 12).

The end of the right knitting needle grabs the working thread from top to right to left over. The loop thrown over the knitting needle is held with the index finger of the right hand, the next loop is knitted.
In the rapport of the pattern, they write: nakid.
To form an openwork and add a loop in the next row, the yarn is tied with a front or back loop.
When knitting in the next row, the yarn is not formed with a front crossed or purl crossed loop, only a loop is added.
The yarn is reversed (Fig. 13).

The right knitting needle grabs the working thread from the bottom left to the right away from you. The loop thrown over the knitting needle is held with the index finger of the right hand, the next loop is knitted.
In the rapport of the pattern, they write: reverse crochet.
To form an openwork in the next row, the yarns are knitted with a front crossed or purl crossed loop.
When knitting in the next row, the yarn over with the front or back loop does not form an openwork, only a loop is added.
Double crochet (Fig. 14).

Two yarn overs are made with the end of the right knitting needle. To add loops in the next row, knit the right yarn over with the front one, and the second one with the wrong loop.
In the rapport of the pattern, they write down: 2 crochets.
Air loop (Fig. 15).

They form a loop from the working thread, throw it on the right knitting needle.
In the rapport of the pattern, they write down: 1 air loop.
Loop from the underlying row (Fig. 16).

The end of the right knitting needle is inserted into a loop located one or more rows below the one being knitted, the working thread is grabbed and the loop is pulled out. The loops located above the newly formed loop, depending on the pattern, are discarded or knitted.
In the rapport of the pattern, write down: 1 front from the loop of the underlying row.
Loops from the gap between the loops of the underlying row (Fig. 17).

The end of the right needle is inserted under the horizontal thread between the loops of the underlying row, the working thread is grabbed and the loop is pulled out.
In the rapport of the pattern, write down: 1 front from the gap between the loops of the underlying row.
Two are knitted from one loop (Fig. 18).

The loop on the left knitting needle is knitted twice - once with the front, and the second with the wrong loop, after which it is dropped from the knitting needle.
First, knit the second loop of the front crossed behind the knitted pattern. Without removing it from the left knitting needle, knit the first loop with the front one, then discard the loops from the left knitting needle.
In the rapport of the pattern, they write: First, the second loop behind the knitting needle, then the first.
Moving the loop with an inclination to the right (Fig. 21).

First, knit the second loop of the front (or purl) in front of the knitted pattern. Without removing it from the left knitting needle, knit the first loop of the front (or wrong side), then the loops from the left knitting needle are discarded.
In the rapport of the pattern, they write: First, the second loop in front of the knitting needle, then the first.
Moving several loops with an inclination to the left (Fig. 22).

When moving several loops, the order of their knitting changes. The required number of loops is re-shot for additional. knitting needle and leave it in front of the knitted pattern. Then several loops are knitted in the usual way, after which loops are knitted with additional. spokes.
In the rapport of the pattern, they write down: 2-3 loops are removed for additional. knitting needle in front of the pattern.
Moving several loops with an inclination to the right (Fig. 23).

Loops for moving are reshooted for additional. knitting needle and leave it behind the knitted pattern. Then the required number of loops is knitted from the left knitting needle, after which loops are knitted with additional. spokes.
In the rapport of the pattern, they write down: 2 loops are removed for additional. knitting needle behind the pattern.
Elongated loop (Fig. 24 A and B).
If the loop is removed from the left knitting needle to the right knitting needle, then it will take two rows in height; if this loop is left untied in the next row, it will increase even more, i.e., it will stretch out. The working thread, depending on the pattern, will pass behind or in front of the elongated loop.

In the rapport of the pattern, they write down: 1 loop is re-shot, the working thread behind the pattern (Fig. 24, a) or:

1 loop is re-shot, the working thread is in front of the pattern (Fig. 24, b).
If several loops are removed in a row and in several rows, then segments of thread are formed, which can serve as a decoration for the front side of the product. Then one of the loops of the previous row is knitted under the pieces of thread (Fig. 25).

In the rapport of the pattern, write down: 1 front (purl) under the pieces of thread.
An elongated loop with a crochet (Fig. 26).
They make a yarn over, and then the loop is re-knitted from the left knitting needle to the right. The working thread is on the needle along with the removed loop.

In the rapport of the pattern, they write down: yarn over, 1 loop is re-shot (Fig. 26 a).
In subsequent rows, depending on the pattern, you can reshoot the loop and yarn over unknitted, after making a yarn over.

In the rapport of the pattern, they write down: 1 yarn over, yarn over and loop are re-shot (Fig. 26 b).
In subsequent rows, yarn over and loop are knitted.

In the rapport of the pattern, they write down: 1 front together with crochets (Fig. 26, c).
Twisting loop (Fig. 27).

The right needle is directed to the gap between the loops on the left needle (for example, between the 3rd and 4th), grab the working thread from front to back and pull out a long loop. Depending on the pattern, it is knitted in the same row with the next loop or in the next row, while maintaining the dialed number of loops.
In the rapport of the pattern, they write down: they pull out a long loop from the gap between the 3rd and 4th loops.
Enlarged loops (Fig. 28).

The right knitting needle is directed into the loop and two or more turns (yokes) are made clockwise depending on the pattern, and then the loop is pulled out.
In the rapport of the pattern, they write down: 1 increased front loop with two crochets.
In the next row, the crochets are dropped, due to this the loop increases.
Loop stitches (Fig. 29).

With the right or left knitting needle, depending on the slope of the stitch, they pick up the desired loop (according to the pattern, it can be enlarged, elongated, etc.), pull the adjacent loops into it and throw it from the knitting needle to the loops. The thrown loop looks like a stitch.
In the rapport of the pattern, they write down: the first two are pulled into the 3rd loop.
In the descriptions of patterns, the knitting of the previous row is often repeated.
In the rapport of the pattern, they write: they knit according to the pattern. This means that they do knitting not in the way the rapport is written in the previous row, but as they see it when knitting a row, that is, if they see a loop being knitted with the front, then they knit it with the front, if it is purl, then they knit it with the purl.
If there are yarns, but it is not indicated how to knit them, then they are knitted on the front side - front, on the wrong side - with a wrong loop.