Crafts for March 8 are complex. Flower "bed" made of paper. Flowers from scrap materials
Hello dear friends!
The long-awaited spring will come very soon, which means that the most feminine holiday is approaching - March 8. And as a rule, every kindergarten prepares a congratulatory matinee for mothers, grandmothers and sisters, in which the child gives a gift in the form of handicrafts, made with his own hand for his beloved and dear women! And these gifts are made with the children - educators, they help to make wonderful works for the kids, which will undoubtedly move to tears, of course, the tears of joy of their mothers.
And I have prepared an interesting selection of beautiful crafts, for different groups of kindergarten, choose and create beauty, and this selection of ideas will also be relevant for mothers who want to make crafts with their children for a gift to a grandmother, a nursery school teacher, aunts and sisters.
Choose the most beautiful work and create with pleasure with your crumbs, as well as do not forget to cook together delicious for the holiday.
Craft for March 8 in kindergarten from plasticine and corrugated paper
Of course, a bouquet of tulips will be the most appropriate gift for this day.

We need:
- plasticine (old is fine);
- glue stick;
- scissors;
- plastic spoons - 9 pieces;
- disposable cup;
- corrugated green paper;
- red and white paper napkins.
Stages of work:
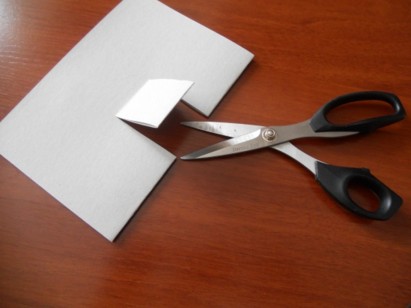
We form a large layer of plasticine and place it inside the glass. So that the bottom is completely covered.
We cut the napkin into two parts. As a result, we get two red two-layer squares. We coat one of them with glue. First around the edges, then in the middle. It is necessary to do this very carefully, otherwise the square will simply burst.
Place the plastic spoon on the napkin, diagonally.


For a whole flower, you need to make three of these petals.
Roll a small ball from the plasticine so that it can fit inside the spoon. If you are using new plasticine to make a ball, you will need about half of a brick.
We put a plasticine ball into one of the petals.

Thus, we attach two more petals. We get one tulip. Remember to fix the bud near the beginning of the handle.

Now let's start making the flower stem. Cut out a small strip of corrugated paper and coat it with glue.

We wrap the handles of the spoons with paper. We start from the place where we tied our bud.

The red tulip is ready. Thus, we make two more flowers: red and white. Then we decorate them with leaves and insert them into a previously prepared vase glass.
A bouquet of tulips is ready. And here are a couple of similar ideas:


Making paper flowers for mom
A very light bunch of flowers. Small children will like making such a bright gift.

We need:
- ruler;
- scissors;
- paper glue;
- simple pencil;
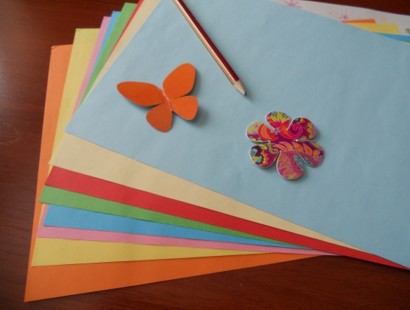
- double-sided colored paper.
For the grass we will use 2 green leaves. And for flowers - any tones you like.
Stages of work:
First, let's make the base. Fold the green sheet of paper in half. Measure 6 cm from the opposite edge of the fold of the paper and draw a line.


Carefully cut the perpendicular strips. From the fold line to where we drew the very first strip. We make another, exactly the same, blank.
So that the remaining lines of a simple pencil are not visible, we turn the sheets of paper over to the opposite side. Then we glue our blanks into one sheet.

Grease one of the uncut edges with glue. And we attach the second side to it. As a result, we get green grass. As we already remember, the pencil marks remained inside.

We twist the paper grass in the form of a small flower bed. We glue the outer edge so that the structure does not turn back. Now we straighten it and make it more magnificent.

Let's start making flowers. You can just cut them out. But if you want them to be the same size, make a template.

We draw a flower, cut out and trace according to the template. As a result, we have twelve flowers.

To make the circle even, take a cap of glue stick and circle it with a pen.
Now we cut out the middle and glue them to the flowers.
To decorate the bouquet we will make a bow. To do this, cut out four yellow stripes. One: 1.5 cm wide and 30 cm long.And three more: 1 cm wide and 15-20 cm long.
We coat the largest strip with glue and glue it to the middle of the base of the flower bed. This will be the ribbon of the future bow.

Take one of the remaining strips and coat the edges. And now we bend them to the middle, with a little overlap. So we do it with two more strips.

Next, re-coat the middle of the bows and glue them on top of each other. As a result, we have a beautiful yellow bow. We glue it to the yellow strip. Finally, we glue the previously prepared flowers.
Here is another version of this craft, but with the addition of leaves.

DIY gift for March 8 for the second younger group
Even the smallest children can make such an easy flower.

We need:
- toilet paper cardboard sleeve;
- glue stick;
- a flower made of red cardboard;
- two green sheets of paper;
- green felt-tip pen;
- scissors;
- a strip of green paper (to wrap the core).
Stages of work:
Let's start gluing the green strip. It should be slightly wider than the sleeve itself. 1.5 cm on each side.
We coat the green paper with glue. We put the sleeve on it and wrap it up. Now we fold the paper on both sides, inside the sleeve.

Now we decorate the leaves. To do this, draw veins on them with a green felt-tip pen. Then we bend each leaf by about 1.5 cm.

We coat the bent corner with glue, on the front side of the leaf, and attach it to the green stem. We make an incision above the leaves, about 1 cm on each side.

Insert a red flower into the resulting cuts. If you dream a little, you can get such interesting options for this craft.


Making a lily from cotton pads to the kindergarten by March 8, 2019
But I also found a simple option for creating a volumetric applique, children of the middle and younger groups will cope with this work. Calla lilies can be made according to this principle, they also turn out to be very beautiful!
Craft from salt dough for children of the older group
And of course, do not forget about crafts made from salt dough. Today we will make these flowers. Even a child can make them.

We need:
- salty dough;
- brush;
- watercolor.
Stages of work:
First you need to prepare the dough. Mix: A glass of flour, half a glass of salt and the floor. glasses of water. Mix everything well. The dough should come out soft and pliable, but not stick to your hands.
For small children, molding from salt dough is much easier than from plasticine. After all, you do not need to knead it for a long time in your hands to warm it up.
Remember to put the dough in a bag so it doesn't dry out.
Now let's start making flowers.
Roll a bun out of half of the dough and place it on a piece of cardboard. Now you need to flatten it into a layer.

Roll the sausage from the second half. We cut it into small pieces. Roll a ball out of each.
Flatten the first three on a large layer. These are the future centers of flowers.
Before gluing all parts, grease the dough with water.
Now we roll three elongated droplets. We attach to the main part, with the narrow side out. We draw veins on them. And in the middle of the flowers there are small holes. This will make the flowers look more realistic.

To make the patterns come out even, you need to sharpen the end of the brush.
Then we form flowers from the remaining balls. In the middle of each flower petal, make a couple of folds.

It remains only to decorate our craft.

After that, dry it in a microwave oven or oven. At the smallest power, no more than five minutes. This will make the product more durable than drying it on batteries.
You can decorate the refrigerator with such a gift if you attach a large magnet to the back.
How to make a 3D postcard for March 8
A good present for World Women's Day will be such a 3d postcard.

We need:
- scissors;
- black marker;
- glue;
- sequins;
- double-sided cardboard in three colors: yellow, green and fuchsia.
Stages of work:
And cut out the yellow cardboard square 15 by 15 cm.Fold it in half, then again. As a result, we get a smaller square.

We bend one half of the sheets in the form of a triangle.

We also do from the second.

With scissors we round off one edge of the triangle and get a petal connected to the rest, on both sides.

We expand it in the form of a flower. In the middle, draw a small circle with a marker and paint over it with black. Then carefully cut off one of the petals.

We glue the petal on the edge with glue and glue the opposite one on it. We get such a voluminous flower.

We coat the middle, near the black mug, with transparent glue and decorate with sparkles. Turn the flower over to remove excess sparkles. We also make seven more flowers.
Now we bend them in half and glue three flowers together. The picture shows the places that need to be coated with glue.

We apply glue to the places that are also highlighted in orange.

We glue another flower.

We attach two more flowers. The places to be lubricated are also indicated.

We only have one yellow flower left. We glue it on top of the entire composition.


Finally, fold the fuchsia cardboard in half. We glue inside it, first one side of the composition, and then the other.

We unfold the postcard and we get a voluminous bunch of yellow flowers. Here's a card with a surprise.
The most beautiful gifts with patterns and templates for International Women's Day
Mom's paper shoe
Inside you can put sweets in a beautiful bag or a small souvenir.

All you need to do is transfer the drawing from the provided stencils to velvet paper.
This is the main part of the shoe:

And this is a flower and a heel:


We collect the shoe and glue it. We decorate according to your wishes.
True, an amazing craft turned out, and mothers will be simply delighted!
DIY round paper cake
And in a box in the form of a piece of cake, you can put sweets as a gift and write a note with affectionate words and wishes, I would definitely be delighted with such a present.

And here is the template for making a cake

We transfer it to beautiful, colored paper, only draw or print on the inside of the cake.

Now we need to carefully cut out the part and bend along the dotted lines, and glue the free edges. Decorate the top of the cake with flowers, beads, buttons and other beautiful details.

And if you have enough time, you can make a whole cake!

Holder for charging the phone to the socket
And also a hand-made mobile phone holder during recharging will be a cool gift for mom. A very practical gift that mom will often use and the phone will be in its place!

And here is the scheme by which this useful little thing is made

Now we need to cut out a semicircle, look carefully at the picture, everything is shown there:


You can color it in another way, for example, draw bouquets of flowers, the number 8, in one word, depict the theme of March 8.
You can also just print the pictures and let the kids color them themselves:


But what a beautiful postcard you get for your grandmother:

These are not complicated gift options presented in our article. The child will cope with many of them on his own. A little help from a caregiver may be needed. But still, be sure to try at least one of the presentations by March 8th.
And I wish that the children would succeed, and their crafts would please the mothers and grandmothers, as well as that they themselves were delighted with the work done!
Hooray! Hooray! March 8th is coming soon! - dream of the fair sex. On this day, they will receive congratulations from men of all ages. It is impossible to imagine this day without flowers, gifts and ... handicrafts.
Always on the eve of this holiday, children in kindergartens and schools embody their creative talents by making crafts for their mother, sister or grandmother with their own hands, and then look forward to the opportunity to present them. For example, as a child, I could not wait for the holiday and gave all my handmade gifts much earlier. And then she sat down again to sculpt, glue and paint new ones, inspired by the lavish praise for her creative efforts.
Children make crafts with pleasure. Thanks to this activity, they can not only congratulate someone in an original way, but also develop fine motor skills of the hands, concentration and creativity.
Beautiful crafts can be made from anything. Nowadays, there are many bright and interesting materials available. Whole shops are dedicated to hand-made art. Today we will consider several successful ideas for crafts that children can make from improvised and purchased funds on their own or with the help of adults.
Kids learn a lot in kindergarten. Before the holidays, they learn to make gifts on their own.
Any gift should be beautifully wrapped. Children even from the younger groups of kindergarten can cope with this craft.
Souvenir sweets:

For manufacturing, you need simple materials:
- Cardboard tubes. You can use toilet paper, kitchen foil, and more.
- Wrapping bright paper.
- Threads, scotch tape.
- Jewelry, sequins.
- Small pre-assembled gifts.
To begin with, let's prepare the basis for future packaging - tubes. We will clean it from the remnants of paper, cut it into pieces.

You also need to prepare small gifts. They must fit freely within the tube diameter.

Cut the wrapping paper into pieces and wrap the tubes with them.

If necessary, fix the paper with glue so that the candy does not unfold ahead of time. From one edge of the candy, carefully tie the paper with a beautiful ribbon.

Now it remains to fill the candy with gifts and decorated items, and tie the second edge of the paper with a ribbon.

The process of making souvenir candy takes a little time, and even small children can cope with this task, of course, adults should help them.
Older children (schoolchildren) can set the problem a little more difficult. Almost all adults have mobile phones and mom will be happy to carry her smartphone in a case made by her beloved child.

To do this, children need to know the size of their mother's phone and prepare in advance pieces of felt of beautiful colors, buttons and threads.
First you need to cut the main piece of felt onto the cover. When calculating the size of the future cover, keep in mind that the side seam will take 5 mm. fabric on each side. You need to add 1cm per seam to the width of the phone.
Fold the main piece of fabric in half and sew on both sides (side and bottom) with threads, as shown in the image below.

From felt of bright colors, you need to cut out several small flowers.

Sew the prepared flowers onto the cover using buttons. The original gift is ready.
You can also make a stylish necklace for your mom or sister with your own hands.

This does not require any special skill and does not require rare expensive materials. All you need is:
- Multi-colored threads.
- Thin rope.
- Clasp for jewelry.
- Transparent glue.
- Wire.
First, you will need to cut the rope to the required length. If you do not have a clasp on the necklace, then the section should be long enough so that the necklace can be worn over the head.

On the rope, you need to fix the thread with a knot and glue it. Carefully wind the colored threads in 2-3 cm lengths on the rope, tie the thread and fix it with glue for reliability, as in the picture below.

Do the same with a different color of thread. After that, wind the thicker dark thread in a criss-cross on the side, as shown in the image below.

Tie the edges of the dark threads to the rope with a wire, the ends of which must be carefully cut off and pressed against the inside of the rope.

Now we are preparing tassels from the same threads that we wound around the necklace.

We cut the bundle and tie it with a thread.

Tie fluffy tassels to sections of the thread of the corresponding color.

All that remains is to secure the clasp or tie the rope with a neat knot.

Thanks to simple instructions, kids will prepare a stylish and beautiful gift.
Ideas and templates for voluminous cards made of colored paper and cardboard
In addition to gifts and flowers, any woman is pleased to receive a postcard from her child. Consider several options for making voluminous greeting cards.
A card for mom can be made from the following materials:
- Ready-made elements (you need to print and cut them according to the templates below).
- Double-sided tape.
- Glue.
- Colored paper (decorative) for the base.

First, print the image below, with all the necessary elements.

Now you need to carefully cut out all the elements and the envelope for the bear from paper.

In several places of the silhouette, stick double-sided tape.

Now the elements of the paws and the head of the bear need to be glued to the scotch tape in the appropriate places, and the silhouette of the bear itself must be glued to the base of colored paper.

As a result, you should have a voluminous postcard.

Now it remains to fold the envelope,

glue it with tape and fix a flower made of colored paper in the middle.

Glue the envelope under the bear's paws.

It remains only to write a congratulation and hand it to mom.
You can make beautiful postcards using stencils. Below are a few templates that you can use.
Here is such a voluminous postcard you can make.

There is a ready-made template for it, you can print it.

You can also cut openwork butterflies from the inside.

or these flowers.

The result will be like this

and such a voluminous postcard.

With a little practice, you can end up with all sorts of options.
Check out a few more options for postcards made from colored paper. For example, this one:

Or like this:

Kids will love making these postcards.

Here is such beauty:

Elegant bouquets of flowers:

Turn on your creative imagination, and you are sure to get an original postcard.
Crafts for kindergarten with children
A beautiful bouquet made of colored paper is very well suited for a kindergarten.

For the craft, you need to prepare glue, scissors and colored paper.
Let's start by preparing the foundation. Fold a sheet of colored green paper in half along the long side, glue the edges with glue, and make "fringe" cuts at the bottom. Roll the workpiece into a tube and glue it with glue so that it does not unwind.

The next step is to cut the flowers out of different colors of paper. After that, it remains to glue them to the improvised stems and leaves.

Check out a few more options for simple crafts below.

A flower on a paper plate above.

Flowers from corrugated colored paper.

Bouquet on the palms.

Take these ideas, it will be fun to make them with children, and mothers and grandmothers will love the gifts.
Paper flowers for March 8, made for mom and grandmother by children
Not only men can give flowers to women. Little kids can do it too. From the materials at hand, they get beautiful bouquets of flowers. Below we will consider several options for self-production.

For such a craft, you will need the following:
- Glue.
- Scissors.
- Stapler.
- Colored and openwork napkins.
- White paper.
- Decorated ribbon.
First of all, we will deal with the preparation of packaging for the bouquet. To do this, fold the lace napkin in half. Try to match the patterns.

After that, let's fold it again.

Now unfold the napkin and cut out a quarter of the napkin along the lines.

Make several cuts in the center.

Lubricate the edges with glue and form a napkin with a cone and secure.

You will need to make a pen out of plain paper. To do this, fold a sheet of paper in half, and then cut it into two equal parts along the line, as shown in the image below.

Roll the pieces into a roll and glue them.

Now carefully insert the roll into the hole in the middle of the napkin and fix it with glue.

To make flowers, we need colored thin napkins.
First of all, fold the napkin in half twice.

At a slight angle, start rolling the napkin. You should have a bud that needs to be secured with a stapler.


Thus, several buds need to be prepared. Then cut out squares from a green napkin.

Make a neat cut in the middle, as shown in the photo.

Now you need to insert the bud and fix it with glue.

When all the elements of the bouquet are ready, they need to be assembled into a coherent composition. To do this, grease the buds with glue and fix them on a cone-shaped package.

The handle of the bouquet can be decorated with a beautiful ribbon. Even small children can make such a bouquet.
A beautiful bouquet can be made from candies and paper.

For crafts you need to prepare:
- Wooden skewers.
- Chocolate candies.
- Duct tape.
- Scotch.
- Colored corrugated paper.


From corrugated paper, you need to cut 27 strips 4x15 cm.As a result, you should get 9 tulips, that is, 3 petals for each flower.

You also need to cut 9 strips of green paper. Size 2-25 cm.

You will also need to cut a long strip of 1 cm wide from green paper.It will be needed for wrapping.

Now you can start making flowers. Twist the red strip in the middle. Then fold in half and gently pull both ends to create a convex volume.

You get these petals:

On a skewer with sweets, it is necessary to fix 3 petals each, forming a bud. You can secure the base of the flower with tape.

Wrap a wooden skewer with green stripes.

Here they are in finished form:

To make leaves, the strips of green paper must be twisted in the middle, folded in half, and double-sided tape must be fixed to the bottom edge, and then fixed on a skewer.

A beautiful bouquet of corrugated paper tulips is ready.

You can make crafts for the holiday with your own hands from any materials at hand. You can use the ideas from this article, as well as turn on your imagination, and come up with something original.
Or a little sister. These people play a very important role in their lives, therefore making for them becomes a matter of particular importance for kids.
You can take part in the preparation for the holiday by holding a small master class - for children this help will be simply invaluable: they will learn how to create simple, but cute crafts, and based on this skill, they will be able to make one that seems most suitable for the occasion.
For example, if you teach children how to make bouquets of corrugated paper tulips, they can congratulate a dear person with such a bouquet or create a more complex composition based on it.
All that is needed for work is green and red corrugated sheets and scissors. Instead of red paper, you can take paper of any other sufficiently bright, contrasting color - for example, orange or yellow.
First, we show the kids how to cut a fairly wide strip out of a green leaf.

Then we bend this strip in half (lengthwise) and invite the kids to do the same.

Now we cut with scissors the edge along which the fold passes. This, at first glance, easy task may require a lot of patience and perseverance from children.

If done correctly, the result is a green corrugated accordion.

Carefully, along the incisions, we roll this accordion into a roll.


We fix the bundle with a thin strip of the same green, tightly pulling its ends and tying them with a double knot. You can use a thin thread or a piece of wire.

We turn the bundle into the base of the flower bouquet, bending its notched ends to the sides.

Now we cut out the tulip heads from red paper. To make several heads at once, fold the paper with an accordion. Toddlers can draw heads on paper.

We insert these heads into the base of the bouquet - tulips with leaves and stems are obtained.

To make the bouquet stronger, you can fix the flower heads with glue.


With our own hands, we turned pieces of an ordinary corrugated sheet into a lush, colorful, spring bouquet, which any woman, regardless of age, will be happy to receive.
Hello everyone who came to my blog today! How is your mood? I hope it's fun and you're doing well. After all, another season will soon come, and with it will come the spring holiday International Women's Day. And we will be happy to congratulate all women on this day.
Let's present mothers and grandmothers with beautiful and original crafts that will be done with care and love.
Of course, you can make a bunch and shower them on your favorite girls and sisters. And you can make gorgeous bouquets of flowers or make original postcards and souvenirs. You will learn all this from this article, so let's go ...
What can you make crafts from? Of course, from the materials at hand that you always have at hand, let it be paper, cotton pads and a bunch of napkins. After all, the main thing is to come up with, and then realize the idea in reality.
I really liked this kind of craft that you can give your mom - this is a flower. Moreover, it is made of paper, but look how magical it looks in this pea.
You will need corrugated paper, and it will need to be cut into small squares, they should all be the same.

And then glue it to the base using the facing method. You can also make the base from a long strip of paper, twist it into a tube and glue it. After that, twist each piece of paper prepared for this case on a rod and glue it to the base.

Make petals and take any flower pot, you can fill it with plaster or come up with something else.

Be creative and you will succeed.

Using this technique, you can make a different look.

If you want to find a more delicate option, then make the number 8 out of satin ribbons and you can even hang it on the wall. Here, of course, certain skills are needed to perform such beauty in the style of a kazanshi.

Using the quilling technique, you can also build a real spring masterpiece, see for yourself.

Such a work looks awesome and very original, even your teacher will be delighted to receive such a gift.

The most common children's souvenir is a postcard in the form of tulip flowers or some other.

I also liked this basket-magnet on the fridge, cool, don't you think?
Or a small multi-colored meadow like this.

Of course, it was not without vytynanka, my favorite type, who needs a template, write, I will send it for free. So gorgeous and not at all difficult, literally five minutes and your masterpiece in the form of an openwork figure eight will stand on the table and you will not take your eyes off it.

There is an even easier option, from ordinary strips you can make such a wonderful bunch, both a kindergarten child and a schoolchild can do it.

You can use an applique, make a vase or basket template, decorate it with leaves and flowers.

Dads, remember they gave them when they were preparing for February 23, you can overpay this idea here. How do you look at it?

For the next great idea, you will need material, namely felt, a needle and thread, and scissors. You can create such a magical and bright bouquet.

First, make a base like this, you can also use a satin ribbon for fixing.

Cut the flowers out of felt, and the bead will be the center.

In principle, instead of a bead, you can use something else, multi-colored pebbles or sparkles.

I was also captivated by such a soft pink charm, and why go to the store when you can make a miracle yourself. It looks like an orchid, well, just cool!

Volumetric postcards made of paper and cardboard
On this day, all daughters and sons delight their mothers and grandmothers with glorious gifts, present them with postcards that they made themselves in labor lessons or in kindergarten. These can be done quickly and at the same time beautifully.
I suggest you make such a nice greeting card out of corrugated paper with the children, it will also look voluminous, take a note. You can use this step-by-step master class in the senior, preparatory group or primary grades. You will get a bunch of roses or wildflowers.

We need:
- cardboard
- corrugated paper
- satin tape
- openwork baking napkins

Stages of work:
1. Take cardboard, preferably blue, light blue or green. Then glue a napkin to it below the center.

2. Cut strips out of corrugated paper and place it on a pencil or pen and start curling, as shown in this photo.

3. And then draw out, pull off the pencil, like an accordion.

4. Spiral to make something that looks like an open bud.

5. Unscrew the product with your fingers, fluff it up.

6. Glue your colorful creations onto a napkin.

7. Cut the leaves out of green corrugated paper.

8. And decorate them with a craft.

9. Make a satin ribbon bow and tie the bouquet.

10. Pretty good and I would say it looks charming. Creative success! Do not forget to learn a poem on this topic.

You can also make such a creative product.

With preparatory tools, you can make just such a beauty from an openwork napkin and cardboard - chamomile.

If you are looking for a simpler option, for example, for the smallest from 3-5 years old, for example, for the middle group of the kindergarten, then this hint will probably push you to the right thought.

For the younger group, make a common huge plasticine craft, literally 10 minutes and you're done. See how great you can make from balls.

Or a violet.

For schoolchildren, you can make a product from threads, such as embroidery. No glue is used in the product itself, the threads pass through the holes.

I found the idea of making a number 8 quite interesting and using a music disk as a stand.

And this is what can be obtained from these materials.

The most beautiful souvenir ideas
First of all, I want to offer you this video for viewing, how do you like that idea? Be sure to write your opinion at the bottom of this note after viewing.
With the arrival of spring, you can see not only flowers, but also the arrival of birds and insects. Therefore, let's make a clearing with a bee, wow, and it all looks well, just great and very beautiful.
We need:
- toilet roll
- double-sided tape
- kinder surprise mold

Stages of work:
1. Take the sleeve and double-sided tape, wrap it around the entire diameter.

2. Then glue the sheet of paper onto the double-sided tape.

3. Wrap the unwanted remnants of paper inside.

4. Take sheets of green paper of different tones, fold them in half, and then cut them into strips, as if you were making a bookmark.

5. Using a stapler, wind the blanks onto the prepared base and secure.

6. Get tempting leaves or weed. The base of the sleeve must be wrapped with paper again to hide everything you do not need.

7. Or do it like this.

8. Then in the store buy figures for decoration or make such yourself, butterflies, bugs, spiders, etc. Unleash your imagination and in an original way and apply them to the grass.

9. After that, make a blank of butterfly wings, which will be made from a case from a kinder surprise.

10. Do not forget about the eyes and possibly a mouth that you can draw with a marker. Here are the tones of spring beauty that will decorate any house or apartment.


Use the materials at hand, lids, cocktail straws and you will surely have an insight.

There are a great many options, I never cease to admire and be amazed at times.

See, even an egg carton was used here. And of course they used ordinary pasta to make another masterpiece.

As the saying goes, who is good at what, and what have you come up with? Or are you still searching and don't know what to accomplish?

Well, then perhaps you will be interested in making such a souvenir using ordinary disposable spoons, and indeed tulips came out, only unusual ones.

Undoubtedly, a basket or pot will emphasize the originality of this simple idea.

The other day I saw this kind of work at school.

By the way, even dandelions or chamomile can be made from cotton swabs and plasticine, to whom does this work resemble which flower?

Well, this is definitely a dandelion here.

And here most likely asters.


Or chamomile.
Using paints and brushes, you can draw a plot and congratulations.

Skillful craftswomen can make a product from beads, it is certainly difficult, but for those who are fond of this it will not be difficult.

For most, the palm is the most beloved card. How simple, but you can even take it to a competition or an exhibition.

We make crafts for kindergarten with children
With the children, first of all, you can make all kinds of drawings for this international day. Use something unusual, like drawing with a crumpled piece of paper or a cotton ball.

Well, for joint activities, you can make such a gift to mothers and grandmothers and place it near the group on booths with congratulations.

We need:
- paper napkins red
- corrugated paper
- scissors
- stapler
- tassel
- cardboard

Stages of work:
1. Take an ordinary paper napkin, see the diagrams from left to right. Fold it in half, then again, connect in the center with a stapler. Then cut out a shape that resembles a circle. Make small cuts along the entire diameter, and then fluff the product.

2. Cut out the shape of the bouquet from cardboard and wrap it with corrugated paper, tie a bow.

3. Make leaves and let the children stick the resulting flowers in any order.

4. Here is such a weird and magical creation, well, it just looks amazing, as if a real bunch of roses.

We give flowers to mothers on March 8
In this article, I will not go deeply on this topic, at the very beginning you have already seen some ideas, now I will show you the simplest ones, and in the next issue there will be new items and very cool options for flowers for this women's day. So, do not miss a new note, add this to your bookmarks so as not to lose.
From pieces of paper for notes, you can make small bags, look and then glue them in a circle, that's what you get.
By the way, you can give such a charm to your beloved teacher).

Nothing special, but it looks cool.

Or you can use this video:
Also use coloring pages, because children love this business very much. Any mother will be pleased to receive such a drawing.

You can use pictures with animals, you can just use some colors.


Or, at the same time, even arrange them in the form of messages and wishes.

Choose any template you like, print on the printer and congratulate!

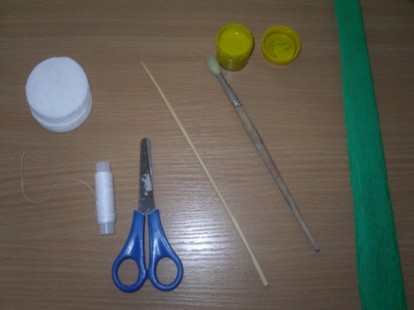
We need:
- cotton pads
- scissors
- threads
- tassel
- gouache paint
- skewer or stick
- corrugated paper
Stages of work:
1. Put a cotton swab on the stick, you can stick it with glue.
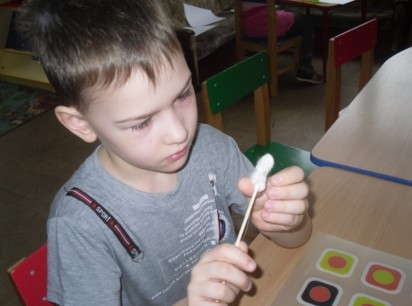
2. Then paint it yellow, and then wrap a cotton pad around the entire circumference of the stick, while using a thread so that it does not fall.
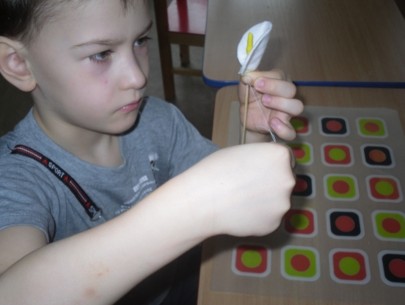
3. Decorate the stick with corrugated green paper, you get a stem, cut out the leaf and also wind it on the stem.

4. These flowers will turn out to be white and at the same time smart, pretty beautiful and cute, super!

Master class for primary school students
I want to offer you an unusual craft that will be made of yarn. You will also need a vase and your good mood, because you will get bright yellow and everyone's favorite flowers, called mimosa.
Next time in another post, you will find instructions in this paper mimosa.

Well, now let's make just such a twig from yarn threads. Here all the steps are shown at once, you just have to repeat.
Now let's create a box, or such a miracle can serve as a candy bowl or a vase, 3 in 1, and this can be done from cardboard, toothpicks and woolen threads.
1. Cut a heart out of cardboard and stick toothpicks into it. But first of all, first make holes on the cardboard with a needle and drip glue into them, and then stick in the toothpicks.


3. Here's what happens over time, you can add beads or seed beads.

4. And of course you can play with the shapes, make them round or square.

Well, how do you like this idea? If you don’t like it, then go to the next type of a voluminous greeting card, so to speak 3d.
We need:
- cardboard - 1 pc.
- colored paper
- PVA glue
- scissors
- punch design
- rhinestones or scrapbooking kit

Stages of work:
1. Take a white piece of cardboard and fold it in half, make two cuts in the center, 5 cm wide, as shown in this photo.
2. Now bend with your hands to make it look like a ladder, this will be the base on which you will glue the craft.

3. Draw a basket out of colored paper and cut it out.

5. Determine the number of products yourself.

6. Now, using a special hole punch, make a decoration, for this take a strip 2-3 cm thick.

7. Glue this decor on the sides, and the basket in the center.

8. Then decorate with flowers and butterflies, as well as rhinestones or sparkles. In general, the fact that you have at hand of jewelry.

You can use this pattern and make extremely expressive and cute gerberas.

To do this, print the flowers, and then glue them one by one so that it comes out quite lush and voluminous.

I also liked the work in the form of a fan with tulips on it.

Or such a postcard.


Also, such a cute wire product can be an excellent option for schoolchildren.

Or fold such a souvenir from paper strips.

That's all for me. I wish you succeed in everything conceived. Success, inspiration and all the best and positive! Bye bye everyone!
Best regards, Ekaterina Mantsurova
Master class "Gilded carriage" Step-by-step photos and description
Gnevanova Olga Mikhailovna, teacher of additional education, State Budgetary Institution SONS SO "Center for Social Assistance to Families and Children", Kachkanar, Sverdlovsk Region.Purpose: for working with students at least 10 years old, for teachers of additional education, educators, primary school teachers, parents and all creative people.
Purpose: A gift for mom, as an interior decoration, participation in competitions.
Target: Obtaining the skills of making gifts for the holiday of March 8
Tasks:
EDUCATIONAL: To teach how to make crafts from paper and thread, teach how to work with corrugated paper
DEVELOPMENT: Develop imagination by composing
paper flowers, artistic taste for the choice of colors, fine motor skills in the process of making crafts
EDUCATIONAL: To foster a desire to get acquainted with the meaning of the holiday on March 8, a polite respect for mother, grandmother, sister, to make neat hand-made gifts for their loved ones.
March 8 - "International Women's Day", the holiday of Spring and Love. On this day, you cannot do without a gift for your beloved women: wives, mothers, grandmothers! And if a gift is made by hand, then it is doubly pleasant to both give and receive!
Every woman in her childhood listened to the fairy tales of Charles Perrault, where “Cinderella” turned into “Princess” and got to the ball. And the film directed by the director Schwartz, where the main character was played by Janina Zheimo, has long become a classic of the cinema of the 20th century. Until now, this gentle and kind film continues to delight and amaze big and small. Try not to be surprised that a sorceress comes to visit you with her charming page and with the moment of a magic wand turns your dressing gown into a ball gown and your slippers into crystal shoes. Try to simply and naturally sit in a gilded pumpkin drawn by mice, and in this carriage go to the ball to the king.
I suggest making a gilded carriage.
Now, hurry to the ball!
Have fun there with all the heart.
But, no later than 12
We need to return from the ball.
How to strike 12 times
Everything will disappear in the same hour:
Coachman, horses and carriage.
Cinderella, remember this!
Required material:
- corrugated colored paper
- white thread No. 10
- needle
- medical fingertips
- wooden sticks (skewers)
- glue moment (gel)
- scissors
- PVA glue
- decorative braid
- universal enamel Metallic
- decorative flowers from hair ties

Step by step description of work:
CoachWe inflate a ball from the fingertip about 11 cm in size, tie it well, leave the end of the thread. We take a spool of white thread, place it in a transparent mug to facilitate winding. And we thread the end of the thread into the needle, pierce the tube with glue from below, it is more convenient to work. Squeeze out some glue to make the thread better wet.

We remove the needle. Next, we wind the thread soaked in glue tightly enough. To make the carriage oval, we focus on the sides.

An oval blank is ready, but still raw. Dry for about 3 hours. The first signs of drying are crackling. As soon as the workpiece dries out, you need to carefully pierce the ball with a needle and remove it.

Cut out a circle with a diameter of 6 cm - there will be a door.

Before proceeding to the next step - working with paints from spray cans, read the instructions for use.
We spray from a can, it must be done under the guidance of adults and follow the safety rules written on the can. Pre-shake it for 2-3 minutes and apply the enamel at a distance of 25-30 cm in 1-2 layers with intermediate drying for 10 minutes.

Complete drying time is at least 2 hours.

The door and the carriage itself turned gold.

We start decorating the door with braid.


We take wheels from a baby carriage, skewers and cover with gold paint.


We make the carriage mountings. On the sticks we make a mark of 12 cm and saw off with a clerical knife, we got springs.

We glue with glue with a moment (transparent gel).

Further to the carriage itself.

We decorate the entrance to the carriage with white braid. To prevent the braid from opening, we burn it with fire.


Making a seat template.

Cut it out, insert it into the carriage and fix it with glue. The gilded carriage is done.

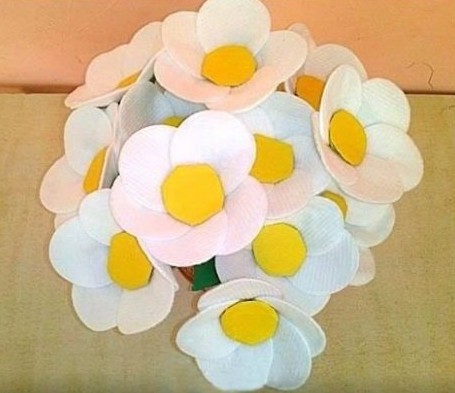
Corrugated paper flowers
We make flowers in white and yellow. Fold the corrugated paper with an accordion into 7 - 9 petals (each layer is a petal) 2.5 cm wide. Cut it off with a height of 6 cm.


It turned out to be a rectangle. We cut off the corners, and we carefully make sure that in those places where the arrows are indicated, the edges remain connected.

When we expand it, it should look like this:

Here are our future petals. We twist the long part of the petal.


We take a skewer and wind this edge on it, squeeze the paper. This fixes the bend of the petal well. For a convex effect, it is necessary to pull each petal inward. We use two thumbs of our hands.


We use all the trimmings for the core of the flower. Then we twist the petals tightly with threads so that the flower does not collapse.

I propose another option for creating a rose. The size of the petals is the same 2.5 cm by 6 cm. Cut out the petals from the rectangles, as shown in the photo. We twist the edges of the petals in the same way.


Cut a fence out of green corrugated paper for future sepals. We glue the flower bud.


Cut off the excess.


Cut 4 strips of 8 cm from a shiny wide ribbon, burn with a match, hot stick together. Glue it onto the base (white circle).

We create a composition of roses and glue it to the base. We give free rein to our imagination.

Decoration of a gilded carriage
We glue our composition to the carriage. We attach the door with a wire. We frame it with decorative braid with a pearl, small flowers (from hair ties).