What designs can be made on nails at home. Nail patterns for beginners step by step photos. Photos of patterned patterns and step-by-step creation
Creating a beautiful manicure is a very troublesome task, especially if you want to express your individuality and surprise others with something. For such an occasion, it is worth leaving plain nail polish with bright varnish in the past. Nowadays it is becoming increasingly popular to apply elegant designs on nail plates. At first glance, this is a very difficult task that requires experience and creative skills. However, almost anyone can create a simple design on a varnish base. The main thing is desire, inspiration and perseverance.
Techniques for creating a manicure with a simple pattern
There are several ways to apply a design to your nails. To do this, use the usual available tools:
- needle or toothpick;
- brush;
- scotch;
- a piece of tulle;
- nail file;
- cotton swab;
- nail polish remover;
- varnishes of several colors.
Before you start creating a design, you need to do a regular manicure on your nails.
- Disinfect your hands.
- Treat cuticles.
- Model the shape of your nails.
- Apply a base coat of clear varnish.
After that, be patient and use your imagination. The drawing can be made using any of the proposed techniques.
- First you need to cover your nails with a base layer of varnish and wait until it dries well. This is a prerequisite for obtaining a beautiful, clear drawing.
- Next, take a varnish of a different color and carefully, holding the brush vertically, place several dots in a random order.
- Between them you can make several dots of contrasting color.
- And immediately, without waiting for the varnish to dry, use a needle or toothpick to make several spiral or chaotic movements mixing the colors.
- This creates an abstract ornate design.
Using this technique you can create a very specific drawing.
- To do this, you need to put a bold point on the base, for example with varnish. This will serve as the center of the future flower.
- Then, using a toothpick from the center, draw the outline of the petals of any shape.
- You can drop droplets of another varnish inside the resulting petals and use a toothpick to shade them with small strokes.
If the flower is small, creating it is even easier.
- Make the middle.
- Place droplets around it at a short distance in place of future petals.
- After this, draw the needle from the point to the middle of the flower.
After completing the creation of the drawing, you need to wait until it dries completely! and cover the entire nail with a fixing layer.
Drawing with a brush
It's not very difficult to create designs with a brush. It should be thin and moderately tough. This can be either a varnish brush or a regular brush for watercolor paints. You can use it in different ways:
- use it in the same way as a toothpick in the previous method. in this case, the result will be smoother with smooth lines.
- randomly draw an invented picture;
- put dots of any size and shape, getting multi-colored polka dots or a “leopard” pattern.
You need to start and finish this manicure in the same way as in the previous technique.
Creating such a manicure is considered quite labor-intensive, because the design must first be cut out on a piece of tape, making a kind of stencil.
In this way, mainly two-color drawings are made.
- Apply a lighter shade of varnish to the base layer and wait until it dries completely.
- After this, glue the prepared one onto the nail.
- Apply varnish of a different color on top.
- Remove the tape carefully when the varnish dries so that the design does not spread.
Drawing with tulle
This technique creates a beautiful openwork pattern, and mastering it is not very difficult.
- Prepare a piece of tulle with a small pattern in advance.
- You first need to prepare your nails and apply two coats of polish (base and main).
- Without allowing the top coat to dry, place a cloth on the nail and press firmly.
- Wait a bit and remove.
- It will turn out very well, which will only need to be coated with clear varnish.

You can use the same design for all nails or choose a separate one for each. Instead of tulle, you can use knitted fabric or velvet fabric.
Examples of simple drawings
Very interesting drawings - images can be created without any special skills, but only with a lot of imagination.
For example, nails are sneakers.
- Apply base.
- Calve the toe line.
- Paint over the sock.
- Mark the locations of the holes for threading the laces.
- Draw the lacing.
- Draw holes.
- Draw a black line.
- Manicure - sneakers ready.

Here are a couple more simple examples. Manicure - domino

Having mastered application techniques simple drawings, you can move on to more original techniques, for example, aquamanicure.
Step-by-step manicure (Photo)


Video:
Drawing is an incredibly interesting and entertaining process. However, to learn how to masterfully draw on nails, you will have to experiment a lot in order to master the techniques of applying simple designs at home.
It is simply unforgivable for a modern woman to be unkempt, since today there are a lot of methods and means for beauty. Moreover, this applies not only to the face and hair, but also to the hands, namely the nails.
The beauty of a woman is, first of all, her well-groomed appearance, and what speaks most about a woman’s well-groomed appearance is her hands.
A bad manicure, rough skin, and lack of jewelry speak of untidiness and a desire to look not like a woman who turns heads and breaks hearts, but like a gray woman who doesn’t care about how others perceive her.
Well, if you want to look good, but don’t have the money for a salon manicure, then it doesn’t matter - this article will tell you how to create a stunning nail design at home without spending any extra money or time.
An ideal manicure is a real decoration for a girl, which emphasizes impeccable taste and style, and also adds zest to the overall look.
We invite you to consider a master class on nail design using simple drawings and using various techniques that will help you become irresistible without visiting a beauty salon.

Materials used in nail art
Nail art is the art of applying patterns on nails that uses all your imagination. The tools and materials used for it are:
- sticks;
- gel pens;
- scotch;
- tassels;
- needles;
- glitter powder;
- stickers;
- foil;
- stones;
- rhinestones;
- threads;
- different colored varnishes, etc.
As for prints, they can be of completely different themes:
- abstract;
- graphic;
- have intricate landscapes;
- flowers;
- paintings;
- logos, etc.

Ideas for simple nail designs at home
Drawings using varnish
You need to start performing a decorative manicure by applying two base layers of varnish. For starters, any light shades are ideal - pink, beige and white.
It is recommended to create simple drawings at home for beginners using curls, dots and geometric shapes, gradually complicating the elements. In this case, all imperfections can be hidden with glitter varnish.
Simple manicure ideas for beginners:
1. Method one:
- initially cover your nails with 2 layers of white polish;
- then, using green paint, draw a wavy line diagonally and make 3 short stems with leaves;
- now, using other colors, draw the flowers;
- Seal your nail art with clear polish.

2. Method two:
- initially apply a rich cream around the nail;
- then take a toothpick, a glass of cold water and several types of varnish;
- add the varnish drop by drop into the water (a continuous varnish film should form on the surface of the water);
- mix it carefully with a toothpick or bring all the colors into the center to form a semblance of a flower;
- dip the nail into the solution and hold it in water for a while with a film of water;
- take your hand out of the glass. The drawing is ready.

Creativity on nails using tape
The most successful option for manicure is tape. With its help you can make the perfect jacket, as well as various prints in the form of rectangles, triangles and other geometric shapes.
When the tape is removed, they get the perfect design, which, after covering with a fixative, will delight its owner for many days.
Usually you learn to do your very first manicure at home using tape, but in the future you can create other designs from it.
Ideas for this manicure:
1. Option one - stencil:
- Initially, you should think about how you want to place the polish on the nail plate;
- then, based on this, cut out a stencil from the tape (make sure that the edges are as neat as possible);
- cover the nail with a transparent base, and after 1 minute apply the first color;
- wait for complete drying;
- Next, take the stencil and apply it to the nail;
- check that the tape is well secured;
- apply the second color over the entire nail plate, including the tape;
- let the decor dry;
- remove the stencil with tweezers and apply a transparent finishing varnish.
A photo of a light design on your nails will help you visually imagine what the result should be.
2. Option two - rays:
- apply pink polish to the nail and let it dry;
- cut out a stencil in the shape of rays from tape;
- fix it on the nail plate;
- apply black polish all over the nail and let it dry;
- remove the stencil;
- We emphasize the pattern with silver or gold paint.
3. Option three - space:
- draw three stripes on the nails: yellow, red and green so that they cover the entire surface;
- let the varnish dry;
- glue three thin strips of pre-cut tape onto the painted nails;
- then cover the entire nail plate with black varnish;
- let it dry;
- remove the tape and get an unusually beautiful decor;
- We fix it with transparent varnish.

Drawings using dots
Dots are a tool with which you can decorate your nails very beautifully. At first glance, it resembles a pen with a metal rod and a ball at the end. The size of the latter determines the size of the future dot, twig, floral ornament, etc.
- before starting to work with dots, nails must be varnished and allowed to dry;
- the pattern can be applied using acrylic paint, which has water base, and with regular varnish;
- if you are using acrylic paint, you must first squeeze it out of the tube onto the palette, dip the dots in water and then stir the color;
- the tool should be held like a regular pencil, namely perpendicular to the surface.
Nail design using the dots technique:
1. Pattern one:
- cover the nail plate with white varnish;
- without waiting for it to dry, put 3 medium drops of red;
- Apply 3 more white drops to the same points;
- take the dots and draw a line through 2 drops, then another through the others;
- We do this several times;
- you should get a rather fancy pattern;
- Now let's start applying curls and petals;
- Once the design is complete, let the design dry and cover the nail with colorless varnish.

2. Second pattern:
If you wish, using dots, you can learn and different types Images. The only thing is, with the first option, make sure that the varnish does not have time to dry, otherwise the pattern will not be very natural.
Nail design and nail art have long been elevated to the rank of art. Many women want their manicure to be decorated with beautiful designs on their nails, but most of them do not know where to start or how to draw. Here we will give quite interesting tips, with which you can independently create stylish and very beautiful designs on your nails.
Nail design, in particular nail designs, is a fun and interesting activity. If you decide to design “for yourself” and decorate your manicure yourself, first of all you need to purchase tools and materials that may be useful to you.
Drawing tools and materials
1. Nail polishes, nail polish base, fixative, top coat, nail polish solvent, nail polish remover - this is the minimum where the design begins.
When buying varnishes, pay attention to its structure and smell - it is better to avoid strong-smelling varnishes. Also pay attention to the expiration date.
2. Acrylic paints - they are absolutely harmless to the health of nails, have a huge palette of colors, are easy to apply to the nail, acrylic paints dry quickly and, finally, they are relatively cheap.
If you don’t need the whole set of paints, then you can buy one or several specific colors, which, you see, is very convenient.
3. Those new to design will also need to buy several brushes, preferably a set of brushes of different sizes made from natural hair.
4. A collection of various decorative elements necessary for design - these are rhinestones, stones, sequins, beads, foil, mica, feathers, colored threads, mesh, confetti, mirror dust, fimo, stickers, fabric decorations, shells, dried flowers, sparkles, broths , lace, etc..
5. Glue is simply necessary for fixing various decorative elements.
Beginning creators should definitely study the theoretical component of painting with acrylic paints, and only then proceed to the practical part.
Of course, it will not be difficult for an experienced master to apply the most ornate designs on his nails in a matter of minutes. But if desired, such a design is quite possible for a beginner.

A simple design is made with a thin brush and acrylic paints. You can start with simple lines and points of different diameters, in this case the risk of making a mistake is minimal, and the result will definitely please you.


To create an exquisite manicure, you will have to try and, above all, be patient.


The procedure for applying designs on nails
So, are your nails and hands okay? This means you can start creating beautiful drawings using acrylic paints.
- To begin with, the nails are degreased. For this purpose, a special product is used, and it will also extend the life of the manicure.
- Then the nail plate is covered with a transparent base. Professional craftsmen advise using such a product, otherwise the unprotected plate may deteriorate under the decorative coating.
- The base can be varnish of very different shades. Apply a layer of varnish and wait for it to dry completely. On a surface that is not completely dried, a drawing made with acrylic will “float”.
- The time has come for the most important and exciting stage - the painting itself - applying the design to the nails. If the drawing is being done for the first time, then it is better to first experiment on a piece of cardboard. This will allow you to adjust your hand to the brush, determine the pressure applied and the intensity of the selected color. Several similar attempts will allow you to create clear and beautiful lines, and even patterns and simple drawings.
It's better to start with painting ring finger. For example, you can draw a butterfly with white paint, and then decorate it with smooth lines and neat dots.
The drawing should not be overloaded, but a couple of gentle strokes will be quite appropriate. You can remove excess paint or varnish using a toothpick dipped in nail polish remover. If you don't like something, you can always start over.
The resulting pattern is secured with a top coat. It will add shine to your manicure. The result will definitely please you, because the painting will give your nails a romantic design and highlight the image of the owner!
One of the simplest nail designs is to decorate the edges with colored glitter. Although it is very easy and simple, such a manicure looks bright and impressive.

Nail designs - varieties
Classic French manicure can serve as an inexhaustible source of inspiration. For example you can change traditional colors and make it brighter and more intense.
A plain white line can be decorated decorative elements and various drawings.
 Nail art with cats

Do you prefer bright colored manicure? You can also decorate it with a pattern and add some golden shades - this adds airiness.


Nail designs - floral motifs
Floral motifs are applied using a thin brush, sometimes you can use a needle. Drawing such a picture is quite difficult and requires patience and talent.


 Nail designs - flowers

This particular print never goes out of style. And making such a drawing is not so difficult. First of all, you need to apply varnish twice. Depending on which print you have chosen, apply the patterns with a thin brush and acrylic paints.
But if the spots are not even, then do not despair, because they do not all have to be the same, this is the advantage of this design on the nails.


Watch the video on how to make beautiful designs on your nails:
It is important to have the entire arsenal necessary tools. While creating beautiful manicure There are a few key things to consider with painting.
First of all, this is, of course, well-groomed appearance both nails and hands in general. After all, even with luxurious painting, imperfect nail shapes, untidy cuticles and dry hand skin will erase all the positive impressions. At the end of this article we will give basic care recommendations.
Non-standard designs on nails - hieroglyphs
IN Lately There is a great interest in everything related to the East.
This also applies to new trends in manicure. Drawings - hieroglyphs on nails give a positive charge. Each of them has its own meaning - it could be happiness, health, beauty, etc.
When using these symbols, it is important to choose the right colors that can bring out their full beauty. It is best to draw the symbols in the traditional black color, and choose red nail polish as the base, which, combined with black, will become a beautiful Japanese theme.

 Nail designs - hieroglyphs
 How to decorate nail designs with rhinestones and stones

Nowadays it is very fashionable to do manicures with stones and rhinestones. Rhinestones must be selected based on the length of the nails. Apply two layers of varnish. Clear varnish outline the drawing and use tweezers to add prepared rhinestones and stones to certain points of your drawing. This design gives your nails a unique look.


On short nails You can also create simply amazing drawings, look at some options.


The more you draw, the better you will do it, the main thing in this matter is not to give up - draw whatever you like and what comes to mind. This way you will find only your own unique nail design.

How to care for your nails and hands
Don't forget that even the most beautiful nail designs will lose their attractiveness if your hands and nails are not well-groomed. Here are the basic recommendations for hand care:
- Nails should rest from the varnish - after removing the old varnish, do not rush to cover it with a new layer, let them “breathe” for several hours.
- Nails hate washing dishes and using any chemicals, so when doing homework Always wear rubber gloves.
- Pamper your nails with baths - dissolve sea salt in hot water, add vegetable oil, 3 drops of iodine and 5 drops lemon juice, and soak your nails in this mixture for 5-10 minutes.
- To have shiny and healthy nails, rub a mask of lemon juice, vinegar, grape or cranberry juice on them from time to time.
- Pay attention to your diet - eat yoghurts, cheeses - preferably fresh, nuts and marmalade more often.
Beautiful, well-groomed hands always reveal a sophisticated girl who knows her worth. Thin, flaking nails different lengths and shapes can be given to your appearance a shade of untidiness, sloppiness, even if the rest of your appearance is impeccable.
Therefore, never forget about your hands and nails. And having learned how to quickly and beautifully apply designs on your nails, you will always have a unique, inimitable manicure.
Nail designs video
Nail designs photo
Pictures are clickable 


A beautiful manicure, decorated with drawings, looks mesmerizing. It is not boring and has its own flavor. Drawings can be very diverse, ranging from standard curls to a real work of art.
Of course, not everyone can draw. But with great desire and diligence, you can learn this craft. It is not at all necessary to undergo paid training in expensive salons, because the Internet opens up a lot of opportunities. By typing in a search engine the query “nail designs for beginners photos” you will see a lot step by step lessons that will help develop your artistic skills.
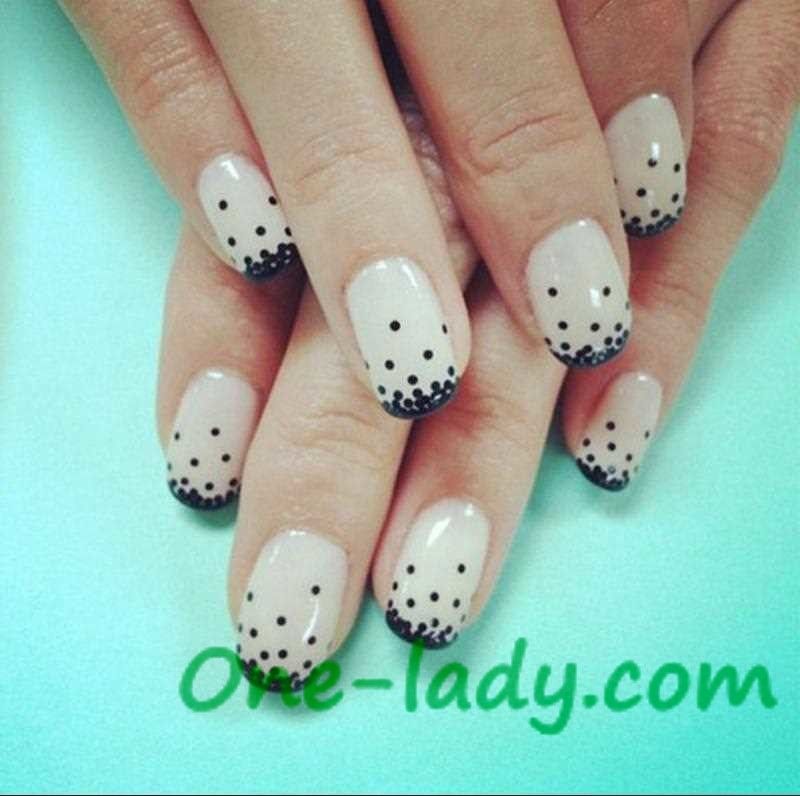
Nail designs for beginners: simple dots designs
For lovers of creative nail art available various options simple drawings. In order for the intended design to turn out neat, you should use professional manicure tools.
Using dots you can create a lot of bright and impressive nail art options.
A French jacket decorated with polka dots looks unusual and cheerful. This option is very easy to do at home, even for girls who do not have artistic skills. If a novice craftsman does not have this tool in his arsenal, then you can get by with a ball rod or knitting needle.
If you soak the dots in water, it will become an excellent assistant when decorating your nails with sand, powder, and balls. Also, using this tool it is convenient to lay out rhinestones or easily draw curls various forms, commas, lines and other artistic elements.


Nail designs for beginners: easy needle designs
Design using a needle is an excellent option for girls who want to get an interesting design in a short time. Needles of various diameters allow you to draw neat lines, place dots and draw other small elements.
Patterns, symbols, and ornaments can be painted with acrylic paints. The technique of making a design with a needle is simple and does not require special knowledge or artistic skills.
Master Class:
- To begin with, the nail plate is covered with a colorless base, which protects it from the bright pigment of colored varnish.
- Next, the nail is completely covered with the selected shade.
- After this, you should act very quickly before the background varnish has time to dry. A contrasting line is drawn on the background surface.
- Then, the needle makes a spiral movement that captures both shades, creating a wonderful effect.
- The resulting pattern, created with a needle, can be supplemented with neat dots.
- The result will need to be secured with a finishing coat.


Drawings for beginners with gel polish
When creating drawings, gel varnish is used various techniques. In order to start “art”, you need to prepare a thin brush, dots and a palette for mixing shades.
This season, a popular design is in which each nail has an individual design.
The color scheme is the same for all nails or may differ slightly. Two fingers can be decorated with a pattern.


Beautiful designs on nails for beginners with acrylic paints
Using acrylic paints you can create various patterns and compositions. Floral motifs are most often drawn. In order for the drawing to turn out neat, it is recommended to initially practice on a piece of paper.
Beginning needlewomen can start from the very simple option- from chamomile. A yellow dot is placed in the middle and white petals are drawn around it. That's all - a cute manicure with a pattern is ready!


Nail designs for beginners, photo
As you can see, you can diversify a boring manicure in no time, and you don’t have to be an artist to do this. A little skill and patience - and you are the owner of stylish and fashionable nail art. In order for you to learn how to quickly and beautifully draw on your nails, we have prepared photos and videos. Let's watch and learn how to do it together!
Video with a lesson on how to make a manicure with a beautiful lace pattern
Nail design ideas with a pattern:


You don’t have to be an artist to create easy nail designs. Stylish nail art without extra effort can be created at home using available tools. Now we’ll tell and show you everything!
What drawings are in fashion
Fashion trends in the world of nail art have never been consistent. Every season, fashionistas become absolutely “favorites” different techniques and designs. What drawings were awarded this title in 2019?
- The undoubted leader has become the minimalist style in manicure design. Elegant and laconic designs are a wonderful decoration for the nails of a girl with impeccable taste.

- Geometry in nail art continues the idea of stylish simplicity and rigor. This design can be embodied with a charming “polka dot” pattern, abstract lines and geometric shapes.

- In the spring-summer season, the nails of all fashionistas in the country begin to bloom beautiful flowers. Absolutely any floristry is trending: unopened buds, various flowers, leaves, twigs and tropical plants.


- Various patterns join these trends. The top features ethnic and lace motifs.


- Animal art is not far behind: the leopard familiar to you from previous seasons is joined by various animal images. They may differ in realism or be emphatically sketchy.


The most delicious and original this season will be “edible” drawings. Amazingly natural strawberries, ice cream, various fruits and sweets - this and much more can become an extraordinary accent in your manicure.
Tools
- To draw dots in a design, you can use a variety of tools - a toothpick, dots, sewing needle, bobby pin or ballpoint pen. With the help of simple circles you can create a stylish polka dot print, an interesting ornament and cute flowers.

- Simple stationery tape will be a lifesaver when you need to create stylish geometric patterns or designs with clear color boundaries.

- Some trendy designs with patterns look especially beautiful on a gradient background. Creating this impressive effect is as easy as shelling pears - you just need to apply the varnishes to the sponge and imprint them on your nails. The same tool is useful in shading the pigment.

- If you're serious about it, invest in a set of manicure brushes. The dotted version can be used to draw small details, the liner will ideally draw thin lines, the flat brush is indispensable for making three-dimensional drawings, the fan brush will create a beautiful background, and the “petal” type is ideal for Chinese painting.

Liner brush for perfect lines

Fan brush
- If you wish, you can add acrylic paints for nail design to your collection of tools. They boast excellent durability, at an affordable price and color saturation. Lucky is inferior acrylic paints in quality, therefore suitable only for elementary compositions.

Acrylic drawings
- Various decors will help make the finished drawing more impressive: rhinestones, beads, bouillons, foil, decorative sand, glitter, mica, velvet and stickers.


Unusual design using foil
- A corrective pencil is a real superman, saving your manicure from minor errors and unevenness. Its tip is soaked in nail polish remover, so it gently adjusts the design.

Features of gel polish manicure
Easy drawings with gel polish require strict technology.
- The first step is to treat the nail plates with a buff – a rectangular file.
- This is followed by treatment with a degreaser.
- And only after the preparatory procedures is the base applied, which is then dried in a special lamp.
- Then comes the drawing’s turn - it also needs to be dried in a lamp.
- Then you should cover the result with topcoat and dry the nails again.
- The top sticky layer is finally removed with a special product.
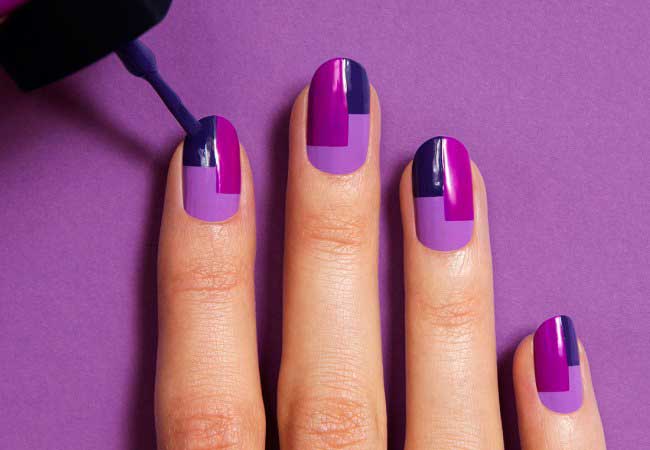
Geometric motifs
Idea No. 1

- Cover your nails with a base coat. The finished design will benefit doubly if you use a matte texture and play on the fashionable contrast with glitter.
- Draw a “V” of thin, contrasting lines toward the base of the nail.
- Draw 2 thin lines from the edge of the nail to its edges in the middle.
- Cover the “V” shape with glitter varnish. If you are afraid to go beyond the boundaries, create the outline of the design with tape.
Idea No. 2

- Apply a base light blue polish to your nails and wait until dry.
- Then it’s time to apply a rich turquoise shade – it should be applied to half of the nail along the vertical border.
- The final touch is black varnish, which should be located diagonally in the lower half of the nail.
Idea No. 3

- Apply the first coat of red polish and wait for it to dry.
- Draw 2 perpendicular black lines. This can be conveniently done using thread, which must first be dipped in varnish.
- The second thread should be used to apply white stripes that are parallel to the black lines.
- Take the third thread and use silver varnish to apply 3 finishing lines at the top and left edge.
- When the patterns are dry, secure the result of your efforts with a layer of transparent varnish.
Idea #4

- Cover your nails with soft peach polish.
- Armed with tape, create a wide vertical line border.
- Paint this space with gold varnish.
- When this coating has dried, draw the boundaries of the lines and patterns as in the photo with a thin brush with white varnish.
- Don't forget about the sealing layer of clear varnish.
Idea No. 5

- The first layer is a light purple varnish.
- This is followed by drawing rectangles to the middle of the nail in a contrasting color.
- On the other side of this rectangle, draw another, smaller one.
- Outline the larger rectangle with black nail polish.
- The final detail is a matte top.
Idea #6

The key to the success of such a drawing is patience and accuracy. Draw thin lines with black varnish after the beige base has dried, and then paint the resulting triangles with glitter.
Idea No. 7

Such a different jacket
Easy nail designs for beginners are often made based on french manicure. This is a classic solution that will symbolize the elegance and good taste of a fashionista in any season.
Idea #8

This design does not have a traditional smile - it is replaced beautiful monograms with glitter. To repeat such an exquisite manicure, you need to cover your nails with beige varnish, and after it dries, draw a thin lower border of your smile. Then the fun part begins - drawing patterns. Once the curls are dry, highlight them with silver hairspray.
Idea No. 9

This original version of the French manicure will look great on your nails square shape. It’s not difficult to repeat it at all - draw a smile with a flat stripe at the edge of the nail, and just below, in parallel, create a thin line in the same color.
Idea #10

Floristics
Idea No. 11

- Apply base polish to your nails - soft pink the shade will suit perfect.
- When the tone is dry, arm yourself with a thin brush and black varnish.
- Draw a leaf stem diagonally.
- Starting from the top, draw the details of the leaf, focusing on the photo cheat sheet.
Idea No. 12

- Paint your nails pink.
- Using the drip technique, mark the hearts of the daisies yellow, and then paint their petals with white varnish.
Note! You should not draw the dots too large so that the image does not blur and looks neat.
- To make your manicure last as long as possible, finish it off with a clear topcoat.
Idea No. 13

- The first stage is applying the base coat.
- Using a contrasting polish from the bottom left corner, draw 2 thin lines with a beautiful curve.
- After this, you should draw the leaves on the branches step by step.
- The design will be more elegant if you paint each leaf with a contrasting or shiny varnish.
Idea No. 14

Idea No. 15

Idea No. 16

Needle drawings
Amazing results can be achieved with a regular needle. This technique is suitable even for those who have never done nail art at home before. The secret to the success of this design is you just need to have time to apply the pattern before the varnish dries.


A few more ideas for dessert

- Cover your nails with base polish. It is important that the base creates a contrast with the pattern.
- Pour a small amount of pink or red nail polish onto a previously prepared piece of paper.
- Use a toothpick to grab a little varnish and place parallel dots.
- From each point you need to draw thin strips down, which turn the workpiece into a heart.


Our photo — the selection proves:easy designs on nailseasy to create at home without any special artistic talents. Move from theory to practice and create an exclusive and original design!
Surely, in your arsenal you will find beautiful stole. In the fall, you can experiment with one technique - tuck a long piece of fabric under a belt at the waist. This trick will help you create a stylish bow in a second, and will also make your figure more feminine.