What can you make a bag out of paper? How to make a paper purse? What material is better to use
Hi. Holidays are coming soon - Valentine's Day, and then March 8th. Have you already figured out how to give a gift or a small bouquet? I think you will like the idea of putting a present in your purse. Theme of the day: DIY paper handbag templates.
Attention! This handbag is not easy a good thing for gift wrapping, and a great toy in 5 minutes for a little girl. If it’s boring at home and you don’t know what to do with your child, then make a handbag and your daughter will come up with a hundred games with it and will be glad and grateful to her mother’s idea! And girls so often like to change bags that if this one suddenly breaks, you can immediately make another one: a different color, with a pattern, with an applique.
I'll start with master classes that don't need templates, and then I'll show you a few templates for printing on a printer.
Master class handbag-heart.
Love and heart are inseparable concepts. Love lives in the heart, and it is the storehouse of the soul. Therefore, it is customary to say about lovers that they have found their soul mate. On Valentine's Day, it is customary to give valentines - small cards with wishes in the shape of hearts. You can deviate a little from the rule and make your valentine in the form of a handbag. The process of making such a handbag will not take much time, if you focus on our master class. 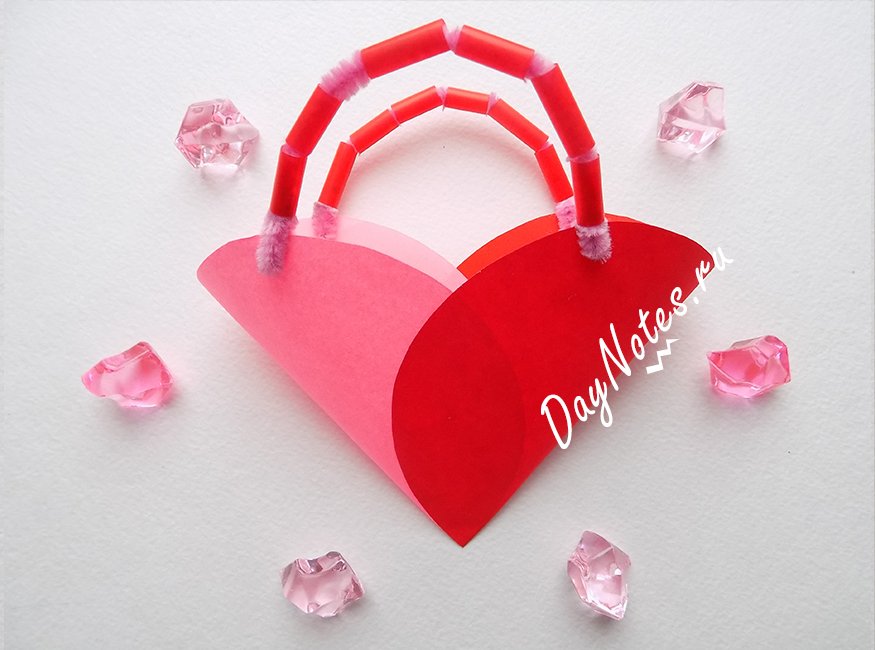
To create a heart-handbag, let's prepare:
- pink and red paper;
- scissors;
- compass;
- glue;
- chenille wire color pink;
- 2 red cocktail tubes.
- Prepare materials

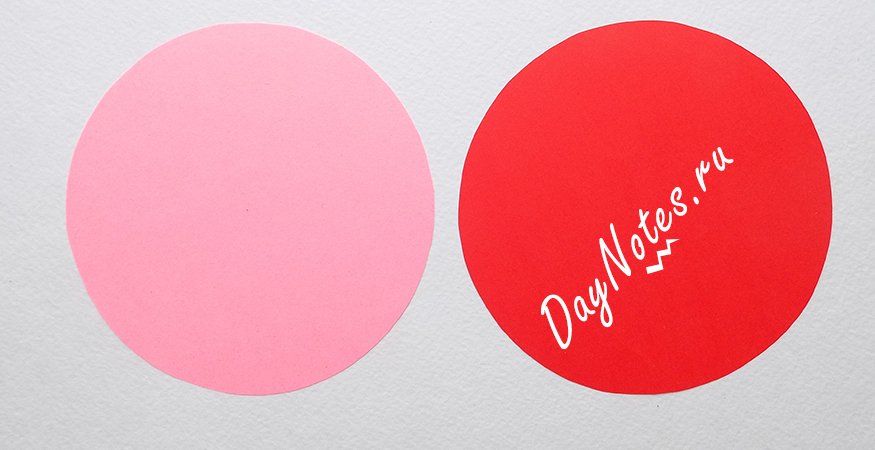
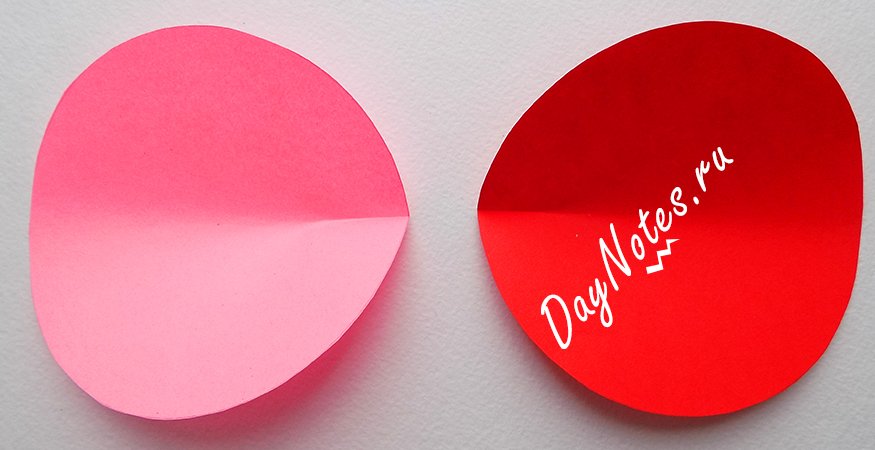
- Our craft will be based on 2 circles. Therefore, for a start, using a compass, draw 2 circles of the same size on red and pink paper. After that, carefully cut them out with scissors.
- Now you need to outline the middle of each circle, but this must be done only from the edge.
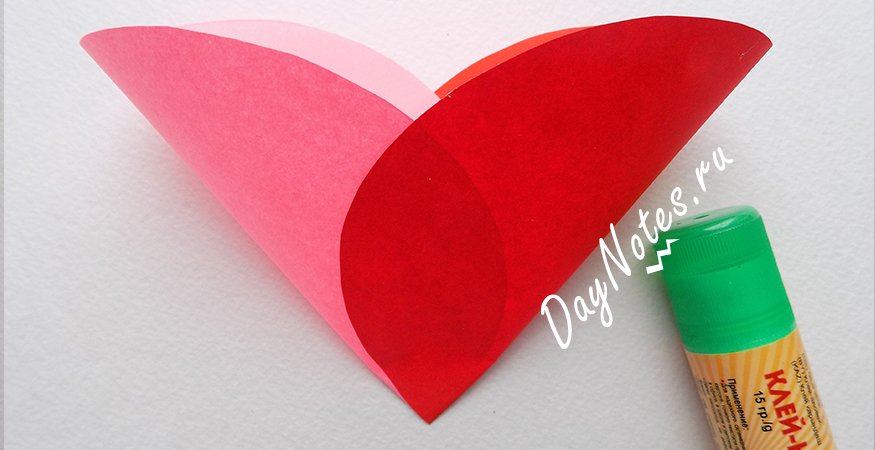
- Two circles (pink and red) need to be aligned with each other at an angle, and then glue.
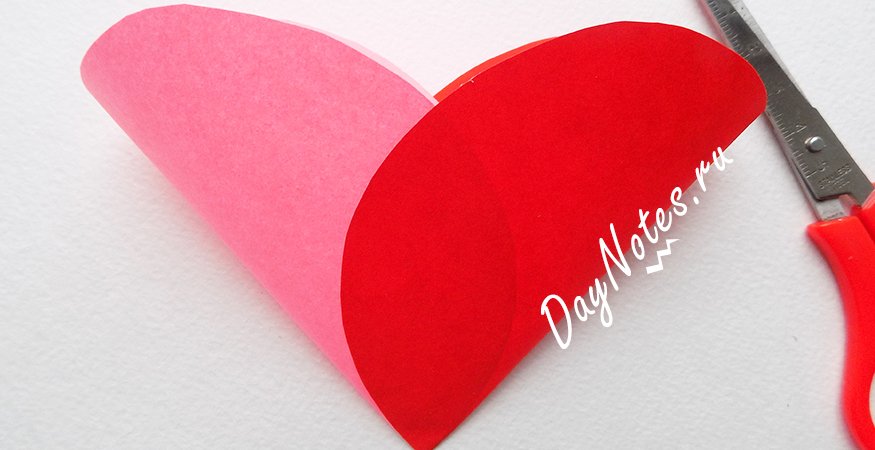
- With the help of scissors, we will round the sides of the future handbag so that it looks more like a heart.
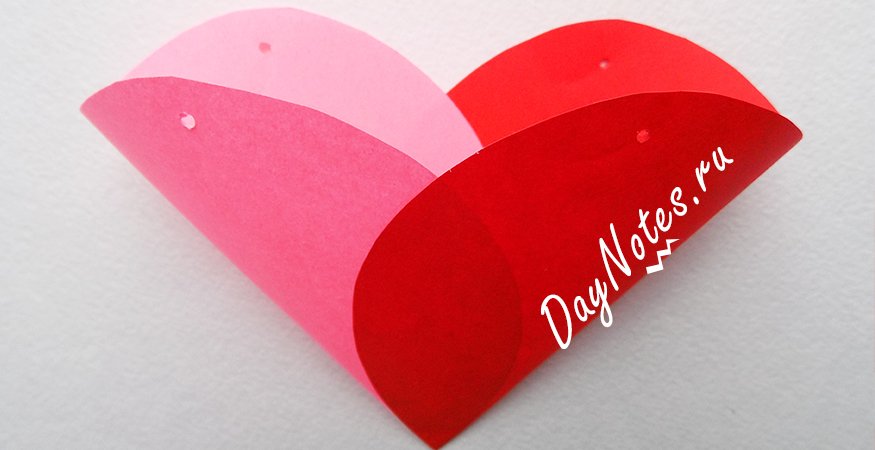
- Now we will make holes for the handles of our purse.
- We will make the handles from chenille pink wire. First, let's cut it in half.
- Cut the cocktail tubes into small pieces (about 1.5 cm long).
- We put these pieces of tubing on the chenille wire.
- It remains to fix the ready-made handles on the purse. To do this, thread the ends of the tubes into pre-made holes, and carefully bend the ends of the wire with back side... We fix the second handle in a similar way. Our heart-shaped handbag is ready.

You can put your wishes and a sweet surprise in it.
Basket-shaped handbag: step by step photos
Such a craft is easy to manufacture, but this will require stocking up measuring instruments... In the process of work, you will need to strictly observe the dimensions given in this master class. You can make a paper basket in any color, and our step-by-step photos will help you in your work.

You will need to prepare:
- pink paper;
- small pieces of green and yellow;
- glue stick;
- scissors;
- ruler;
- pencil.
- For the basket itself, we need to draw a rectangle with dimensions of 18x15 cm. We do this on pink paper.

- Now, along the long side of the rectangle, we divide the figure into 3 equal parts, 6 cm each.

- Along the width of the rectangle, it is required to divide the figure into 3 equal parts of 5 cm each.

- In the corner rectangles, we will make markings, divide them into strips 2 cm wide.

- Draw triangles in the upper and lower parts, their vertices should be located at the edges. The shaded places will need to be cut out later.

- We take scissors and make cuts along the marked lines.

- Bend the resulting corners up.

- Now we start collecting the basket. To do this, glue the lower side strip on one side to the triangle.

- We fix another strip symmetrically to it.

- Then we take the strips located above and also glue them onto the side triangle.

- Using the same principle, we fix the uppermost strips of the basket.

- We repeat the same actions on the other side.

- For the handle of the basket, cut out a strip 1.5 cm wide and 20 cm long.

- We glue it to the basket.

- Cut out small circles. You can use a glue stick cap to draw them. Glue the green circles.

- Cut out a couple of small flowers from yellow paper.

- We glue them on the green circles.

- Our paper basket is ready.

Paper handbag templates for printing
As promised, I made a selection of interesting and at the same time simple paper handbag templates. You can simply print them on paper, you can immediately print them on beautiful design paper. Or you can simply open the picture to the full screen of the monitor by zooming in, attach the paper and circle it right on the monitor screen. It is very convenient, fast and does not need a printer.
There is, perhaps, no other such universal material in the world as plain paper... It is from paper that you can make many useful, interesting and simply beautiful crafts and objects - animal figures, Carnival masks... In our master class, we will teach you how to make a bag out of paper with your own hands.
Craft "Origami paper bag"
- To create a craft, we need a sheet of ordinary A4 office paper. Bend the sheet diagonally, aligning one of its corners with the opposite side.
- Cut off the bottom of the sheet, thus dividing it into two parts: square and rectangular.
- Draw diagonal lines on the square.
- We fold the square into an envelope, connecting all its corners in the center.
- Fold the resulting square in half diagonally so that all the previous folds are inside. We get a double triangle.
- We combine one of the corners of the upper triangle with the opposite side, outline the fold line and return it to its original state.
- We fold the upper corner of the triangle down until it is aligned with the previously marked fold line.
- Turn the workpiece over and align the remaining corner of the triangle with the opposite side.
- The main part of our bag is ready, it remains only to bend its upper parts outward.
- Now let's make a handle for our purse. To do this, take a rectangular piece of sheet and cut off a strip 1.5 cm wide from it.
- We fold the cut strip along, outline the fold line and unfold it again.
- We bend the edges of the part inward by about 1.5 cm.
- We fold the edge of the strip diagonally, aligning its edge with the previously marked fold line.
- We repeat this manipulation in the other direction.
- We fold the triangle along the outlined lines.
- Fold the edges of the strip inward, aligning them with the center line.
- We get just such a handle with two arrows at the ends.
- We attach the handle to the bag.


We get just such a paper origami bag!
Elena Bobrova
For work we need:
Colored cardboard
Colored paper
Sample handbags
Glue stick
Materials for decoration (rhinestones, hearts, bows, etc.)

Choosing colored cardboard, placing a template handbags, circle, do markup:

And cut out:

We draw with scissors along the markings, in order to make it easier to bend details:


We add up handbag by markup and glue:

Well, now, the best part is decorating handbag using all your imagination. You can make a flower from colored paper:

Or decorate with ready-made elements for decor:

Can be put inside for mom small chocolate or candy.
Sure, mom will be happy with the gift!
Related publications:
Greetings to all guests of my page! Happiness and health to your families! I present a master class for making a gift for Mother's Day.
"Women's handbag" - paper construction. Master Class. Construction is an activity in which children learn to work with paper, cardboard ,.
Evangeline is 4 years old. Material: 1. colored paper. 2. colored cardboard. 3. glue stick. 4. ruler. 5. scissors. 6. simple pencil. 7. decoration.
For work we need: cardboard, white and green paper, yellow woolen threads, PVA glue, a simple pencil, scissors, a flower leaf template.
I offer you a master - class on making a gift for mom "Flowers for mom" from paper napkins. Materials: Paper napkins different.
Master - Class: "Children's handbag or purse in 5 minutes" All children love to play "Daughters - mothers" and an integral part of this game is handbags.
We made this postcard with children middle group for Mom's Day. To make a postcard, we need: cut out from a stencil from half.
Good evening, Dear Colleagues! Probably every Russian Kindergarten preparing to celebrate Mother's Day these days. At all times a woman-mother.
Handbag made of paper as a DIY craft for children or a gift bag
We offer to make with your own hands, together with your child, elegant handbags made of cardboard, foil, velvet paper with voluminous flowers from colored paper, colored velvet, foil. Such fancy handbags can be made in no more than thirty minutes.
Paper bags for a girl can be made both as a children's craft in kindergarten, and as a bag or a gift bag for a gift, and as an independent gift. At the same time, the child will master the basics of construction.


How to make a paper bag
To make such elegant handbags you will need: cardboard of different colors or colored paper, velvet paper, foil, scissors, stapler.


For a handbag with a yellow flower, you need 1 sheet of green cardboard, 1 sheet of yellow velvet paper. Cut the green cardboard in half lengthwise. Twist a cylinder from one half, fasten it with a stapler.


We make the cylinder flat and make inner folds on both sides with a total width of about 2 cm on each side.


Using our green cardboard blank, cut out a rectangle of yellow velvet paper so long as to cover the front and back parts and the bottom.


Draw a flower on the back of the yellow velvet paper. Fold the paper in half and cut out the flower only in the upper part, the lower part of the flower remains intact and fused together with the bottom.


We unfold the paper. Cut out circles for the middle of the flower - from foil, white paper or paper of a different color (optional). Trying on a piece of yellow velvet paper on our flattened green cardboard cylinder.


We attach the middle to the flower and at the same time to the inside of the green cardboard bag (our flattened cylinder) on one side of the bag and on the other side. The bag is ready. We cut out a strap for a handbag from green cardboard - a strip with a length of a sheet of cardboard and a width equal to the width of the inner side fold of the handbag - 2 cm.


We attach the strap on the sides of the bag with a stapler.


The bag is ready. You can put a gift for a holiday or birthday in such an elegant handbag.
Butterfly handbag
For this we used red foil, dark blue, pink, red and brown velvet paper. Instead of the listed paper, both colored cardboard and colored paper will do.
The inner part of the bag is made of red foil similarly to the bag with yellow flower... A butterfly-shaped detail has been cut out of blue velvet paper with a red folded cylinder inside. We attach pink and red ovals to the butterfly with a stapler as shown in the photo.


The body of a butterfly with antennae is cut out of brown velvet paper. We fasten this part with a stapler at the bottom. Then we place a red foil piece inside the butterfly and attach the butterfly with a stapler at the top to the inside.


Cut out the handle for the purse from the red velvet and attach it to the purse with a stapler. The bag is ready.


Handbag with a voluminous flower
For it, we used cardboard with a metallic tint (gray cardboard is also suitable), a sheet of pink velvet paper, a sheet of silver and pink foil paper, a little white paper. To make the inside of the bag, cut a sheet of cardboard along the middle and first twist the cylinder, fix it with a stapler. Then we flatten it. We outline the lines of the side folds. Width -1 cm. The total width of one side fold is 2 cm.


Bend the folds inward.


From pink velvet paper, cut out a rectangle equal to two cylinder heights plus a bottom width of about 2 cm.


On the back of the velvet paper, draw a flower on one of the parts. Fold the paper in half to the level of the bottom and cut out the flower at the top.


To decorate the handbag, we cut out two circles with a diameter of 12 cm from pink foil, two circles with a diameter of 10 cm from silver foil, and 4 circles with a diameter of 2 cm from white paper. The circles of white paper are the middle of the flower. For the middle, you can also cut 2 circles of pink velvet paper (as shown in the photo).


Cut the cut circles into narrow strips 1-1.5 cm before the middle.Then put a silver circle on the pink circle, put two white paper circles on the silver circle (or one pink one if you wish). We attach our folded flower to the pink part and the inside of the gray cardboard bag at the same time using a stapler.


We take scissors or a flat stick and curl the petals of our flower. The white center can be simply "skewed" towards the middle. We do the same on the other side of the bag.
Cut out the strap for our purse from gray cardboard. We attach the strap with a stapler to the side of the bag.


Metallic paper bag
We make the inner part of orange cardboard in the same way as other handbags. Metallized paper yellow color or we cut out the foil as in the photo. The narrow part is equal to the width of the bottom of the bag.


We collect the upper part on each side in folds and fix it with a stapler. We attach the finishing part made of metallized paper to the inside of the bag using a stapler.


From a thin strip of metallized red paper or foil, we fold a bow and fix it with a stapler. We attach the bow to the purse.


Brown handbag with terry flower
Cut out six strips 2 cm wide and 10-12 cm long from pink velvet paper. Cut each strip into thin strips 0.2 mm wide, 1-1.5 cm short of the edge. Curl the strips with scissors or with our hands. We fold them into a flower and fasten them with a stapler.


Cut out six stripes from the orange velvet by 1.5-2 cm shorter than the pink ones and do the same with them as with the pink stripes.


Combine the orange flower with the pink one. We make the inside of the bag out of orange cardboard in the same way as the bag with a yellow flower. Cut from metallized paper Brown color the top of the handbag.


We wrap the inside with metallized paper and fasten it with a stapler. We attach the flower to the purse. Cut out a 1 cm circle out of pink velvet paper and glue it to the flower.


A handbag handle can be made from velvet orange paper and attached with a stapler. You can make an elegant handle for a purse - weave a pigtail from thick woolen threads or threads folded in several rows of different colors. In our case, the pigtail is woven from woolen threads of brown, orange and pink colors. You can put a gift in such an elegant handbag.
 Handbag made of paper
Blue paper bag with white flower
The inside of the bag is made of blue cardboard. The upper part of the bag is made of blue foil or metallized paper of blue color... Along the lateral edges of the upper part, cuts were made about 1 cm long. We fasten the upper part to the inner one, "squirt" the edges. For a flower, it is necessary to cut strips with a width of 0.6 mm in length with a sheet of A4 format. We bend each strip in half. Then we pull the edges of the strip to the middle and step over the middle by 1 cm to secure. We apply this strip by strip (in the photo there is a flower of 9 strips) and fasten it in the middle with a stapler.


From blue paper, cut out three circles with a diameter of 2 cm for the middle of the flower and make cuts along the edges before reaching the middle. We fasten the middle to the flower with a stapler and collect the edges of the middle to the center.


We attach a flower to the top of the bag. Cut out a strap for a purse from blue paper - three layers 3 cm wide.Fold three layers one on top of the other and make cuts along the entire length without reaching the center.


We attach the strap on the sides of the bag. Slightly "slant" the sides of the strap together.

Metallic Paper Lace Handbag
The inside of the bag is made of red cardboard. The upper part of the bag is made of silver cardboard. From red metallized paper or foil, cut out two strips 5 cm wide and equal to the length of the upper front and back of the bag plus the bottom. We fold two strips in several layers and cut out in the same way as for New Year's paper snowflakes... We lay out the strips and attach them to the top of the bag on the sides.
- thick paper;
- napkins for decoration;
- scissors and glue.
- compacted paper;
- PVA glue;
- ruler;
- pencil;
- rope for handles.
Handbag made of paper
Paper is generally a very versatile material, and it is also very affordable and inexpensive. You can store something in a paper purse, or even give it by making it more elegant. Here are a couple of the simplest diagrams of how you can make a paper purse.

An original paper bag can be made by modern technology origami. Here is an origami diagram for a paper bag:
Follow all the steps in turn, take your time, and at the end attach the tape. It turns out to be a very nice handbag!
A very fun activity to do handbag made of paper... At the same time, it can be useful in everyday life, or it can be presented as a gift bag.
For making paper bags, we need:

This diagram can be printed on a printer using thick paper.

We cut out the workpiece, make folds in the places of the dotted lines.

We cut out flowers from napkins, we have napkins in this theme. We glue them to the blank of the future bag.

We glue our handbag.

Berm paints and colorize the background. Our bag is ready.

You will be surprised, but the bag can be made in just 15-20 minutes. If you get used to it, then faster. All you need is:
I won't be able to explain the whole process in words, so please read the video below (it has more than 1 million views - a really useful instruction):
How to make a paper purse with your own hands? Very simply for this we need: colored paper, scissors and Glue Moment Crystal and a sewing machine.

We cut our beautiful piece of paper into stripes:
We make the bottom of our paper bag, retreat 2 cm from the edge and cut out just such a detail

How to draw oval edges with the lid


Our handbag made of paper, which we made with our own hands and is ready at home :)
I will add to the listed methods one more option of how you can make a handbag out of paper. Suitable as original packaging gift for a girl or a woman. You will need thick paper, preferably embossed or patterned scrap paper. From it it is necessary to cut the figure according to the template, bend it in the places indicated by the dotted line and hook the slots together. A small flap at the bottom of the template is threaded into the slot in the top. In addition to the purse, you can twist a wire handle with beads and make a clasp from a button. Another way additional decor such a handbag is a decorative paper pocket.

Paper handbags can be very different, from a regular square bag to an elegant pot-bellied handbag. They are perfect as gift wrapping and as a storage item for all sorts of little things. And they are made easily due to an integral scheme, and not a lot of pieces of parts. I offer you several options for handbag schemes. You can decorate such bags with anything: ribbons, rhinestones, stickers, or decorate using the quilling technique. You can also weave a handbag from tubes of paper, or you can weave it using the origami technique, but thicker sheets, like from glossy magazines, are suitable for this.


Here, I provide you with a video that shows how you can make a very fashionable and attractive clutch bag out of paper (magazine). Perhaps not everyone can make such a handbag, but if you want the same one for yourself, then there is nothing impossible. So see:
Making a paper purse is easy enough. First of all, berm a sheet of A4 paper, after which we outline the core of the A4 sheet. Bend one of the cores to the middle and smooth it down. We do the second edge in the same way, that is, we fold it to the middle, the main thing is to leave a little bit of space for the glue in the middle. We glue the inner edge and join the sides. From below we make a lapel of 3-5 cm and bend it. Open the fold and smooth its corners right inward, align to the middle so that the lines coincide with each other. Bend the first edge just below the middle. Bend the second edge to the first edge. Along the cuts, you should get even and identical rhombuses. In the first edge we glue only the corner, they are in the form of a triangle. We glue the triangular edge and triangular corners, after which we connect this business. After which we have to make the sides. Bend the side strip so that the first corner of the rhombus coincides with the second corner of the rhombus. We do the second the same way. Align the bottom and sides. Smooth the inner side lines outward and form the correct shape of the bag. The top of the bag can be bent and tied with any thread or handles, you can also use ribbons.
If something was not clear, you can watch a video in which they show how to make a handbag out of paper correctly.