How to make a chocolate cake. Chocolate cake. How to make a DIY candy cake for a man
Almost everyone loves sweets, so candy cakes are becoming increasingly popular every day. No wonder, because such products look solemn and festive. In addition, such a gift is easy to make with your own hands!
Candy cake: master class
You will need:
- Candy;
- Cardboard;
- Corrugated paper;
- Scissors;
- Double-sided tape or glue.
Instructions for implementation:
Cut out the frame for the cake from the cardboard. Stick with tape or glue on the base of the candy so that they are securely held, but at the same time, they can be detached.

Lay out the corrugated paper, cut out the petals and strips from which you can make flowers. Select the size of the flowers in accordance with the size of the candies. By the way, you can also put small sweets in the buds themselves.
Wrap the candy in a strip and glue the petals to it, twisting the edges a little. The sweets should be easy to remove from the flowers.


Gather sweet buds into a bouquet and attach to the prepared frame. Flowers can be decorated with green corrugated paper leaves, beautiful beads, rhinestones, ribbons, sparkles and even small figures.
How to make a candy cake?
You will need:
- Candy;
- Styrofoam;
- Round box with cookies;
- Rafaelo's box;
- Corrugated paper;
- Double-sided tape;
- Scissors;
- Beads;
- Hot melt glue;
- Foil;
- Toothpicks;
- Candles;
- Beautiful fabric.
Instructions for implementation:
Cut out the bottom layer of foam. The first one should be the biggest. Sand the edges and glue it over with a nice cloth.

The second layer is a box of cookies. It also needs to be pasted over with a cloth using double-sided tape. Cut a 4cm wide strip of crepe paper. Glue the cutout ribbon onto the middle layer like a frill. Attach the candy to the sides with double-sided tape.

For the bottom layer, cut the corrugated strip just above the base. Glue it to the styrofoam using tape. Stretch the top edges of the paper slightly to form a shuttlecock.

At the junction between the base and the shuttlecock, glue the beautiful beads with hot melt glue. Secure the sweets on the side.

Now proceed with the design of the top layer, which consists of the Rafaelo box. Cover it with a cloth, attach the crepe paper and glue the candy.


You now have 3 layers of different sizes. Wrap each with pretty ribbons and tie a bow. Decorate the bottom "crust" of the cake with candles, and the top one with any flowers. Glue half a toothpick to the base of the candles with double-sided tape.

Cut flower petals out of foil or glitter paper.

Glue the leaves to the scotch tape to form a flower. Stretch the tips of the petals a little and use a pencil to bend each to the bottom.

Attach the finished candles to the bottom layer of the cake.

DIY candy cake: how to make?
You will need:
- Several types of candies;
- Double-sided and regular tape;
- Scissors;
- Gift ribbon;
- Whatman;
- Glue;
- Gift paper;
- Toothpicks.
Instructions for implementation:
Use cardboard or colored paper to make as many layers as needed for your cake. If you don't want to make your own product levels, you can buy round boxes of chocolates in different sizes from the store.

Now, use double-sided tape to glue the candy to each level. To make the cake brighter, attach different sweets to each layer. It is recommended to start with the top "cake".

After that, tie each row with colorful ribbon. You can fill in the blank spaces with flowers.

Using gift paper, cut out 10x10 cm squares. Take the candy, open it on one side and insert a toothpick. Wrap the end of the candy and secure it with tape. Make about 20 of these flowers.

Instead of gift paper for making flowers, you can take corrugated paper. Cut the petals out of it and attach them in a circle with tape to the candy with a toothpick. Now you can decorate the cake with flowers.

Candy cake: photo


As you know, the best gift is a handmade gift. Candy cake - an original solution! With such a present, you can congratulate a child on his birthday, give an elegant cake for an anniversary, or decorate a romantic evening with it.
Used materials from sites: mamochki-detishki.ru, na-zametky.ru.
You can make a variety of crafts from sweets, cakes with children and bring them to kindergarten. Very good for such a cake for the kids later disassemble for individual candies, if there are candies, not candy wrappers.
It turns out very festive, elegant.
The box must be made of cardboard and lined with sweets on the walls, and then pasted over and decorated beautifully.
You can use candies like Kit-Kat, Kinder, Snikers and others.


It is not difficult to assemble a cake from Kit-Kat chocolates, inside you can put biscuit cakes, chocolate candies like Skitls, mamp; ms are poured on top, you can make decorations from mastic such as toys, animals, birds and cartoon characters (Angri Birds, Minions):


Here is a cake made of sweets and chocolates for the New Year:

Here is a step-by-step execution technique visually:

Now it has become very fashionable for a child's birthday to bring to kindergarten not just sweets and cookies in a bag and then distribute them to their classmates, but to make a magnificent masterpiece of sweets and delight the whole group.
There are many options. You can try to design the cake yourself or order it from a professional.
There is nothing complicated here. The most important thing is your imagination and building material: Barney, waffles, bars, chupa-chups, dragees, juices, chocolates, kinder surprises, marmalade, ribbons, corrugated paper, etc.


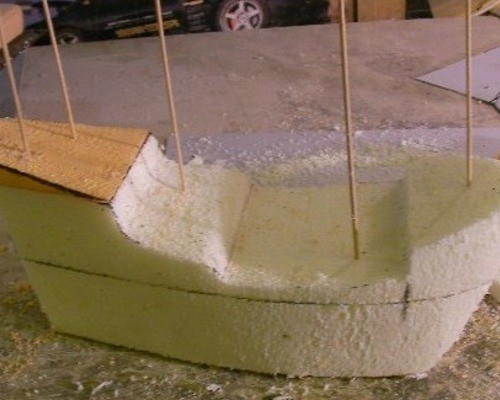
You can make a cake of sweets and chocolates yourself. It's not difficult at all. To make your masterpiece, prepare - sweets, preferably large, corrugated paper, ribbons, bows, artificial flowers, as well as a cardboard frame - it can be made of cardboard, or you can use a cardboard box from a store cake. By the way, for such a cake, you can use the favorite children, Kinders, and even soft toys for decoration, and the shape of the cake does not have to be standard (round or square) - you can make a cake in the form of a ship (for a boy)
Delicate creamy birthday cake made of sweets is an amazing gift for a loved one, a real sweet surprise that will delight anyone! I will show you a step-by-step master class with photos on how to make such a craft with your own hands. For decoration we will use - you will find the technology for making such flowers on this site. So, we need: sweets, artificial flowers, decor, glue, scissors. You can take any sweets - your favorite ones, but it is desirable that they be in beautiful wrappers.
Candy box cake master class

We will have a three-tiered cake, so we cut out three round blanks of foam with diameters of 12, 17 and 25 cm.


Grind the circles thoroughly with sandpaper to make them smooth.

The upper tier of the cake will open, so we cut out the inner part of the smallest circle, we get a blank in the shape of a ring. From the middle we make a circle 0.5 cm thick for the lid. 
We glue the resulting workpiece on all sides with corrugated paper.

For a cover made of thick cardboard, cut out a circle with a diameter of 12 cm and also glue it over with corrugated paper. 


We glue the other two tiers with corrugation on all sides.

Next, cut out a strip about 5 cm wide. Using double-sided tape, attach the candies to it. It can be done with ribbons as shown in this master class -. We glue such strips in a circle on each tier.


We put the tiers on top of each other, fix them with hot glue and start decorating - everything here depends only on your desires. Due to the fact that the top cover can be opened, it can be used as a jewelry box for rings, earrings or money. I decorated my cake with paper roses, beads, artificial flowers and greenery.

Our cake is ready! see here.


With your own hands. But it turns out that candy and other materials can be made amazing compositions, which will become wonderful sweet gifts for your loved ones and will delight the eye.
Candy compositions will do for any festive occasion and will please everyone: women, children, and men. We offer you several master classes on making the most popular do-it-yourself candy compositions. Knowing the basics can help you get a little creative and come up with your own compositions.
DIY candy basket
Candy basket- one of the simplest candy compositions that is easy to make using a paper base. To get a neat basket, they usually use sweets in the form long sticks.
To work you will need:
- Candy
Light colored cardboard
Double sided tape
- Scissors

Let's get to work:
1) Have long chocolates fold your ponytails by gluing them to the sides with double-sided tape.

2) For the basket, you need a cardboard base, which you can make yourself, or use a ready-made one. Measure the height of the candy and measure out a rectangle on a piece of cardboard width corresponding to the height of the candy, and long, depending on the size of your future basket.
Fasten a sheet of paper in a shape cylinder and secure the edges with a stapler. On the 300 grams chocolates, a basket with a diameter of 7-8 centimeters.

3) Glue to the bottom of the cylinder round bottom... To do this, you can use a circle of loose paper by folding the edges and gluing them on the outside with glue. Then glue on loose paper circle of cardboard, which corresponds to the diameter of the bottom of the cylinder.

4) Stick strips of double-sided tape on the top and bottom of the outside of the cylinder.

5) Then, one at a time, begin to fasten candy.

6) You should get something like this uncomplicated basket:

7) Decorate the basket as an addition bow tying up a row of sweets. The basket is ready. Now you can put other candies in it or make several corrugated paper flowers.

Laptop made of candy
This original candy gift can be used as a basis for many other compositions. A laptop can be easily made out of the candy box, which is decorated with sweets on the outside. The box should have an opening and closing lid that will serve as a "monitor" for the notebook-composition. If you do not have a suitable box, the basis of the product can be made from a piece of styrofoam.

To work you will need:
- Sweets (flat and rectangular)
Styrofoam (thickness - 2 cm)
Glitter paper
Printed page showing the Windows splash screen
Paper knife
Thick wire
- Scissors

Let's get to work:
1) Lay out the flat candies to get outline of the future laptop and draw around the outline with a pen.

2) Cut from the foam around the contour two identical rectangles, then wrap each one in glitter paper or foil. These will be the main parts of the laptop - the monitor and the keyboard.

3) Take the first blank and glue in the center of it printout with a computer screen saver.

4) Lay out flat long candy from all sides of the picture.

5) Lay out the candies and glue them to the second blank, which will be keyboard... For example, like this, you can use more tall rectangular candy to get the keys:

6) Glue the candy to the outside of the laptop.

7) Cover with candy sides of workpieces, then only from three sides. You will need the fourth side of each to secure it. To do this, use thick wire, sticking it into the end of the monitor.

8) bend wire at the desired angle and insert the other end into the keyboard blank. To connect it to a monitor.

9) You will have an open laptop.

Here are some more options laptop made of candy, which will be a great gift for your beloved sweet-tooth men:


DIY candy tree
Very popular gifts for any special occasion - candy trees... There are several ways to make them, but the principle is the same: a round base, a leg and a pot.
Option 1:
This variant of the candy tree is the simplest. It will take you to make crafts no more than an hour... A variety of trees can be made on the basis of this product. It all depends on your imagination.

To work you will need:
- Sweets of various shapes (about 50 pieces)
Old newspapers
Wooden stick for the trunk
Glass or vase
Decorations (ribbons, colored paper)
- Scissors


Let's get to work:
1) Make from newspapers small ball of the desired diameter and wrap it with threads so that it does not unfold. From the bottom, stick a wooden stick that will serve as the trunk of your tree.

2) Stick the bottom end of the stick into a glass or vase and somehow strengthen to prevent the barrel from tilting. For example, you can fill a vase with the same newspaper or use a piece of styrofoam. The base for your tree is ready.

3) Make sure the barrel stood tightly in a vase and did not fall when you decorate your tree with sweets and other details. Start by attaching the candy. They can be glued with a glue gun. Better to use flat bottom candy, then it will be easy for you to unfold them right on the tree and eat.


As a basis for trees, you can take other, more professional materials, for example, foam ball and plastic stick which can be found in specialized handicraft stores:

As a basis, you can use liquid gypsum, which, when hardened, will firmly hold the trunk.

Working with plaster will take a little longer, although such a tree will eventually turn out more stable and reliable.

Option 2:
Original trees can be made from candies "Chupa Chups" or others chocolates on sticks... Moreover, these will not be simple candy trees: each such mini-tree will represent one candy.

To work you will need:
- Candy on sticks
Mastic (edible plasticine)
Spreading for cakes of different colors
Thimbles
Decorations for pots
Gypsum or hardening plastic
- Water

Let's get to work:
1) Insert the candy on a stick into the thimble and secure it with plaster or any other material that will work (for example, clay or salt dough). Let the base harden.

2) Unfold the candy, wrap it mastic and form a ball the correct shape.

3) After wetting with water, dip the candy in a container with sprinkles and roll it over so that small particles adhered to the tree.

4) Decorate the thimble ribbons or wrap in foil... Your candy tree is ready.

Similarly, you can do a big tree from round chewing gums.

Candy tree (master classes):
DIY candy cake
Candy cake- an original gift for a birthday or other holiday, as well as a beautiful craft that is easy to make. The composition is decorated candy flowers that can be made from corrugated paper. You can read more about candy flowers.

To work you will need:
- Candy
Corrugated paper
Styrofoam
Ribbons for decoration
Cardboard box
- Scissors
Let's get to work:
1) Cut out cake blanks from thick foam sheets: one larger, the other smaller. The size of the cakes will depend on you. Paste the blanks corrugated paper leaving beautiful edges on top.

2) Also cover with colored paper cardboard box which you will place on the topmost level and in which you can put small gifts and toys.

3) Paste the same paper over the top of the foam blanks and set all levels one on top of the other securing them well.

This is the basis for your future cake. Now you can decorate it with sweets. For example, you can place candy flowers and bouquets on top of it, or sweeten the sides by placing sweets on glue or double-sided tape.

Such a composition can be made from the same foam base by cutting it out in the shape of a triangle. It will turn out piece of candy cake.

One-deck candy cake from long and round candies and paper flowers:

This original cake is made from broken chocolate bars Kitkat and decorated with dragee on top M&M "s... Not bad idea for children's party or birthday... The chocolate bars were probably used without a backing, but held together with the help of a ribbon.

Candy grapes master class
Bunch of grapes made of sweets is an excellent and very original gift for those with a sweet tooth. It can be used as a separate gift, or to decorate any composition with it: a cake, a bouquet, and so on.
Option 1:

To work you will need:
- Round wrapped candies
Wire for bouquets
Details for decoration - leaves, ribbons, ladybugs, etc.
- Scissors
Let's get to work:
1) Make blanks for the bunch. To do this, use scotch tape for each candy attach the wire.

2) Then collect several candies (5-6 pieces) together and secure with tape or tape. For example, you can use colored tape to match the color of the wrapper, then the fasteners will not be visible.

3) Do several small bunches which you will then attach to the thicker wire.

4) When the whole bunch is ready, decorate it with leaves, ribbons and other decorations.

With the help of such bunches, you can decorate gift bottle of wine:

DIY gifts are becoming very popular. Especially if this gift can be eaten with great pleasure. In this article we will analyze all the nuances of cooking cake of chocolates and sweets.
First, you need to choose a variety of chocolates that will be included in the composition. After all, each candy is wrapped in a colored wrapper, so it is important to choose a certain color of the packaging material so that the cake is visually attractive.
Preparing such a gift is a creative process that requires the expression of imagination and creativity. And in order to get tremendous pleasure from the process and feel like a brilliant master-artist, you need to deal with all the stages of preparation.
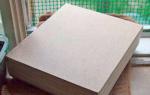
- Prepare the frame on which the sweets will be attached. For this, it is best to use foam, since you can easily build the desired shape from it, be it a circle, oval or square. Also, cardboard is suitable as a material for making the base. It is not as practical as polystyrene, but it will make simple shapes just as easy.

- The prepared frame must be decorated with whatever material you have on hand. It can be satin fabric, corrugated paper, or just colored paper. This must be done so that the hero of the occasion, after eating the sweets, will have a beautiful box and pleasant memories, and this will also make the original gift ideal.


- In order for the sweets to firmly adhere to the frame and keep the given shape, they must be attached. To do this, you can use double-sided tape, it will easily hold the chocolate on the frame, and it will be quite easy to tear it off. Scotch tape is a practical and affordable material. You can also use glue, but this method has its drawbacks - if glue gets on the candy, you can't eat it anymore. Therefore, when using it, be very careful.
- For a beautiful cake, use the same shape of chocolates for each tier of the cake. The first (lower) tier is best made from cylindrical chocolates. This will make the tier higher. Also consider the color of the wrapper.

- Decorating a cake also requires a little creativity. For this, candles, and beads, and small toys, and any confectionery figurines, in general, anything that suits the theme of the holiday, will suit you.
Chocolate cake decorations
Anything is suitable as sweets for such an original gift. The main thing that you need to know is the taste preferences of the person who is preparing this cake.
For the preparation of children's sweet cake, they are most often used:
- Kinder chocolate
- Kinder Surprise
- barney bars
- small juice packs
For older children, they also use Chupachups, MMDems, chewing gums and much more.

For adults, recipients of a sweet gift consider their preference for milk or dark chocolate. And already knowing this, they choose the right sweets.
Making a chocolate cake
A spectacular chocolate cake decoration is the key to success. This stage of preparing an original gift should be approached with special interest and imagination. Here are some options for decorating a cake for a children's party:
- Having prepared the frame-base of the desired shape, give it color using corrugated paper. Cut out a strip 4 cm wider than the width of the base.
- We glue it with glue, smooth the joint well.
- We wait a bit for the glue to set, and gently stretch the side sticking out at the top (our 4 cm). This will create a wavy side of the bottom tier of the cake, which can be filled with small multi-colored candies or other decorations.

- You can also glue the pockets for each bar along the rim of the frame, or glue the sweets with the same corrugated paper as the entire frame.

- Having attached chocolates, bars or juice to the body, you can tie them with a beautiful satin ribbon.

- You can make beautiful flowers from corrugated paper. To do this, cut out 5 or more petals in the form of a droplet and wind them on a toothpick, breaking it in half.
- With the sharp end, stick the flower into the cake, forming a beautiful composition.
- The middle can be made of candy in a beautiful wrapper by gluing it with double-sided tape.

- If the cake is intended for a birthday person, candles are placed on top, either a large number or small candles. They can also be wrapped in the shape of a flower, only it is better to use wrapping foil for this.

Photo of chocolate cakes for a children's party


Chocolate cakes for adults
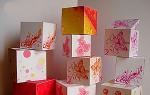
- When decorating a cake for a woman, the main thing that is used is bouquets of corrugated paper with a sweet center, various shapes of beads, ribbons. Here are several options for compositions of jewelry for a creative gift for a woman:


In order to learn how to make flowers of unique beauty for decoration and giving such a gift just a stunning look, watch the video master class.
A man's cake is often decorated in darker colors and different models of cars are used, cakes are made in the form of emblems of car brands, in the form of a ship or an airplane, it all depends on the skillful preparation of the frame.
Here are several cake options for congratulating men:


No one can forget a gift of such beauty. It will delight not only little sweet lovers, but also charm adults with its beauty. Creative, and most importantly, handmade, chocolate cake decorated with sweets and other decorative elements is a real gift from the bottom of the heart. After all, this great work done will require tremendous patience and investment of your whole soul in it.