A box made of fabric and cardboard: how to make it quickly and easily. Craft box out of the box DIY boxes made of cardboard and fabric
Every woman at least once in her life has come across a situation when her favorite small trinkets have nowhere to store. Someone solves the problem by conducting an audit in the house. But you can do with "little blood", without depriving yourself of the accumulated wealth - to make a box out of cardboard with your own hands.
What size your casket will be depends first of all on the volume of accumulated treasures - someone will need an original small paper box for earring rings, while someone will have a container of materials for needlework reaching the size of a grandmother's chest. In any case, whether you want to make a beautiful chest for your mother or make something convenient for yourself - look at our mk, you can go through the stages of creation step by step and then you will be able to make a box of any size.
 Crafts made of cardboard - original hobby with a distant history. In the modern world, few people own this art, however, twenty years ago it was the most popular way to have fun on a boring, rainy evening. The boxes were made not only from new cardboard, but also from old postcards or magazines.
The most interesting thing is that despite the incredibly beautiful appearance of the finished product, the manufacturing process is very simple. To create a paper box does not require special skills or knowledge, it is enough to collect all the necessary materials - and you can start.
Preparatory stage
 On the Internet, you can find many ready-made blanks for creating a cardboard box. They only need to be printed and assembled. But it's much more interesting to create a blank on one's own... You have to show your imagination and a little ingenuity, but the result is worth it.
Before proceeding with the creation of a blank, you need to decide on the method of fastening the parts:
- Gluing;
- Assembly;
 The set of basic materials.
However, techniques can be combined using both gluing and assembling for a single product.
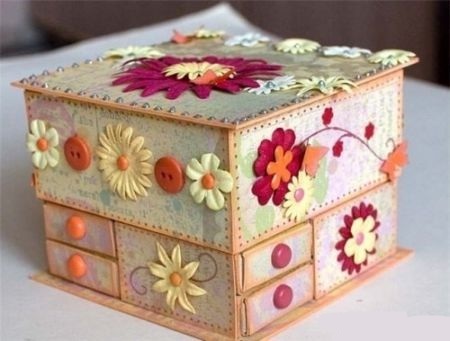
The finished box can be additionally decorated applique or flowers made of satin ribbons. It all depends on your taste and the purpose of making the box.
Gallery: cardboard box (25 photos)


Box by gluing
 So, let's get down to the main question of the article: how to make a cardboard box? Consider the simplest option- glued cardboard box. The capacity and purpose of such a product depends on your needs.
We need:
- Thick cardboard;
- Two tetrapacks for milk (one tall, the second medium-sized);
- Clothespins;
- PVA glue;
- Super glue;
- Scotch;
- Kraft paper;
- Scissors;
- Two small magnets;
- Wood beads;
- Materials for decorating the product: beads, ribbons, fabric, flowers, fringes, etc.
Let's start the master class:

 In such a product, you can store various women's little things or materials for needlework. The original way to use is to keep in a box clock... For fashionistas who have a large number of these wrist accessories in their wardrobe, such a box will be a real salvation. Watch mechanisms will be protected from dust and accessories will no longer be lost, being always in one place.
The assembly method is the simplest possible. To complete it, you need to find on the Internet and print a ready-made template on thick paper. Then, using scissors or a utility knife, cut out the shape and assemble. After assembly, the product can be decorated with any decorative elements. This option for creating a casket is ideal as a gift wrapping.
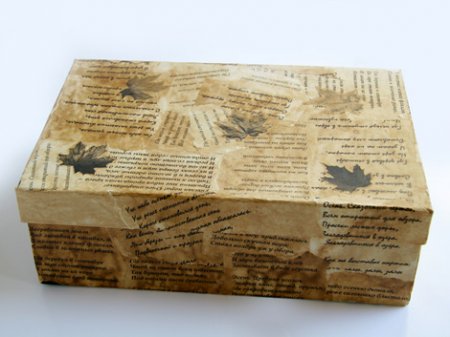
Original box for money
 To store money, many use various hiding places which can be easily purchased at any gift shop. But why, if you can make a money box with your own hands? The original piggy bank will reliably hide your savings and decorate the interior.
To create a storage box money we need:
- Book (it will serve as a cache);
- Stationery knife;
- PVA glue;
- Glue brush;
- Kraft paper;
- Pencil;
- Ruler.
Let's start the master class:

The product can be used as packaging for valuable gift, for example, luxury watches. Having made several compartments in the box, it can be turned into a storage for small items. Or make a curly hole, then such a box is ideal for storage memorabilia.
Cardboard box
 Another easy way to create a cardboard box with your own hands is to use a ready-made box. For the master class we need:
- Simple cardboard box;
- Magazine clippings;
- PVA glue;
- Pencil;
- Ruler;
- Thick cardboard;
- Lace or rope.
Getting started:

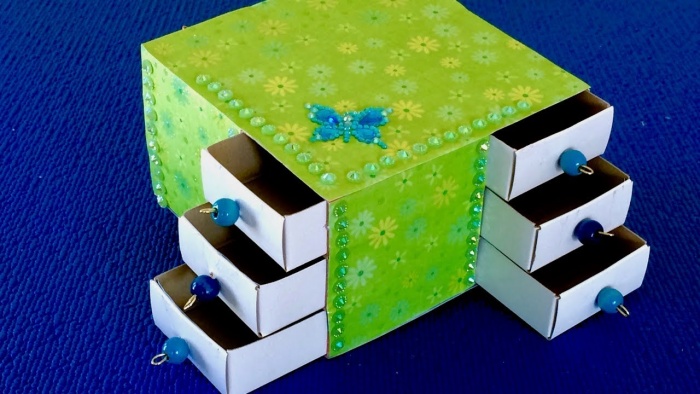
 By the same principle, you can do casket with compartments or drawers. Only in this case, it is necessary to braid the box after connecting all the parts. It is not difficult to do this kind of work. Print schema the caskets you like, cut out and collect the details.
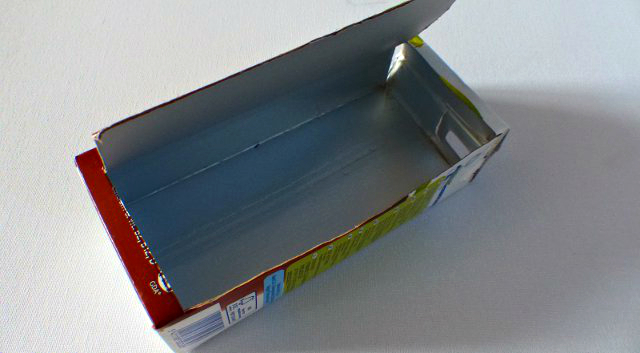
To make a hand-made box happy, even the simplest materials at hand will do. Find out how to sew it from fabric and cardboard, what technique exists for this.
So, do it yourself box. What and how to make a box? This will require:
- an old shoe box, from which we will borrow a durable cardboard with a corrugation inside;
- designer thin (coated) cardboard;
- natural or artificial fabric of several types and colors (calico, chintz, satin);

- indoor fleece;
- button and decor;
- round elastic band;
- masking tape;
- silicate glue.
Check out the step-by-step description of how to make a box with your own hands:
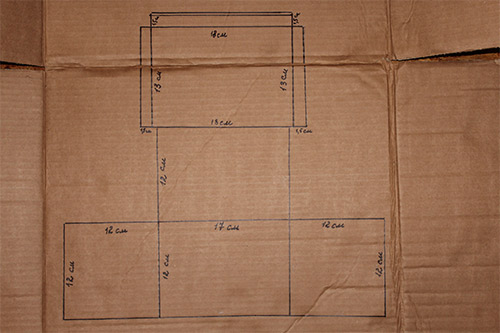
- Cut out the parts from the corrugated board.
Cut the same details out of coated cardboard.
In the photo, light-colored parts are marked with coated cardboard. Their sizes:
- No. 1, 2 pcs. measuring 7 x 13 cm from two types of cardboard.
- No. 2, 2 pcs. measuring 7 x 19 cm made of two types of cardboard.
- No. 3 made of coated cardboard measuring 7 x 19 cm.
- No. 4 corrugated cardboard measuring 7 x 20 cm.
- No. 5 - 2 pcs. made of coated cardboard 13 x 19 cm.
- No. 6 - 2 pcs. from corrugated cardboard measuring 14 x 20 cm.

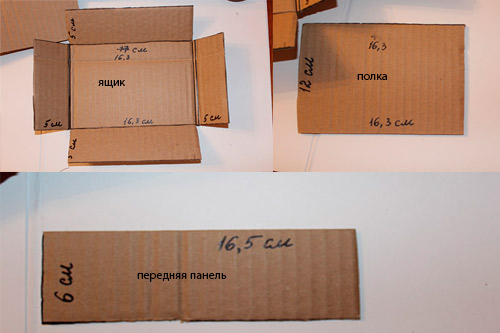
- How to make a lid out of cardboard?
Glue parts No. 4 and 6 made of corrugated cardboard onto the fleece. Arrange them so that # 4 is in the middle of the fake.
Leave a distance of 0.5 cm between the parts. This will be a cover - carefully cut the part out of the fleece.

- Place the fleece cover on a decorative cloth.
Cut out a rectangle 1.5 cm from the edge of the template.

- Wrap the indents in the middle of the workpiece and glue to the corrugated board.

- Glue the decor to the outside of the lid and sew a button.

- On the other piece of fleece, place the pieces # 1 and 2 cut out of coated cardboard and place them around piece # 5. Leave a distance of 3 mm between them. Glue them to the fabric.

- Mask the seams with masking tape.

- Cut out the workpiece.

- Place the blank on the fabric you have chosen to decorate inside. Cut out by indenting 1.5 cm.
Glue the edges of the gaps to the cardboard base.

- Sew the workpiece at the folds (by hand or with a sewing machine).

- Fold the bottom blank so that the fabric is inside. Tape the folds with tape.

- Stick the rest of the corrugated cardboard to the fleece and cut it out.

- Wrap each piece with a cloth for the outside. At the same time, on long elements of the workpiece, do not bend or glue the fabric from the short sides.

- Glue the long pieces to the outside of the box.
Secure the top with binders. Glue the rest of the fabric at the ends to the body of the box.

- Stick two short strips on the body. Dry the structure.

- Cover detail No. 3 of coated cardboard with a cloth for the inside. Do not glue fabric on long sides.

- Glue this piece in the middle of the lid blank.

- Cover the last piece of coated cardboard with a cloth for the outside.

- Glue to the lid, hiding the threads from the sewn button. Secure with binders.

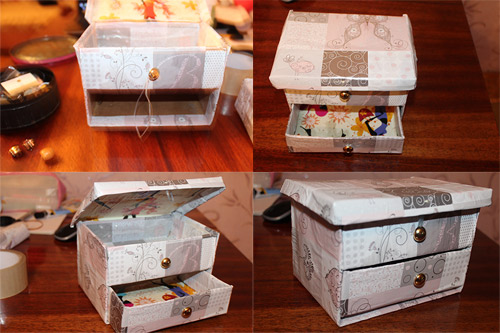
- Glue the lid to the box. Place an elastic band between the bottom and the long part of the lid. Leave to dry.
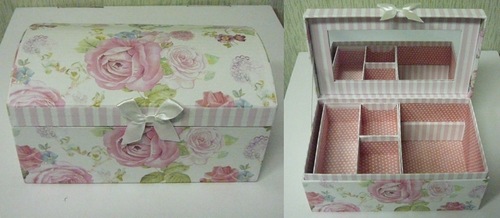
The jewelry box is ready!

Having mastered the proposed technique, show your imagination and make boxes of different sizes and shapes.
Such crafts are an excellent decoration for the interior and a convenient organizer.
Decorate the box with flowers or lace. It will be a wonderful gift for a birthday, wedding and other important events.
Svetlana Dyubina-Laikova 4267
Every home should have a handicraft box where the most essential sewing accessories are kept. Consider several master classes for making handicraft boxes from improvised material for different needs.

 |
Aegidius | 1,020 R | |
 |
Aegidius | 1 820 RUB | |
 |
Aegidius | 1 690 RUB | |
 |
Aegidius | 2 380 RUB | |
 |
Aegidius | 2 160 RUB | |
| More suggestions | |||
Wicker box for needlework: a master class for children
This box will require any cardboard, plastic or metal jar with a lid. Having stepped back from the edge a couple of centimeters, so that the lid can be easily closed, make holes at the same distance above and below.


Using a darning needle, pull the woolen threads through the holes so that there are vertical stripes on the front side and short horizontal stitches on the inside. Fasten the end of the thread from the wrong side. Next, go to the horizontal lines.
To do this, weave the vertical "columns" alternately, as when weaving paper rugs. The bottom and top of the box can be pasted over with decorative tape. In such boxes, you can store light things (sewing accessories, stationery, hair bands, small toys, etc.).


Whoever owns weaving newspaper tubes can braid a cardboard box. The finished product must be painted (mix the paint in PVA) and varnished. Then the box will be durable and you can store balls, needlework kits, hooks, needles and other sewing accessories in it.
 |
Aegidius | 1 210 RUB | |
 |
Aegidius | 2 150 RUB | |
 |
Aegidius | 1 130 RUB | |
 |
Aegidius | 1 160 RUB | |
 |
Aegidius | 1 140 RUB | |
 |
Aegidius | 1,290 RUB | |
| More suggestions | |||
How to make a needlework box for a child in 1 hour
Children can glue any plastic container with beads, decorative fittings and get beautiful boxes for needlework. In the first option, select the beads and braid by color. Glue the lid and the middle of the box with beads. As soon as the product dries, glue the tape on the double-sided tape.


You can string the beads on a thread and then glue them on the sides of the box. The technique is exactly the same as for making Christmas balls. Beading professionals can braid boxes and lids. This method is laborious, but the product cannot be distinguished from purchased caskets.


If you buy a satin braid in the form of a pigtail, a rose and a ribbon, you will get a great box for handicraft trifles. Glue the bottom and lid with a cloth, and then attach jewelry to it.


By the way, adults can make an express box out of an iron box. Just mark points at a distance corresponding to the thickness of the bobbins. Next, drill the bottom of the box, insert the screws, which you tighten with nuts from the inside. Paint the box, decorate and arrange sewing supplies.


 |
sewcity.ru | 120 RUB | |
 |
Shveiburg | 170 RUB | |
 |
Schweimarket | 123 RUB | |
 |
Shveiburg | 215 RUB |
Handicraft fabric travel box
For a travel box, you will need thick cardboard, fabric, synthetic winterizer, elastic bands. Measure 5 squares with a side of 9 cm in the form of a cross on cardboard. Glue the blank with a cloth from the outside completely and the middle from the inside.


Now cut out squares with a side of 8.5 cm from cardboard. Glue a synthetic winterizer, cover it with a cloth. In the middle, fasten the elastic band slightly taut. Attach the finished pads to the inside of the box.
Then again draw on cardboard 4 rectangles and 1 square in the form of a cross with sides of 4 cm and 7 cm. Also glue the blank with a cloth and padding polyester. Glue the part to the box in the middle, the side parts remain free.


Now you are making out the middle. You can make a ball-needle or a box for small handicraft parts. For the second option, draw a rectangle with sides 5.5 cm and 14 cm on cardboard. Divide it into five parts (you get 5 rectangles in a row). Cover the blank with a cloth, make a box and attach it to the box.


The last step is to make the lid of the box. Paste over with a cloth and decorate with braid. It turns out a small, but capacious box for needlework, which will come in handy on any trip.
 |
Schweimarket | 85 RUB | |
 |
Schweimarket | 3 190 RUB | |
 |
Schweimarket | 655 RUB | |
 |
Schweimarket | 85 RUB |
Unusual boxes for needlework
Fancy organizers can be a great gift for women. For example, for a saucepan box you will need fabric, synthetic winterizer and cardboard. Draw a circle with 16 sectors, marking the bottom of the product with a line.


Glue the cardboard bottom between the two templates and sew each sector, creating a "bag". Fill them with padding polyester, sew. Decorate upward with a strip of fabric to match the color of the product, sewing in pigtail handles. Make the lid of the pot out of cardboard and fabric. Decorate upward with a "bump".


The trimmed plastic cylinder with fabric pockets looks original. This box can also be used not for needlework. And you do it in two stages: first, you measure the fabric according to the size of the cylinder, taking into account the seam, and then sew on the pockets from the folds of the long material. Sew on the bottom and decorate the box.


 |


You don't have to buy expensive jewelry boxes or organizers to store jewelry and small accessories. It is enough just to make a cardboard jewelry box with your own hands. Most homes have wrapping paper, small pieces of lace, beads or beads and other materials that can be used to create an original box.
Components for crafting:
Shape of the cardboard box
Simple rectangular or square
A do-it-yourself box made of cardboard for needlework is formed from a box and paper tubes. First you need to choose a suitable base for the box - for example, a shoe box. It is better to take a base for the bottom about A4 sheet size or less, so it will be easier to go through the finishing process. 
To form the tubes, you will need glue, knitting needles. For weaving, you can use straws made of plain paper for printing, unnecessary press and magazines. The finished cardboard box can be painted with acrylics or left as it is.
It is advantageous to use colored paper for the printer: it has an extensive color palette.
The process of making a cardboard box with your own hands does not take much time. First, you need to glue the vertical tubes outside the box, which serve as guides. You need to glue in the interval of 4-6 cm - it all depends on the size of the box. Further, the tubes are bent to the side faces, and then inward.
A sealed cardboard, suitable in size, is glued to the bottom, which will hide the place where the tubes are fixed. Then the tubes are intertwined around the circumference of the base. The lid also folds down.
Round box
For needlewomen, the round coil left over from the scotch tape is an expensive material. This base can be used in different types of needlework: decoupage or scrapbooking, decorate with coffee beans, beads, beads, jewelry stones, stick on leather or fabric. To make a box made of round cardboard with your own hands, it is advised to use interwoven cardboard. 
First you need to attach the reel to the cardboard and draw three circles along the inner diameter and two along the outer diameter. Circles with a smaller diameter are glued together, it is recommended to use Moment glue. Sand the finished element and glue it with a large diameter circle in the central part.
As a result, a lid will be formed, which will hermetically close the box.
If there is a need to process the edges with sandpaper. The box layout is ready. It is allowed to decorate it to your taste with different beads and decorative stones in any needlework technique. The lid can be made slightly protruding: you need to enlarge one of the circles with a large diameter. This will make the box easier to open.
Heart shaped box
The heart-shaped box is perfect as a wrapper for a surprise for Valentine's Day. First of all, you need to cut out a heart-shaped element from the cardboard - this is the bottom of the box, the dimensions of which will predetermine the parameters of the box as a whole. Then you need to cut a wide strip of cardboard with teeth on one side. Stick the strip to the bottom. Collect the other side in the same way. 
You need to glue the two halves of the walls and attach them with paper clips, wait for the glue to dry. Decorate the inside and outside of the box with paper with different textures or ornaments. Glue two pieces of fringe to the base - they will act as curtains on which the lid is held. Then cut out the second heart, this will be the top cover. It needs to be glued to the curtains.
Decorated paper should be glued in the same way. Then, to your taste, you need to decorate the cardboard box in the shape of a heart. As an option, lace can be glued along the contour. Decorate the top with flowers, beads, ribbons, etc.
How to make a lid for a box

We decorate the box with fabric
To decorate a cardboard box with your own hands, you can use not only an old press or wallpaper, but also decorate it with fabric. With the help of a wrap, it is possible to glue the box with cloth. Such a thing can serve as a separate present, as well as an organizer for saving small household items, for example: toys for children, home decor items, sewing accessories.
Materials and accessories that are indispensable for covering the box with fabric:
- Box. When choosing, it is allowed to apply the rules described above for working with the press, magazines, wallpaper.
- The very fabric of which you will sheathe the box.
- Specialized glue, scotch tape.
- Sharpened scissors.
- You may need an awl in work, as well as a strong cord (you need to choose the color of the fabric).
In order to do everything accurately and get an excellent result, you need to follow the recommendations:

Soft box made of cardboard and fabric
The box with your own hands can be made of compacted cardboard and pasted over with a cloth. Make the lid with padding polyester - it will be soft. Such a box is perfect for saving jewelry, materials for needlework. The parameters of such a box are 18 cm by 9 cm. Also, you can enter your own value, based on what you will use it for.
To create you need:
- thick paper,
- matter,
- filler,
- glue,
- stationery,
- paper tape.
You need to draw a circle of the required diameter on thick paper and cut it out. Cut rectangles for the sides. 
Instructions:
- Form a box with adhesive tape and clamps.
- Paste the box over.
- Glue the bottom of the box with a cloth.
- To seal the side edges, cut a rectangle out of not very thick cardboard and glue it over with a cloth.
- Cut the lid out of the cardboard and glue the side. Put the synthetic winterizer on the lid and glue it with a cloth.
- Glue the edge of the cover with an additional piece of paper with a cloth.
Needle casket
To create a needle box you need:
- White fabric in peas.
- Satin ribbon.
- Scotch tape reel.
- Consolidated cardboard.
- Glue gun or regular quality glue.
- Scrapbooking paper.
- Stationery.
- Fillers.
Instructions for shaping a needle box made of cardboard with your own hands:

The needle casket is almost ready - it remains to decorate:
- Glue the red satin ribbon on top, bottom and sides.
- On a white fabric in scarlet peas, circle the coil.
- Sew the canvas, leave half unstitched.
- Cut off the parts so that the seam does not come apart.
- Turn on the front side.
- Insert the cardboard circle into the fabric.
- Put some filler inside.
- Glue the bottom of the fabric with cardboard.
- Add more filler, tuck the top of the fabric, glue it to the cardboard.
In order to decorate the cover of the needle bar, make a bow from the tape and glue it to the cover.
Master class on creating a box with drawers
You can make an excellent box with retractable drawers with your own hands from available resources, for example, cardboard or matchboxes. Only tiny rings will fit in ordinary matchboxes, but if you buy tourist or fireplace matches, you can make a full-fledged box.
Required items to create a box:

Formation will take very little time:
- matchboxes, without a layer of sulfur, glue together;
- glue thick cardboard outside;
- surfaces that are visible to decorate with wallpaper or film;
- fasten decorative buttons on the fishing line or wire using an awl.
Decorate with beads, designs, bows if desired.
Box in the form of a doll sofa
Instructions for making a box in the form of a doll sofa:

Step-by-step instructions for the organizer box
To design an organizer box, you must have:
- an untreated wooden box;
- velvet fabric;
- high quality glue;
- brushes.
Tools needed to create an organizer box:

Instructions:
- Stain the wooden box, everything that has not been absorbed must be wiped off with a rag.
- Using a drill, you need to drill a hole in the center in order to fix the handle
- Cut out two pieces of fabric slightly smaller than the bottom and lid of the box. Then you need to cut another piece in half. Next, you need to lay a short piece of fabric on a long one, sew to make a pocket. Secure the velvet fabric and organizer inside the lid and at the bottom of the box.
Box in the form of a book with a cache
Instructions for making a cache-box:

Making a shabby chic box
Components for making a box:

You need to cut a pattern from a decoupage napkin, then divide it into layers. Cover the entire area of the pre-made cardboard box with paint. Dry with a hair dryer and leave to dry completely. Rub the box with a candle in places where there will be scuffs. Be sure to rub the corners with a candle. Cover the box with white acrylic primer and dry.
Rub the box with sandpaper to create a worn effect. Attach the decoupage pattern to the box, apply glue on top. Allow to dry, paint over the edges of the pattern with a brush with your own hands. Dry and varnish.
Ideas for decorating a homemade casket
A cardboard box with your own hands can be easily decorated with anything, suitable: beads, old unnecessary jewelry, decorative stones, buttons, etc. Get creative, you can look at various decorating options online for inspiration. Do not be afraid to do something of your own, the main thing is that it is done from the heart.
There are many variations of creating a beautiful cardboard box at home. Have you decided to do something interesting with your own hands? Choose the option you like and go for it.
Video: DIY cardboard box
How to make a cardboard box with your own hands, see the video:
Master class on how to make a cardboard box with your own hands:
Content
The options that we have prepared for you are suitable for decorating a gift for any occasion and for any occasion, and for storing jewelry, postcards, and various little things. Stock up on good heavy cardboard, sharp scissors, glue, and colored paper.
Options for making caskets
Out of the candy box
As usual, let's start with the simplest and most affordable option for creating a cardboard box with our own hands, using a ready-made candy box. What you need additionally:
- PVA glue;
- scissors;
- decorative (gift) paper;
- white acrylic paint.
First you need to get out of the box a foam insert with cells for sweets. Now the box needs to be pasted over with gift paper, and the inside should be painted with white paint. Instead of paint, you can use white cardboard, which can be used to decorate the inside of the lid. If you want, you can return the plastic cells so that it is convenient to store rings, earrings and chains separately.
From ordinary matchboxes
This is also one of the interesting and affordable options for how to make a cardboard box with your own hands. The role of the main material will be played by cardboard matchboxes glued together. What you need:
- thick cardboard for the base;
- matchboxes - 8-10 pieces;
- PVA glue;
- paper for decoration;
- beads, felt, rhinestones, beads and other decor.
To begin with, you need to cut a square out of thick and strong cardboard, to which you will attach the details of the future decorative chest of drawers. Connect the matchboxes in pairs and glue them to the base. Now you can start decorating. You need to paste over the “drawers” of the chest of drawers with paper and attach your decor to them.
Use buttons or large beads to create comfortable drawer handles.
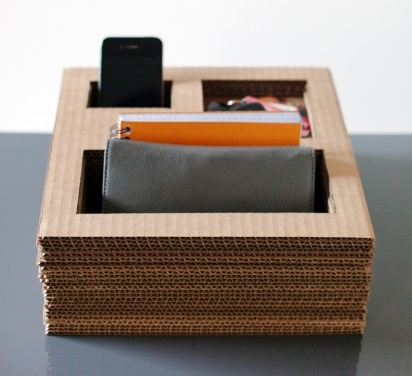
Corrugated cardboard
This is a do-it-yourself box made of cardboard, which does not have a lid and which can act as an organizer on the desktop. What do you need:
- several sheets of thick corrugated cardboard or ordinary thick cardboard;
- stationery knife;
- PVA glue;
- Ruler and pencil;
- pattern.
First you need to make a drawing of a cardboard box with your own hands or use ours:

Now, with the help of a sharp clerical knife, you need to cut out the holes of the future organizer. You need to prepare 20 of these templates. But! Make five layers with only the large hole, five more with all three holes, and 10 templates with only two holes. You will also need 5 sheets without holes.
Now you need to glue the parts together: first, connect the solid parts, then glue the parts with a large hole, then glue the parts with two holes and the rest of the parts on top. You need to put something heavy on the organizer and leave it on overnight. Now you can put the stylish and eco-friendly box on the table and store your phone, notebooks, notes and other essential items in it.
Round
This is a do-it-yourself option for a box made of cardboard and fabric. You will also need the following materials and tools:
- synthetic winterizer;
- cardboard;
- dense material with any pattern;
- PVA glue;
- sharp scissors;
- paper tape;
- binders;
- simple pencil;
- ruler.
First you need to cut a circle of the same diameter as you want the chest to be. Now you need to cut out a long rectangle for the side. The width will depend on how high you see the future product. Now connect these two pieces with masking tape.
Now you need to glue the blank with the selected fabric, cut out the bottom of the box from the fabric as well. Use binders to secure the material and allow it to adhere well. According to the principle of preparing the box, make a lid, glue a synthetic winterizer on top so that it is soft and also decorate the lid with a cloth. You can use additional decor to decorate the sides and lid.

You can decorate the box not only with fabric, but also with thick gift paper, and also use the shape of a heart. We offer several interesting options that are suitable for decorating a gift, for example, a watch or jewelry, as well as for storing sewing accessories or jewelry.
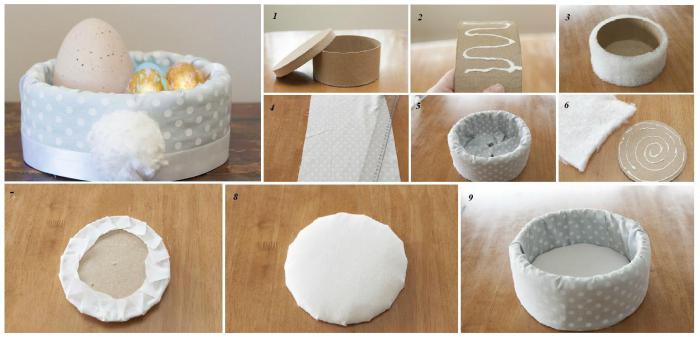
It is convenient to store jewelry made of precious metals in such a soft box or use it as an egg holder for Easter.

A cardboard box does not have to be additionally decorated with paper or cloth; you can use corrugated cardboard and leave it in its original form or paint it in any color.

In the form of a chest
Such a chest is useful for playing pirates, for collecting money at a wedding or for storing any things. If you use a ready-made pattern, which we will place below, then choose a thinner cardboard that bends easily. If you are going to assemble the lid of the chest in parts, then thick cardboard will do.
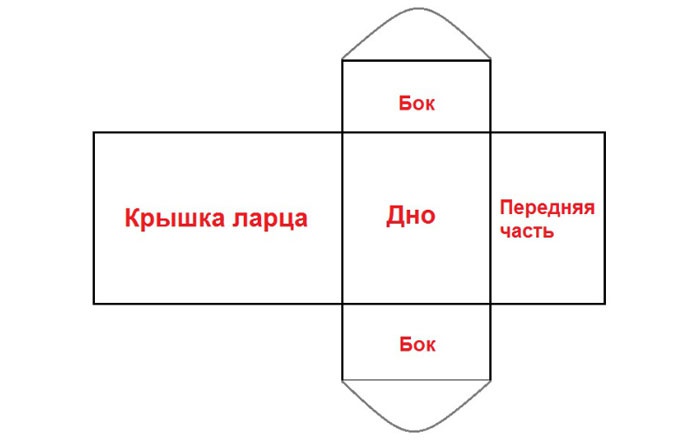
Decorate cardboard boxes with your own hands with fabric, paints and satin ribbons.


Made of cardboard with multiple compartments
You need to stock up on the following materials:
- thick cardboard (an electronics box will do);
- sharp tailors' scissors;
- PVA glue;
- Scotch;
- large buttons;
- decor (paper, lace, napkins for decoupage technique, paints, rhinestones).
First, make a drawing of the future box on the prepared cardboard.
Now you need to carefully cut the pattern and prepare other details.
Assemble all the structural parts using duct tape. It will provide the structure with strength and stability.

When the design is ready, then you can start decorating. Use any material suitable for this: fabric, paper, lace, satin ribbons. Use large buttons as handles.
Book box
An interesting gift option or an option for secretly storing jewelry or money.
What is needed for the craft:
- dense binding (take an old or unnecessary book, which is not a pity to put on a craft. Although, of course, book lovers can argue with this);
- scissors;
- pencil;
- ruler;
- corrugated cardboard;
- thin cloth or gauze;
- for decoration of the top: vinyl wallpaper or thick fabric, or gift paper and other materials.
First you need to separate the binding of the book. Next, you need to build a box of a future book-safe from corrugated cardboard.

Carefully connect the parts and use gauze to seal the walls. Further, it remains only to decorate the top of the future book, using any material that is at hand.
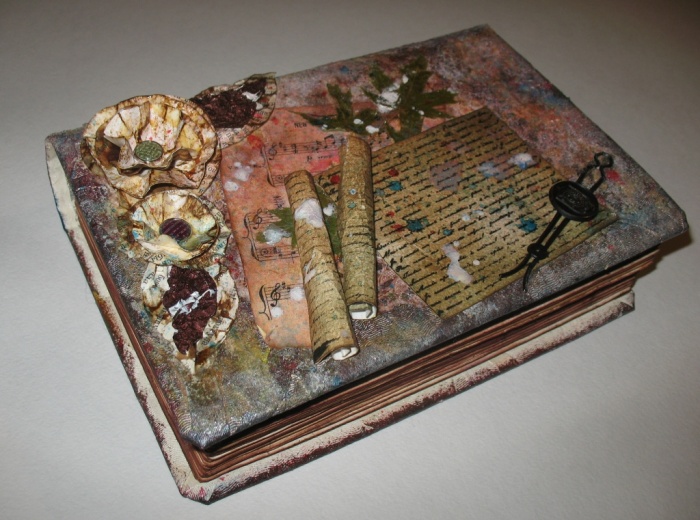
This is an option for decorating the box in the form of a book, although the execution technique shown in the photo is somewhat different. A real book was used here and its glued sheets with a cut out hole serve as a storage container.
From a milk or juice carton
A fairly simple version, but it turns out very cute and beautiful. At first glance, it is even difficult to understand that the chest is made from an ordinary tetrapak box. What you need:
- an empty and clean box of any shape;
- masking tape;
- printed paper or wrapping paper, you can even use wallpaper;
- stationery knife;
- ruler;
- pencil;
- glue;
- all kinds of decor;
- satin ribbon.
To begin with, on the wide side of the box, you need to outline the future door with a pencil and a ruler and carefully cut it out with a knife.
Now with scotch tape (you can use masking tape) you need to glue all sides of the box, as shown in the photo:

Then you can start decorating the box. Use your pre-cut materials and glue to complete the look. You can also attach a clasp or satin ribbon to your box by tying a bow.

To make the box look like a real box inside, you need to glue it over with velvet, felt or any suitable soft material.

We offer you to see a few more photos of cardboard boxes with your own hands:

When decorating, you can use various interesting techniques, for example, decoupage, craquelure, quilling and others.
An ordinary shoe box makes an excellent jewelry box with compartments for storing jewelry. It is quite easy and convenient to work with thick cardboard, it is durable, lends itself to the action of glue and goes well with various decor.
We suggest using one of the above-mentioned techniques in the design of a cardboard box with your own hands. The master class is traditionally at the end of each of our articles:
Post Views: 1 171