Crafts Christmas toys material trash design. Craft ideas from plastic trash bags. From cardboard - in a couple of minutes
Scientists say that the tradition of decorating a Christmas tree under New Year came to us from our pagan past. There is a lot of controversy and debate on this subject. But we, the descendants of those same pagans, by and large do not care where this tradition came from. The main warmth of the family hearth and such a bright symbol of the new branch of time. New Year is for many that point in the life span of time, which is so required to be set. Mark the end and, accordingly, the beginning.
Both big and small love to decorate the green fragrant beauty of the Christmas tree. Agree, there is something magical in this. We could not avoid this issue and we offer you collection of crafting ideas New Year's toys for your crazy hands. Let's not talk about value, a lot has already been said about this, and on our website, in particular.

Just read the article, you will surely be interested in one of the ideas. And if one of the crafts we have proposed takes pride of place on your New Year's green or maybe not green beauty, it will be a holiday for us.
In this article, let's talk about Christmas tree decorations that can be built from improvised means and which are advantageous to distinguish your Christmas tree from many others. So, let's begin…

The snowman is one of the traditional symbols of the New Year and, as a result, the most popular Christmas decoration. But how often have you met snowmen made of iron bottle caps? Not? Then meet: snowmen from caps.
What you will need to create a fun snowman:
- Iron lids from glass bottles(these can be found on beer bottles and lemonade bottles in glass containers).
- Acrylic paints.
- Paint in a can. White.
- Tapes. Preferably not wide up to about one centimeter.
- hot glue
- Buttons.
- Scissors.
- Tassel.
- Glitter or something similar for decor at your discretion.

Using spray paint, paint inside caps in White color. Before painting, bottle caps should be washed, dried and laid out as tightly as possible on one plane. Painting is preferably done outdoors. The paint should cover the inner surface of the lid tightly, if necessary, repeat the staining.

We form the body of a snowman
We form the body of a snowman
After the covers are dry, you can start assembling the bodies of the snowmen. Lay three lids in a row, with the convex side facing you. Try on how many ribbons it takes to secure all three lids together with hot glue. Cut off the measured piece of tape, do not forget to leave a margin of tape in order to make a loop for hanging.
Glue the cut tape, as mentioned above, with hot glue to the lids. You can grab the covers a little beforehand so that they hold better on the tape, so to speak, add structural rigidity.

Take acrylic paints and use a thin brush to paint eyes, nose, mouth and buttons on the painted side of the bottle caps. If you do not have a suitable brush, you can replace it with a toothpick. The edge of which needs to be kneaded a little to get something like a miniature panicle. After the paint dries, you can add a little sparkle.

Cut small pieces of colorful ribbons and tie them to your snowmen in the manner of scarves. In places where you tied scarves, glue on a bright button. How do you like the idea?
A burnt out light bulb is considered garbage and is rushed to be thrown away. Well, in vain. In our business, exactly what should be thrown away will ideally fulfill the role of something new. Here's an idea with funny penguins for you to consider. Such penguins will perfectly decorate Christmas tree and make your family happy.

So, what you need to create a cute inhabitant of polar ice floes:
1. Damaged incandescent bulbs.
2. Acrylic paints or gouache.
3. Tassels. It would be nice to prepare a few. It is good to cover large areas with large ones, and draw small details of faces with thin ones.
4. Ribbons, cords, threads or something similar.
5. You can prepare hats in advance. The hat left from the toy will do or you can build something similar yourself.
6. Hot glue.

Damaged light bulbs should be cleaned of dirt and degreased. Then cover with black and white paints. Do you remember the color of real penguins? Exactly. The back is black, and the belly and muzzle are white. You can make a simple and slightly complicated coloring of a pingini. You can simply cover the light bulb with white and black paint, or you can draw a little fins and an arc above the eyes.
Light bulbs painted white and black must be dried. Then paint the muzzles. Just use a thin brush to draw eyes, nose and blush.

Tip: to make it more convenient to work, take a reel of tape or toilet paper, or something similar. Install the bottom of the light bulb in a round hole of suitable size, it will not stagger and thus it will be easier for you to apply drawings to the surface.
After you have painted the penguins and painted their faces, you need to dress the cute ones. For this purpose, doll things are well suited. And if you wish, you can build clothes on your own. Knit simple hats and scarves from the remnants of the threads.

Yes, but don't forget the hanging loop. If your penguins will not be wearing hats, then simply use hot glue and apply the right amount of it to the very top of the cartridge and glue a loop of lace or tape. And in the case of hats, you must first leave a hole in them in order to thread the loop.

We put on hats, put on scarves. Scarves can simply be tied on penguins, or you can fix them with hot glue. This is at your discretion and wish.
That's all. Cute lamp penguins are ready. Hurry up to hang them on the Christmas tree. Let the family please.

The fashion for knitted napkins is immortal. All the same, for several dozen housewives there is one who will not fail to decorate the furniture with a knitted napkin or throw light lace on the monitor, in the manner of a grandmother's decor. Yes, they are not extinct, they exist. Therefore, rummaging through your stocks or mother’s, or even grandmother’s, you can find a couple of three openwork lace napkins. It's time to give them a second life.
openwork ball can be applied as christmas tree decoration or how christmas decor premises. And even leave it as a ceiling. There are many applications for this product.

- Lace. The remains of simple lace are perfect. Old knitted napkins.
- Inflatable ball.
- PVA glue.
- Tassel.
First you need to dilute the PVA with water. The approximate ratio of parts is 2:1. Glue and water must be thoroughly mixed and poured into a container with a fairly wide neck, you can even take a plate for this purpose.

Tip: do not use any other glue, especially silicate. He has a quality that in this particular case is completely out of place. After drying, this glue is known to turn into a substance that vaguely resembles glass. And having a tendency to crack and turn into sand from mechanical stress. Which is absolutely inappropriate. Yes, and when it dries on the ball, it will burst it. Experimentally proven.
Then, lace and napkins should be soaked in the resulting solution.
Tip: Naturally, the material of napkins and lace should have absorbent properties. At least the minimum.
Diluted glue can be applied to napkins and with a brush. Having previously laid them out on an oilcloth.

Now we need to inflate the balloon. Ideal if you take a simple and strong ball round shape. Determine the size yourself.
Gently cover the inflated and ball with glue-soaked napkins and lace. Try not to leave unfilled space between the material, but do not apply it in a thick layer. After the ball is completely wrapped, it must be carefully hung up and wait until the glue is completely dry and turn the napkins with lace into a kind of crust.
Next, the ball must be burst with a needle or something similar. The rest of the ball must be carefully removed. Now, for greater stability, the openwork ball can be sprinkled with hairspray. It was hairspray that showed itself perfectly in this case. Proven experimentally.

Tip: do not use this design as a candlestick (there are such ideas on the Internet). An openwork ball can easily ignite and then the result may be slaps on the butt of firefighters, and not a fun pastime. Don't ruin your holiday!
Watch the video on the topic: Christmas ball of threads
Although sometimes winter in our area reminds us of spring, and deep autumn, and then spring again, in a word, any season, just not winter with snow. But a warm knitted hat still remains a symbol of winter cold and snow. Use our idea and make funny warm hats as toys for the Christmas tree. Original, and what is important, practically from garbage.

So what you need:

1. Garbage. More specifically, toilet paper reels, cling film, or any other lightweight cardboard reel that you may be taking out of the trash can right now.

2. Remains of threads from knitting. It is desirable that they be approximately the same in texture and thickness, the latter is more important. The length of the segment can be taken from 25 centimeters.

3. Scissors.
4. Ruler.
5. A simple pencil or something with which you can take notes.
Let's start making:
Cardboard cylinders should be marked and cut into rings, like a cucumber. Choose the width of each ring yourself. This will determine what kind of cap lapel you want to make.

Tip: if you are planning to make wide lapels, then the length of the threads also needs to be increased.
The threads must be folded in half and make loops on the cardboard rings. They must be constantly tightly shifted one to the other. The cylinder must be tied tightly.


Leave a few loose threads about a centimeter, when you cut off the excess, they will form a semblance of a pom-pom.

This will give the cap realism and cuteness. A loop for hanging can be made from the same thread with which you grabbed the top of the cap under the pompom.

Thus, when hanging, the hat will not hang evenly, and this will give the product asymmetry, which will only benefit the appearance.


And again, the material for the future masterpiece is nothing but garbage. The lemonade bottle would have been thrown away at any other time, but not in this case. We offer you the following idea, namely a snowflake from the bottom plastic bottle. This craft will fit perfectly with any other Christmas decorations. A snowflake is a traditional symbol for winter and the New Year.

So, what do you need to create a wonderful Christmas decoration:
- Plastic bottles. Standard clear or blue/light blue.
- Stationery knife.
- Awl.
- Dye.
- Tassels.
- A thread or thin ribbon so that the toy can be hung.
- Sequins for decor at your discretion.
From the whole bottle, we are only interested in the bottom. Cut it off with a utility knife. Make it as low as possible. Heat the awl and carefully make a hole in the cut, into which you will eventually thread the thread for hanging.

Now apply a pattern of curls or lines to the cut bottoms. It can be both complex and simple, it depends on your imagination and wishes. You can add sparkles to the drawing or mix it with paints. That's all, Christmas decoration ready for the tree.

Call the kids! The proposed idea will simply honestly allow you to spend amusing minutes, or even hours, together. Everyone is used to that christmas balls round and convex. No, but this does not affect the originality and beauty of the toys at all. Moreover, the manufacturing process is absolutely simple. Even cope with it Small child. It will even be better for the children to help you in the manufacturing process. Since a kind of awkwardness inherent only in children, let's call it charm, is required to stylize our jewelry.

- Knitting threads, multi-colored. Better than medium thickness.
- Wire or twigs that will be easy to bend, and they will keep their shape.
- Pliers.
- Beads with large holes.
- Fantasy.

Let's start doing Christmas crafts
We take the wire and wrap it with a piece of dark fabric, or thread or dark paper. It is not necessary to do this carefully, it is enough that the wire is hidden by 80%.

We grab the free ends with pliers and make a few turns. Make sure that the wire is fastened and the wrapping material is fixed. It turned out a kind of not quite even circle with antennae.

If you use twigs, then fasten them with a thread so that they keep their shape. Just made a few turns. And don't forget to leave long loop ends so your balloons can be hung up.

Now we take multi-colored threads and wind them on an impromptu frame. We do it not tightly, but also weakly. You can use up to three colors, preferably contrasting.

On the thread that you plan to wind last, string a few beads, if desired. Attach the thread to the "tail" of the frame.

Everything, your New Year's toys are ready. Extremely simple and at the same time extraordinary and eye-catching. Happy New Year!
Christmas tree toy made of waste material. Master class with step by step photos.
Author: Fatima Alibulatovna Elmurzaeva, educator of MKDOU No. 10 "Cheburashka", Manas village, Karabudakhkent district, Republic of DagestanMaster Class. New life old toy
Description: The master class is intended for teachers of preschool, additional and school education, parents, children and all those who like to fantasize.
Purpose:Christmas tree decorations made from waste material.
Target: teach how to make crafts for the holidays from waste material.
Tasks:
- make decorations for the Christmas tree with your own hands;
- teach how to use waste material for creative ideas;
- develop imagination, fantasy, creativity;
- Cultivate diligence and perseverance.
Note: Poems of own composition.
In each group of the kindergarten there are toys that are no longer suitable for use. These are balls, wheels from cars, plastic geometric figures, pens, finished ballpoint pen pastes, broken bills, counting sticks, pen caps and much more. Don't rush to throw them away. Collect them in a separate box. When the holidays are approaching, I always use this box of mine for crafts. When the Christmas holidays are approaching, it's time to think about the Christmas tree, about toys. That's when happy times begin for my hidden trinkets. Their time comes, their turn to please children, guests. They have a second life.
You ask us: - Why
Do you need old junk?
"The economy must be economical" -
We will kindly answer you.
Lived in a small box
Handles, wheel, laces,
Skittles, ball, cap,
Burlap, spider,
Cubes, toys, cup-
We don't need old junk.
What happened to them once
We will tell you now.
Our pen sobbed: -
There is no benefit, where is the use?
Were going to calm down
All toys, as best they could.
-Don't be sad, don't cry, pen, -
The wheel tells her.
Let's all come to life, you'll see
Here comes Christmas.
We'll all be pulled out of the box
The one that hid here.
Turn us all into toys
New Year's, then ....
Let's shine, let's shine
smile to everyone...
That they didn't leave me
I'm not crying, I'm very happy.
I am glad to those who are so skillfully
They give us a second life.
New Year's toy
Believe me, you will like it too.
When I read this rhyme before work, the children set to work with extraordinary ease, and everyone is proud that he gave a second life to his old toy or trinket. And I really want all the junk toys in the kindergarten to get their second life not only on Christmas holidays, but also in autumn, spring, summer.
All groups have skittles with balls. Since they are made of lightweight plastic, they quickly deteriorate, crack, dent, fly off a round head, and as a rule, we throw them away. We give our children a second life. they turn in our hands into New Year's toys. Balls and cones have always been considered the main toys after the star. They can be big or small, different materials, simple and with the addition of various elements, as there is no limit to the imagination. In this master class, I propose to make two toys from skittles: round and oval, and a gift toy from a plastic cube.
For this you need:
- skittles, cube,
-fabric (you can use any, basically, since I like to sew, I use shreds;
- satin ribbons and gift bows that are no longer needed, ribbons of different colors (optional);
- cotton pads;
-buttons of different colors and shapes;
- different flowers from damaged hairpins, invisible or beads, scales (optional);
- caps from handles;
- colored paper foil;
- scissors, glue, ruler, needle and thread, pins.
Safety precautions when working with scissors, needle, pins:
- scissors must be adjusted, be careful when using, put closed to your right.
- so that the needles are not bent or rusty, do not leave them on the table, do not take them in your mouth, do not stick them into clothes, stick them into needle pads after work.
Progress:


We take spoiled skittles, separate the round part from the main part and get two shapes


We take a piece of fabric, cut it out with a square (dimensions depend on the size of the ball)

Lay the cut circle on the fabric

Wrap with fabric, making small folds

First we tie with a simple thread,

We take the heads from the handles and the ribbon and start decorating

We cut the ribbon into 4 segments -2 by 6 cm and 2 by 9 cm (depending on the size of the heads) and we sweep with a needle

Then we tighten the swept thread and make a spiral

We put these spirals on hats-heads from handles and get small Christmas trees

we make caps for these Christmas trees and sew these Christmas trees to the toy

take a satin ribbon (color and width at your discretion) and make a bow

tie a toy with this bow

cut the ends of the ribbon into thin threads (the height of the notch is at your discretion), take the damaged hairpins, invisibility with flowers, choose the most suitable one from them (also at your discretion) and sew to the toy

Here is our first toy.

To make the next toy from the oval part, the skittles will be needed

We take skittles and with a pin we fix the center of tying the form with a ribbon (the color of the ribbon is arbitrary)

we wrap it like a cocoon with a ribbon, fixing the ribbon to the shape with pins.

When we reach the end, we turn the ribbon 90 degrees and fix it so that we can make a suspension

bend the ribbon, make a pendant and cut out the rest of the ribbon

then we start wrapping the bottom part. When we finish tying, we sew the lower part, and so that the sewing from the bottom is not visible, we glue a cotton pad - we imitate snow

Let's get to the design of the toy. We take cotton pads and cut out three circles of different sizes.

From these circles we make a snowman and fix (or glue, at your discretion)

From colored paper, or scales, or from beads (optional), we make eyes, a nose, buttons for a snowman

We take a toothpick and the remnants of the cut cotton pad

We make a broom for a snowman and a snowy meadow out of them

We take different buttons, a twig from old Christmas tree, pieces of a cotton pad from a carved snowman

Next to the snowman we sew a button - a star

We sew a Christmas tree branch under the star.
We take buttons, string rain on them (I used a ribbon for gifts, as it can be twisted)

With these buttons we decorate our little Christmas tree, make a snowman a hat and snow under the Christmas tree

So our second toy is ready.

To make the third toy, we take the following:

We take colored foil, purple (optional), put the cube on it and wrap the cube

Since we have junk material-foil does not match the size of the cube and, accordingly, was not enough.
But it's even better. you can dream up

We take colored paper foil, golden color, cut out with a square (dimensions depend on the size of the square)

we draw the shape of a cube to the center of the paper and draw a diagonal line from the corners of the cube to the corners of the paper and cut it out

We put the cube in the middle with the unwrapped part turned down to the paper and begin to glue the foil to the cube.


It turned out a shiny two-color cube

From the cut out pieces of golden foil, cut out small cubes and make snowflakes out of them.

Tie a bow with a shiny ribbon (choose a color of your choice)
Christmas markets and New Year's markets are full of variety Christmas decorations and so they beckon to buy bright balls or painted monkeys, a symbol of the coming year. But it is not so easy to seduce us "greens" of dubious origin with artificial products. It's not in the policy of environmentalists to support the production of plastic toys. It is better to make them with your own hands - from natural materials. Fortunately, the collective mind in the embodiment of the global network will prompt a lot of ideas. In this issue of Ecoworkshop, we will try to make two toys for the Christmas tree and a garland on our own.
DIY toys
The most fashionable hand-made Christmas tree toy made of natural materials, is a figurine sewn from fabric. It can be an asterisk, a heart, a Christmas tree, a horse or a deer. Such “homemade” toys are good because they solve not only the issue of using natural materials, but also the problem of household waste disposal: pieces of fabric do not go into the trash, but get a second life. And besides, they create a festive atmosphere!

What pleases, there are a lot of ideas for using household waste to decorate a Christmas tree. For example, from wine corks you can “fold” a figure - a heart, a Christmas tree, a staff. You can fold the decoration from toothpicks.

And non-working light bulbs, thanks to the painting, turn into a Christmas tree toy depicting a Christmas character.

And, of course, in the course of decoration Christmas tree there are gifts of nature - cones, fruits, spices (cinnamon, anise stars), nuts and even shells.


If there is a lot of time, you can mold toys from dough, bake and paint.

Today we will try to make two versions of a New Year's toy - both from natural materials.
Toy #1
We will need: a bump, glue, salt, golden sequins, golden ribbon.

We apply glue to the scales of the cone and immediately generously sprinkle with salt - this will give us the effect of being powdered with snow. When the “snow” dries up, we tie a golden ribbon to the tail of the cone, apply golden sparkles to the scales. Let dry - and the toy is ready!

Toy #2
Required: 6-7 cinnamon sticks (more possible), glue, whatman paper, anise stars, cranberries.
We choose cinnamon sticks of different sizes. Some of them will have to be cut into pieces of different lengths. On a sheet of drawing paper we assemble a “constructor” in the form of a Christmas tree from sticks. We mark the contour of the Christmas tree on the paper with a pencil and cut it out - this will be the base on which the sticks are attached. Then glue the cinnamon to the base. You can not use a paper base, but drill small holes in the sticks and thread a thread through them. Thus, the "designer" tree will be strung on a string.

When the toy dries, it must be "decorated". Anise stars can cover the junction of cinnamon sticks. When the whole composition is dry, you can cut a hole in the paper tail at the top and hang a fragrant toy on a branch. Or thread the thread and tie the mount.

DIY garland
Homemade eco-friendly garlands are also a wide field for implementing ideas. Those who support nature use cones to make them - this is the most popular material. And here household waste can do a pleasant service. Bottle caps, old newspapers, paper and even citrus peels are used.


You can make a garland from the citrus fruits themselves: dry the slices in the oven and string them on a thread. Bright, fragrant and eco-friendly.

If you want an unusual garland, you can string decorated leaves or popcorn on a thread.

For the garland, we will need: cones, salt, sparkles, acorns, golden acrylic, golden ribbon and thread, red ribbon.

We make cones using the same technology that we described above: we coat with glue and generously sprinkle with salt. We make holes for the thread in the acorns, paint them with gold acrylic. When all the products are dry, we tie a gold thread to each. We twist together the gold and red ribbons, we impose cones and acorns on them alternately. The garland is ready! It can decorate both the Christmas tree and the room.

Wishing you inspiration and festive mood!
If the master has the desire to make beautiful decoration for your home or to please a child new toy, crafts from packages will be an excellent choice. It can be children's toys, and decorations for the interior of the house, and even beautiful accessories for fashionistas. For all this, it is enough to have only scissors and a roll of new ones. garbage bags.
One of the most simple crafts from packages with your own hands, but roses that can be made from bright polyethylene will become a very interesting decoration for the house. To do this, you will need: several new bags of different colors, wire and scissors. For decor, you can take a braid, as well as a green thread, but this will already be needed if the flowers will stand in a vase, and not be attached to any surface.
First you need to cut the wire into even segments. A ring with a leg is twisted from each element. For one rosette you will need 6 long and 5 oblong short petals. That is, we cut and twist the wire base in just such an amount.

One of the easiest crafts plastic bags is a rose
Then we take a garbage bag and cut out 11 squares from it. They need to carefully wrap the rings, and on the leg, which turned out when twisting the wire, fix everything well. This procedure must be carried out carefully so that the petal does not break and is held very tightly on the wire base.
One rosette is assembled from the finished petals. First of all, oblong petals are twisted, and only then larger elements are attached on top of them. Everything must be carefully fixed and straightened so that the plastic bag craft (rose) looks like a real flower.
Further, it all depends only on where exactly this flower will be used. If to decorate the walls or your favorite box, then you can leave everything in this form and simply attach it to the right place. But these flowers can also be put in a vase if you attach legs to them. To do this, it is necessary to attach a dense wire to the base of the flower, and then wrap it up to the very petals with green thread. Additionally, the stem can be decorated with braid. In any case, it turns out very nice. From these roses you can make a whole bouquet. To do this, you should call for help from children who will be very interested in spending time creating crafts from garbage bags.

The rose petals must be held very firmly on the wire base.
Polyethylene toys
Garbage bags can also serve as a great base for cute toys. You can work on them together with your child so that the kid learns to handle scissors and improves his creative potential, which in this case will be very relevant.
Important! Experts recommend classes on creating crafts from plastic bags for children who are already 5 years old or more, because in early age the child may not understand the principle of work and will quickly get tired of such a process.
So, for the manufacture of toys from polyethylene, you will need: a roll of garbage bags of the color that the toy itself is supposed to be, thick cardboard, scissors and additional accessories, that is, eyes, a spout, or just beads of suitable colors.
Regardless of which toy animal is planned to be made from bags, it will be assembled from pompoms. It is very easy to collect such crafts from garbage bags with your own hands. First we need to prepare the base, which is made from two cardboard discs. They should be exactly the same, and their size will match the diameter of the pompom. Cut a hole in the center of the cardboard circle.

Trash bags make great bases for cute toys.
Next, you need to take a garbage bag, unfold it completely and cut it into strips lengthwise so that they are longer. Now these strips need to be wound on 2 cardboard circles folded together. You can wrap in any direction, but so that there are no gaps on the circle. This is important, otherwise the pompom will turn out oblique. If the strip of polyethylene is over, take the next one and wind it according to the same principle. The more polyethylene can be wound onto a cardboard base, the more fluffy the pompom and the toy made from it will be.
This work can be done by the child himself, since there is nothing complicated here. But the further process should take place exclusively under the supervision of an adult. We will need scissors with which to cut the pom-pom along the edge. Next, take a polyethylene strip and fold it several times for strength. It must be wrapped between two cardboard discs so as to fix the pompom in the center. Then we remove the cardboard, and we are left with a beautiful ball that needs to be straightened so that it becomes more fluffy.
Similarly, you need to make a larger pom-pom. If the small one is the head of an animal, then the big one will become its body. In addition, you will need 4 more small pom-poms for the paws of the animal. To assemble the animal completely, you need to tie 2 large elements, and glue the small ones to a large pompom. Next, we fix the eyes and nose of the animal with glue, and then you need to take care of the ears.
Thus, you can make a lot of crafts from garbage bags with your own hands, not only a bunny, a cat or a dog, but also a snowman for the New Year. There is nothing complicated in working on such a craft, so it is imperative to involve a child in this work. It will be not only very interesting for the kid, but also useful.
Knitting from trash bags
What needlewomen just do not come up with. Even elementary garbage bags have become an excellent material for making unique crafts. Fashionistas came up with knitting from polyethylene. Thus, all kinds of handbags and backpacks appeared, which have sufficient strength to withstand a considerable load. Moreover, knitted crafts from bags look very interesting, but to create them, you need to prepare balls, that is, turn the bags into a knitting thread.
To do this, we need a clean garbage bag, which is cut across into even strips. You should get polyethylene rings. Now the task is to assemble one chain from individual elements.

Knitted crafts from garbage bags look very interesting
Important! To make knitting comfortable, and the finished product turned out beautiful, it is necessary to do this work so that knots do not form.
To avoid their appearance, we take one ring made of polyethylene and thread the second one into it, which we bend in the middle and thread one end into the other. Then we tighten it and get a strong connection of the two elements. We do this with all polyethylene rings. We twist the finished thread into a ball and use it for knitting.
It is worth noting that soft polyethylene is needed to make knitted crafts from bags, otherwise it will be difficult to make thin details. The work itself is extremely simple for those who know how to crochet. It will not be so convenient to carry out the product on the knitting needles, but it is also quite realistic.
With the help of polyethylene threads, you can knit not only a handbag or a cute backpack, but also a basket for storing small things, as well as a convenient cosmetic bag. If you take tight bags and a thick hook, then it is quite possible to create a rug. It can be knitted round or rectangular, decorated with a pattern, etc. Such rugs look good even at the threshold, in general, the hostess will definitely find a use for this useful little thing.
Hello, friends! In the last three days, I have been stubbornly surfing the Internet in search of ... garbage) Or rather, in search of crafts that can be built from it. And, you know, some crafts are so good that it's hard to even imagine that they are made from something that you could just take and throw away.
In this article I want to present you a great review of "garbage" masterpieces. Crafts from garbage that are worthy of praise!
Lesson plan:
From empty matchboxes
They say that matches are not toys for children! And it is right! But from the boxes, you can not only make toys, but even the real ones didactic games. See for yourself.
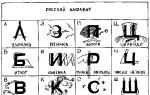
Pasting the boxes with colored paper and writing letters on them, we get the alphabet!

And inside we hide the figures, the names of which begin with different letters alphabet. The result is an interesting educational toy. And also multifunctional! After all, a child studying the alphabet can:
- try to line up the letters in order;
- to form words from letters;
- place items in the correct boxes.
And this not only develops thinking, but also fine motor skills.
Tired of learning letters? No problem! You can also relax! You can always build something from colored boxes.
Another option for playing with boxes is “Who eats what?”

I just want to say bravo to the author for such an idea. Here, on the outside of the boxes, images of animals are pasted, and inside there are different habitats. The boxes are disassembled. Well, then you need to properly collect them. Are we expanding our horizons? But how! And we also train memory.
I think many mothers, when they were still girls and had a couple - a trio of little babies, had furniture made from matchboxes. I had! I am sure that modern girls will also like to make it with their own hands and play with such interesting doll furniture.

There are so many shelves, so many cabinets. And there is so much to hide there.
You in kindergarten didn’t they accidentally ask you to make a mathematical pencil case? We were not asked, but I heard about such a contraption from my acquaintances, kindergarten parents. And it is made again from matchboxes. And it looks like this.

This pencil case helps kids learn geometric shapes, counting, colors.
If there is a needlewoman in the house, then she will surely be pleased with such an organizer for all sorts of different handicraft trifles.

And there is nothing complicated in its manufacture. The main thing is to turn on the fantasy!
You can also make puzzles out of boxes.

just take one beautiful picture, cut it into rectangles, stick the rectangles on the match houses and the puzzles are ready!
From toilet paper rolls
From matchboxes, we move on to another popular material for making crafts. Let me introduce you, toilet paper rolls, which give almost unlimited possibilities to young masters.
Let's start with a cool stationery organizer.

It's such a caterpillar. I think that if she settles on the desktop of a first-grader, then she definitely won’t be bored) The body of the caterpillar is just made of bushings. They are papered corrugated cardboard and look very personal. Do you agree? It will not be a shame to take such a craft to the school for the competition.
In continuation of our review - a sorting game for children.

10 colored bushings. They have 10 numbers. And various little things, buttons, some figures, large beads in bowls. The game will help you deal with colors, get acquainted with the score.
Strange as it may seem, but they write pictures with bushings! You just need to cut them, and then make different flowers, leaves, circles from the pieces. And glue it all in an arbitrary, beautiful order.

It turns out very soft and beautiful.
If you take a little top of the sleeve, you get the ears. And then the little animals with ears. Variety. And very beautiful.

Here are the heroes of various games.
And you can try to make these animals.

It's a little more difficult, but the result is worth the effort.
These pencil holders look interesting.

And the idea is simple. You need to take the threads and carefully wrap the bushings with them. Then build a decoration out of fabric or felt. And that's it! The original and pleasant to the touch color pencil holders are ready.
From egg trays
We also quite often throw away the trays in which eggs are sold, without even thinking that very pretty little things can turn out of them.
For example, here are such charming caterpillars.

Someday they will definitely become butterflies, but for now they are standing, looking, what else to chew)
Or those chickens. Probably laying hens! Just a couple of simple touches and the poultry yard is ready!

And you can be original! Take a cardboard tray, cut it into separate cells, paint them in different colors, string them on threads, and then tie these threads to a stick.

So an interesting bright pendant is ready, which will delight the eye and cheer you up)
And from the trays are obtained very beautiful flowers. You can make flowers very simple, such as daisies, or you can make them more complicated, for example, roses. There are a lot of options.

Well, you can decorate with such flowers anything you want. For example, a frame for a photo or a frame for a mirror.

You can also make beautiful flowers from plastic trays. But I think it's a little more complicated than cardboard ones.

Well, now not quite a craft from the tray, but rather from what lies in the tray. From eggs. Rather from empty eggshell. First you need to carefully remove the egg from the shell, and leave it almost intact, removing only the top. Then fill the shell with earth and plant the seeds of some fast-growing grass in it. Wait and water! And after some time to get acquainted with such funny herbs.

Just so that they can wink and smile at you, you will need to draw their eyes and mouths)
From empty juice or milk boxes
Do you like juice? Do you drink milk? Where do you put the boxes? You are probably throwing it away, but in vain! Indeed, in the soul, each box is not just a box, but a real little man! With its own face and its own character. Don't believe? See for yourself!

Vehicles can be crafted from large empty boxes.
And land.

And airy.

And even waterfowl.

Well, for those who like to grow something, this option is offered.

Vegetable garden in boxes. A very convenient way to grow different seedlings. And neatly, and you don’t need to spend money on special trays.
And now about the serious. How to make sure that there is always order on the table? Of course, install the organizer! You can, of course, buy it. But it is much more interesting to make it with your own hands from the same irreplaceable boxes. And decorate to your liking.

From used disposable tableware
Well, now let's move on to crafts from disposable tableware. Let's start with plastic spoons. What would be so interesting about them? Maybe flowers, and at the same time ladybugs?

Well, just like alive)
And a couple more representatives of the insect kingdom, only a larger size.

These beetles are made from paper plates. In my opinion, they are just adorable!
And how about such a great hat?

It is made from two plastic bowls. One deep and one flat. In a flat plate, the middle is cut out and a deep one is glued onto it. Don't forget to paint your hat in your favorite color and decorate it. Here, by the way, flowers from egg trays, which were discussed a little earlier, would fit.
If you like to arrange home theatrical performances, then plastic plates are ready to help you with the actors. You can make faces of different animals out of them, and then glue a small stick to each. And artists puppet theater ready.

And if you cut out the eyes in the faces, you get masks. And a fun children's masquerade is guaranteed to you. Then you will look at the photo and remember how great it was!
And now about beauty. Look what a miracle.

This is a fan made of plastic forks. The forks are attached to an old unnecessary disk. The fan is decorated with ribbons, flowers and lace.
A real work of art that can decorate any interior!
And in this photo you see a fan of large and small spoons.

Also very beautiful.
I also advise you to pay attention to the article about and from them.
That's all for today! I hope you liked the review, and you already wanted to create something with your own hands!
I wish you creative success!
Yours, Evgenia Klimkovich.