Pedicure gel transparent. How to make a pedicure at home gel lacquer with step-by-step photos. Pedicure gel varnish at home - stages of work
Today, fashionable instead of the traditional nail coating are increasingly choosing gel varnish. He is appreciated for convenience and durability. Pedicure with a coated gel varnish will look good even after a few weeks. Even novice masters can make it at home.
Well-groomed feet with pedicure
Advantages of gel varnish
This coat is preferred if they do not want to injure nails. When it is applied, it is not necessary to cut a nail plate.
Also, the gel varnish is chosen over the following advantages:
- long service life;
- beautiful appearance nails;
- variety of color solutions;
- additional protection;
- simplicity of application and removal.
When complying with all rules, the coating will hold at least a month.

Red saturated gel varnish
What will be needed for coating
If you decide to do, you need to purchase special equipment and means.
The list of what will be needed in the process includes:
- Ultraviolet lamp. It is designed for drying the coating. If the budget allows you to select the hardware with a power with a power of at least 36 W. In such a lamp, the gel will freeze quickly. A more expensive option is, which dries nails in seconds.

Ultraviolet lamp
- Pillet. It is worth purchasing a professional BAU with high abrasiveness. A conventional grindinglet for grinding is suitable.
- . Professional funds have proven well well, but you can use alcohol or liquid to remove varnish. Instead of watts, use synthetic napkins from which there will be no pile.
- . They are used after processing the degreaser in order for the coating to hold even longer. But at home you can do without them.

Bondex for pedicure
- Base. This is the first element of the future pedicure. It is worth purchasing a professional agent that contains vitamins that prevent damage to the nail plate. There are cheap bases, but when buying them, be prepared for the fact that the gel varnish will quickly suck.
- Colored varnish. This is the main element of the pedicure. There is a huge selection of shades and manufacturers. You can purchase a set where the main colors will include. These usually use beginners.
- Finish (top). It is impossible to save on it, as on the basis, since when buying a poor-quality agent, it is possible to quickly notice chips and scratches on the surface of the nail. There is a finish with a sticky layer without it, as well as glossy or matte.
How to prepare for applying
Before making a nail pedicure with gel varnish, you need to prepare for it. For this, the legs are sprinkled, after which it is shifted by a manicure spatula.

Sparking legs
Nails must be processed using a baff or a peel. This will provide high-quality coating with a surface.

Nail Processing Filk
Applying gel varnish phased
After preparing the nail plate, it is necessary to degrease the surface. This will avoid peeling.
Pedicure is done in several stages:
- if you purchased a bondex or primer, treat them nails;
- apply the database, trying to do it so that it does not come into contact with the skin. If the remedy fell on the cuticle, carefully remove it wooden stick. Dry the base in the lamp;
- apply the color gel lacquer, adhering to the same technique. Dry in the lamp. If several layers are needed to obtain a smooth tone, each will be dried separately;
- finish coating completes pedicure. The top is also dried in the lamp. If you use the finish with a sticky layer, remove it with the help of a degreaser;
- after that, you can apply a little base oil on the cuticle.

Gel lacquer
Main mistakes
Beginner masters often violate pedicure technology. Because of this, gel varnish quickly begins to peel. Most often forget to handle the nail plate with the bough or apply a degreaser. Another common mistake is a thick layer of gel varnish. It must be distributed evenly. The thick layer does not dry and often forms irregularities.
Important! You can not shake a bubble with cosmetic toolotherwise the risk of shallow bubbles increases. Sometimes newbies do not seal nail from the end. It threatens the formation of chips. It is also forbidden to remove the sticky layer from the colored coating.
How to remove gel varnish
To remove the tool, you need a foil, removal solution, cotton discs and a manicure blade.
- To begin with, the surface is slightly treated with an abrasive filling to ensure the best penetration of the liquid.
- Catchy discs are cut into several small pieces. Each is wedged in a special professional solution. You can use a simple lacquer removal fluid, but it must contain acetone for better results.
- Pieces cotton disc Place on the nails and tightly grind them with foil. Keep tool need 15 minutes. After that, the discs remove and remove the remnants of the coating with a manicure blade.

Removing gel varnish with nails
Fashionable design pedicure
The design of the pedicure gel lacquer is improved every year. It is fashion trendswhich have been popular for several years.
In 2018. fashionable design Nail includes bright color solutions. Saturated shades of burgundy, green, pink will attract attention to your legs. Pedicure does not necessarily repeat the design of the nails on the hands. Choose the option that will satisfy you.

Fashionable mirror coating
Fashionable pedicure gel lacquer includes gradient and broken glass techniques. In the photo such solutions look spectacular. If you are new, then before using these techniques, it is better to practice a little.
Fashion trends in 2018 provide for the use of foil, rhinestones and glitters, creating an effect of a metal or mirror coating. Franch will be popular, which can be done in a classic or color version.
When choosing a design, remember that the color solutions should be combined with clothing. If you make a pedicure recently, it is better not to use complex techniques. You can start when they nick your hand.
You can choose suitable optionLooking at the presented photo of the pedicure on the legs with gel varnish.
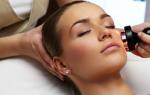
Well-groomed hands and legs are a distinctive feature of every girl and a woman who follows themselves. Pedicure with gel varnish is a popular beauty procedure. It allows you to put the legs in order and get a resistant colored coating that is worn without chipping a few weeks and strengthens the native marigolds. In the salons, the procedure is expensive, but it is possible to conduct it at home.
Permanent coating with a special color layer, which is polymerized in the UV lamp, distinguishes high resistance to external influences.
It is not erased as a result of contact with shoes, does not register and does not change the original color even after 10-15 days. The average frequency of corrections is once every three weeks. Gel-varnish well masks defects nail plate like irregularities, furrow. In addition, this is a space for various design ideas and color combinations. Online a huge number of photo works on beautiful pedicure. The only minus procedures is the cost of purchasing work tools and accessories.
Salons offer clients manicure and pedicure services with a resistant nail coating with gel varnish or shellac. The difference between them will be able to clarify not every master.

Gel varnish holds on the nails from two weeks or more. It includes a soluble plastic gel, the drying of the means is carried out strictly in a special lamp.
Smooth coating, beautiful glossy shine - notes with any design even after 7-10 days look perfect. The usual lacquer layer, even the highest quality and persistent, does not achieve this effect. In addition, this version of the pedicure saves a mass of time that does not need to spend on the update of ordinary varnish.
Let's go back to the question of the difference between Gel Lacques and Shellac - and it is. First coat this type It was developed by CND. The company called the new product Shellac.
Shellac is an ordinary gel varnish, but the CND manufacturer. It has a special composition other than the products of other firms.
Under Shellac does not need to apply primer and this coating is removed easier than others.
Does he have cons? Yes, Shellac is stronger than other gel varnishes dries the nail plate and can cause its bundle.
Useful video
Master class on the implementation of the classic pedicure, removal and coating of the gel varnish.
What you need to cover nails
Facilities and devices for pedicure with gel varnish can be requested in specialized stores for manicure and pedicure masters.
Lamp
The first thing that will be needed to perform a pedicure with gel varnish is a special lamp. Stay on a powerful model by 36 W - the layer will stick no more than two minutes. LED lamps are more expensive than ultraviolet, but also the speed of drying in them is much higher.
Important! Not all kinds of gels are normally polymerized in LED lamps - specify this information from the seller.

Funds and tools
Be sure to buy a cabinet or bug with abrasiveness of 220-240 units. Instead of professional many girls and women use a conventional polishing soft pylon.
Do not do without a degreaser - it can be bought in a specialized store of products for manicure and pedicure. This nails composition are processed before applying the base for a resistant coating. Popular degreasers Sky Cleaner, Orly, Domix, Kodi Professional, Giorgio Capachini. Analogue can serve as an alcohol or liquid for removing varnish (normal with acetone).
Bondex is used to provide high-quality nail clutch with a gel varnish. Apply it or not - to solve only you. Many masters apply a base without Bondex.
The choice of bases under the gel varnish on sale is large. There are products with a content of vitamins, minerals and ordinary. For self-use, a universal remedy is often taken - base and top in one bottle.
Gel lacquer is most profitable to buy in sets. You can choose three colors for pedicure or more - it all depends on personal preferences, favorite design options for nails and financial opportunities.

Last on our list, the product is a top cover. It is better to stay on the face without a sticky layer.
Also need scissors for nails or tweezers, trimmer or scissors for the cuticle (if you are making a cut pedicure), an orange stick and a special gel (if the pedicure is no longer), the peel for heels.
Pedicure steps with gel varnish at home
Pedicure with gel lacquer is carried out in several stages:
- Remove the extension nail length and give them fit form.
- Move the cuticle with an orange stick or remove with a special softening agent.
- Purify the necessary shape to the nails, polish their surface, then treat the degreaser.
- Apply Bondex and Base. All perform neatly and do not rush. Note that Bundex sticky, and apply it to a separate tassel. When working with the base, you follow that it does not get on the skin. This layer after applying must be dried in the lamp.
- Start applying colored coating. The number of layers - from one to three. Each of them successed in the lamp.
- Apply the top and again hold the nogs under UV-rays.
If the finish coating is sticky, treat the surface of the nail degreases.
That's all - it remains to enjoy the impeccable result of the work done!
Features of care
Nails covered with gel varnish require a certain attention. How to save a new pedicure longer and how to shoot it when the nogot will start growing?
Secrets of durability
So that the colored coating is worn as long as possible, follow the recommendations:
- Do not sign nails and do not cut them down.
- Do not pick solid surfaces (get rid of such a habit).
- Be careful with the knives and razors - they are very simple to spoil the coating, and it gets to get ahead of time.
- In the first day after applying gel varnish, it is advisable to avoid active contact with water - set aside a swimming pool or sauna, steam room, making hot bath, soul or general cleaning, washing the floors at least for a day.

What and how to remove the coating
The coating is removed using a special tool and foil. Use acetone to remove gel varnish is not recommended because it damages the nail plate. At first, the colored coating is slightly spilled with an abrasive saw, put on the nails, moistened in liquid to remove the shellaca, and turn them with foil.
Instead of foil, you can use plastic tips - they are sold in dials.
After 5-10 minutes, the coating is removed by the spatula, the surface of the nails is polished with the use of Buff.
Summer Pedicure Ideas Gel Varnish and Nail Design Photos
What is he - the perfect summer pedicure? Consider the most interesting options for nail design.
- Summer topics - flowers, seashells, stripes, palm trees and more. This is the perfect design for those who go to the sea, or simply exhausted on vacation. Note that to create such patterns you will need skill.
- Glamor - sequins, rhinestones, and in huge quantities. On the Internet are full of photos with design options. Experiment - because summer is not too bright!
- Franch is classic and multicolored. You can choose any colors of the base and "stripes", wearing such a design in " pure form"Or in the company with patterns, rhinestones.
- Acid shades are bright, even screaming. But note that on tanned skin, such colors look good, and the pale make even more painful.
- Chrome - winter novelty will be in demand and summer. Chrome coating can be applied to varnish of any color and admire it unusual overflows.

Conclusion
Pedicure with gel lacquer do it is not difficult. All you need is to explore the rules for working with the compositions, buy gel varnish, base, top and lamp. With applying the coating, it is better not to experiment, and you can play with designs. To create drawings, you will need brushes, stickers, stamps and stembling plates, dots.
According to some polls, 40% of women shy their feet and prefer closed summer shoes. And this is at the time men in one voice credit thin ankles and feet in the top 10 most attractive female parts of the body. Maybe you should not deprive the courageous half of humanity of pleasure to admire the female legs and make a pedicure with gel varnish, whose photo-novelties we will consider in detail in this article.
Self fashionable colors 2017 are divided into two camps: natural shades - Pink, beige and deep saturated tones - red, blue. Source: Flickr (Thepolishdiars)
Why is the gel varnish?
- This is an easy-to-work material that allows you to adjust the shape of the nail and hide all its shortcomings - roughness, chips, irregularities, ribbing, etc.
- Provides a dense coating that is not damaged due to the wearing of narrow shoes.
- It is noted that the nail plate covered with gel varnish slows down the pace of its natural growth, which means the next visit to pedicure on the correction procedure can be postponed for a period of 4 to 6 weeks.
- In some cases, this is the only way to give the damaged nails is a beautiful natural color.
Note! Gel varnish is resistant to sharp temperature drops. Make a pedicure and boldly go to the sea - hot sand and salt water is not terrible to him.
Pedicure Gel Laca 2017: Fashion Trends, Photo
Complex drawings are gradually moving with fashionable arena, giving way to simple geometric patterns. Colors can be absolutely different, but it is easy to highlight the two most popular accents: a game of contrasts and naturalness. These directions in design can be called opposite, but they are equally fashionable this season.


French pedicure 2017 (photo): gel varnish and secrets of its application
French technician again at the peak of popularity. It allows you to give nails as natural and well-groomed speciesAnd this is the main trend of the current year. Those who crave experiments can safely move away from the classic theme "White + Nude" and create bold two-color combinations. Gently looks blue or pink bed in combination with a white smile. You can go even further by using ultra-water blue. Glitter, small rhinestones, transfer foil - all this is relevant and allows you to beat the usual Franch in a new way.
The main secret of a successful French pedicure is the right smile. A long oval line with high ears looks great on hand, but it looks rough on the fingers. Too thick strip is also not worth drawing, the optimal width is 1-3 mm (depending on the length of the nail).

Important! The nail plate on the legs is usually short, but under Franch you can grow it a bit. In this case, 2 mm is quite enough. All that is longer, risks look ridiculous.
And yet, relevant in french manicure Transparent gel in pedicure is better not to use - he will only emphasize the shortcomings. And on the contrary, the matte pink and bright peach on his hands can look unnaturally, but for foot fingers is a great color solution.

Multicolored gel varnish on the legs: design, photo 2017
The most fashionable colors of 2017 are divided into two camps: Natural shades - pink, beige and deep saturated tone - red, blue. Each of them can be used separately by creating stylish and concise solutions. And you can go further and add several contrast elements to the base color. Here are the options for fashionable combinations:
- pink with blue, mint, beige, red;
- blue with white, orange, golden, cherry;
- red with beige, heavenly blue, golden;
- beige with white, black, gold and ... green!


It is these color combinations that are the most fashionable in this year. But restrain your creative impulse in hard fashionable framework Do not. Lemon, elevated yellow, purple can also serve as the basis for creating a fashionable Pedicure gel-lacquer in 2017.
The golden rule: the darker the tan, the brighter gel varnish. Summer is the most suitable time for juicy and rich colors. Girls with pale skin from such bold experiments are better to refrain and give preference to gentle design based on natural shades.

Pedicure: Photo, Design 2017 - gel lacquer "At horse"!
Main fashion technique This year - Feng Shui. Masters of Neil-Art already consider their duty to allocate one or two fingers from the general theme of the pedicure. You can make it not only a gel varnish of contrasting color, but also with the help of various patterns. Today in the trend:
- Polka dot - small points of black or white color paint most often, but others meet original options. For example, large white and small blue peas on a blue background.
- Strips are more often vertical, but the horizontal "sailor" is also popular, especially during summer holidays.
- Mosaic is a complex technique requiring a masters of special skills and patience. But the result is worth: small multicolored cells, circulated contrast contour, make pedicure bright and original.
- Broken glass - It sounds frightening, but on the nails, small bright glass glasses look stylish. It is possible to achieve a similar effect with the help of multi-colored glossy foil.
- Flower ornament that year does not lose relevance in any performance.


Another trend is the lunar design of nails with gel varnish, in the photo and in life he looks amazing. The main thing is not to leave the hole empty, otherwise there is a risk of opening any flaws of the nail. White, golden or silver crescent is what is fashionable and suitable for any basic color.

Finally, a few words about rhinestones. They can be glued directly not the upper sticky layer of gel varnish - it is very simple and convenient. Such a decoration of feet of feet - Hit 2017. But great importance in this case It has shoes. Trendy Roman sandals with thick straps at low move is not the best pair for such an elegant pedicure. It is appropriate to look only with a sophisticated model of sandwichees on a thin high heel.

In a word, there is a fantasy where, but the main thing is moderation. Too sophisticated compositions have long been considered a sign of bad taste.
Video on the topic
The representatives of the female half of the population make considerable efforts, spend a lot of free time and material means to create an ideal image. At the same time pedicure plays no less important rolethan stylish hairstyle, gentle Makeup and fashion manicure . Especially the need for pedicure increases with the arrival of warm days, when it is possible to present their neat and well-groomed legs in the advantageous light, which as a magnet attract admiring views of others. However, to look stunning, you should not neglect the pedicure and in the cold period of time - a real woman seeks to look impeccably at any time of the year.
Specialized salon treatments They will help to return a well-kept appearance and give the grace with your legs, but this is related to considerable financial costs that no every woman can afford. In search of material resources saving, I found out that there is absolutely nothing complicated to learn how to make a pedicure at home, and with the advent of such a unique tool, like gel varnish, making margins has become much easier and more economical. In my opinion, there are no analogues of a more efficient and durable means for nails than gel varnish.

Features of the pedicure with gel varnish

Benefits

Frequently asked Question: How much Pedicure with gel lacquer holds on the nails? The answer is very pleased: the unique strength of the gel varnish allows you to maintain the original type of pedicure to three to five weeks. In addition, when complying with all rules, the pedicure acquires a unique charming shine, which is preserved until fifteen-twenty days.
Fashionable pedicure ideas with gel varnish
Feline eye
The harmonious combination of an unusual overflow and muted shade creates a feeling of something magical. Based on the principle of operation with magnetic gel varnishes, which includes metal particles. To achieve a clear and beautiful effect " feline eye»It is necessary to apply a magnetic gel lacquer on a black substrate. Than less layers of magnetic gel varnish, the sort of soft and blurring It turns out the effect.

Photo of pedicure gel varnish "Feline Eye"
Pedicure with drawing
One way to give a pedicure of both light tenderness and causing audacity are drawings. Them can be placed either exclusively on big finger legs or on the surface of all marigolds - It all depends on your desire and mood. Today, the fulfillment of even the simplest pedicure has become a creative process - it is done using intricate patterns, curls, abstractions, geometric figures and various images that can be diversified by any boring design.

Ombre
Soft and smooth transition will be harmoniously looked on the legs only if there will be no more than two or four shades when creating ombré. When choosing shades, take a very carefully to their selection - they must be in one color gamma and applied on increasing: From dark to the very bright or from light to the dark. The essence of such a design lies in a smooth transition of the same color in a darker else.

Franch
If you have had difficulty choosing a pedicure design, pay attention to the stylish classics. Similar pedicure design unique in that it looks great on the fingers both young girls and respectable ladies. In addition, Franch is elementary to make himself at home, and believe me, it will not be worse than salon.

Single pedicure gel varnish at home
A monophonic classic pedicure always looks juicy and elegant, and also gives the legs not only well-kept, but also a chic look. Due to its conciseness and restraint, it will be appropriate for any outfit, events in your life. I bring to your attention a simple and very stylish pedicure, made in a blue gel lacquer. Blue colour It is the most "calm" color, and about its positive and soothing impacts on others know still long.
We will need:

The process of preparing nails

Another of the advantages of gel lacquer is that various decorations are glued to him very firmly and for a long time. If you have a desire to decorate your pedicure with rhinestones, beads, pebbles, and so on, fasten them to nail after applying the last layer of the top varnish and to dry.
The process of applying gel varnish
- We apply a degreaser on the nail surface and wait until the tool is absorbed.
- For so that the main color lay easily and smooth, cover the nail thin layer of the base coating and dry under the lamp for two minutes.

- After drying neat and smooth movements cover nails Thin layer of top cover and dried by a layer under the lamp. The thinner the layer inflicted, the more naturally your pedicure will look like.

- For more saturated and juicy color
Similarly, we apply the second layer of the blue gel lacquer. You can safely apply several layers of gel varnish, but remember that each layer after applying must be dried under the lamp.


- To secure our result, apply transparent gel varnish And envy under the lamp.

Pedicure video with gel varnish
The gel varnish has a multifaceted color shades palette, which allows you to perform absolutely any fashion design on the marigolds, and considering modern trends, perform a pedicure at home has become accessible even inexperienced fashionable. However, remember the important axiom: on the marigolds of the hands and legs it is necessary to do the same design, it looks very aesthetically. Otherwise, if the design in the hands and legs is different, this indicates the absence of taste in its peculiar.
Those who do not like to spend time reading, offer several educational videos, looking, you you can make sure easily create a unique pedicureAnd in the future it will not be difficult for you to spend a little of your free time on such a pleasant and necessary procedure as a pedicure.
Videos for beginners
Video Tutorial №1: Single pedicure From and to
Video Tutorial №2: Franch herself
Video Tutorial №3: Independent Pedicure with Rhinestones
Master class video
Master class №1: Franch gel-lacquer from and to
Master Class No. 2: Edged Pedicure + Feline Eye
Master Class # 3: Combined Pedicure
What is the pedicure of gel varnish

I will finish this. It seems I told about everything and did not forget anything. Use information on health! If you have any questions when you read any questions, ask them, I will definitely answer. Share with me with your success and show the result in the photos, if possible - I will be glad to see that you did everything. Good luck to you in experiments!
Gel lacquers are becoming increasingly popular among the representatives of the beautiful floor, first of all, because Shellac holds up for a long time on the nails (2-3 weeks) without chips and sweating, preparation for its application does not injure the nails, and the gel varnish itself strengthens the nail plate.
Shellac can be done both manicure and pedicure.
If you do a pedicure with gel varnish in the beauty salon, it is better to immediately prepare a "good" amount, especially if you are an amateur of interesting designs, or learn how to make a pedicure with gel varnish in home conditions.
Required minimum for applying gel varnishes at home
- The first and most importantly without anything do not do - ultraviolet lamp. It is needed for drying gel varnish. It is better to immediately buy a powerful lamp of 36 W, the coating is frozen in 2 minutes. Of course, Shellac will freeze in 9 W lamp, but it will take much more time and gives some inconvenience. For example, when performing a manicure or pedicure with a gel varnish in a low-power lamp, thumbs have to be dried separately. You can use LED lamp. She is expensive, but nails dry in it in 10 seconds.
- Also for work will need pilot or Bafik. It is better to choose abrasiveness 220-240. You can save and purchase a conventional soft pink for polishing.
- After polishing you need to treat nails with a degreaseler. Cheaper its counterparts for home pedicure - This is an ordinary lacquer removal fluid or alcohol. They will definitely cope with the task. Make sure that there are no vests left on the nail. It is better not to use cotton wool or cotton discs, but take a soft synthetic napkin.
- For better nail clutch with shellac professionals are usually pre-covered with bondex nails. At home, you can do without it and start coverage immediately from the base.
- Under the gel varnish must be applied to the database, the range of which is very large for today. There are bases with vitamins, base and top in one bottle. Firms are also a lot.
- Of course, for pedicure, gel lacquer will need Himself gel varnish. Often they are sold in the sets, which includes the most running colors. This shellats acquisition is the most budget. If you can save on the colored coating, the base and finish should be good quality. It is from them that the resistance and attractiveness of manicure and pedicure depends.
- Completes the stage of applying gel varnish top coating. It is better to take without a sticky layer.
These are the main components that must enter the professional set for Pedicure Shellac. The removal of gel varnish will also require special knowledge, as it is not removed as ordinary varnish. For removal, you will need:
- foil (ordinary kitchen);
- orange chopstick (can be replaced with toothpick);
- cotton discs ( fabric napkins);
- manicure vane.
Pedicure with Shellac: Step-by-step instruction
 Gel lacquer technology is the same for manicure and pedicure. Make sure that the cuticle has been removed.
If she has grown a little, then just move it with a manicure spatula. The pedicure process itself is divided into the following steps:
- Polishing Nail. It is done for better clutch of materials with the surface.
- Surface degreasing. If the gel-varnish remains dust, that is, the likelihood that it will begin to flap. The degreaser solves this problem.
- Applying Bondex. This step will make the clutch even better, and the coating will be perfectly held. Bondex has a sticky texture and need to be applied with a separate brush. Pedicure with Shellac coated can be done without a bondex, but so it will last less.
- Application of the base. The base should not fall on the skin surface. When you get carefully, remove the coating with the skin with an orange stick. The base will be dried in the lamp.
- Colored lacquer gel. If you plan to make pictures on the nails acrylic or put the sparkles, then this is done at this stage. Color gel varnish can be applied in several layers, each layer must dry.
- Applying Top. This layer is also dried in the lamp.
- Treatment degreased. In the case when the finishing coating has a sticky layer, simply treat it with a degreaser or a liquid for removing varnish.
 As you can see, Pedicure Shellac at home is quite feasible. Just follow all rules for applying. With the procedure for applying, it is better not to experiment, but you can make the designs with designs. Make a design with gel varnish is much easier, it is more damaging and does not freeze without a lamp, so it can be easily corrected.
You need to apply drawings on a base color or transparent layer depending on the idea. In addition to acrylic patterns, you can make a temp roting design or use ready-made stickers. The design is covered with top coating and dried in the lamp. Pebbles and rhinestones are better to plant on the top layer to drying. When the layer freezes, pebbles "tightly" attach to the nail.
An important point is not only how to make Pedicure Shellac, but also to remove it. Gel-varnish is removed not as ordinary varnish, but also quite simple. For removal it is necessary:
- Cut the napkin or cotton disk on squares size a little more nail.
- Locked them in a liquid for removing varnish (shellaca).
- To impose on the nails and wind each finger of the foil, attaching, so the cotton disk with the means. Leave for 15 minutes.
- Remove foil and discs and remove the residues of the shellac with a spatula.
Other ways to remove gel varnish have not yet come up. Now you can buy special envelopes to remove the shellac, in which you just need to shove your finger and hold 15 minutes.